How to Connect Cloudflare with Moesif
Integrating Cloudflare with Moesif allows businesses to leverage Cloudflare’s robust network services along with Moesif’s sophisticated API analytics and monitoring. This integration can be particularly beneficial for understanding user interactions with your APIs and improving API performance and reliability, and is quite easy to accomplish.
There are two core paths to using Moesif with Cloudflare. The first, the “Simple” method, takes only a few seconds to do, but is somewhat more limited than the “Custom” method. Both will be described in this piece.

Simple Method – How it Works
This method makes use of the Cloudflare Apps marketplace to integrate Moesif with your Cloudflare services. By navigating to the marketplace and updating your application ID, you can deploy a Moesif integration with very little friction. While this is an easy solution, it does lack some flexibility such as custom hooks which may make it not an appropriate solution for some enterprise or complex environments.
Step 1 - Create your Moesif Account
Before you do anything, you should make sure that you have a Moesif account. To do this, simply head to the sign up page. Here, you will register using a few details:
- Organization Name
- Your current role at your organization
- What you want to achieve
Step 2 - Install via the Marketplace
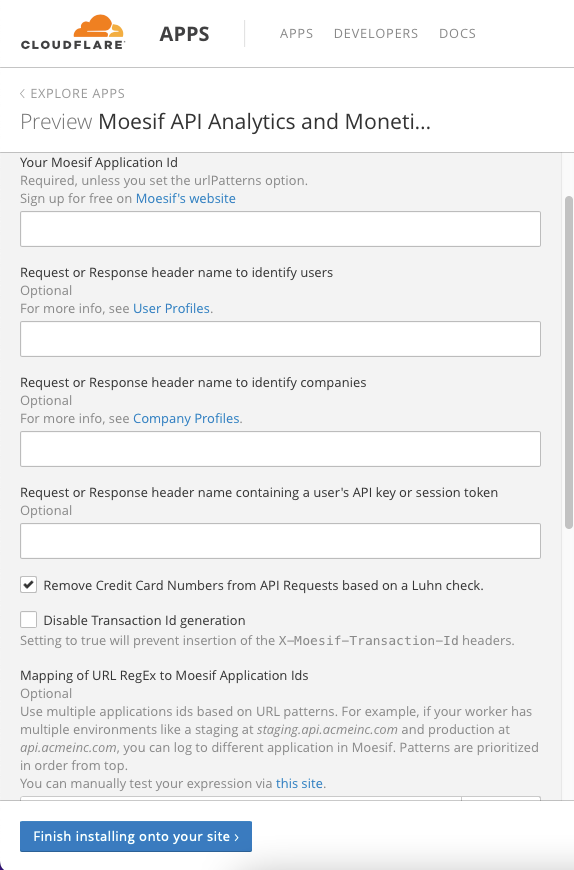
Now that you have your basic Moesif account data, you can navigate to the Moesif App on the Cloudflare Marketplace. From here, simply select the “Preview” button. This will allow you to update your Moesif Application Id, which will authenticate your Moesif integration. Simply click “Finish installing onto your site” to activate.
This is by far the simplest way to do this, and is appropriate for most users. Complex hooks or data flows will not be able to use the simple install due to limitations in the default worker deployment, and as such, the custom install route will have to be used.
Custom Method – How it Works
This method will use the Cloudflare Workers Dashboard to create a worker using code provided by Moesif. This worker will allow for more complex flows using custom hooks, and is more appropriate for complex data flows and enterprise consumers.
Step 1 - Create your Moesif Account
Before you do anything, you should make sure that you have a Moesif account. To do this, simply head to the sign up page. Here, you will register using a few details:
- Organization Name
- Your current role at your organization
- What you want to achieve
Step 2 - Create the Moesif Worker
To begin this process, navigate to the Cloudflare Workers Dashboard. On this dashboard, you will be creating a Moesif worker using some custom code.
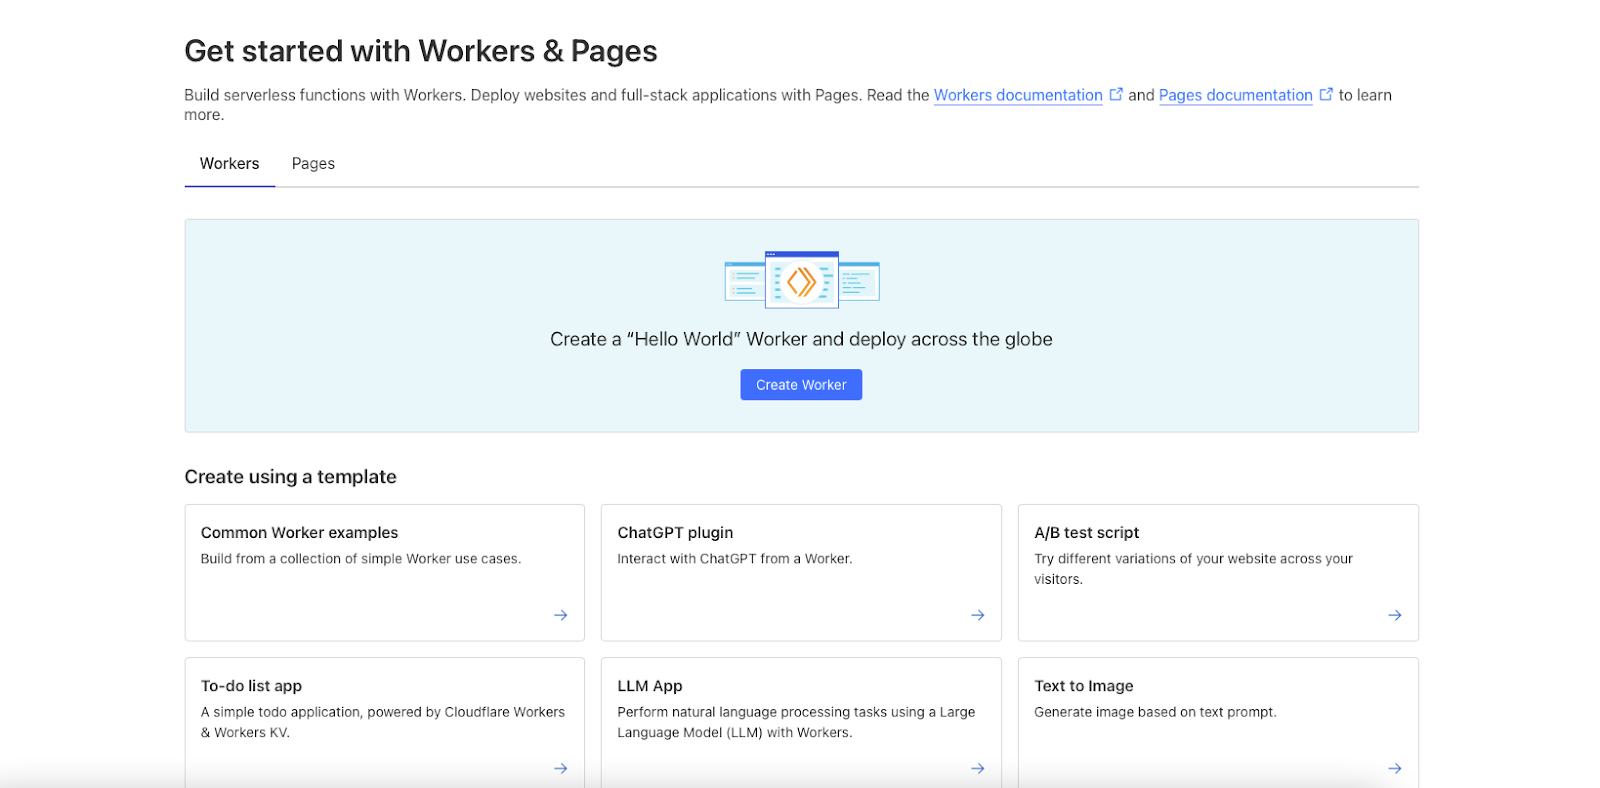
Select “Manage Workers”, and then click the “Create a Worker” option. Here, you will be given a script window, which will allow you to set the behavior and constraints of the worker. Copy the code from the Moesif Cloudflare GiHub repo and paste it into the script window. Please note – you will need to add the Moesif Application Id by updating “INSTALL_OPTIONS.applicationId”. You may also update “INSTALL_OPTIONS.urlPatterns”, but for most users, simply updating “INSTALL_OPTIONS.applicationId” is sufficient.
Finally, you might want to consider renaming your worker. While Cloudflare auto-generates a name, it is typically machine-friendly, not user-friendly, and as such can be complicated to work with. Naming it something like “moesif-logger” can go a long way towards cleaning up your code.
Step 3 – Set the Worker Route
Now that you have your worker, you will need to set its route. Navigate back to the Cloudflare Workers Dashboard, and select the “Add Route” option. From here, you should utilize the route for your domain – in other words, the route pattern for Moesif.com would be moesif.com/. Select the worker you created in order to apply the route.
To finalize this process, you should ensure that your worker and route are configured correctly. To do this, issue a request via the shell with something like the following:
curl https://my-cloudflare-domain/my-path
This request should show up in your Moesif event stream. Do note that if you are testing in the Cloudflare Playground, the response may be empty as there is no origin server. When you release to production, you should set logIncomingRequestsback to false to prevent duplicate events.
Conclusion
Cloudflare is incredibly powerful, and it becomes even more so with the inclusion of Moesif. By combining the logging and filtering powers of Cloudflare with the analytics and insights of Moesif, you are unlocking a powerhouse of information and data that can drive more effective business decisions and resource allocations.


Related Articles

API Strategy
Leveraging AI For a Better API Strategy
Learn how to leverage AI to build and fortify your API strategy. Improve design, governance, documentation, and align APIs with business outcomes.
API Strategy
The 5 Best Mixpanel Alternatives of 2025
Learn about the best Mixpanel alternatives to determine the right analytics solution for your use case.

API Development
How to Leverage Moesif Effectively for API Observability
Effectively leverage Moesif for API observability through best practices for integration, event enrichment, custom actions, and engineering workflow integrat...
API Strategy
How to Build an Internal Chargeback Model for Your API and AI Usage Using Moesif
Use Moesif to implement internal chargebacks and enable precise API and AI cost attribution for better transparency and resource optimization.