Using Moesif and Stripe for Pay-As-You-Go API Billing
Offering customers a variety of ways to pay for your product allows for flexibility and ease. In general, there are two ways for companies to invoice for subscription-based API access: Post-paid and pre-paid. Pre-paid is sometimes also referred to as PAYG, or Pay-As-You-Go.
Post-paid usage can sometimes lead customers to have billing surprises if they are not tracking their usage or payment details closely. This can cause headaches for these users and can also cause issues for the subscription provider. The result could be lost customers and lost revenue due to bills adding up that a customer is unable to settle. There are plenty of positive and useful situations to use post-paid billing as well. Many of the services you use right now are likely post-paid services.
Pre-paid, or PAYG, services can add an extra peace of mind for users. Essentially, the users will buy credits and when those credits are used their access to the service is cut. This is great for budgeting and ensuring that bills won’t soar with subscription usage. This approach allows teams to pre-pay their bills, which is great for the service provider since they know that usage revenue is guaranteed.
Moesif’s latest billing feature can support both use cases. If you’re unfamiliar with Billing Meters in Moesif, you can check out some more details about them here. We will use a few features in the platform to enable a PAYG flow. This tutorial will walk through accepting payment by integrating Moesif with a payment provider, the Stripe API.
- #1 - We will set up a Company Cohort that will contain users who are out of credits
- #2 - We will set up a Governance Rule that blocks users who are out of credits
- #3 - We will set up a Behavioral Email that will let users know that they are out of credits
We use a Company cohort instead of a User cohort because Stripe Customers map to Companies in Moesif. For more information about how different Stripe entities map to Moesif entities, see Provider Mapping.
Let’s take a look at implementing a PAYG monetization scheme in Moesif.
Prerequisites
There are a few things we need to do in order to implement the above PAYG flow. This includes:
- An active Moesif-Stripe integration
- You will require the Moesif and Stripe integration to be configured and active for taking Stripe payments.
- An active billing meter
- Once the Stripe integration is active, you’ll also need to make sure that you have an active billing meter set up.
To dig into a working example of this using Kong API gateway, check out our example code here and our docs on billing meters.
Set up the cohort
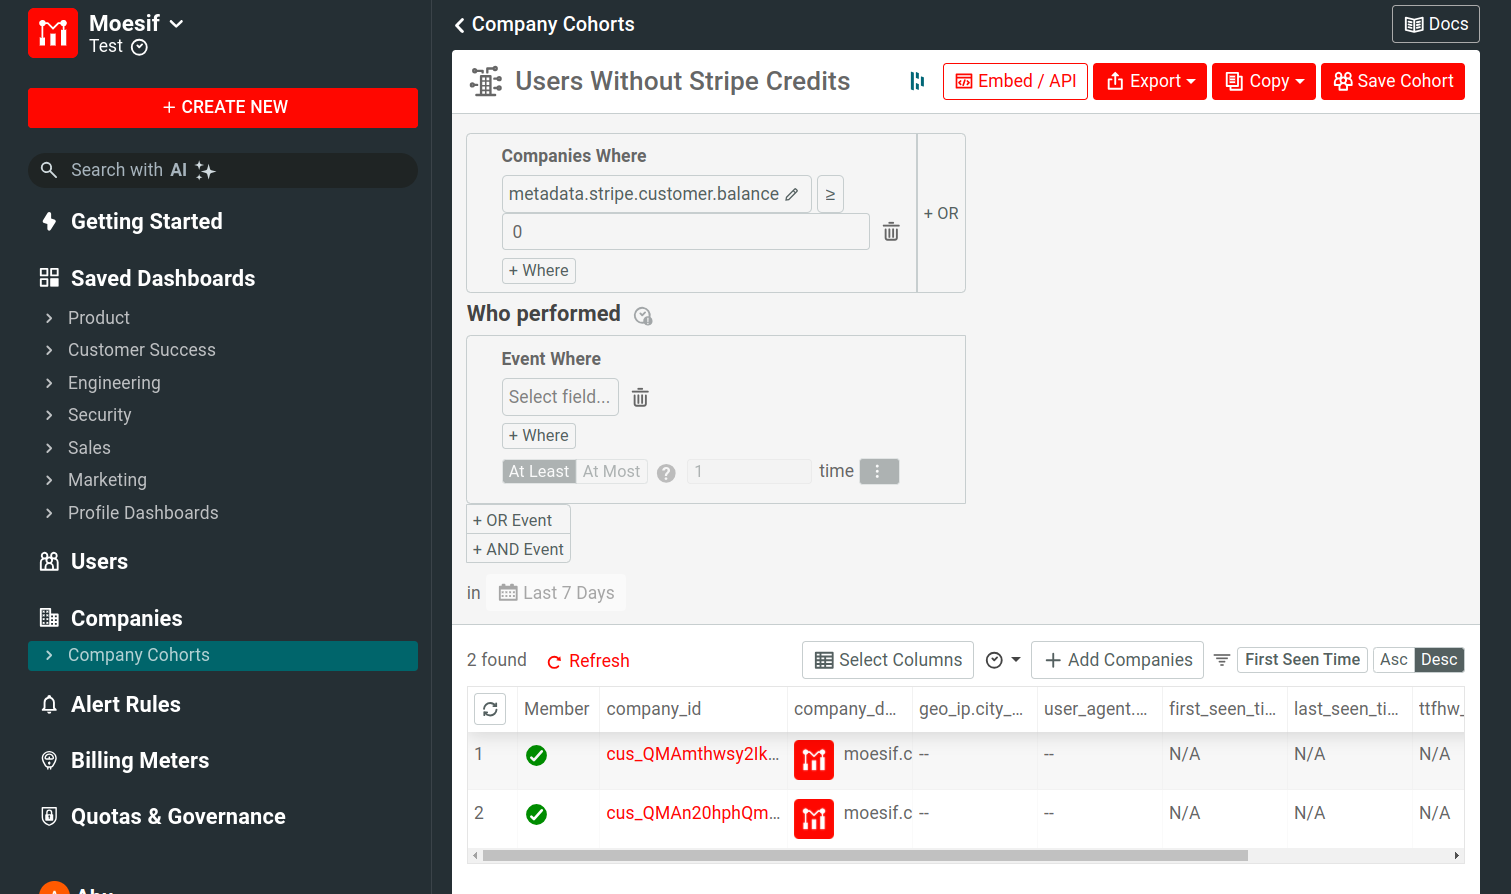
To set up the cohort in Moesif, you will navigate to the Companies screen using the navigation on the left.

Then we will create our filter for the cohort so that if their balance in Stripe is greater than or equal to 0.
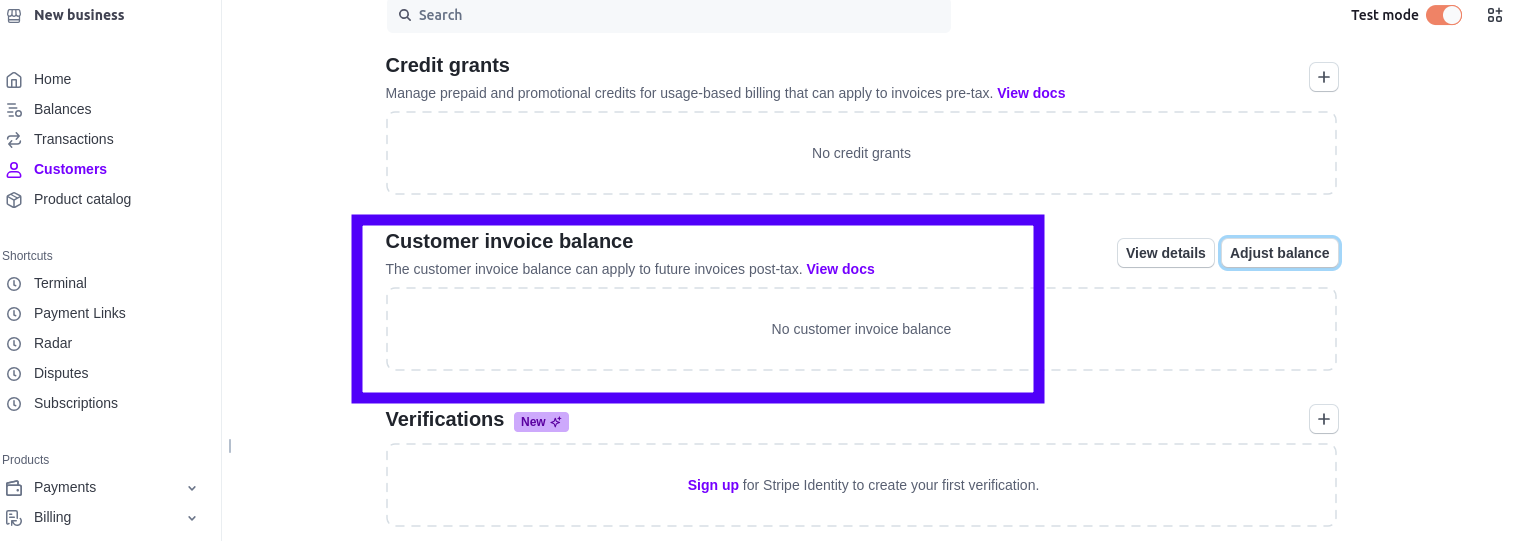
In Stripe, a negative balance would show that a user has credits that can be used. The balance is represented in cents. So a user with $100 in credits would show in the Stripe API data as -10000.
Our filter will look like this:
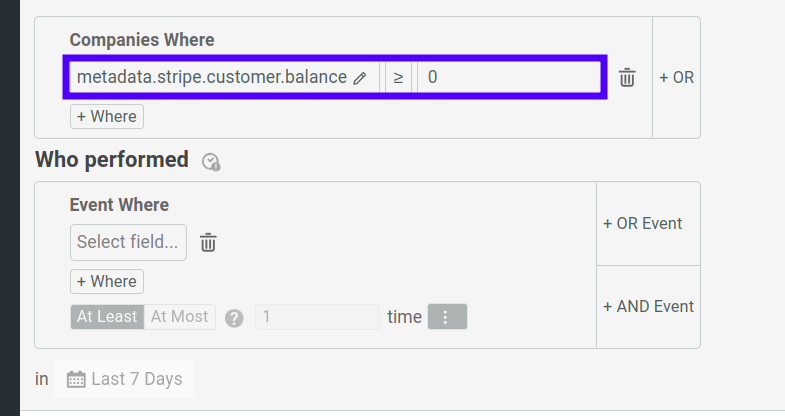
This is all we need to set up our cohort filter. Our next step is to create the cohort. To do that, we will click the Create Cohort button in the top right of the screen.
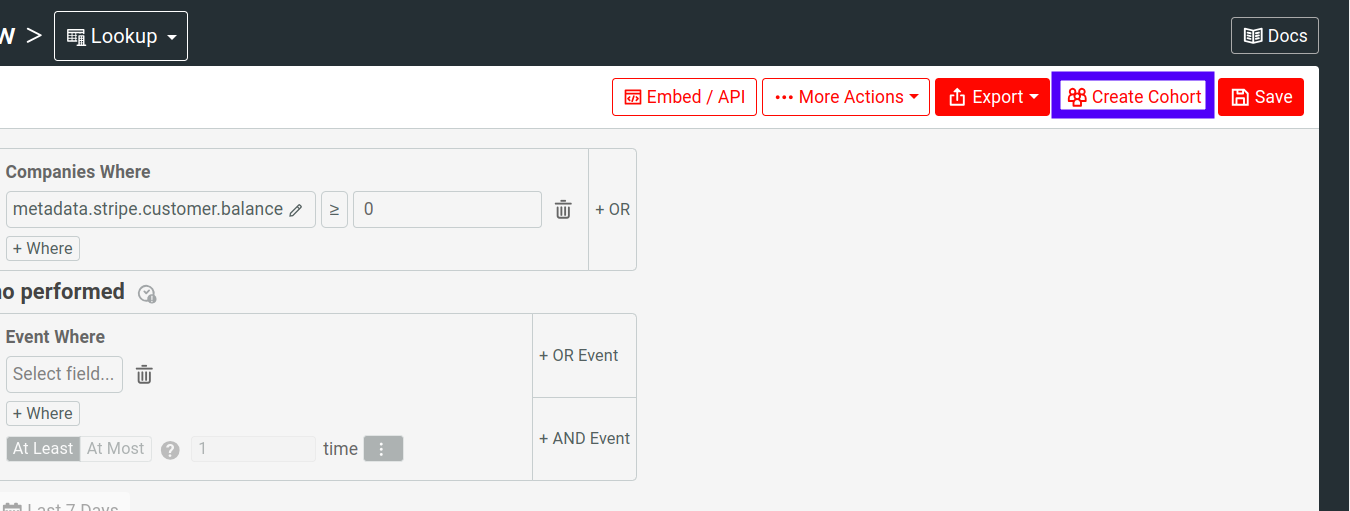
You’ll then be shown a modal that will allow you to name the Cohort (and set up a Cohort Notification if you’d like). Enter a name for the cohort and click the Create Cohort button in the bottom right of the modal.
After this, you’ll be prompted to use the newly created cohort. On this next screen in the modal, choose Governance Rule.
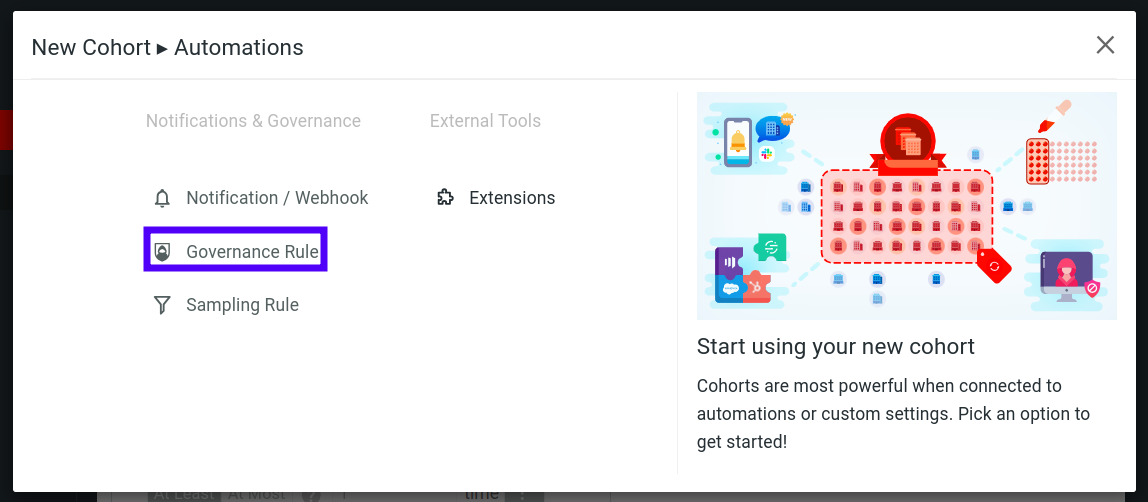
This will then bring you to the Governance Rule screen where you can create the rule.
Integrate new users with your platform and resolve issues quickly with Moesif.
Set up the Governance Rule
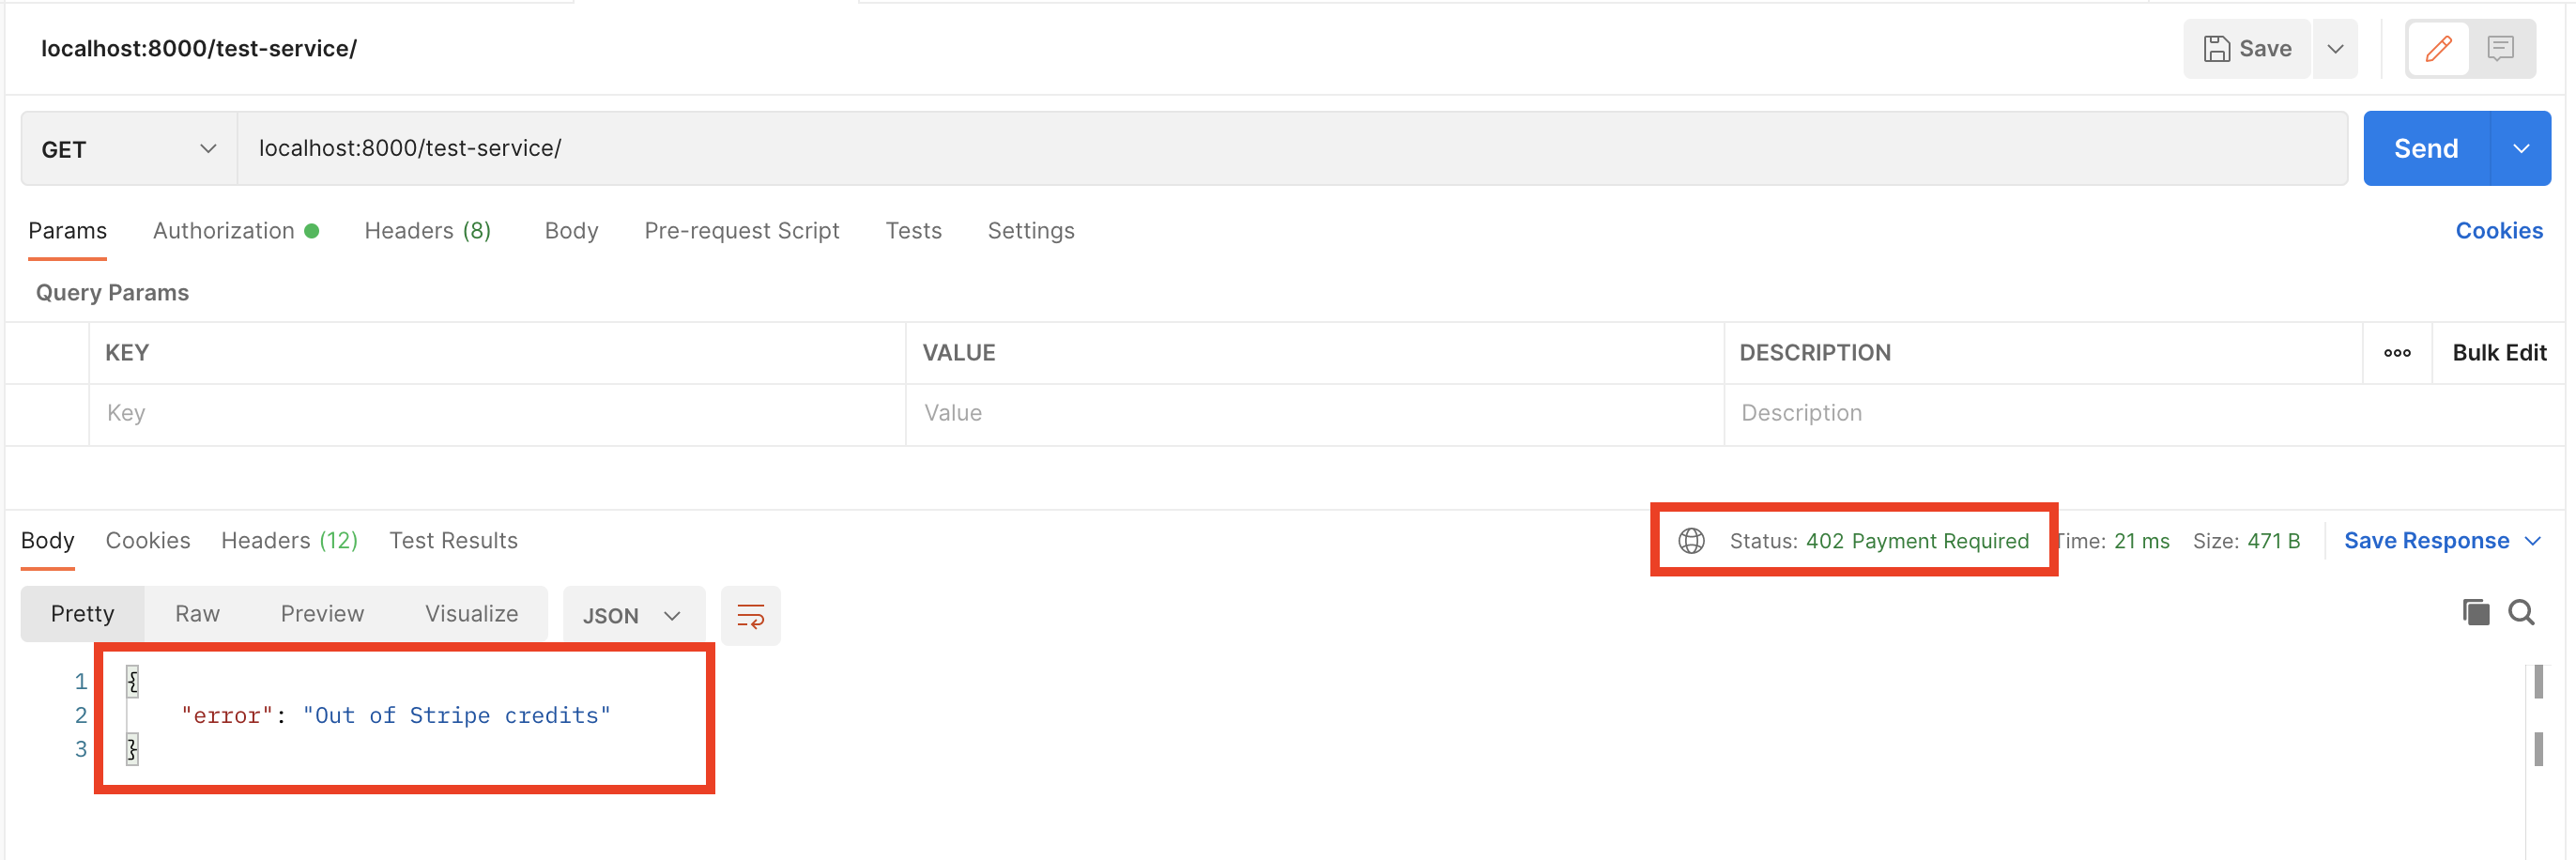
For the governance rule, we will see that our newly created cohort has been added under the Apply To Users field. We also need to make sure the Blocking checkbox is checked, the Override Response Status should be set to 402 Payment Required, and the Override Response Body dropdown should be set to Merge Tags and should have a JSON error message populated in the text input.
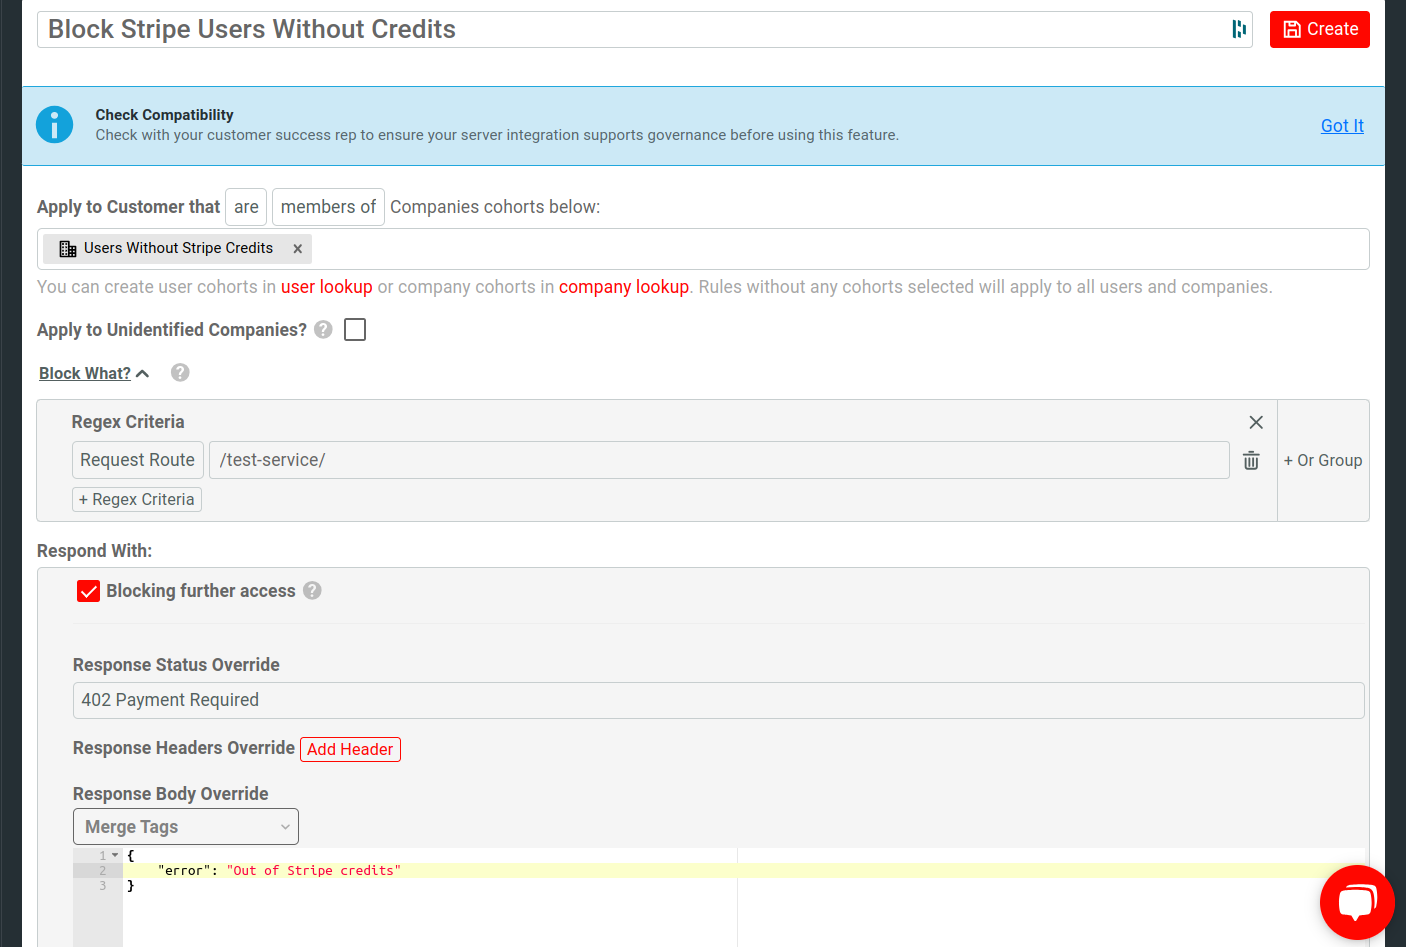
You’ll then click Create in the top right corner.
Once created, you will then need to make sure that you enable the rule by toggling it to On. By default, a newly created cohort is always turned on.
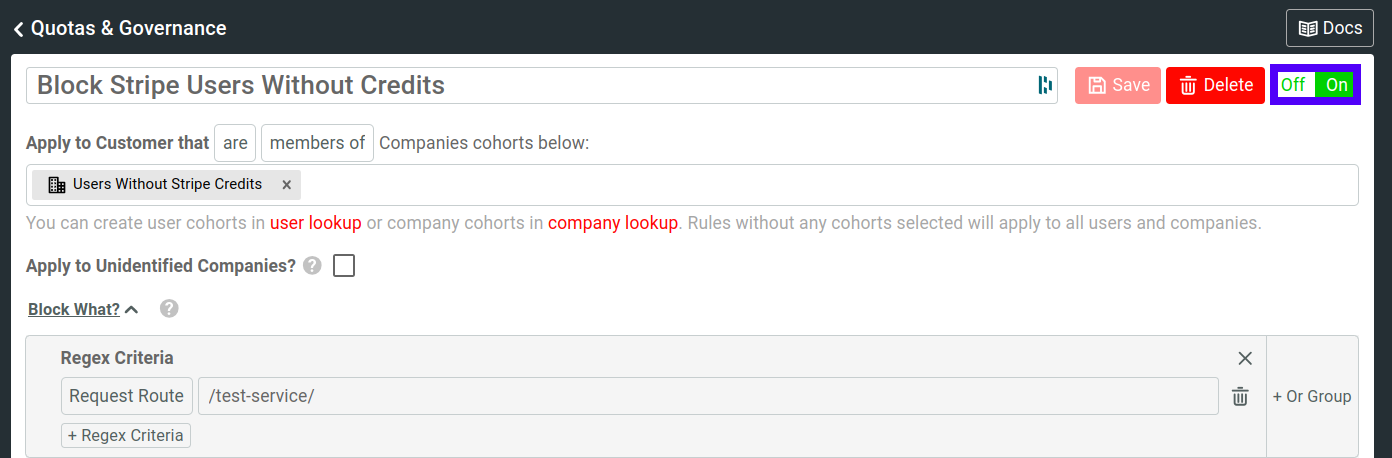
Your Governance Rule will now be active.
The rule may take a few minutes to be enforced. If the rule isn’t working instantly, give Moesif up to 15 minutes to propagate the rule and take effect.
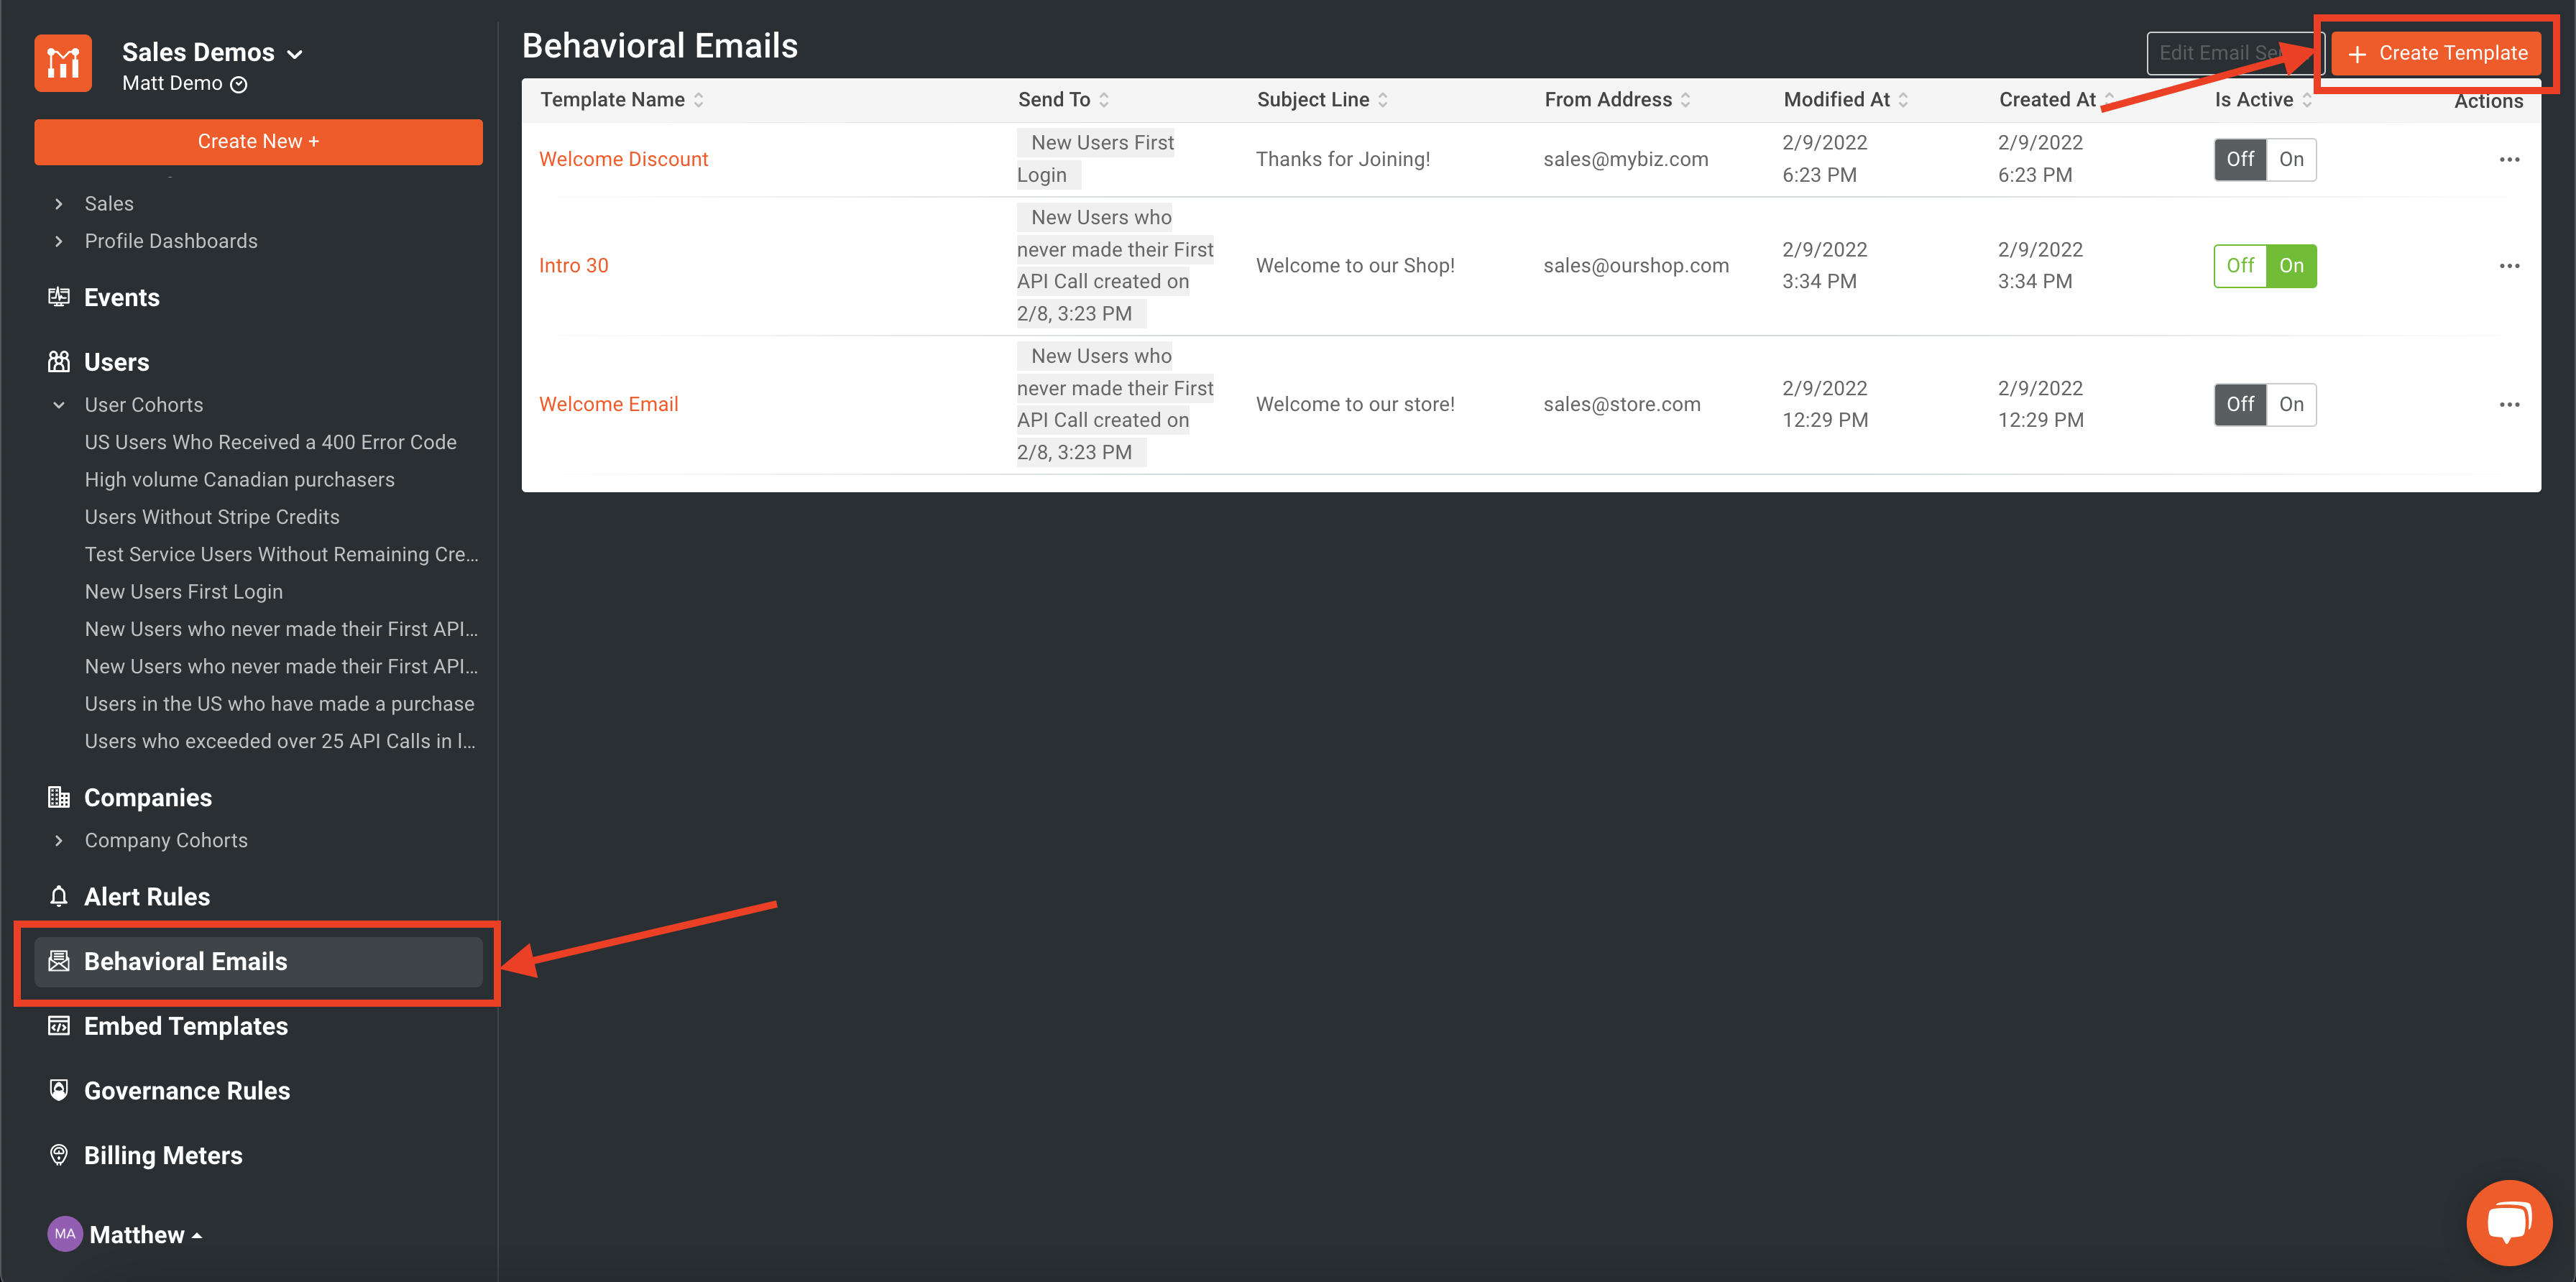
Set up the Behavioral Email
In order to proactively let users know that they have run out of credits, we will also send them a behavioral email which is triggered the same way the governance rules is, through the cohort.
To do this, we will click on the Behavioral Email menu item in the left-side navigation. Then we will click Create Template.
For this example, I used Sendgrid as the SMTP server. For more instructions on how to set that up, check out our blog all about it. You’ll need to set up your email server before your emails will be able to be sent.
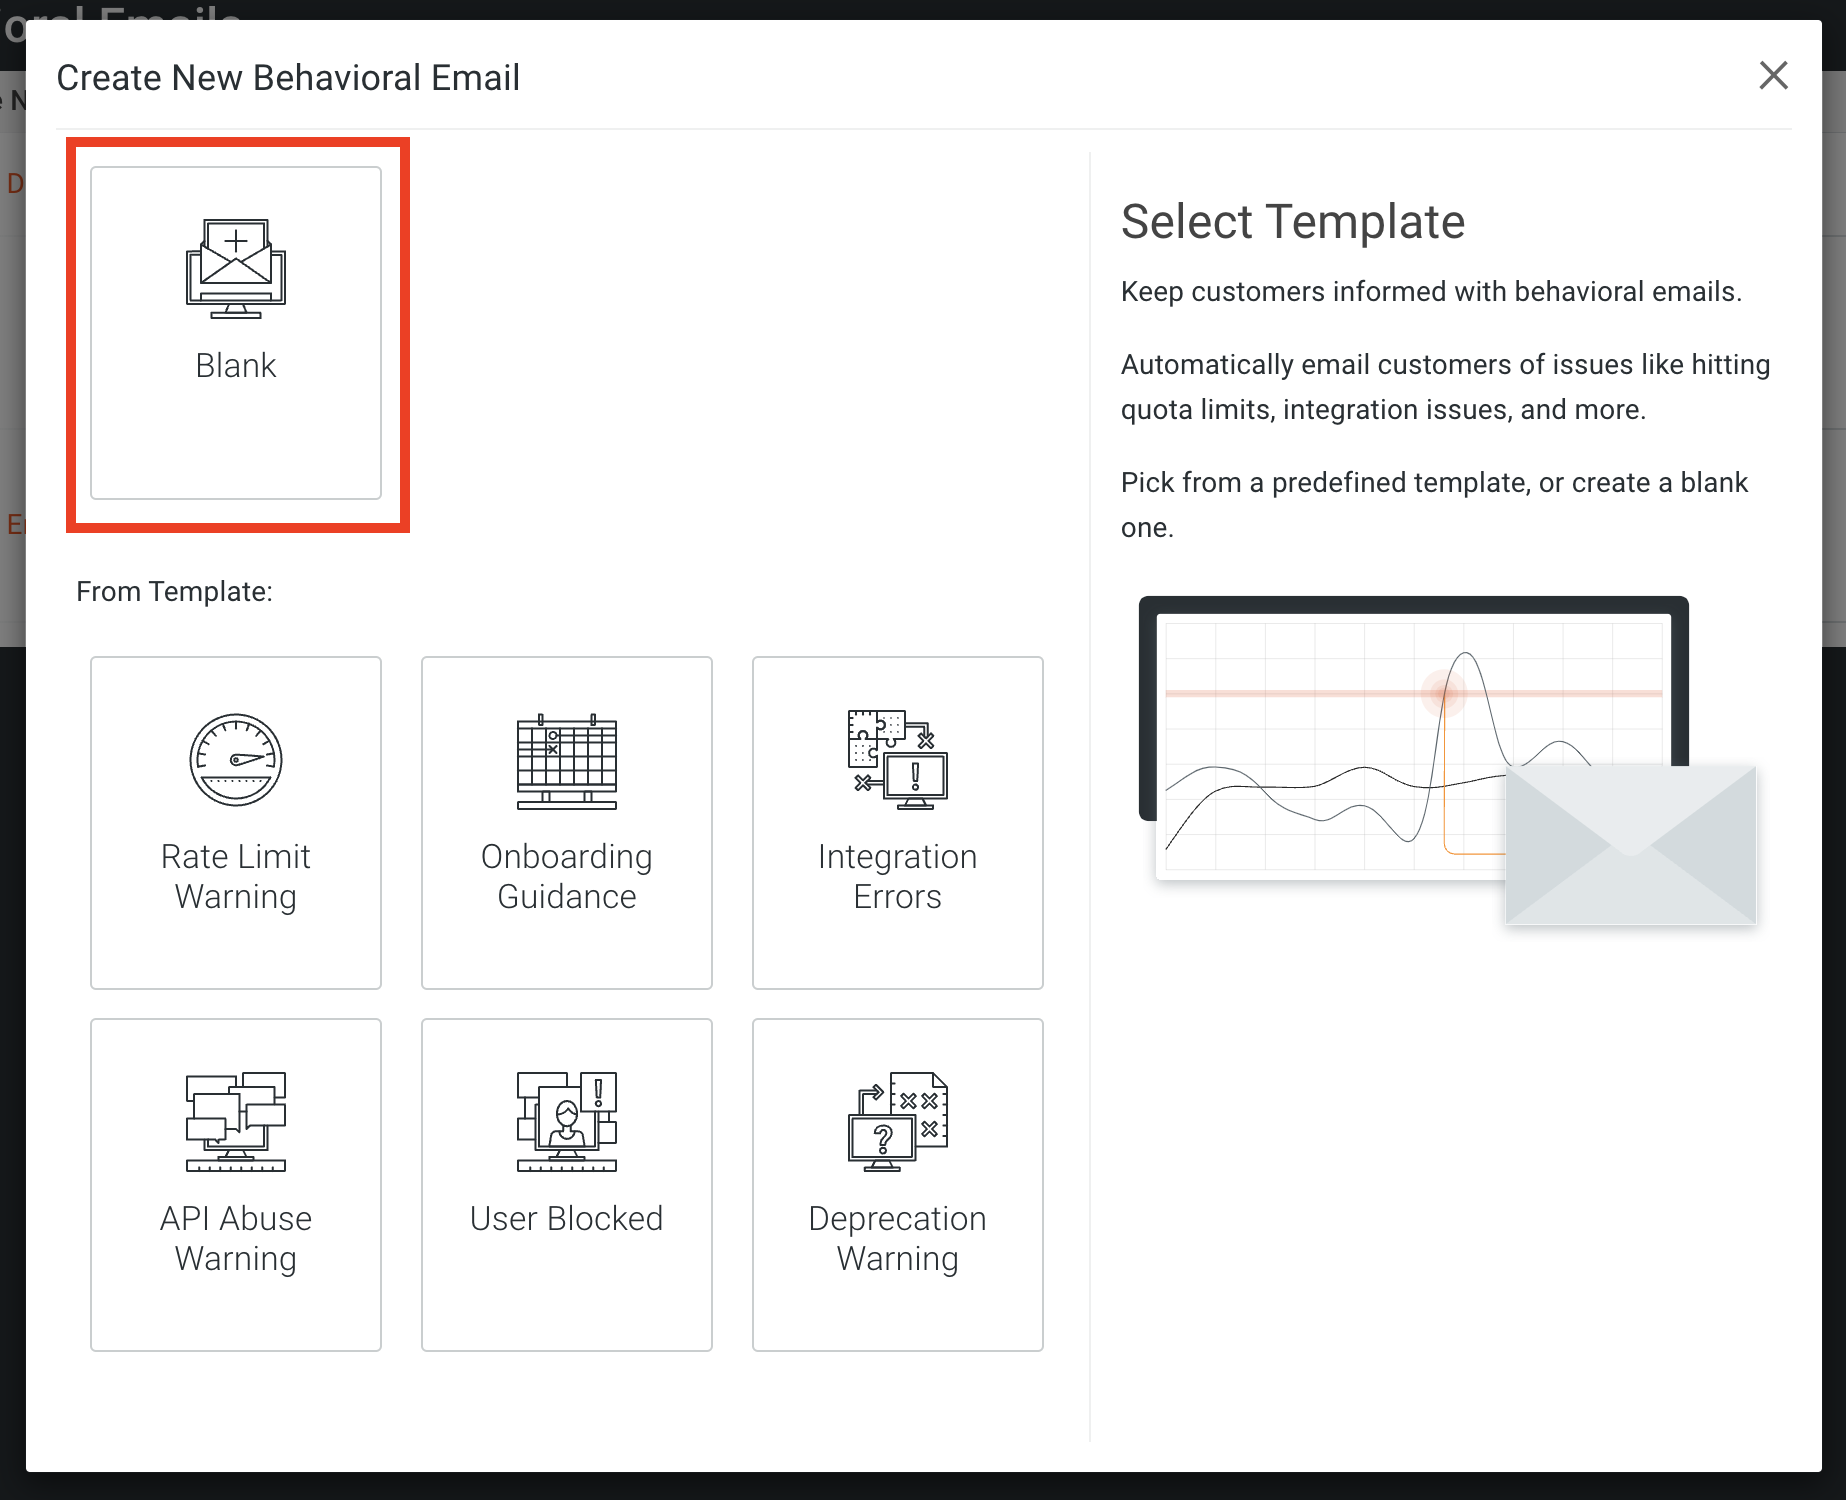
After you’ve clicked Create Template, you will then be prompted for the type of email you’d like to set up. Moesif offers many different “pre-canned” options you could go with but for our purposes today we will choose Blank. Clicking this will bring us to the email design screen.
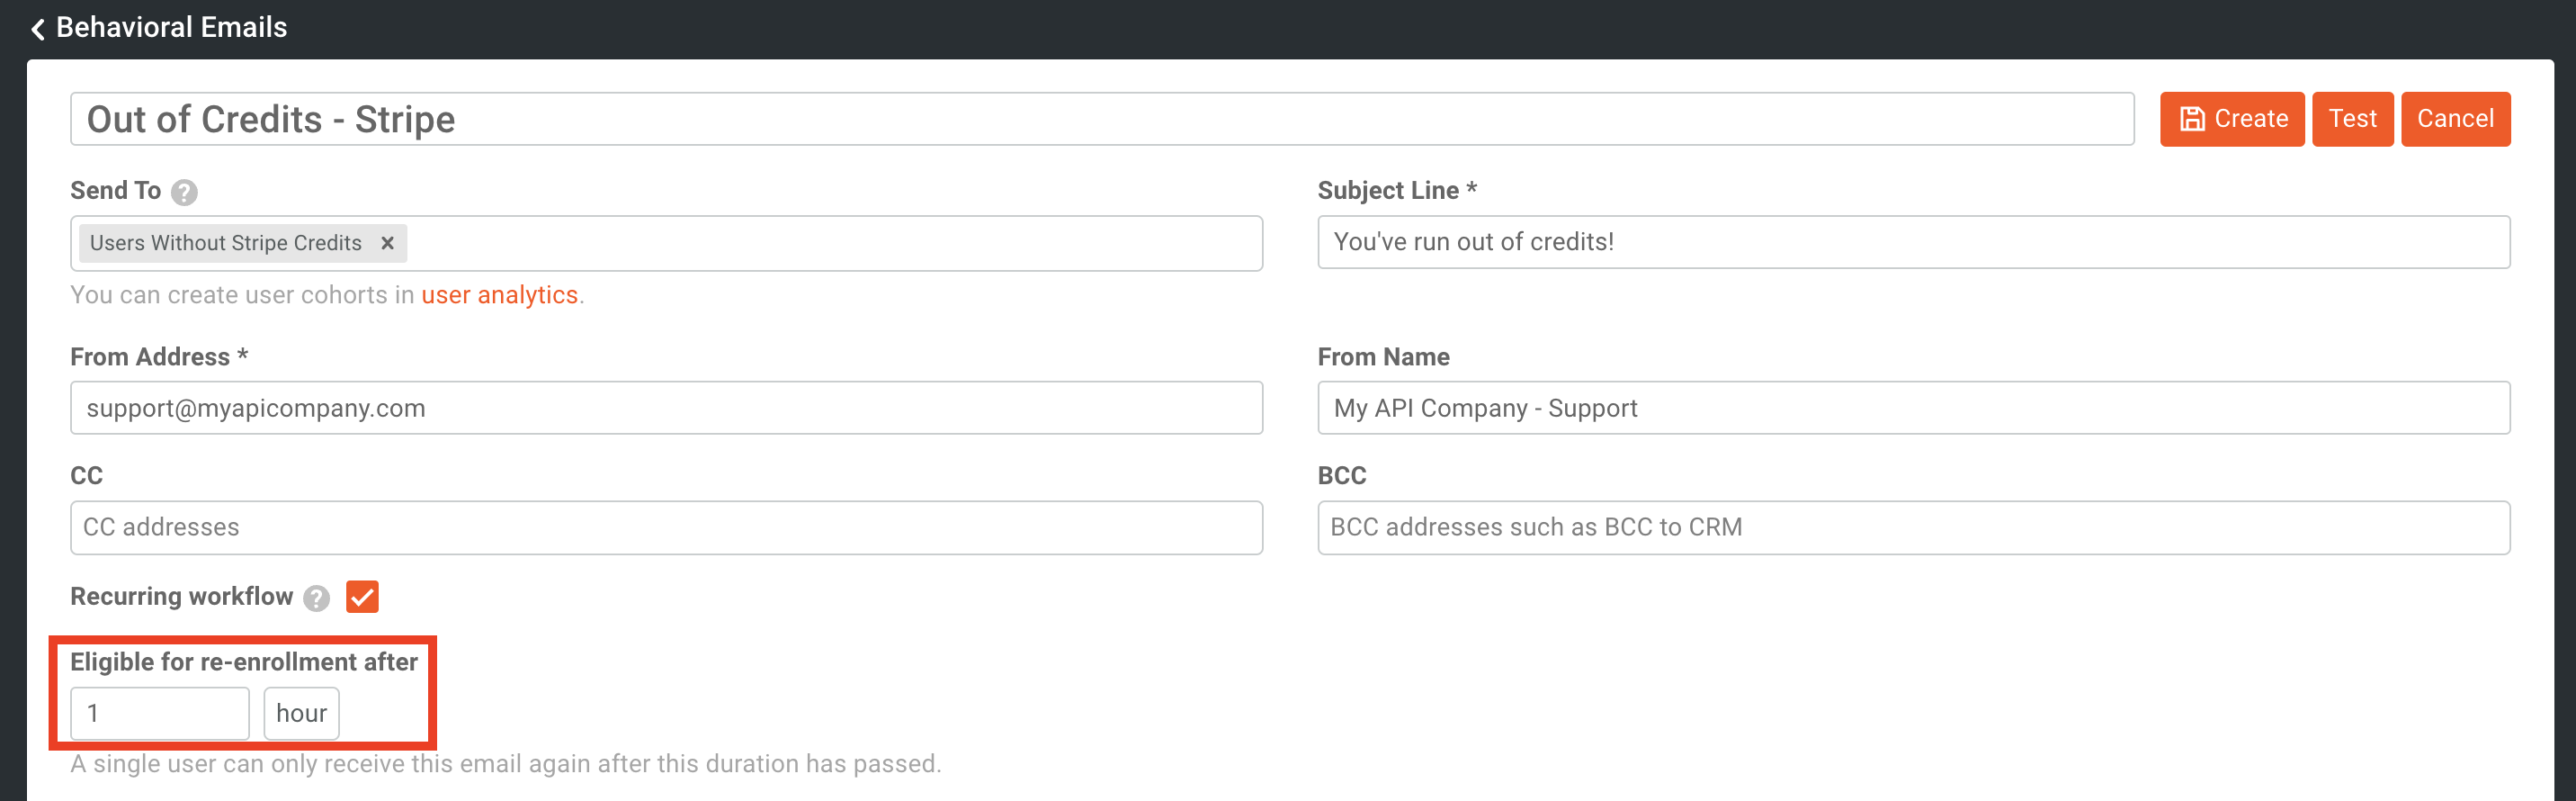
On the email design screen, we will:
- name our email
- pick our cohort to trigger the email (the one we created earlier)
- Add our subject line
- Add our From Address, and optionally, our From Name
- Check the box for Recurring workflow
- Set the Eligible for re-enrollment after field to “1 hour”
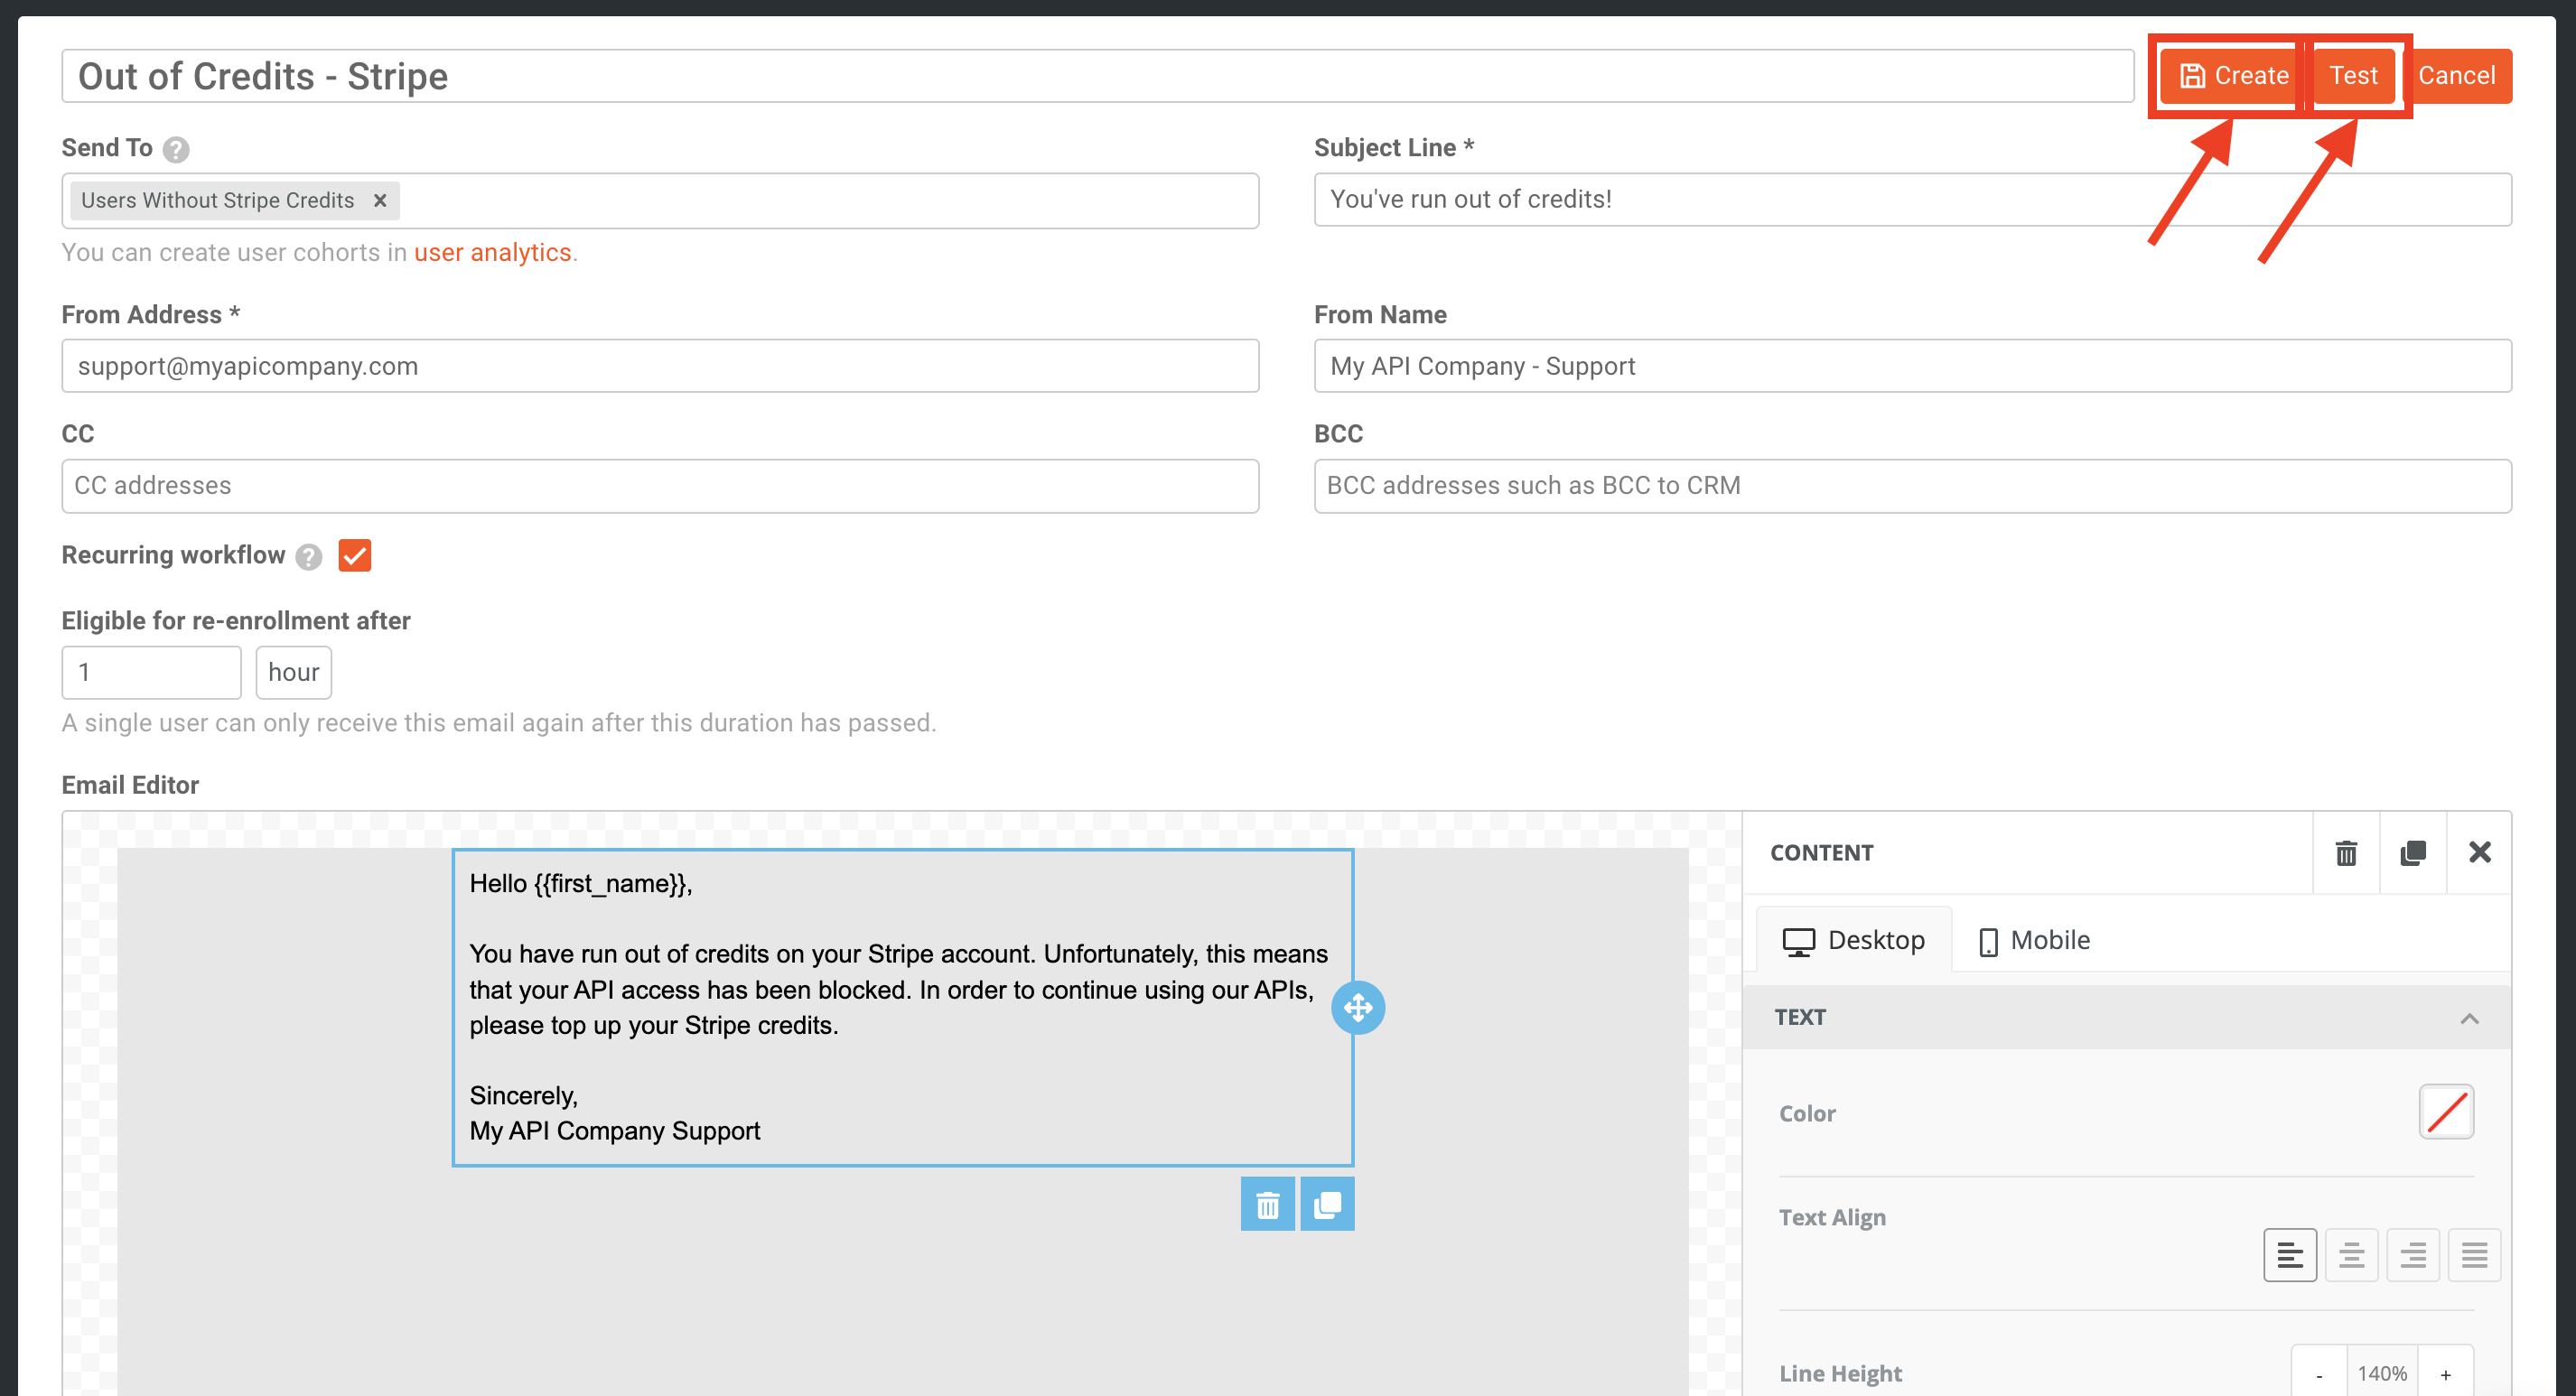
Below is an example of how the configuration will look once completed.
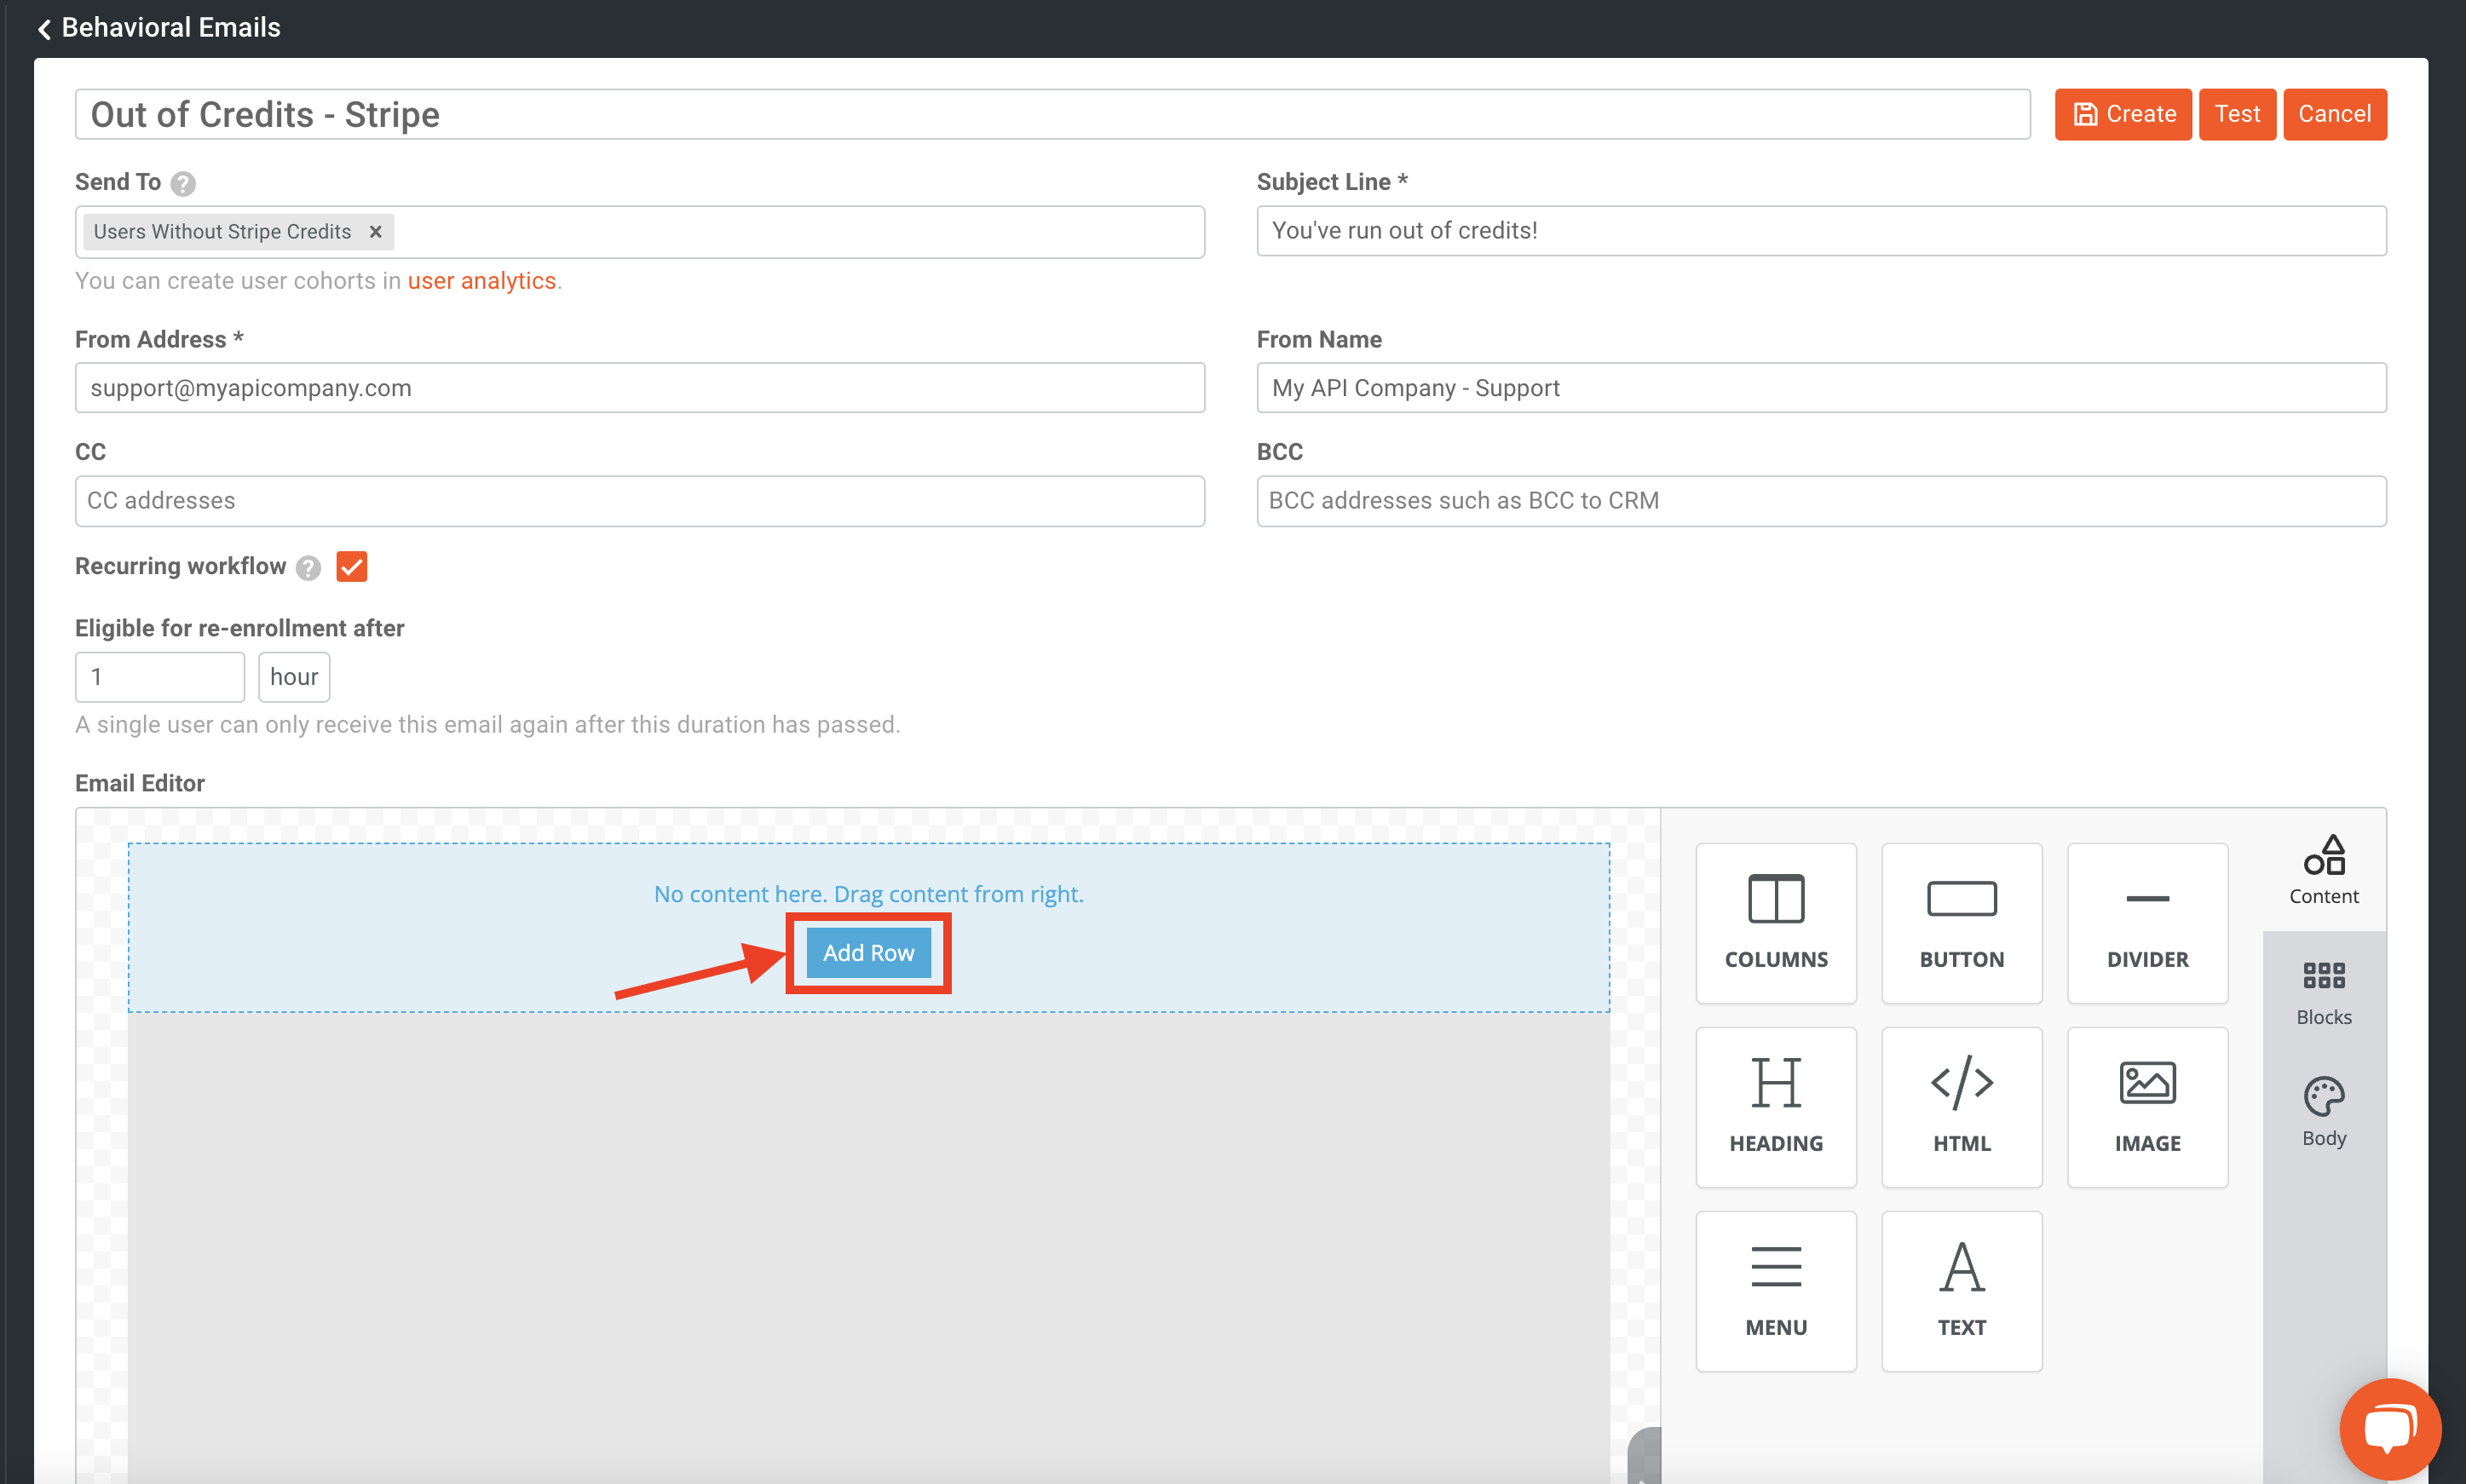
Next we will focus on the template itself. We will click the Add Row button to begin adding some elements to the template.
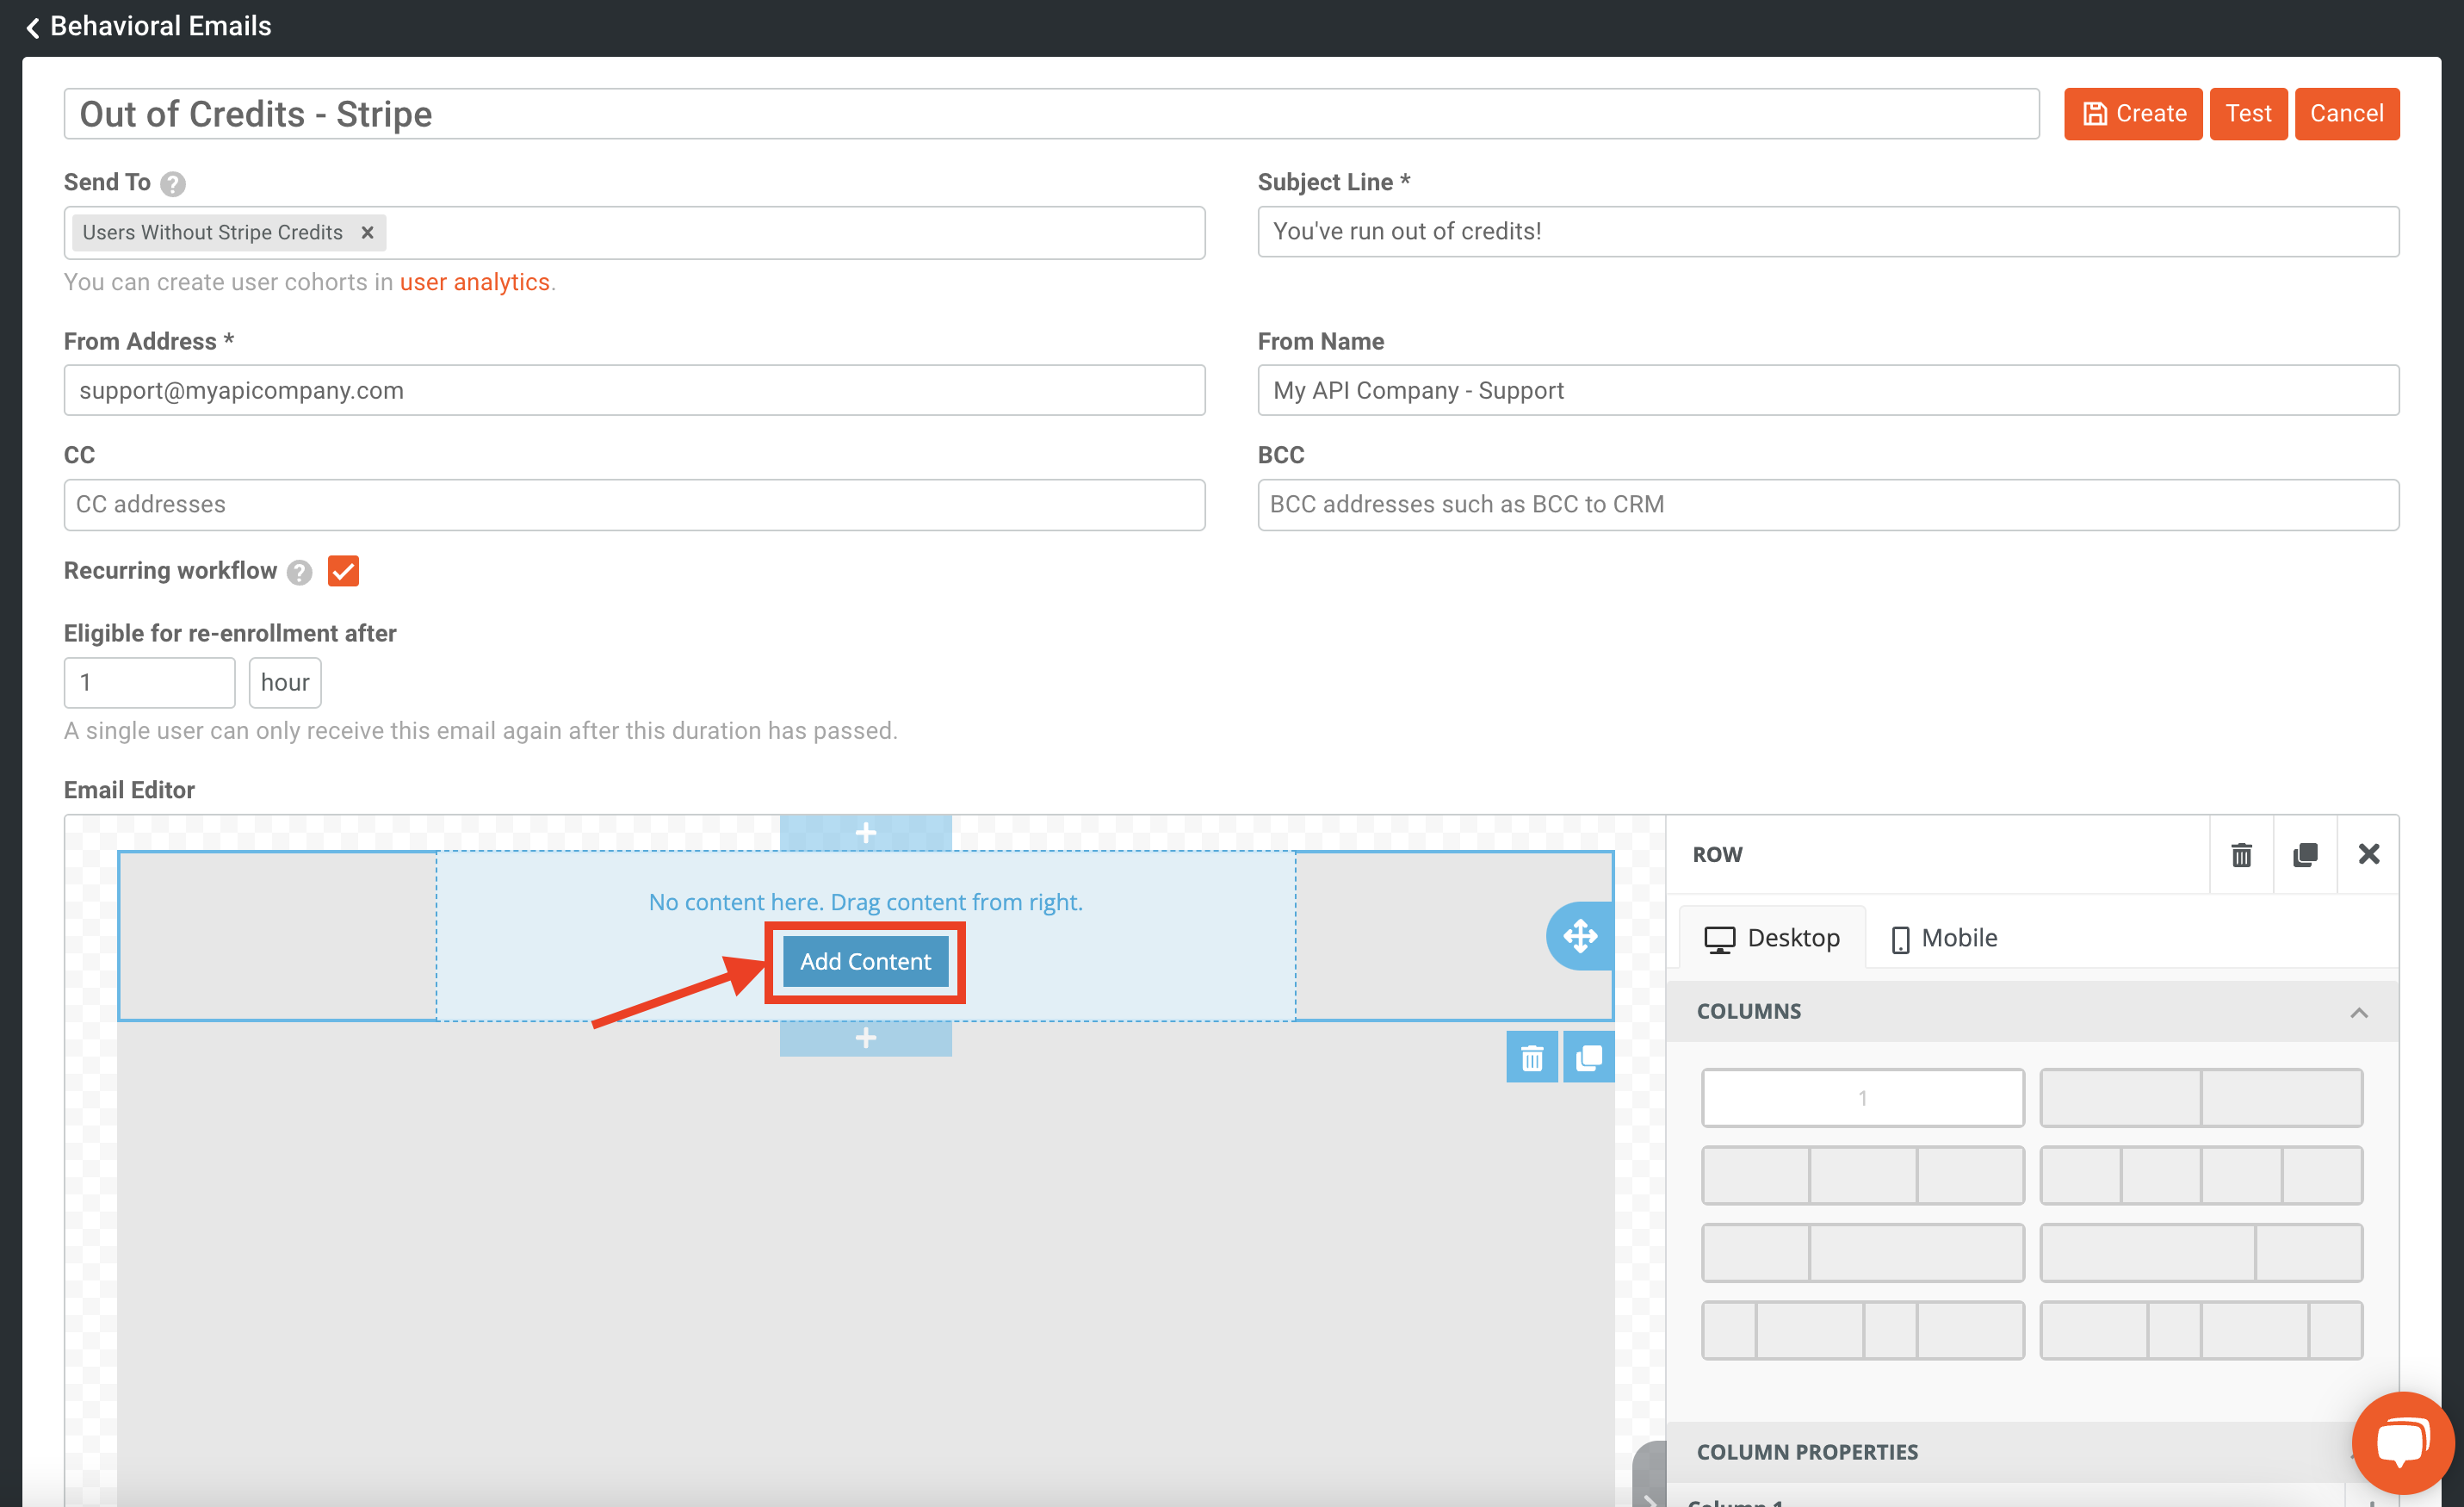
Then, we will click Add Content.
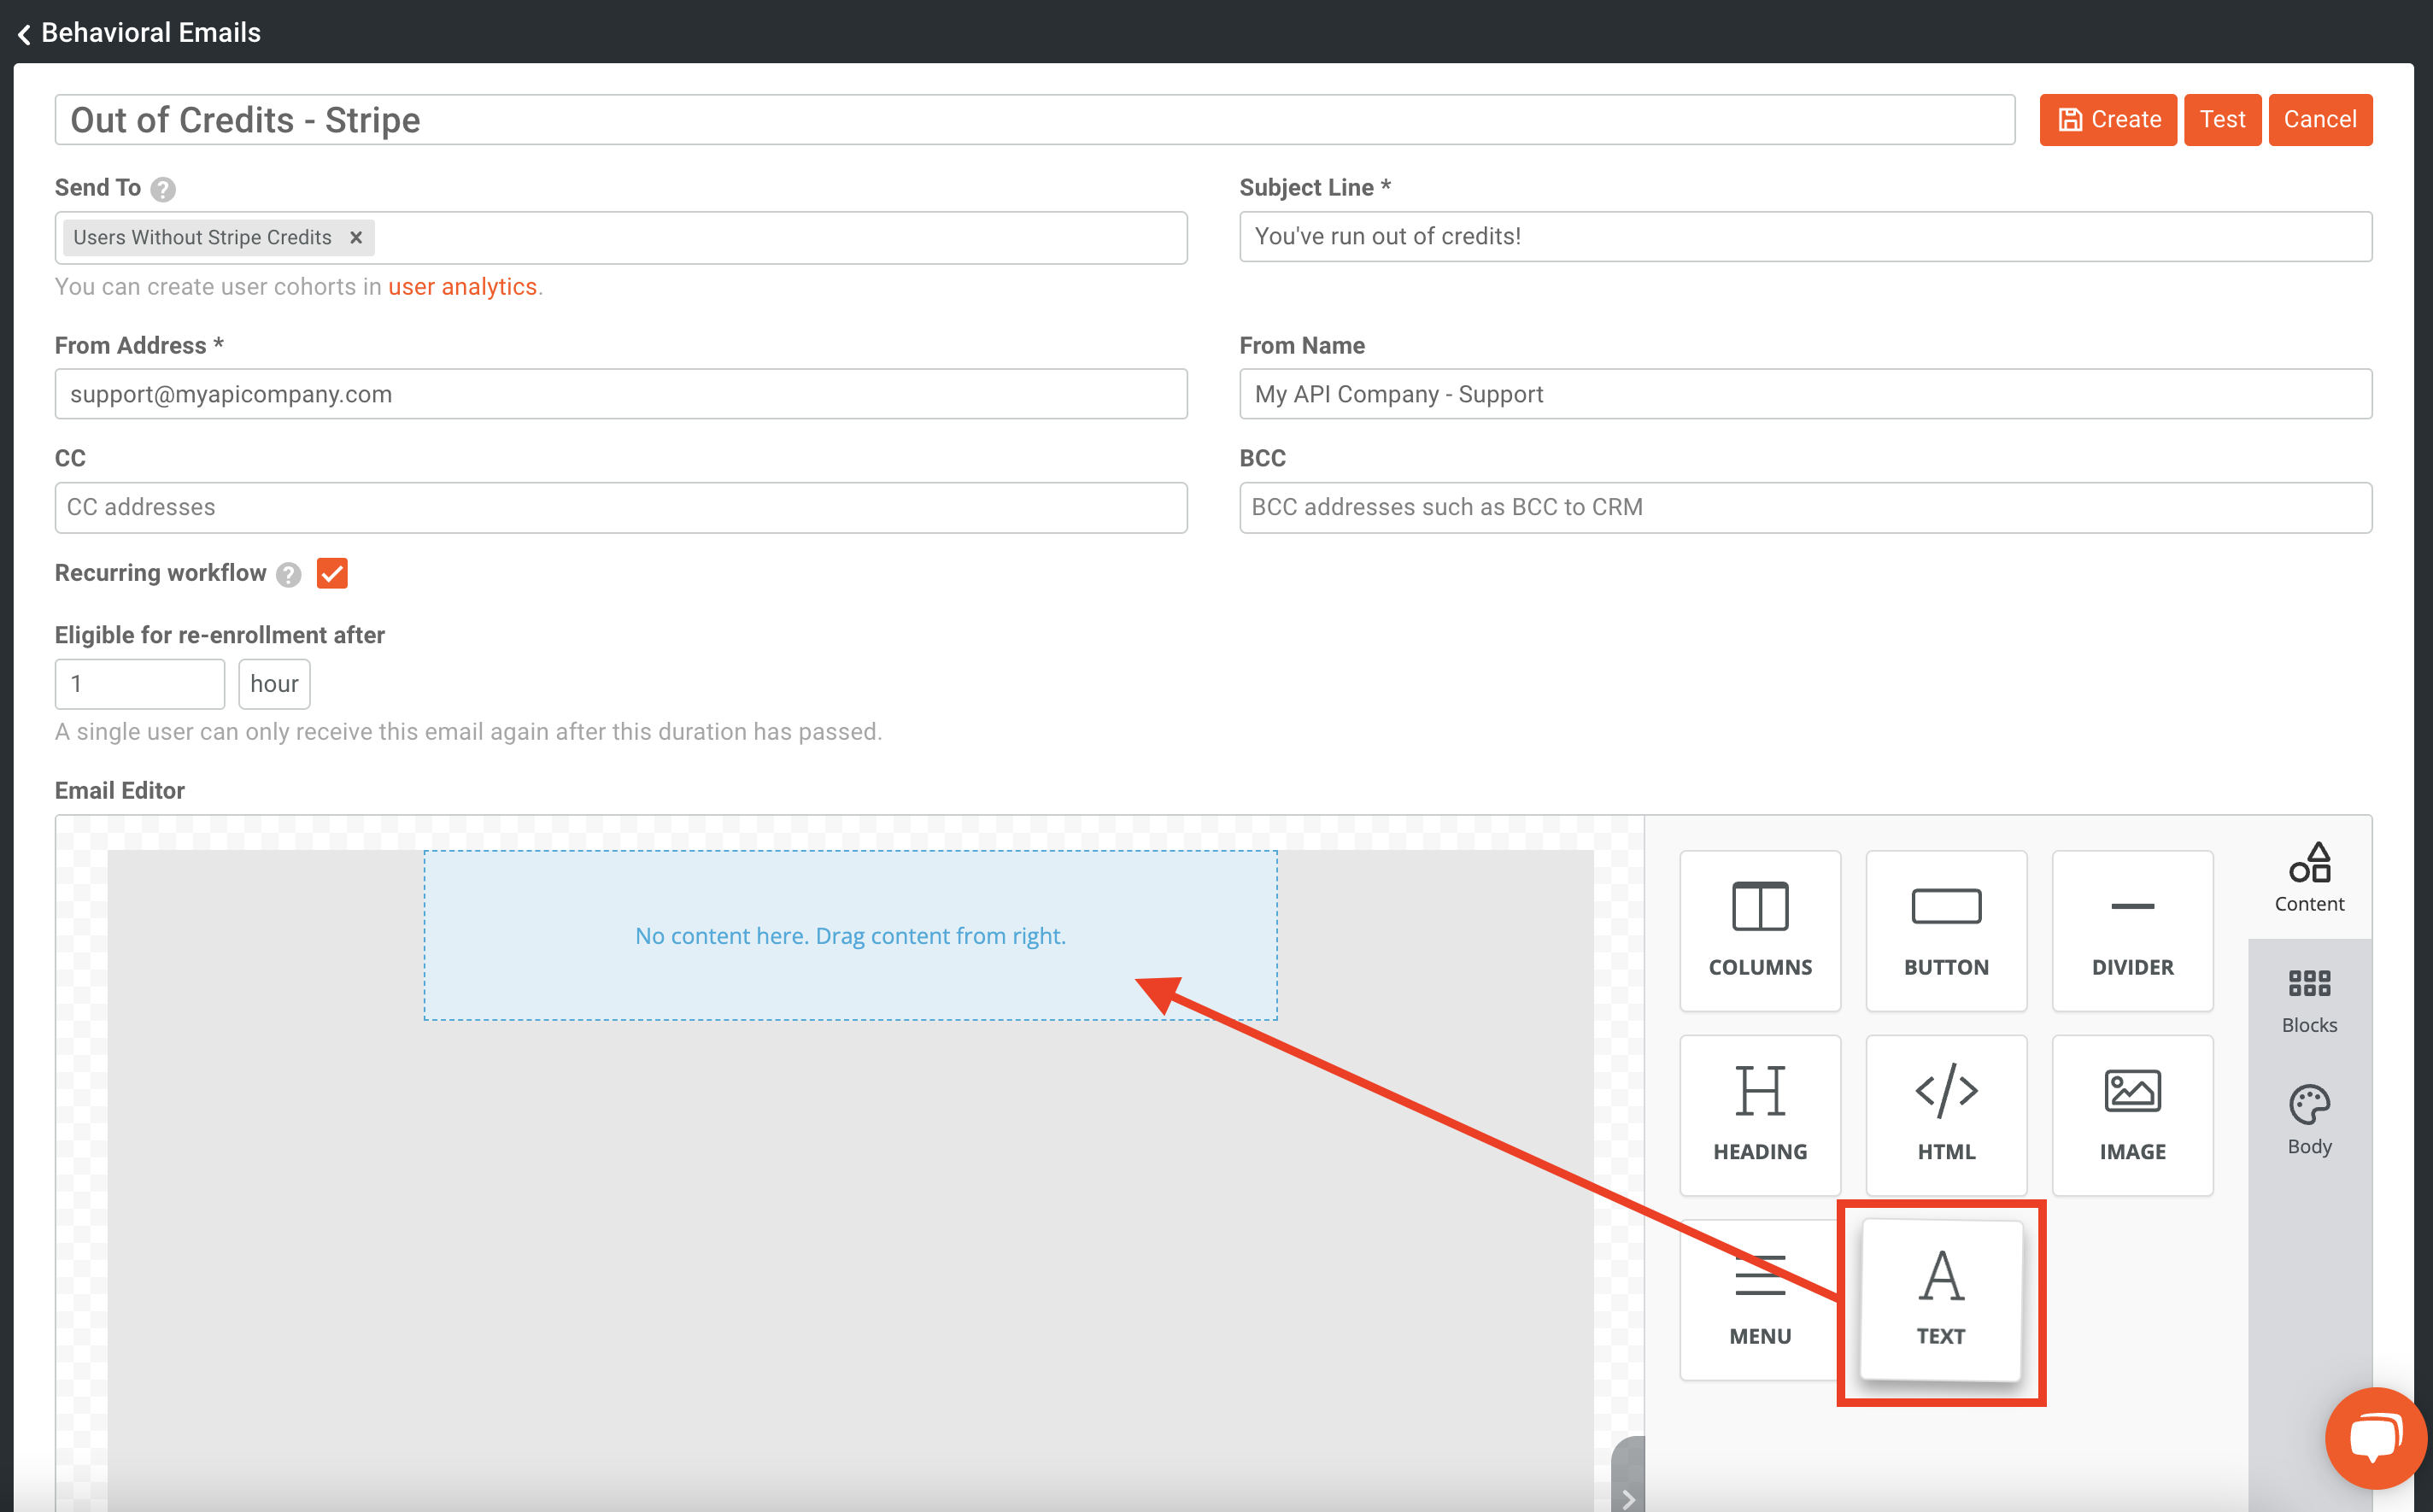
Next, we will drag and drop a text element from the right-side menu onto the template.
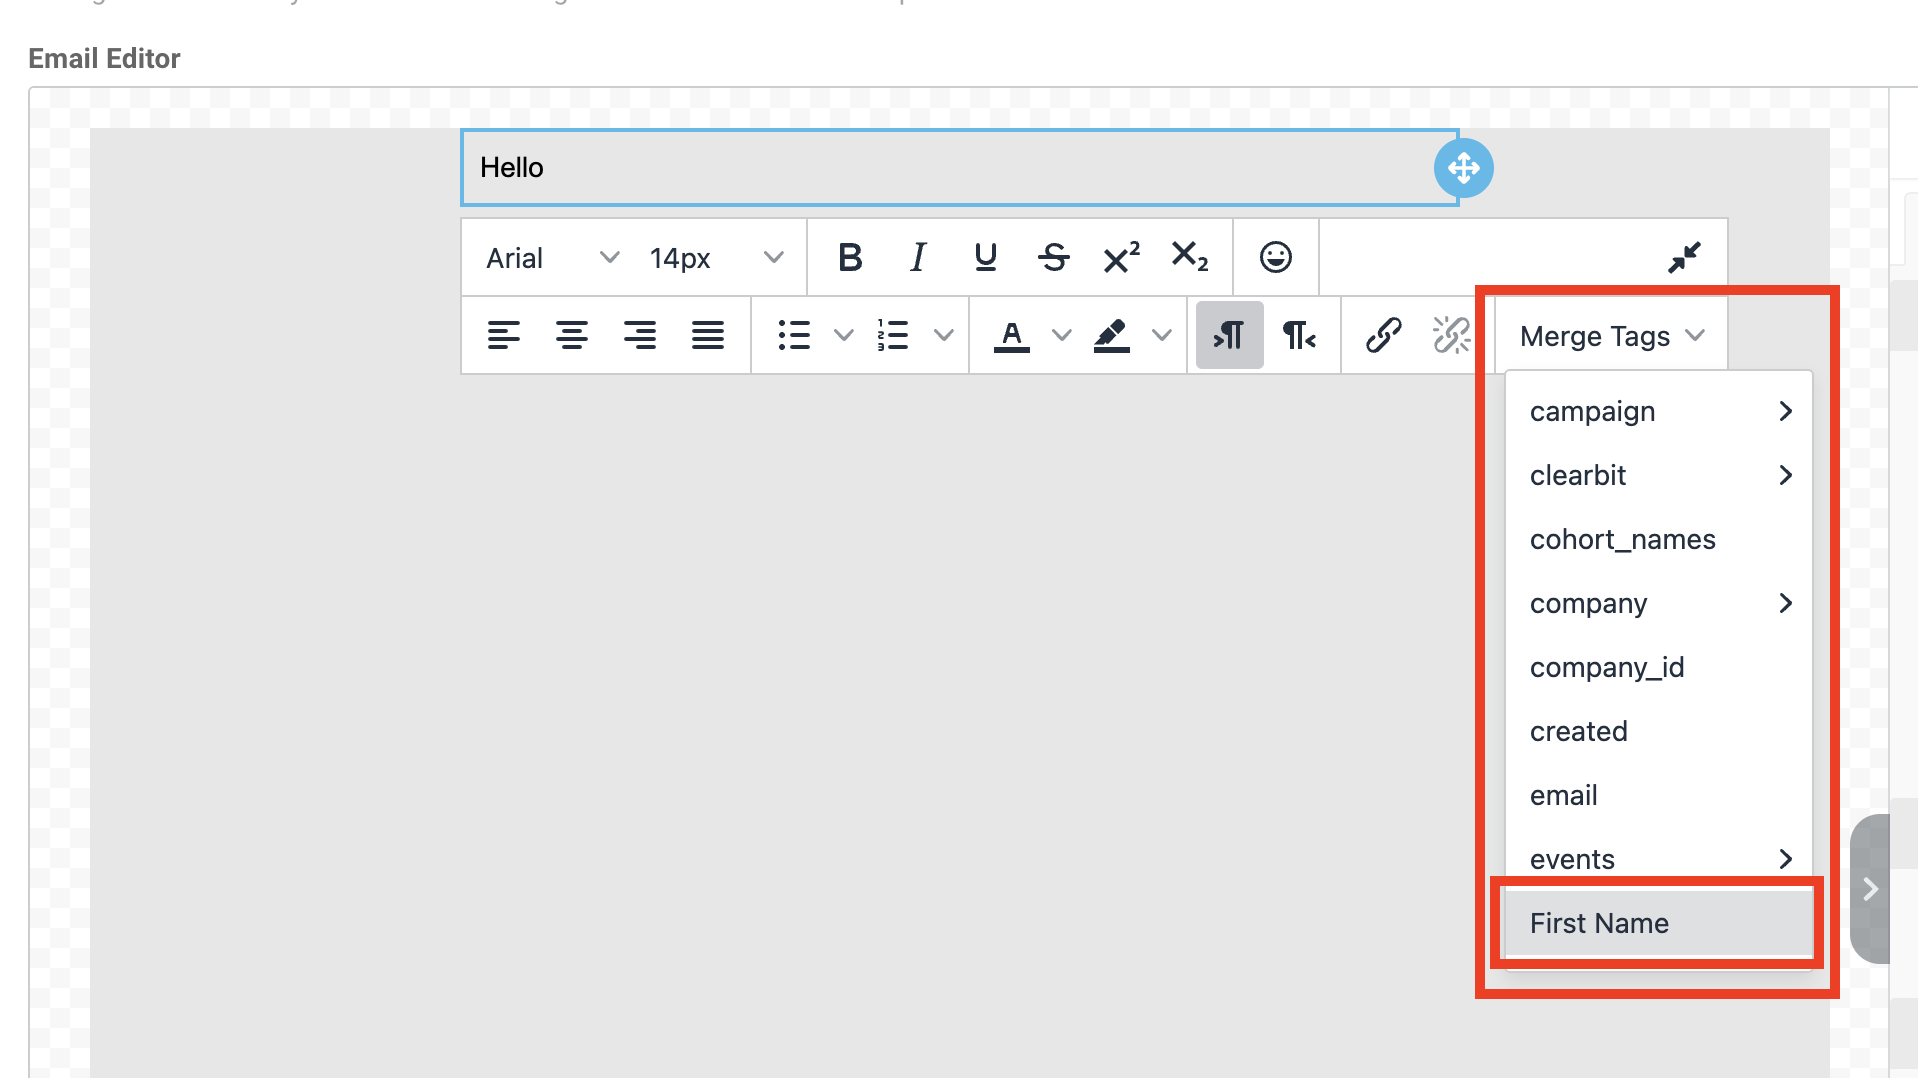
Click into the newly added text element. We will begin to type our email content within it. So that we can add a more customized feel, we will click on Merge Tags in the editor and select First Name.
Our completed email will look like the one displayed below. We will then click Test to send a test email to our account to verify everything is working from an email configuration as expected. Lastly, we will click on Create to actually create the email.
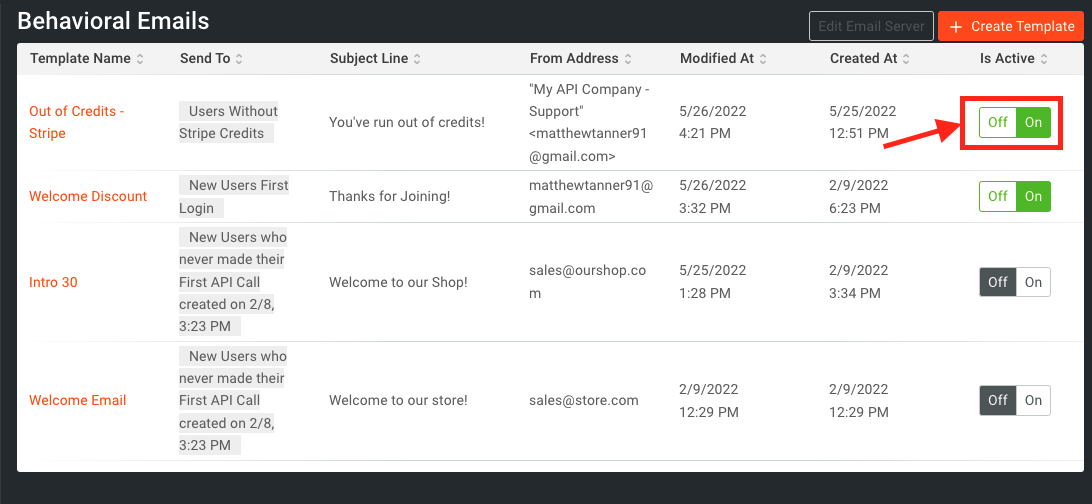
Once you go back to the Behavioral Emails menu, you’ll also want to ensure that the email is turned on in the Is Active column. You can use the slider to toggle between states.
The cohort, governance rule, and email are all now set up and ready to be tested.
Reduce analytics costs with Moesif - zero maintenance with no performance impact.
Test the setup
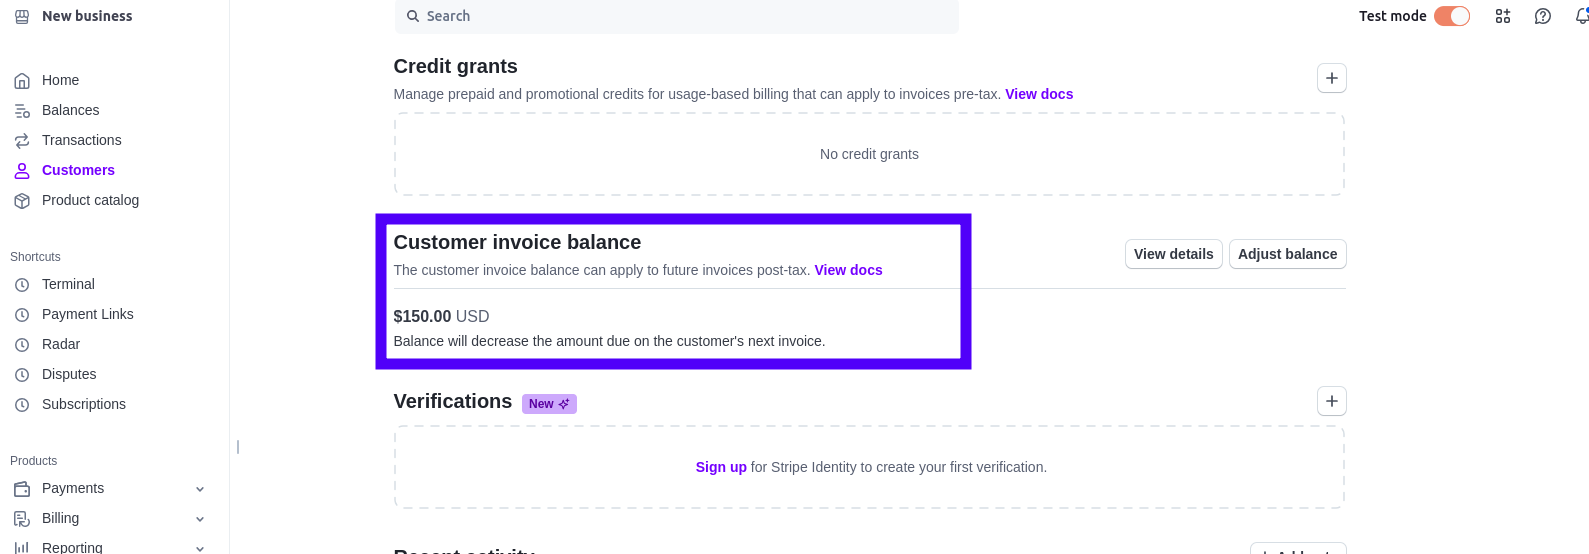
Testing the setup is simple to do in the Stripe dashboard. First, we will log into Stripe, select a customer, and give them some credits.
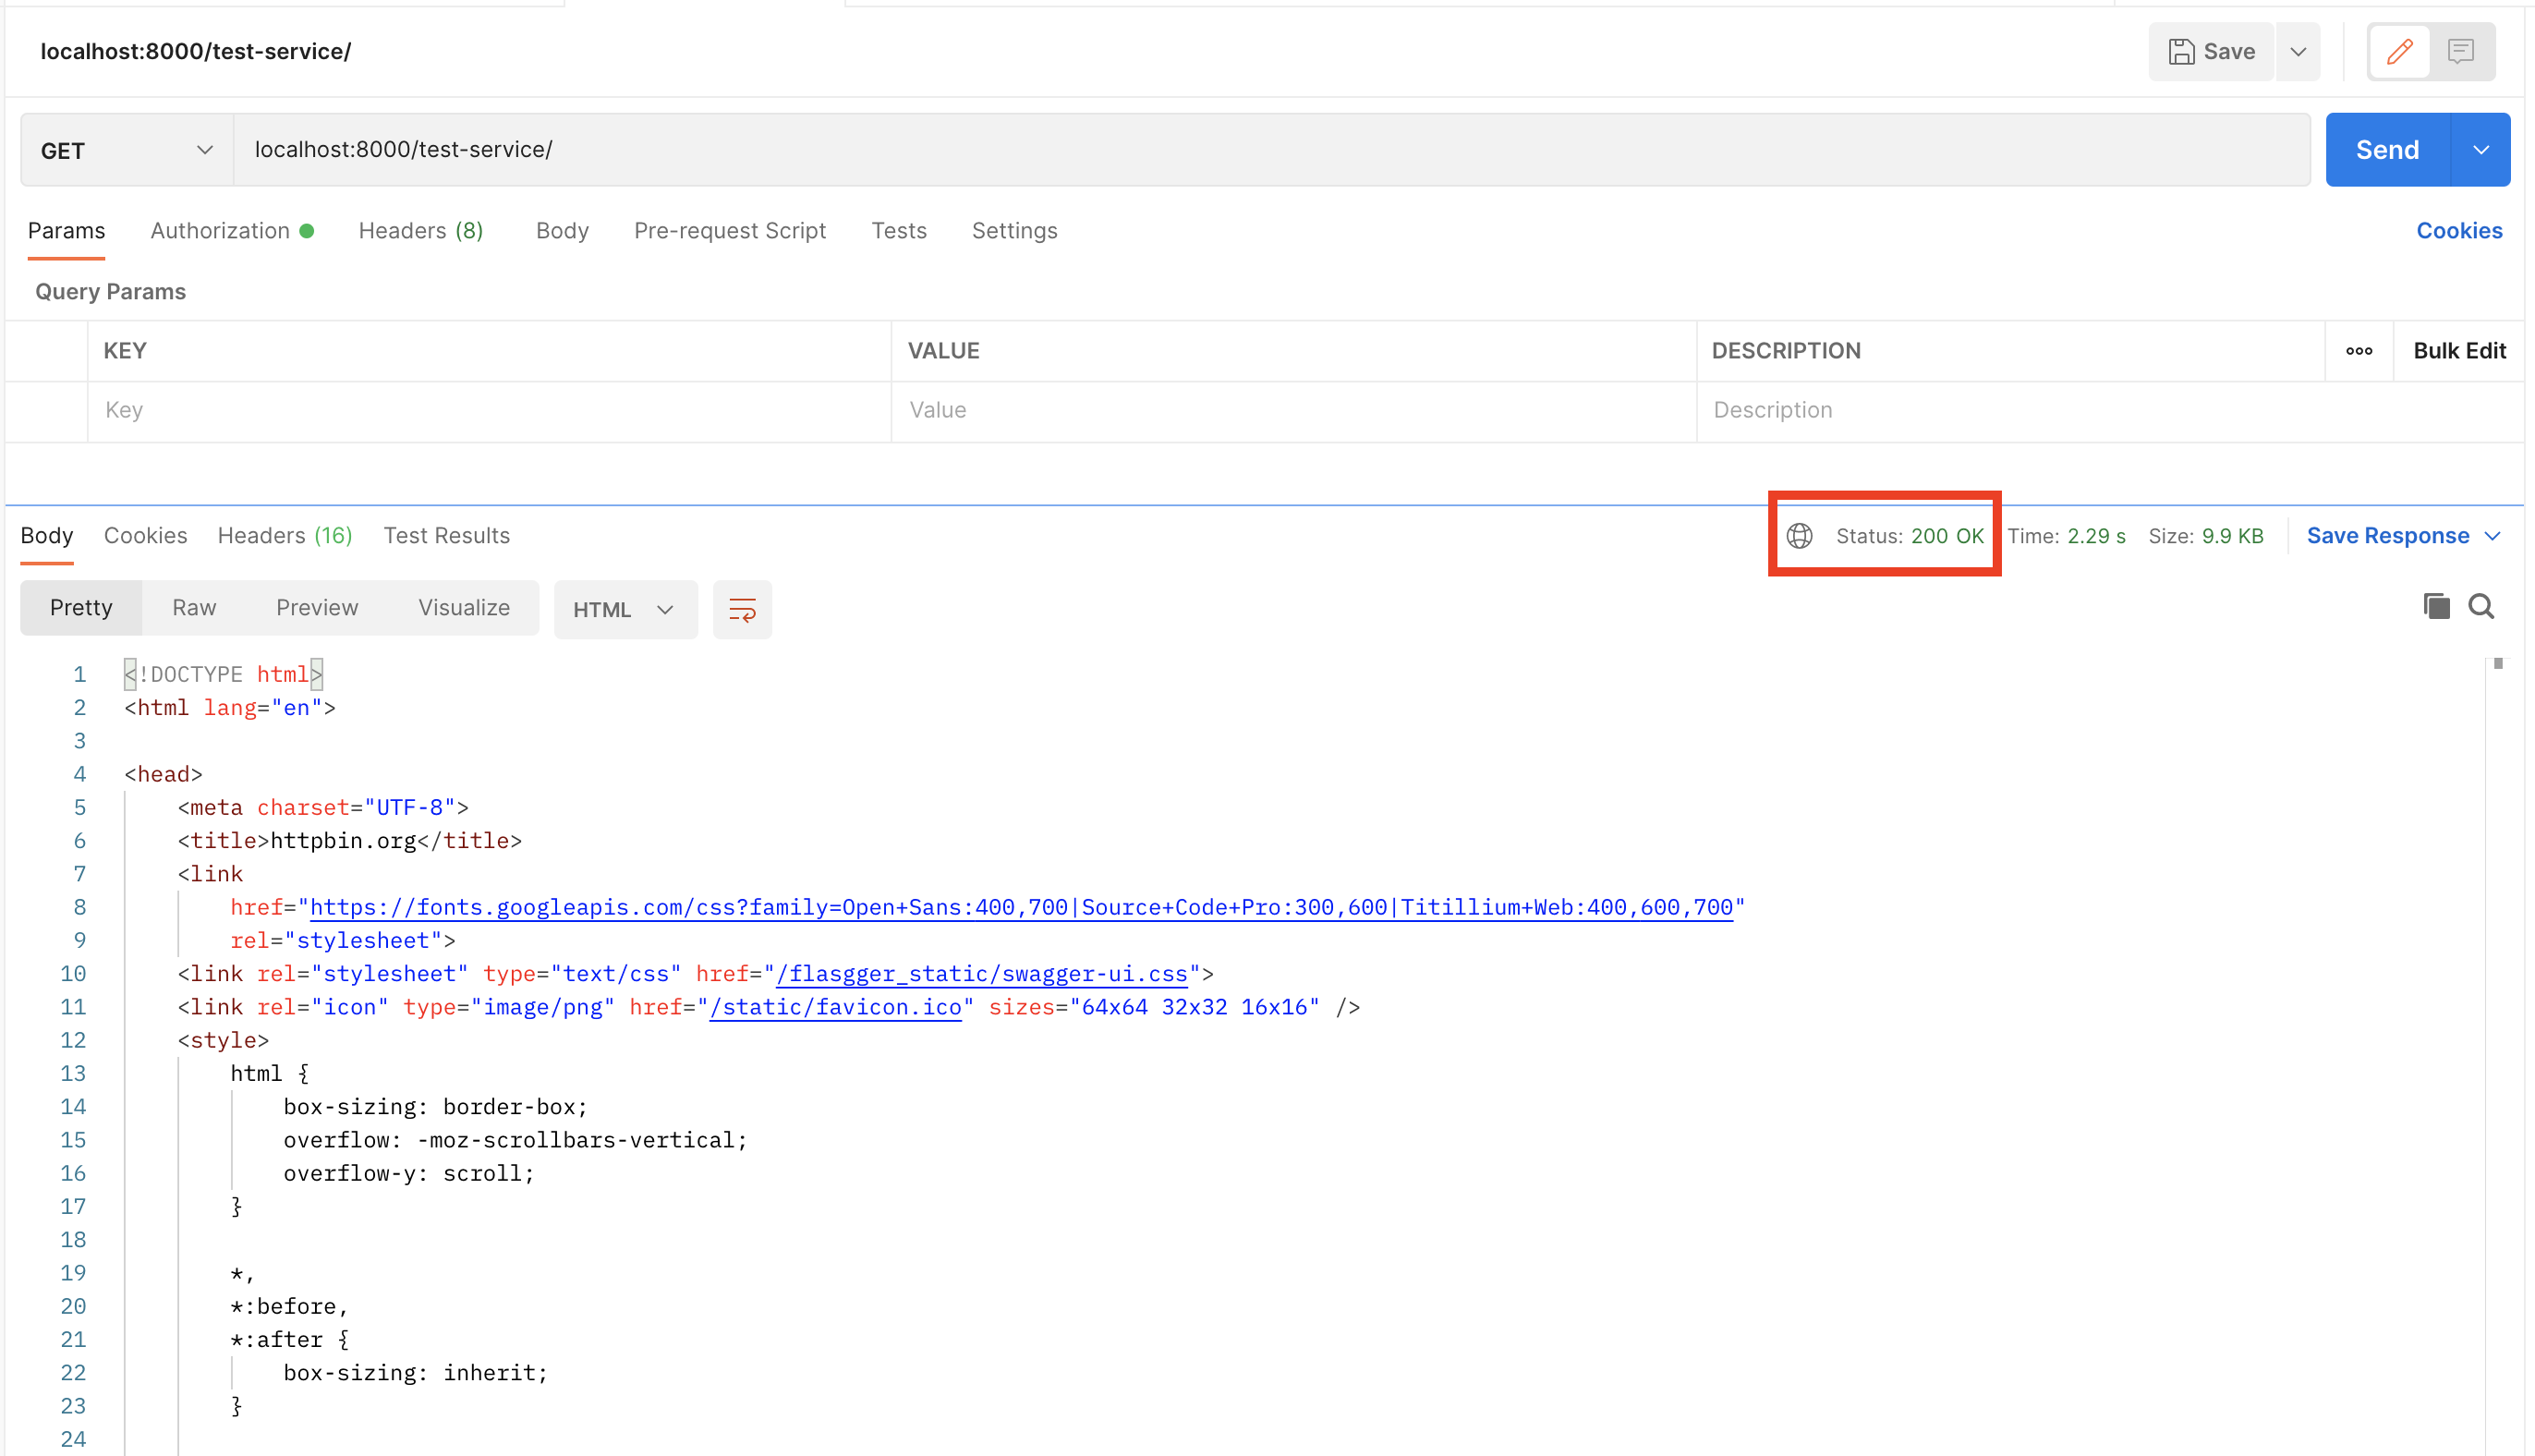
We can then send a request through for this user and see a 200 OK response returned in Postman.
We will then take away the credits from that user via Stripe API, leaving their balance at $0.
The user will then be added to the cohort in Moesif.
It’s important to note that because of how Moesif works, it may take a few minutes for members to be added/removed from a cohort. If there is a yellow caution badge on the right of the table, the user has not been synced into the cohort yet. If it is the green check, the user has been successfully synced to the cohort.
We will then send an API request again with the user having no credits remaining. Moesif will then block the call and return a 402 Payment Required to the user.
This will effectively stop the user from being able to make an API call until they have added more credits to their Stripe account and completed payment with a successful checkout session.
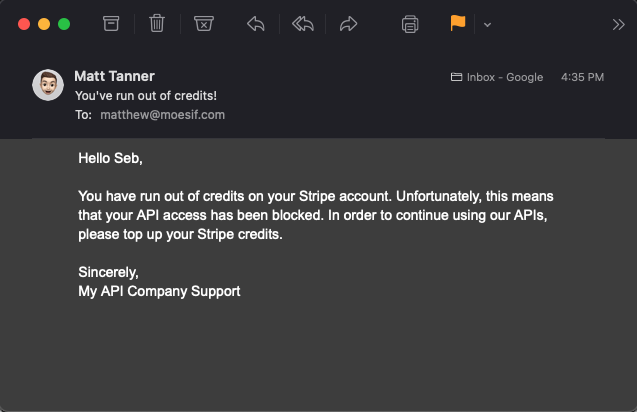
Lastly, the user should also receive the “out of funds” email we created earlier as well. That will be received and look like this:
With that, we can confirm that our PAYG monetization scheme is in full effect. For future payments, users will now be required to top up their accounts in order to use the API and will also be emailed to let them know. By directly sending invoice reminders to your users, you can shorten the amount of time a bank transfer takes by staying top of mind. For card errors, sending payment information can keep your users from hitting surprise governance quotas.
Of course, many other considerations could be made in order to customize this for your organization’s needs. You may put a minimum credits threshold for your governance rule where users must have Stripe credit > $10 in order to use the API, or something similar. You may also notify customers before they hit a 0 balance to ensure that they do not have their usage suspended and cause service interruption for their applications.
Try it out!
Want to try out PAYG billing or post-paid billing for your APIs and apps? Sign up for Moesif today to begin using billing meters, behavioral emails, governance rules, and powerful analytics, out-of-the-box. Moesif is a “one-stop-shop” for all your monetization needs with a growing number of payment gateway platforms we support including Stripe, Recurly, and Chargebee.


Related Articles

API Development
Using Moesif for API Observability and Analytics in NGINX One
Enable API observability in NGINX One with Moesif to track latency, errors, and usage patterns through powerful API analytics and user-aware monitoring.

Podcasts
APIs Over IPAs 19: API Product Management with Emmanuel Paraskakis, Level 250
In this episode, Emmanuel Paraskakis of Level 250 joins to discuss the role and responsibilities of API product managers.

API Strategy
How Engineering Teams Should Monitor Customer Health and API Usage
Learn how engineering teams can monitor API usage, debug production issues, and track account health with Moesif for better API observability.
API Development
Moesif for API Observability and Analytics in NGINX OpenResty
Set up API observability in NGINX OpenResty with Moesif to track performance, monitor errors, and gain real-time insights into your API traffic and users.