Building a RESTful Minimal API with .NET Core 7
.NET Core and ASP.NET Core are popular frameworks for creating powerful RESTful APIs. In this tutorial, we will use it to develop a simple Minimal API that simulates a credit score rating. Minimal APIs provide a streamlined approach to creating high-performing HTTP APIs using ASP.NET Core. They allow you to construct complete REST endpoints with minimal setup and code easily. Instead of relying on conventional scaffolding and controllers, you can fluently define API routes and actions to simplify the development process.
We will create an endpoint allowing a user to retrieve a credit score rating by sending a request to the API. We can also save and retrieve credit scores using POST and GET methods. However, it is essential to note that we will not be linking up to any existing backend systems to pull a credit score; instead, we will use a random number generator to generate the score and return it to the user. Although this API is relatively simple, it will demonstrate the basics of REST API development using .NET Core and ASP.NET. This tutorial will provide a hands-on introduction to building RESTful APIs with .NET Core 7 and the Minimal API approach.

Prerequisites
Before we start, we must ensure that we have completed several prerequisites. To follow along and run this tutorial, you will need the following:
- A working .NET Core installation
- An IDE or text editor of your choice
- Postman to test our endpoint
Creating the Initial Project
We’ll be using the .NET cli tool to create our initial project. The .NET command line interface provides the ability to develop, build, run, and publish .NET applications.
The .NET cli new command provides many templates to create your project. You can also add the search command to find community-developed templates from NuGet or use dotnet new list to see available templates provided by Microsoft.
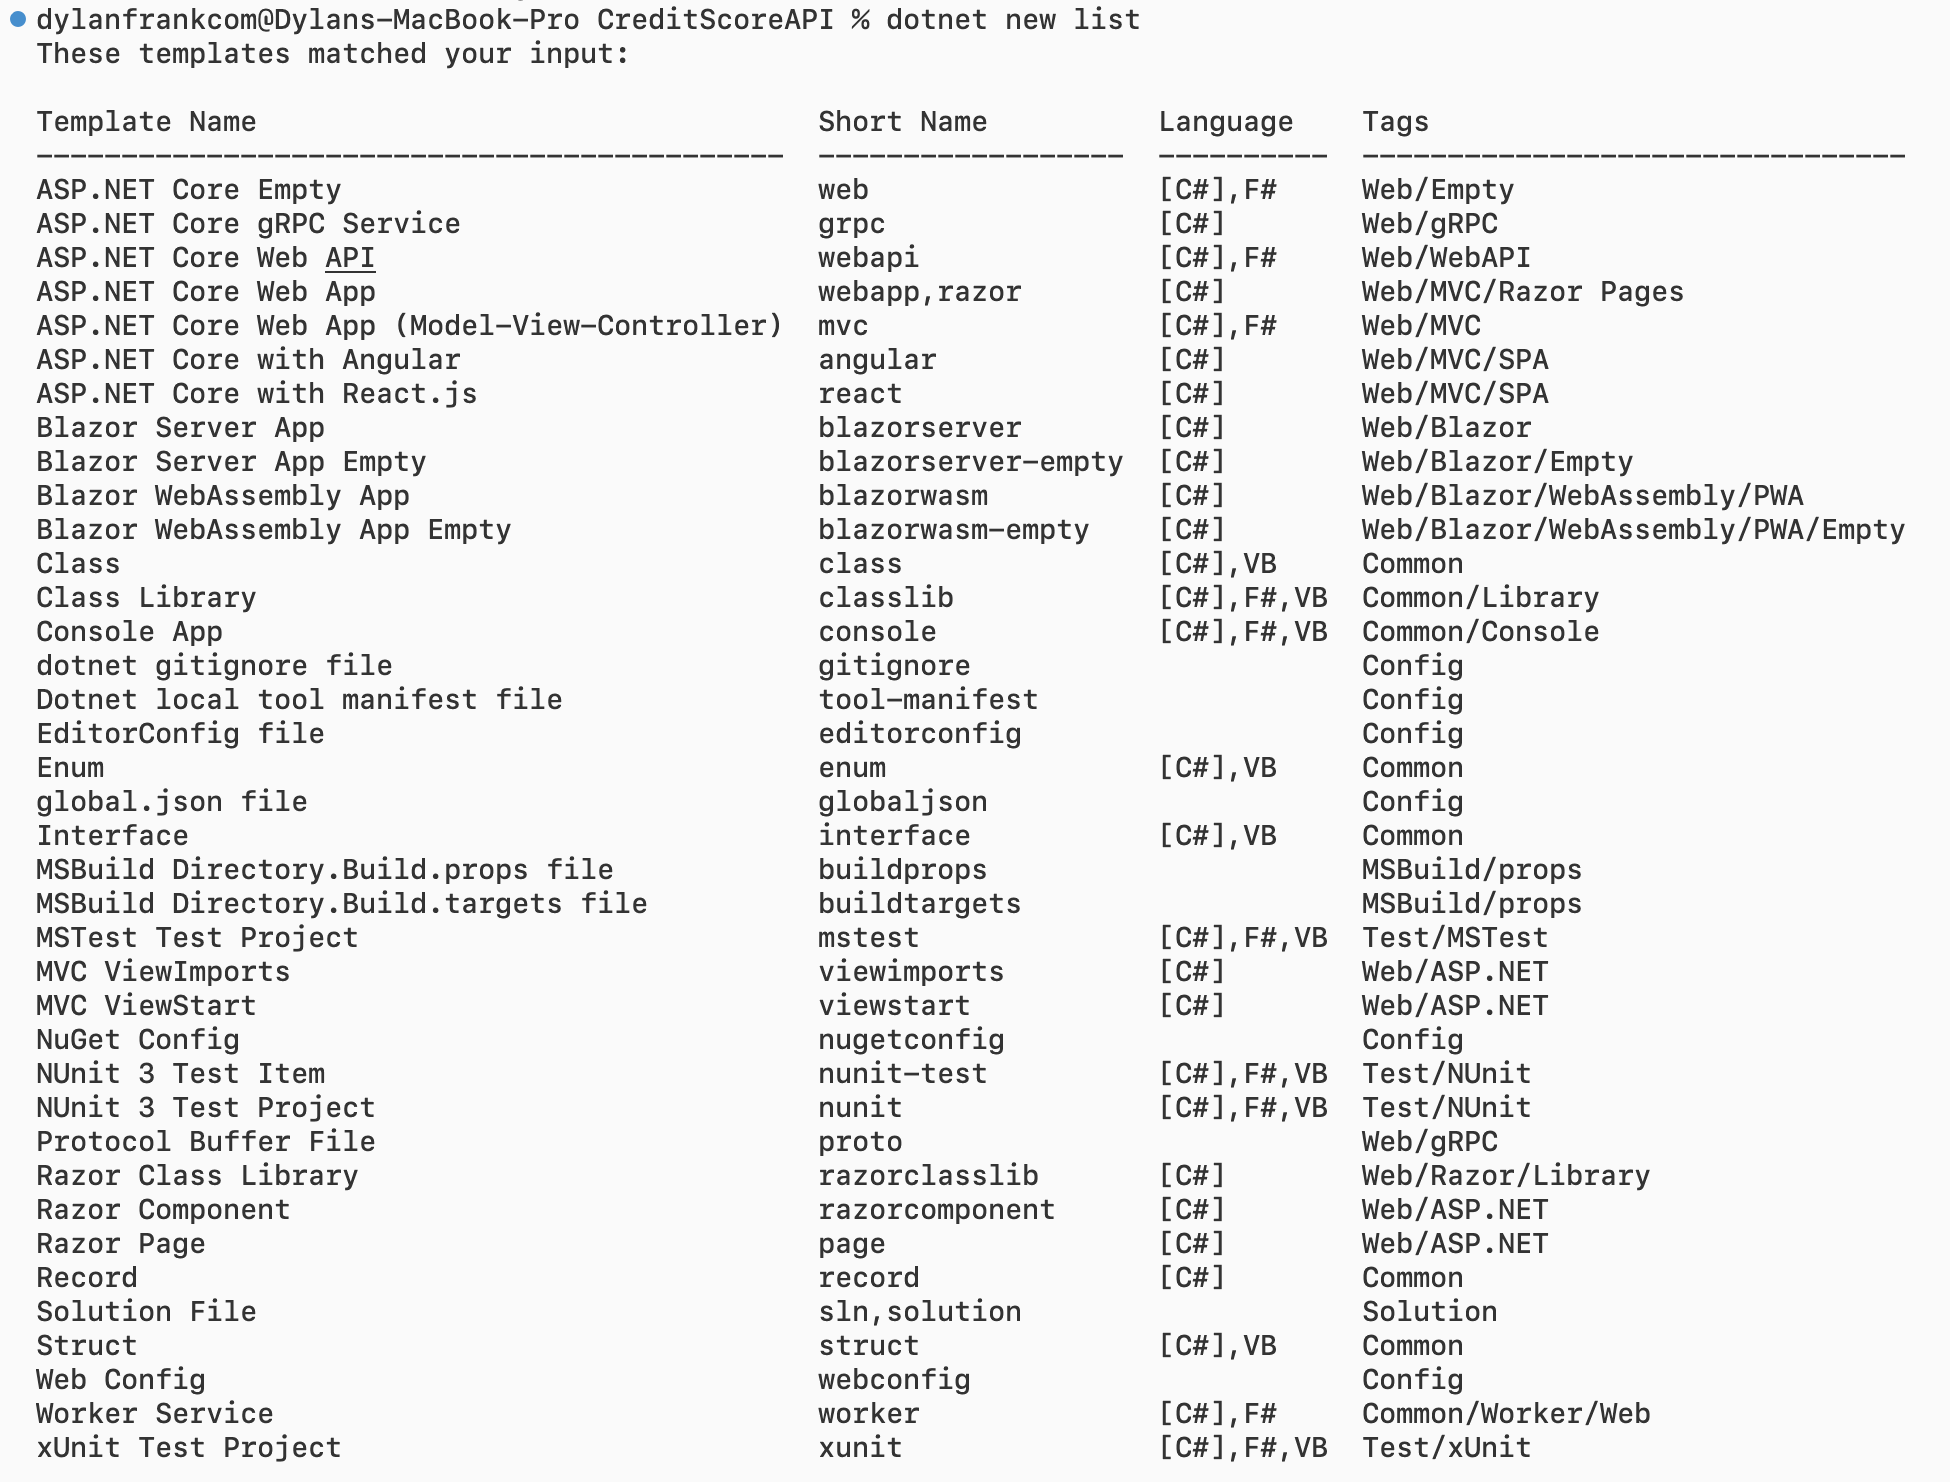
We’ll be creating a Minimal API and starting from as clean a slate as possible. We’ll be using the empty ASP.NET Core template. In the directory of your choosing; enter the following in the terminal:
dotnet new web
You’ll notice that the directory structure will look something like this:
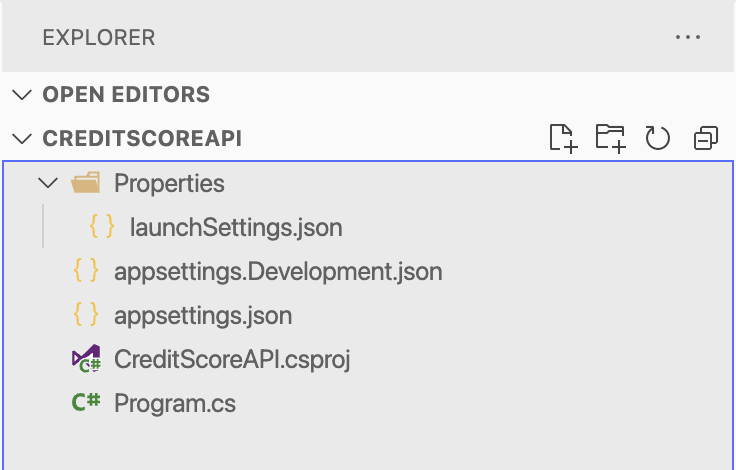
We’ll be doing all of our work in the Program.cs file. Its starting code should look similar to the following:
var builder = WebApplication.CreateBuilder(args);
var app = builder.Build();

app.MapGet("/", () => "Hello World!");

app.Run();
We can see how concise and readable our starter code is. Let’s break down the code provided by the template line by line:
- The
WebApplication.CreateBuilder(args)method creates a new instance of theWebApplicationBuilderclass, which is used to configure and build theWebApplicationinstance. The args parameter is an optional array of command-line arguments that can be passed to the application at runtime. - The
builder.Build()method is called to create a new instance of theWebApplicationclass, which represents the running application. This instance configures the application, defines routes, and handles requests. - The third line defines a route for the root path (“/”) of the application using the
app.MapGet()method. This means that when the root path is requested, the application will respond with the string “Hello World!”. - We start the application by calling the
app.Run()method.
Using the builder pattern, we can configure and customize the WebApplication instance. This allows us to define the application’s behavior, including middleware, routes, and other settings, in a structured and extensible way. For example, the WebApplication instance created by the builder can be thought of as the “entry point” of the application, which handles requests and generates responses.
Overall, this code block creates a simple Minimal API in .NET 7 that responds with a “Hello World!” message when the application’s root path is requested.
Next, we’ll customize our API to mimic retrieving a credit score rating.
Adding in the Code
In Program.cs, we will house our endpoints and business logic. We’ll define our creditscore endpoint to provide GET and POST operations. We’ll implement a list to store any credit score we would like. We’ll also define an endpoint to retrieve the list of saved credit scores. We’ll be utilizing a CreditScore record, a new reference type in C# 10 similar to structs. A record is a lightweight and immutable data object optimized for comparison and equality checking.
Populate Program.cs with the following code:
var builder = WebApplication.CreateBuilder(args);
var app = builder.Build();

var userAddedCreditScores = new List<CreditScore>();

app.MapGet("/creditscore", () =>
{
    var score = new CreditScore
    (
        Random.Shared.Next(300, 850)
    );
    return score;
});

app.MapPost("/creditscore", (CreditScore score) => {
    userAddedCreditScores.Add(score);
    return score;
});

app.MapGet("/userAddedCreditScores", () => userAddedCreditScores);

app.Run();

record CreditScore(int Score)
{
    public string? CreditRating
    {
        get => Score switch
        {
            >= 800 => "Excellent",
            >= 700 => "Good",
            >= 600 => "Fair",
            >= 500 => "Poor",
            _ => "Bad"
        };
    }
}
As mentioned, our code first creates a builder object for the web application and then uses it to build an application instance. It also defines a record type called CreditScore with a single property called Score and a read-only property called CreditRating. This may look a little strange as we define our record after using it. However, this is due to namespaces, and the record must be defined outside of the WebApplication namespace.
The application exposes multiple endpoints using app.MapGet() and app.MapPost() methods. The first endpoint, /creditscore is a GET method that generates a new random CreditScore object with a score between 300 and 850. We’ll define a POST method for the same endpoint that accepts a CreditScore object in the request body, adds it to a list called userAddedCreditScores, and returns the same CreditScore object to the caller. The other endpoint /userAddedCreditScores is a GET method that returns a list of all the CreditScore objects that have been added to userAddedCreditScores.
Finally, the application starts running using app.Run().
Running and Testing the API
With our code written, run the following command to compile and run our project:
dotnet run
The API is now operational and ready for testing. After running the previous command, you will see which port has been used to host your API in the console. You can define which port you would like to use by editing the Properties > launchSettings.json file or by adding editing the app.Run() command in Program.cs like so, replacing 3000 with your desired port number:
app.Run("http://localhost:3000");
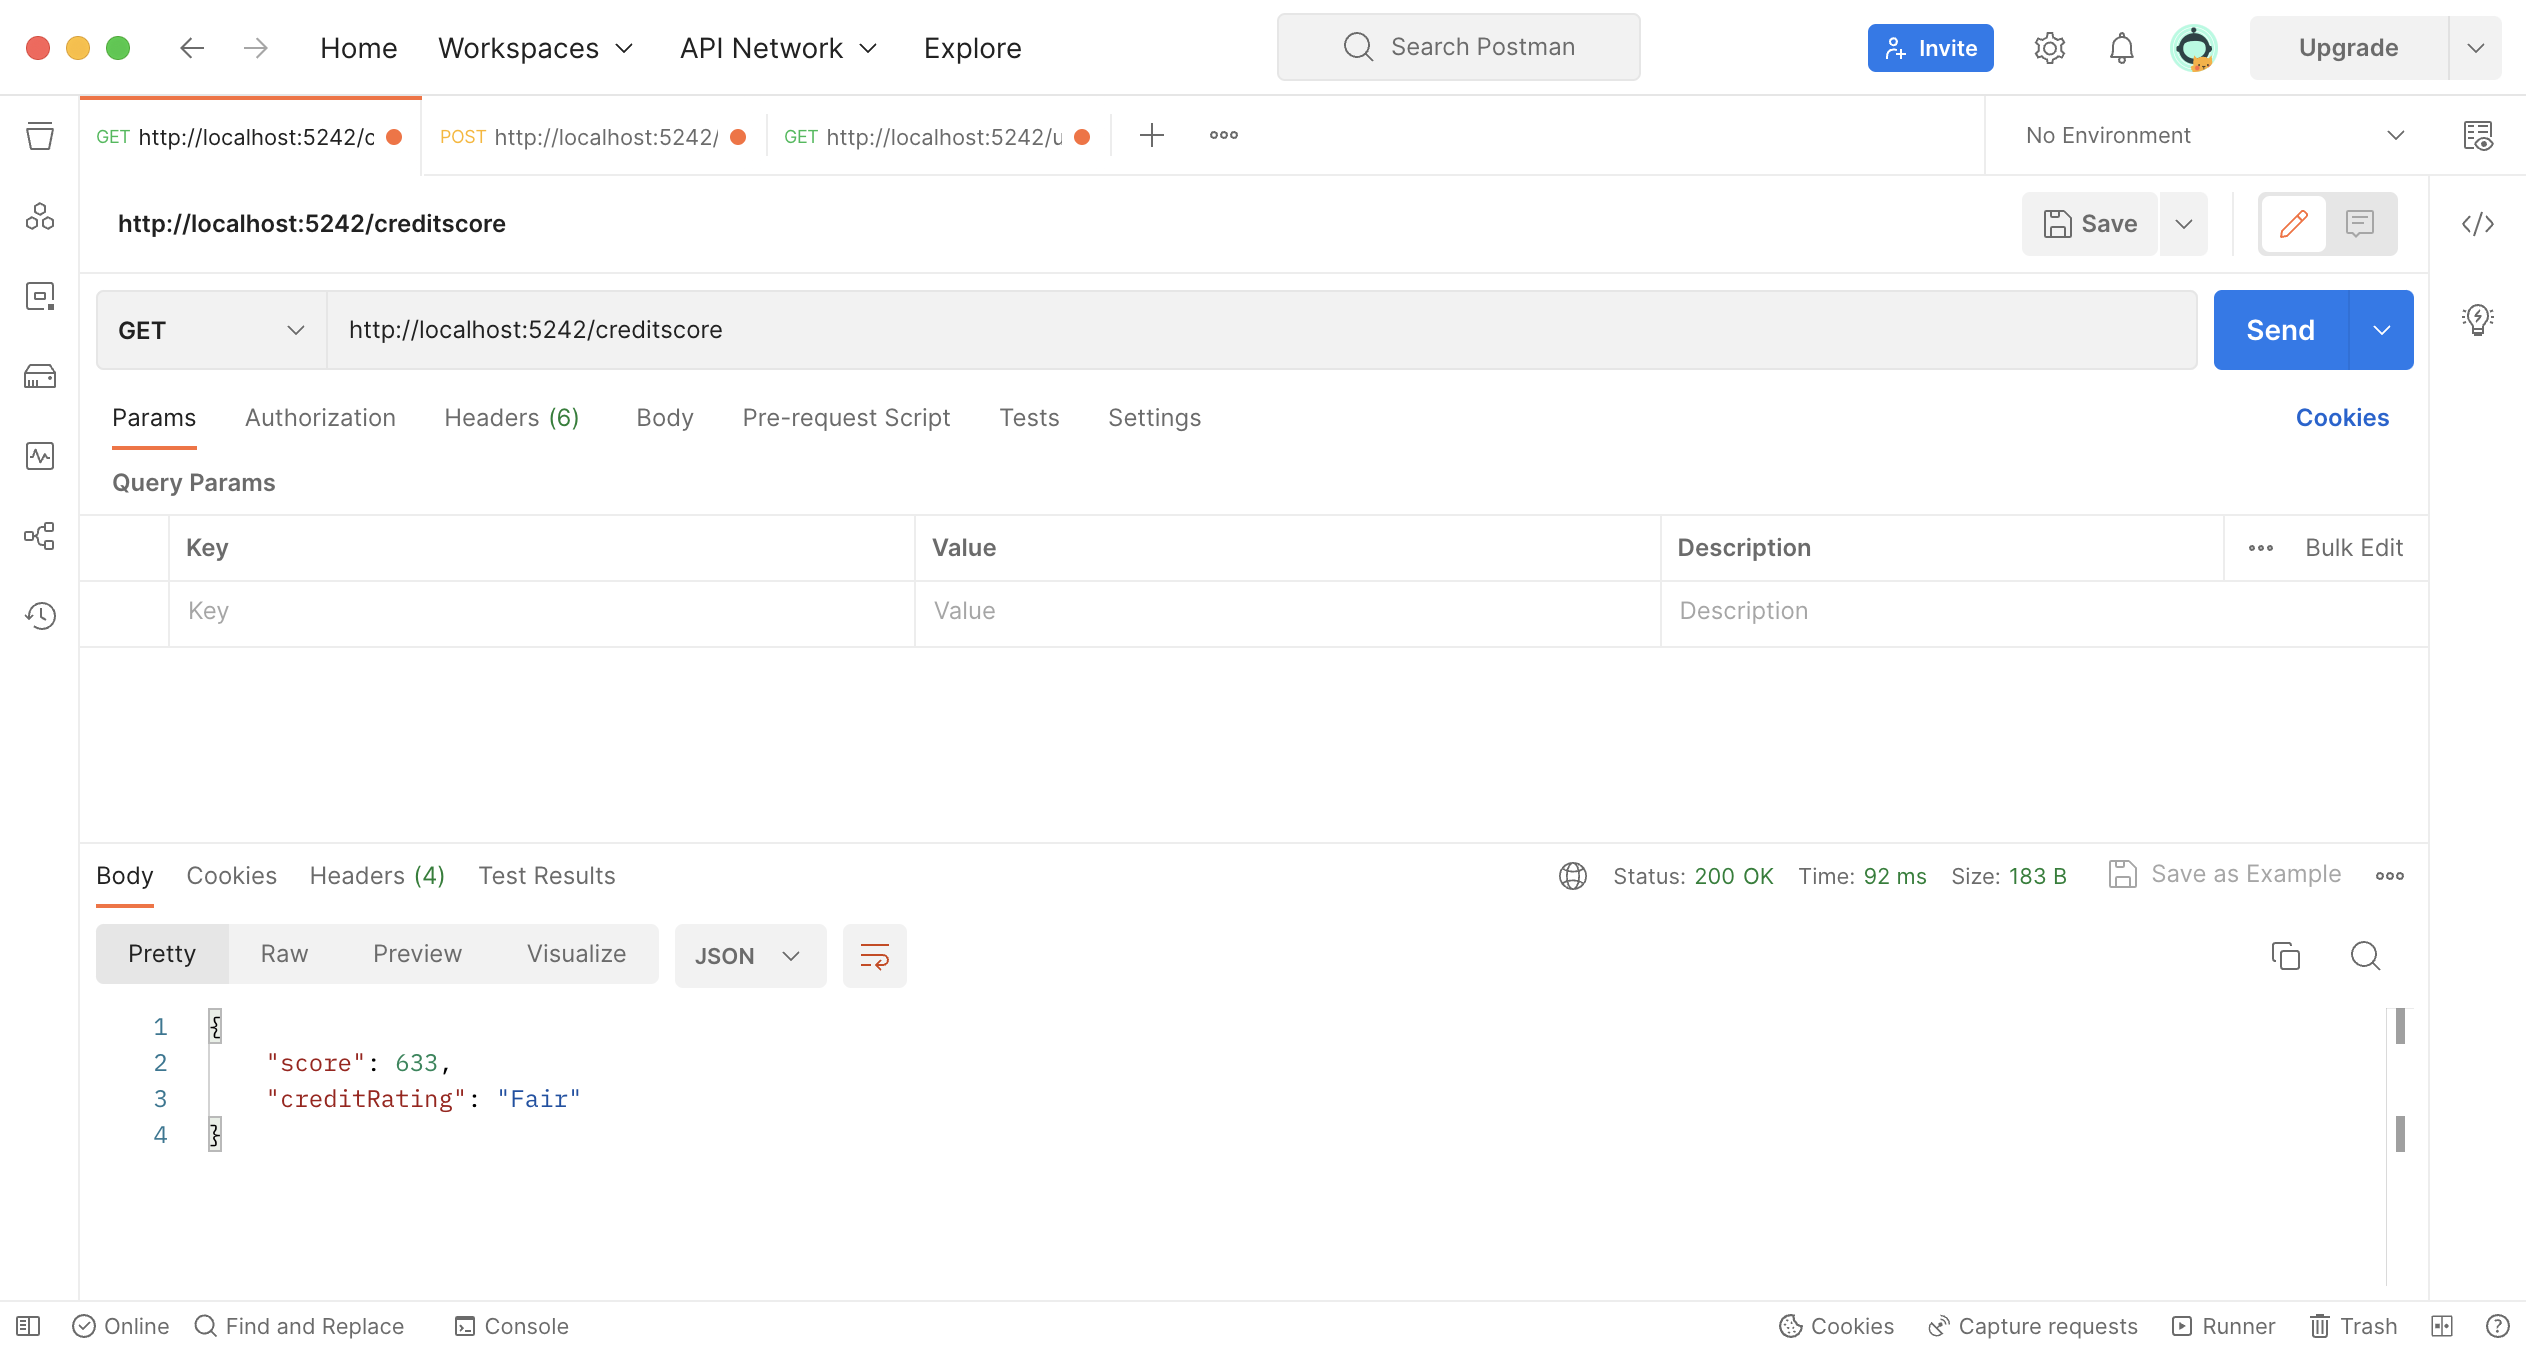
You can use a tool like Postman to send an HTTP request to the API. For me, the endpoint to get a credit score is localhost:5242/creditscore. When you send a request to this endpoint, you should receive a 200 OK status code, a credit score generated by the random number generator, and a credit rating.
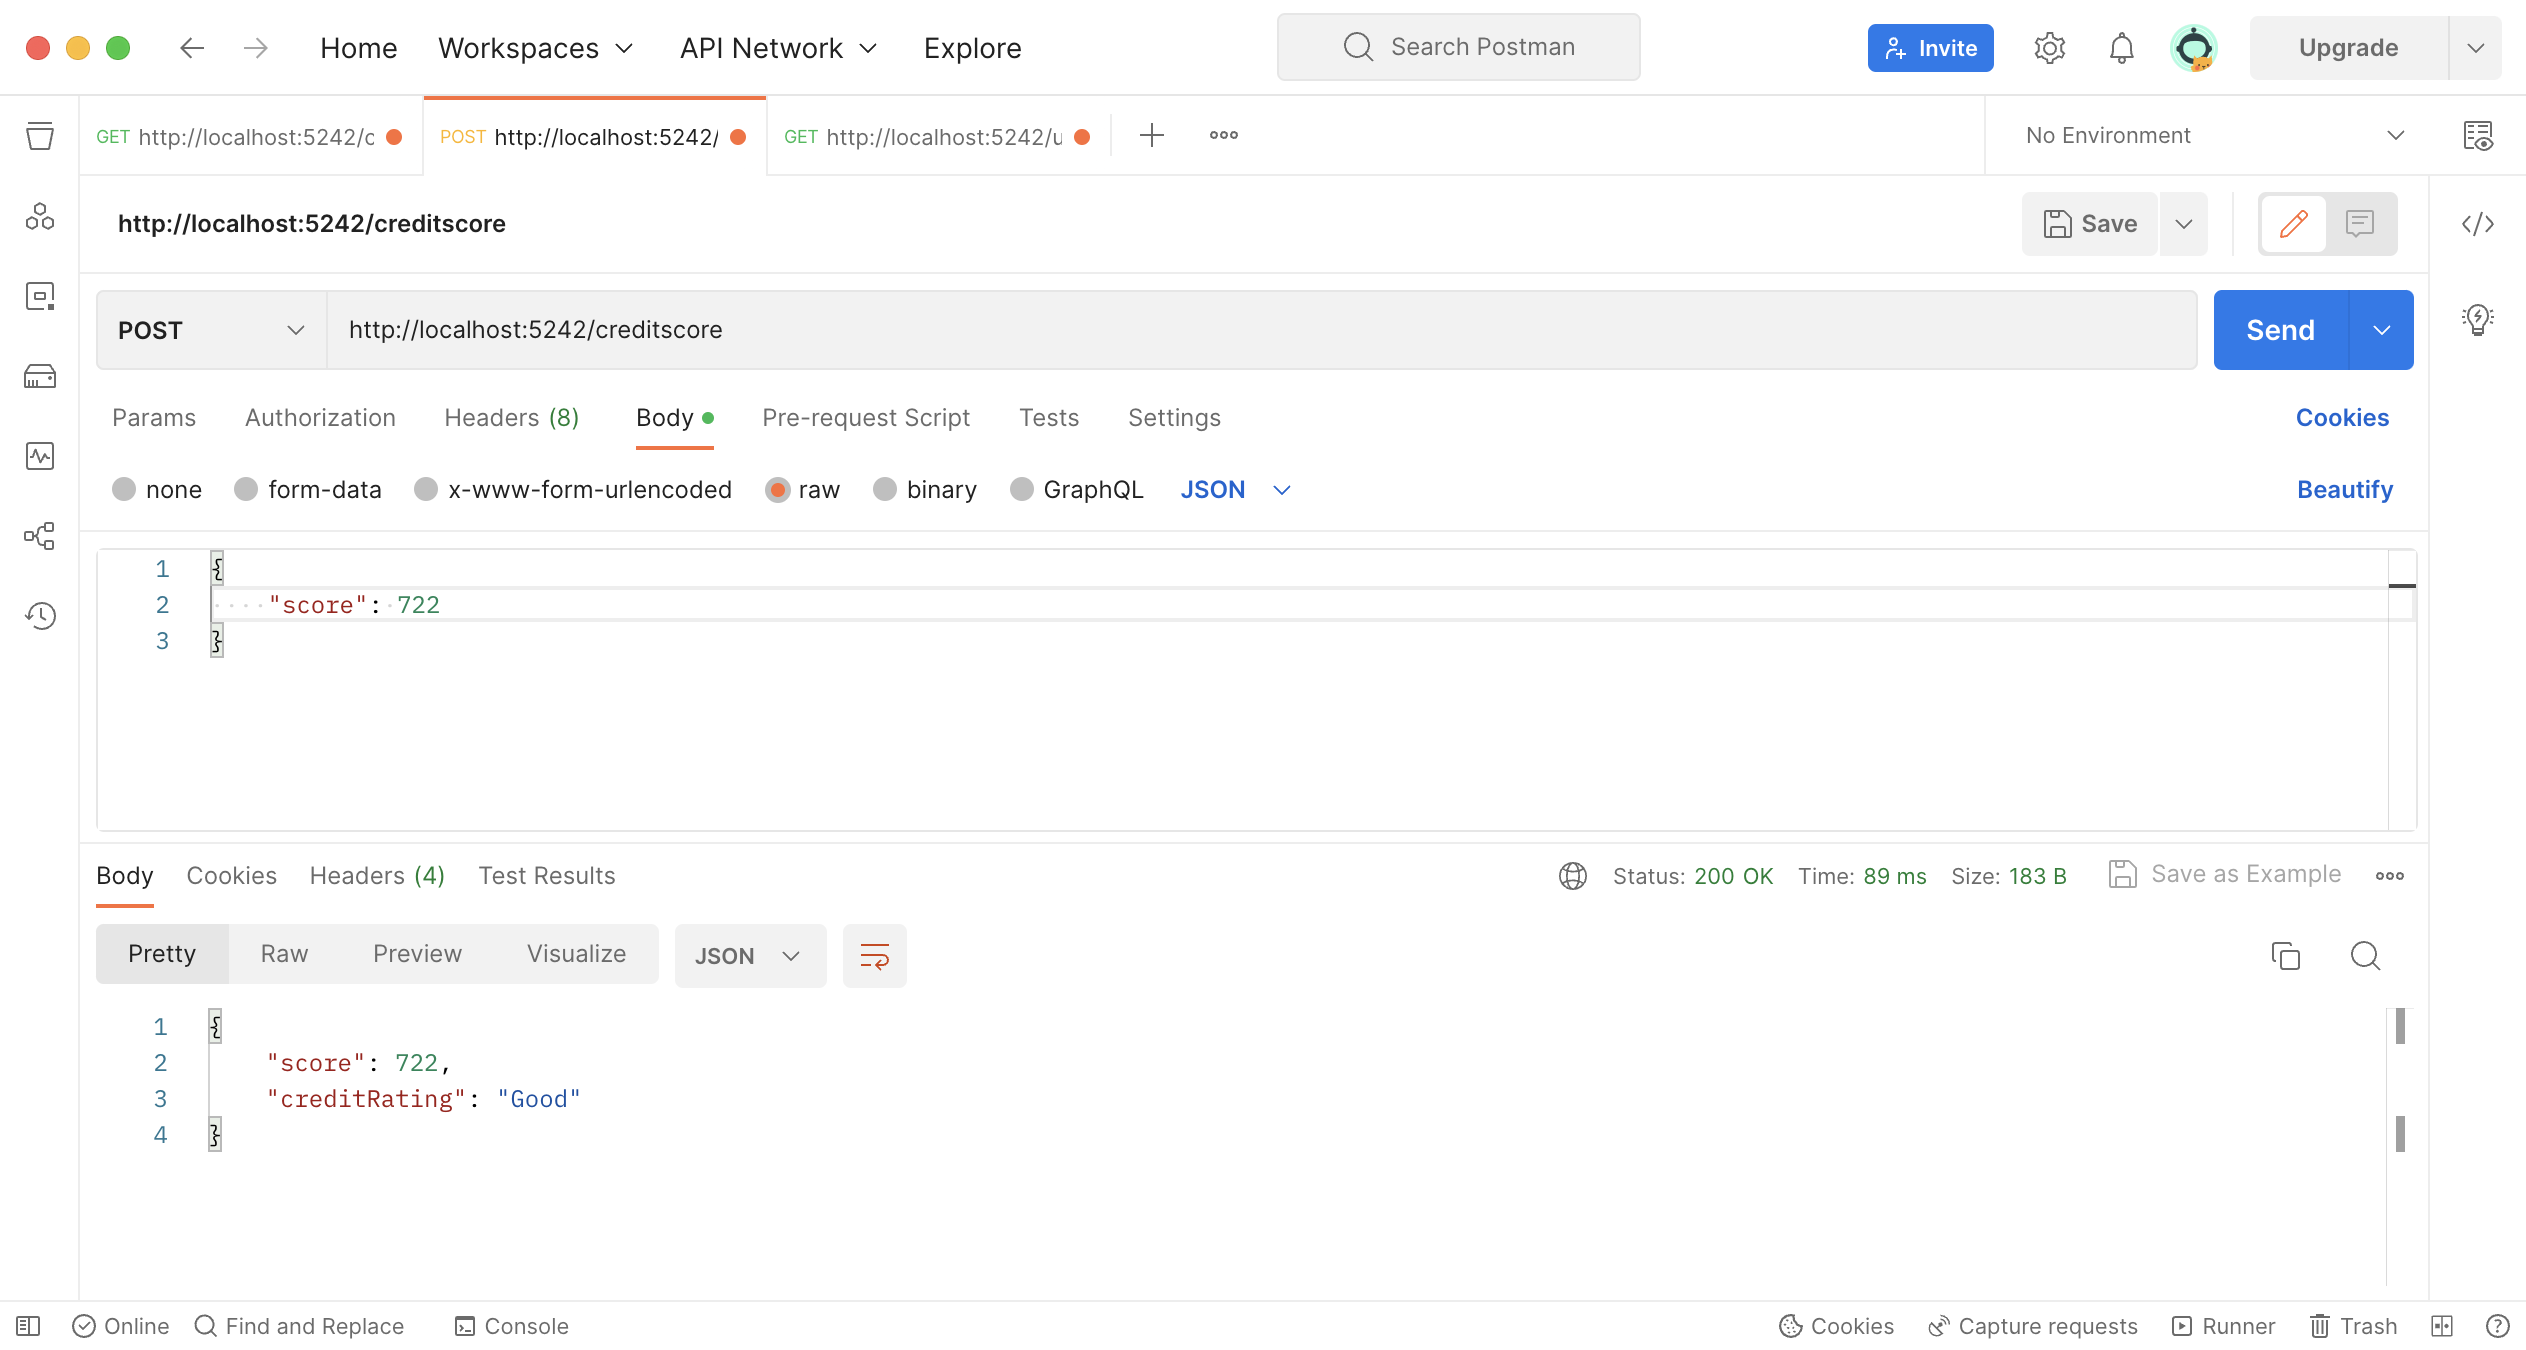
We can save a credit score by sending a POST request to the creditscore endpoint. We form the request’s body with a CreditScore object.
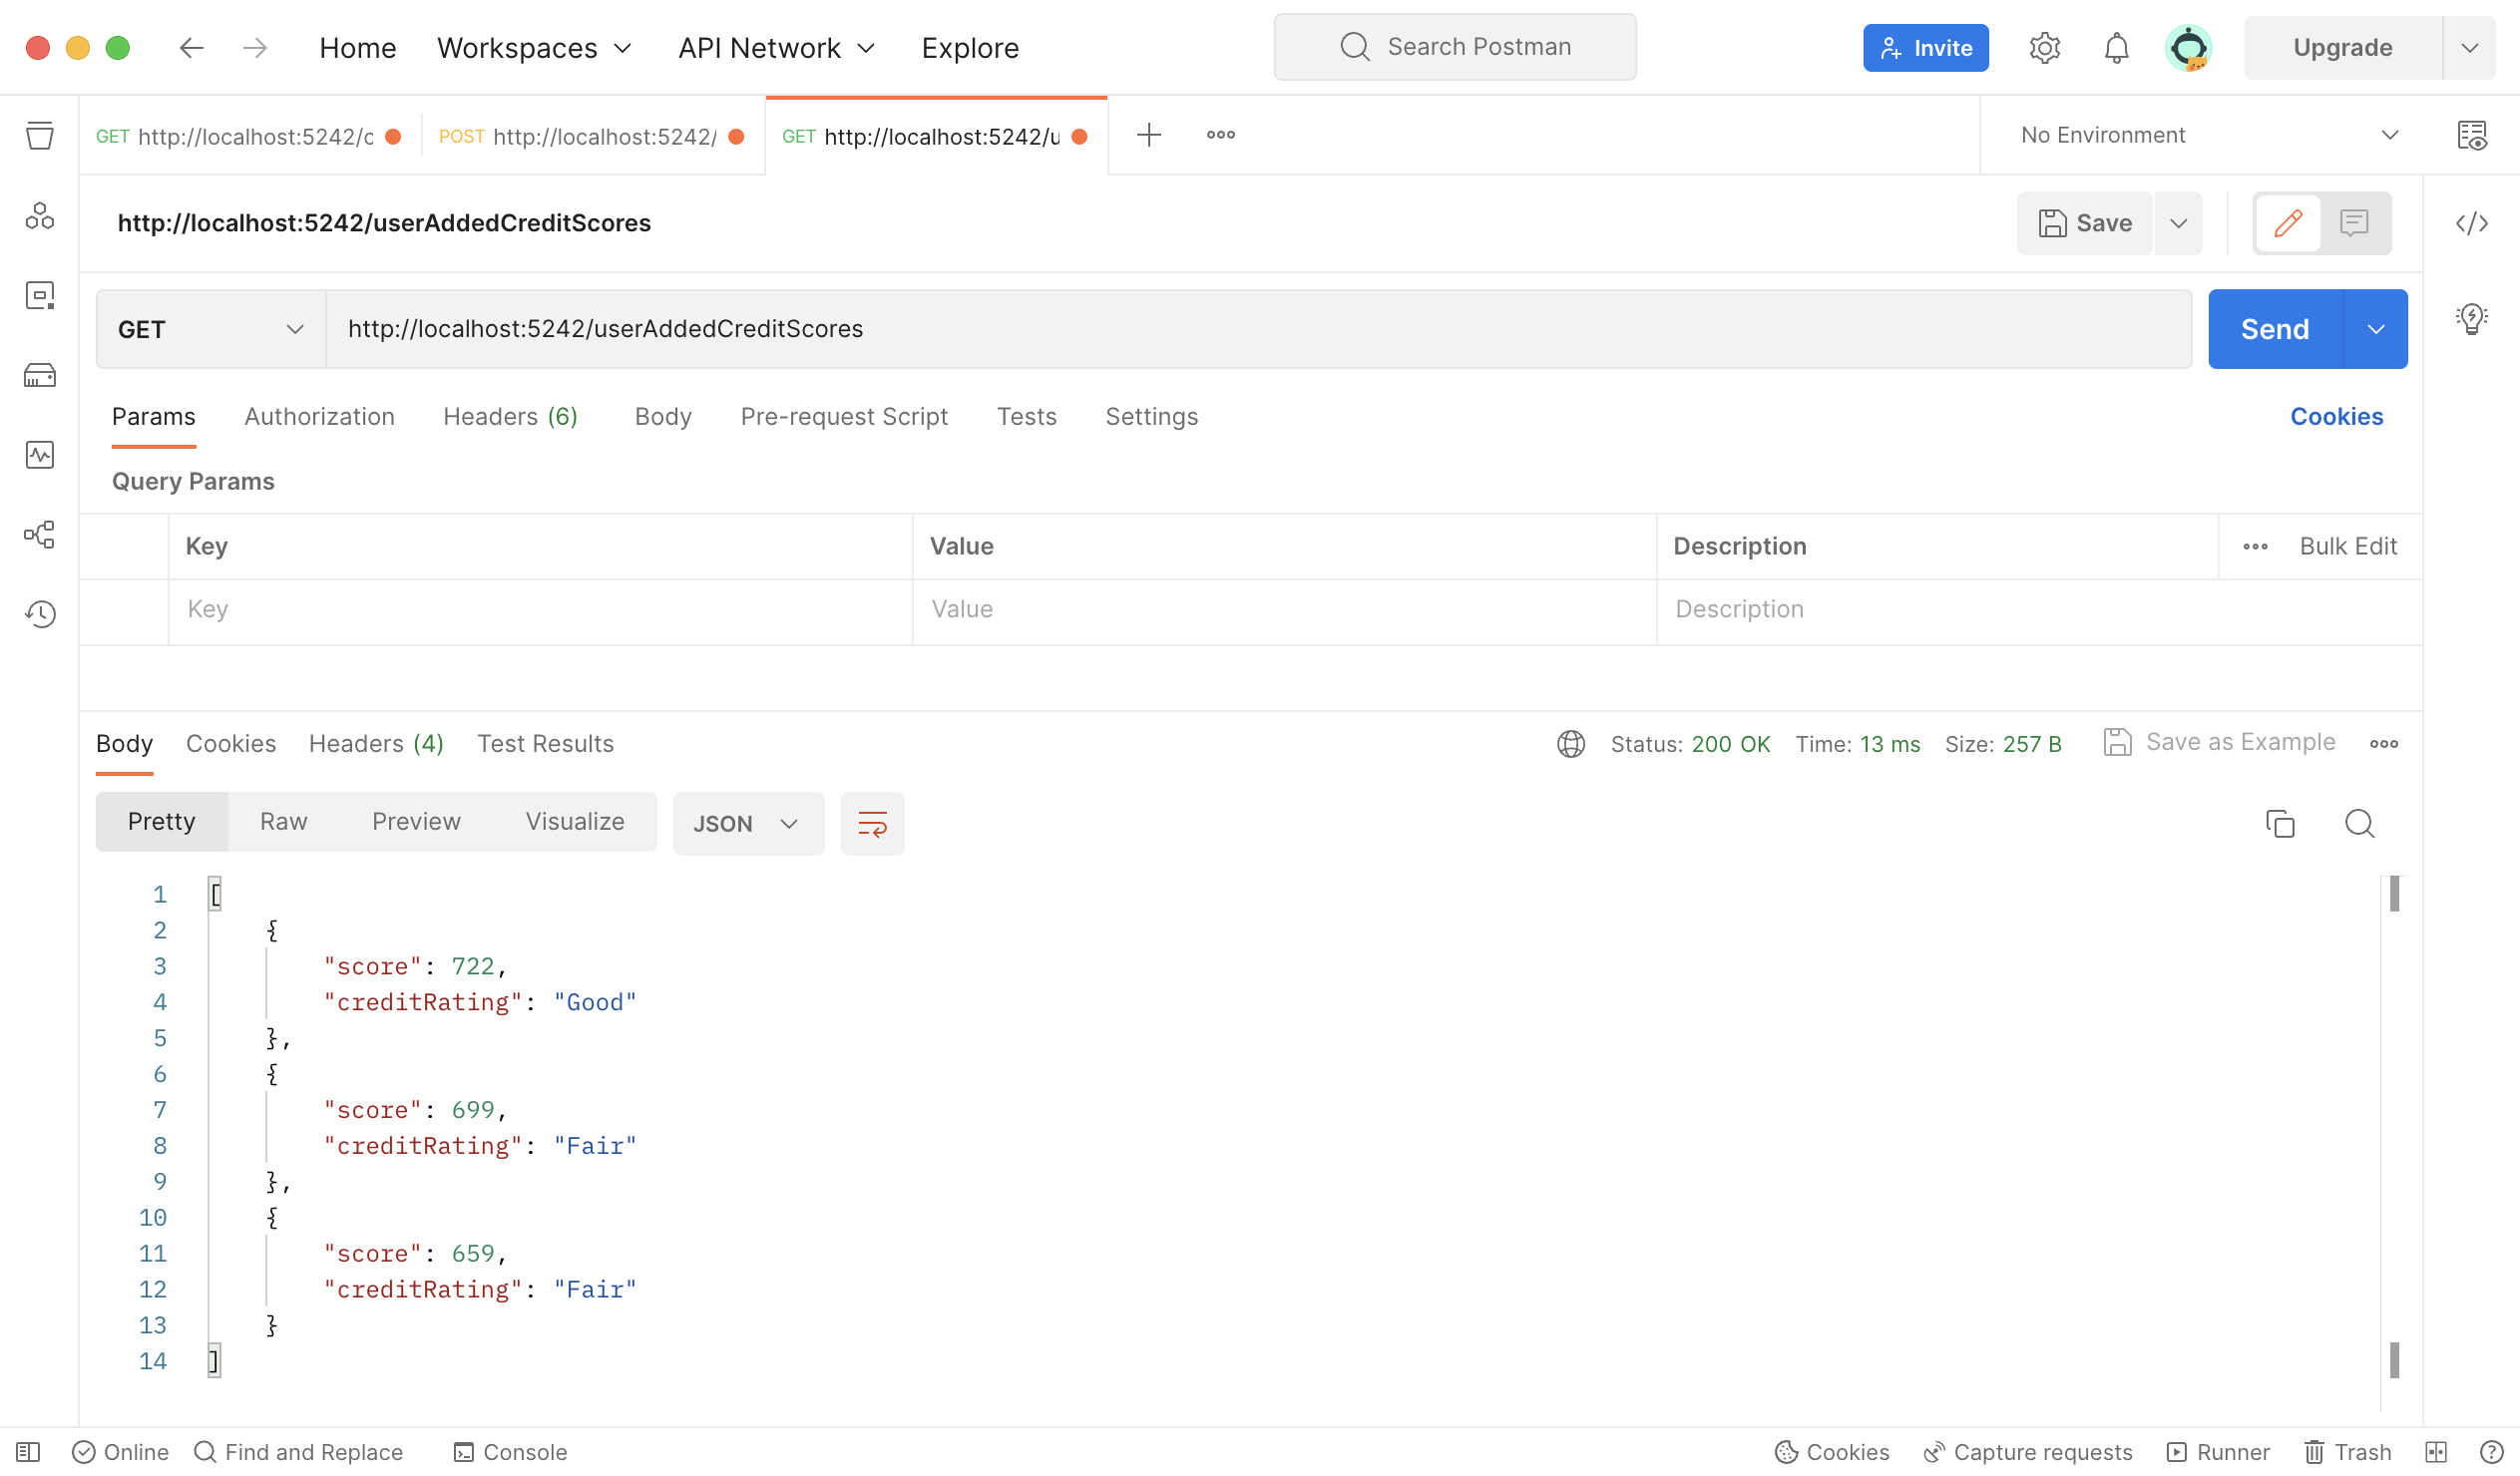
Finally, we can retrieve all added scores by sending a GET request to the /userAddedCreditScores endpoint.
Wrapping Up
In summary, we have developed a basic RESTful Minimal API using .NET Core 7 and ASP.NET. This code can be a foundation for creating more complex APIs for your application. As you continue to develop the API, you may want to consider implementing security measures such as an API key, integrating with an API gateway, monitoring the usage of the API, or generating revenue through API monetization. If you are interested in exploring options for API analytics and monetization check out Moesif.


Related Articles

API Strategy
Leveraging AI For a Better API Strategy
Learn how to leverage AI to build and fortify your API strategy. Improve design, governance, documentation, and align APIs with business outcomes.
API Strategy
The 5 Best Mixpanel Alternatives of 2025
Learn about the best Mixpanel alternatives to determine the right analytics solution for your use case.

API Development
How to Leverage Moesif Effectively for API Observability
Effectively leverage Moesif for API observability through best practices for integration, event enrichment, custom actions, and engineering workflow integrat...
API Strategy
How to Build an Internal Chargeback Model for Your API and AI Usage Using Moesif
Use Moesif to implement internal chargebacks and enable precise API and AI cost attribution for better transparency and resource optimization.