How to Set Up Pre-paid Credit-Based Billing With Stripe

In today’s subscription-driven economy, flexible billing options are crucial. While traditional post-paid models are widespread, pre-paid credit-based billing is gaining popularity. This approach empowers businesses to bill customers upfront for a set amount of usage, offering an alternative way for customers to pay for your service.
Stripe, one of the largest payment processing platforms, can implement pre-paid billing models even though the setup isn’t directly built into its core features. This blog will guide you through everything you need to implement pre-paid credit-based billing using Stripe. With a few simple steps, you can begin to use Stripe to implement pre-paid billing models and governance to make sure that when users run out of credits, they are no longer able to access the service. Let’s begin by quickly looking at what Stripe is.

What is Stripe?
Chances are that if you’re trying to monetize a product or have purchased something recently, you’ve heard of Stripe. The platform is a comprehensive suite of online payment processing tools and APIs, allowing businesses to monetize their products easily. At its core, Stripe offers a robust infrastructure that securely helps businesses accept and manage payments across various channels. For the more technical crowd, developers love Stripe for its ease of integration, well-structured and highly-respected documentation, and a wide range of features that include:
- Payment Gateways: Facilitating the secure processing of credit/debit card transactions directly on websites and within applications.
- Recurring Billing: Automating subscription-based payments at various intervals (weekly, monthly, annually, etc.).
- Fraud Prevention: Advanced tools and machine learning models to mitigate fraudulent activity.
- Developer-Friendly: Extensive libraries and SDKs for multiple programming languages, simplifying integration efforts.
While Stripe provides an excellent foundation for payment processing, setting up a pre-paid credit-based billing system requires additional steps. Getting pre-paid credit-based billing up and running involves integrations with other tools to track usage and manage customer balances. Even though this may sound complicated, it can be done relatively quickly using Moesif and Stripe.
What is Pre-Paid Credit-Based Billing?
In a pre-paid credit-based billing system, customers purchase a predetermined amount of usage in advance. These credits could represent anything from API calls, text messages sent, minutes of video streaming, or any quantifiable unit of consumption relevant to your business.
For instance, imagine an audio streaming platform where users can listen to audiobooks and pay by the minute. A user may pre-pay for 1000 minutes. As the user listens, these credits are “burned down” until they have no credits remaining. At that point, their service access will be cut off until they add more credits to their account, known as “topping up”.
For an even more straightforward example, we can go back to the days of pre-paid, pay-as-you-go phones. You bought a top-up card to add minutes to your account. When those minutes ran out, your service was disrupted, and you had to top up to gain access again. This is pre-paid credit-based billing in a nutshell.
To summarize the above concepts, a user’s pre-paid credit balance gradually decreases as the customer utilizes your service. Here’s how the process/functions break down:
- Loading Credits: Customers “top up” their account with a payment covering their desired usage level.
- Usage Tracking: The system meticulously monitors resource consumption, deducting credits accordingly.
- Access Control: Usage can be restricted or blocked once a customer’s credit balance is depleted.
- Invoicing and Reconciliation: While payment happens upfront, invoices detailing usage and the corresponding credit deductions are generated.
Pre-paid vs. Post-paid: Key differences
The fundamental distinction between pre-paid and post-paid billing is when payment occurs relative to service usage. Let’s take a look at how things compared between the two billing models:
Post-paid: This is the conventional billing method. Customers are charged after consuming a service, often at the end of a billing cycle (e.g., monthly). This model focuses on measuring usage first and billing later.
Pre-paid: Customers pay in advance, purchasing credits that are then consumed as they use the service. This shifts the focus to upfront payment and controlled service consumption based on available credit.
There are a few key differences between the two models. First, non-payment risk for pre-paid models is reduced since customers have already paid for their usage. Second, pre-paid offers make revenue predictability more straightforward since payment is received upfront. Lastly, usage control is more straightforward to enforce within a pre-paid model since service access can be tied directly to the availability of credits.
Does Stripe Support Pre-Paid Credits and Pre-Paid Plans?
While Stripe provides a robust foundation for various payment scenarios, it doesn’t offer out-of-the-box solutions for pre-paid credit-based billing. Stripe’s core strengths lie in managing recurring subscriptions and post-paid billing models, where charges are calculated after the customer uses the service. However, Stripe can easily handle pre-paid billing requirements with additional tools.
To get pre-paid billing working with Stripe, you’ll need additional mechanisms to address specific requirements for implementing a pre-paid credit system with Stripe. Firstly, you’ll need a way to track and manage customer credit balances, ensuring accurate decrements as usage occurs. Secondly, you’ll require a system for metering usage precisely, measuring things like API calls, data transfer, or any other quantifiable unit relevant to your product. Finally, you’ll need logic to control access to your service, potentially blocking usage when a customer’s credits are depleted. So, although Stripe does not support pre-paid billing out of the box, it doesn’t mean that it can’t be supported; it just requires additional tools and configuration.
When Should I Use Pre-Paid Credits?
The debate over whether to use pre-paid or post-paid billing models is always a great one. Some businesses offer one or the other, while others may allow you to use either option depending on what works best for you as a customer. That being said, pre-paid credit-based billing is a better option in several specific use cases. Let’s examine three key factors in why and when pre-paid billing models make sense.
Preventing Abuse
If your service is susceptible to abuse or potential overuse that could lead to unexpectedly high bills (e.g., an AI service with variable costs), pre-paid credits help you mitigate risk. Users are restricted by their purchased credits, minimizing the potential for overages.
Getting Paid Upfront
Pre-paid models ensure payment is received before the bulk of service usage occurs. This can be particularly advantageous for businesses with high upfront vendor costs related to service delivery (e.g., telecoms paying significant fees for SMS delivery).
Inconsistent Usage Patterns
Pre-paid credits offer flexibility if your product experiences unpredictable usage spikes (like sending large volumes of SMS messages in bursts). Users can pre-purchase a buffer of credits to accommodate fluctuations without committing to a rigid subscription tier that may be underutilized in low-usage periods.
Of course, there are many other advantages that may factor into your decision to implement a pre-paid option for customers. Choosing one approach over another is a balance of business risk, revenue needs, and many other factors specific to your use case.
How Pre-paid Credits Work In Stripe
While Stripe doesn’t have a single button or mechanism to activate “pre-paid billing,” its flexibility allows us to assemble a pre-paid system with Stripe as the payment processor and subscription management platform. Here’s a conceptual outline of the core elements involved in implementing pre-paid billing with Stripe.
Pay Upfront
Customers purchase credits in advance using Stripe’s standard payment processing features. This could be done through a custom portal where users can do a checkout to add credits to their account, an auto top-up process, or even having your team manually process payments through the Stripe UI. Somehow the user gets charged for their pre-paid usage, and Stripe will process that payment.
Burn Down
As customers use your service, you’ll have a separate system meticulously tracking usage events. This system calculates the corresponding cost of credits and decrements the customer’s balance accordingly. In the case of our example below, we will use Moesif to do this since it allows us to quickly set up these mechanisms through it’s direct integration with Stripe.
Monthly Invoice (with credit adjustments)
Stripe can still generate invoices at regular intervals (e.g., monthly). However, instead of charging the customer directly, the invoice will primarily reflect their usage for the period and the deduction of credits from their balance. For instance, if a user has pre-paid for $100 in credits and has had $40 worth of usage within the current billing period, the Stripe invoice will show a charge for $40 in usage and a corresponding $40 credit adjustment applied to the invoice. This will leave the customer with $60 in credits for any following billing periods.
It’s important to note that the success of this model hinges on integrating Stripe with a system that can reliably track and manage credit balances, like Moesif. Without such a system, pre-paid billing with Stripe from a credit-based perspective is not possible. To show you how this works in action, let’s look at how we can implement this with Moesif.
Setting Up Pre-paid Billing in Stripe and Moesif
To follow along with the example below, you will be required to have the following:
- An active Stripe account
- An active Moesif account
These two will allow you to implement all of the mechanisms mentioned below for pre-paid billing and credit management using Stripe.
Integrate Stripe With Moesif
First, we must integrate Stripe with Moesif. This can be done by adding your Stripe API key into Moesif and adding the Moesif-Stripe webhook into Stripe. This facilitates two-way communication between the two platforms, where usage can be sent over to Stripe from Moesif and data, such as subscription status updates, can be passed over to Moesif to keep both systems in sync.
To achieve this connectivity, check out the following step-by-step guide.
Creating Your Plans and Prices
- Go to Product Catalog:
- Log in to your account and navigate to the “Product Catalog” page.
- Click Create New:
- On the Plans page, locate the “Create New” button and click on it.
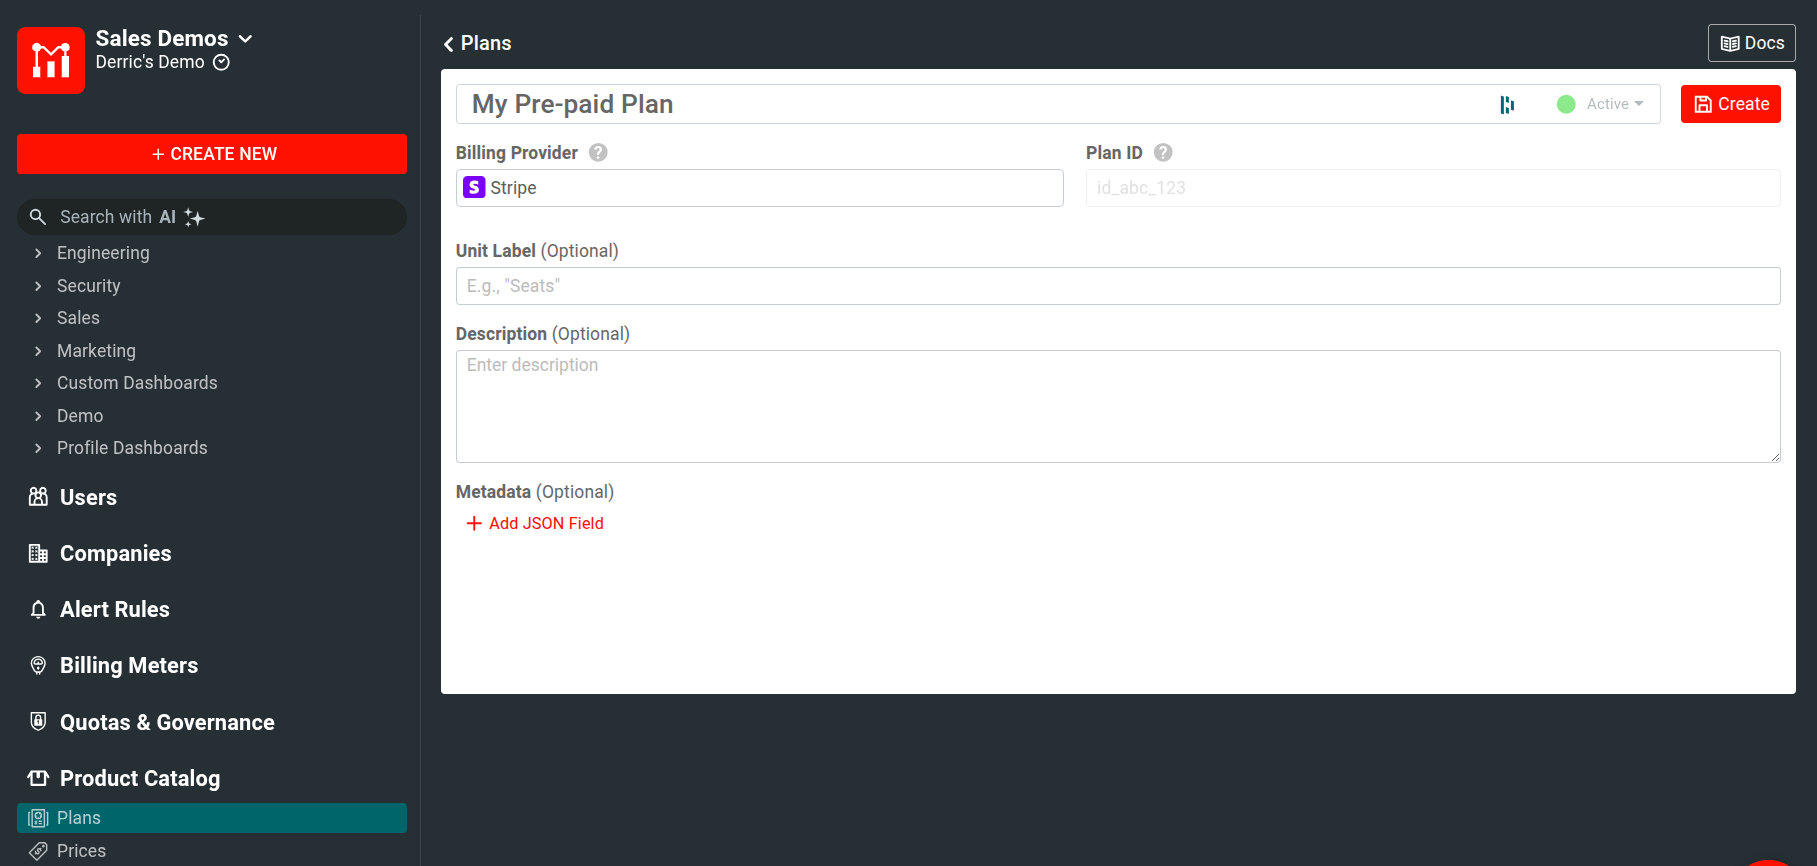
- Fill in details:
- Enter the required details for your plan, such as the plan name, billing provider, a unit label,description, and any additional metadata you would like to include..
- Click Create:
- Once you have filled in all the required details, review your entries for accuracy and click on the “Create” button to save the plan.
Next, you need to establish pricing for your plan. After successfully creating the plan, you can set a price either directly from the workflow modal by clicking on the “Create Price” button or by navigating to the Prices page. To get to this page, go to the left-side menu and select “Product Catalog,” then choose “Prices.” Here, you will find the option to click “Create New.”
On the “Create New Price” page, you’ll be asked to provide the specifics of the pricing structure. Make sure to link the price to the plan you just created by selecting it under the “Linked Plan” section.
For instance, let’s create a price setup where you charge $0.01 per unit. In this context, the unit will be each API call. This means every time an API call is made, a charge of one cent will be applied.
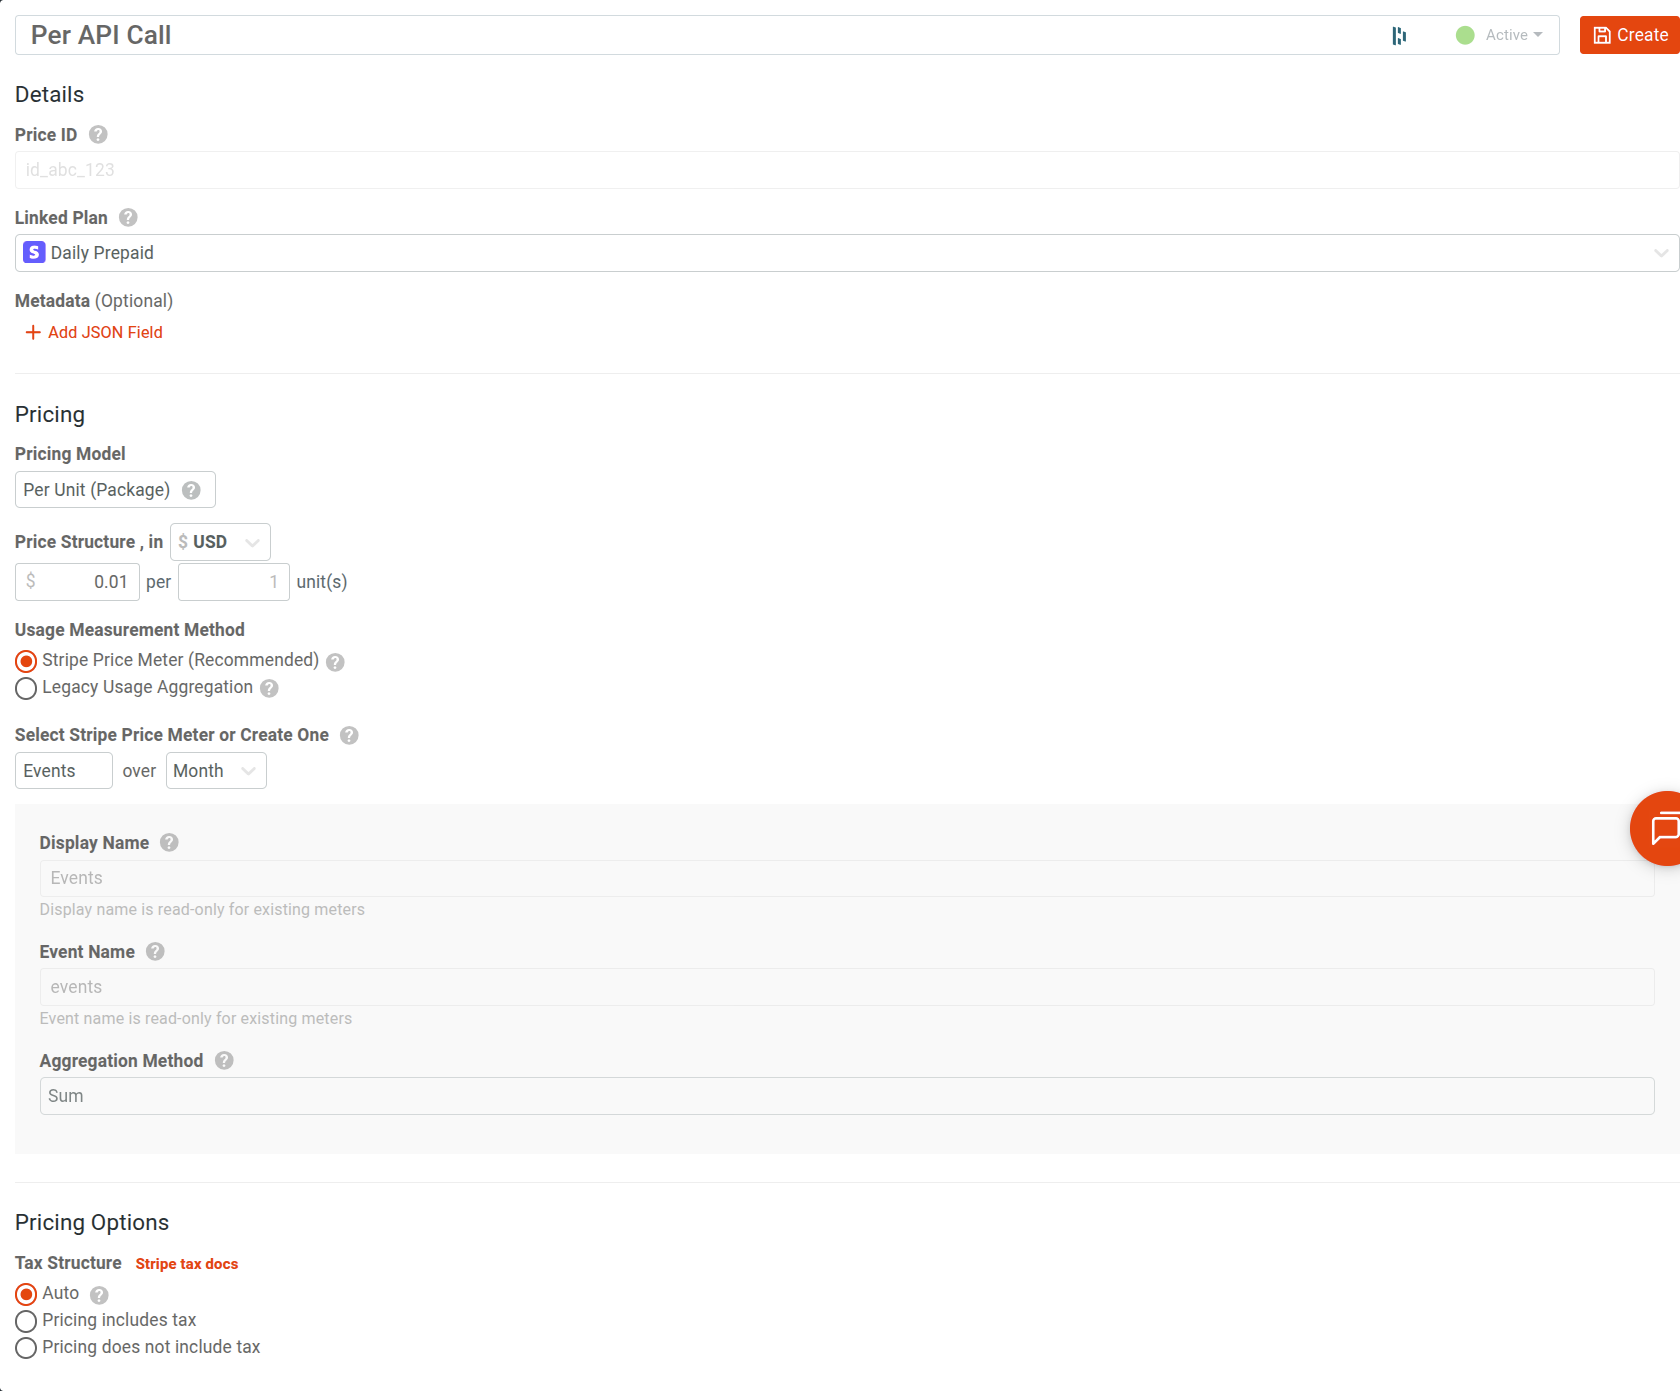
Once the price screen is dialed in as you need, click Create in the top right of the screen.
Create a Billing Meter
Next, we will create a Billing Meter that will meter API usage as it rolls into Moesif. This will add up the API calls that are being consumed and will report the usage to Stripe as well as burn down the pre-paid balance within Moesif.
To create the Billing Meter, you can click on the Create a Billing Meter item in the workflow modal shown after the price is created or go to the Billing Meters screen and click Add Billing Meter in the top right.
On the Add Billing Meter screen, we will do the following:
- Add a name for the meter in the Name field
- Under Billing Provider, we will select Stripe and choose the Plan and Price we just created.
- Under the Filter, we will dial which events we want to cover with this meter.
- Under Metrics, we will dial in how we want the usage to be metered. Per API call, per unique user, etc.
Here is an example of a Billing Meter that uses the created plan and price and filters on a specific route and status code. The metric in meters is Event Count, which means that each API call will count as an event and be charged at the $0.01 rate we put in our created price.

Once this is filled out as you’d like, click Create to create the meter and activate it.
Create a Governance Rule to Block Users Without Credits
Next, we will implement a Governance Rule that will block users from accessing the metered API when they run out of credits. To do this, we will click the New button in the top-left corner of the screen and in the modal that appears, select Gov Rule/Quota.
On the modal that appears, we will choose Start From Template -> Block Zero Prepaid Balance.
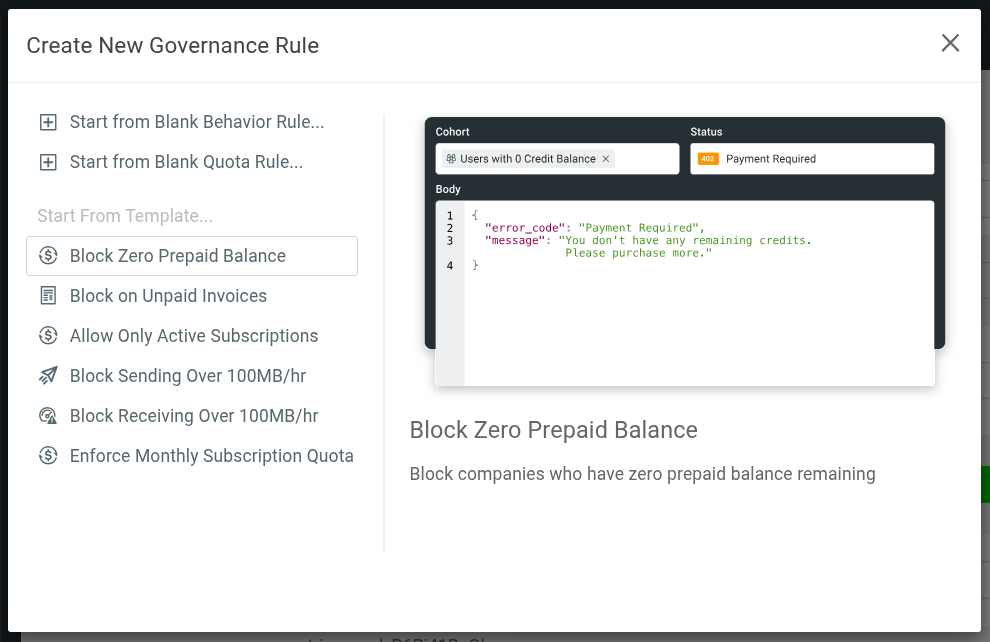
This will then create a new cohort called Subscriptions with zero prepaid balance. On the creation modal that appears, click Continue. This will create and activate the governance rule that will block users who have run out of credits.
Support for Governance Rules varies across Moesif’s SDKs and plugins. Before using a method, please verify that it supports governance rules.
Create a Payment In Stripe
Next, we will need to add some money into our Stripe account in order to be consumed when API calls are made. This can be done by:
- Logging into Stripe and going to the Customers screen
- Select the customer you’d like to add the top-up to
- Click Create Payment in the top left of the screen
- On the Create a new payment modal, select USD as your currency, add in the amount, and choose the Payment method.
- Click Create Payment
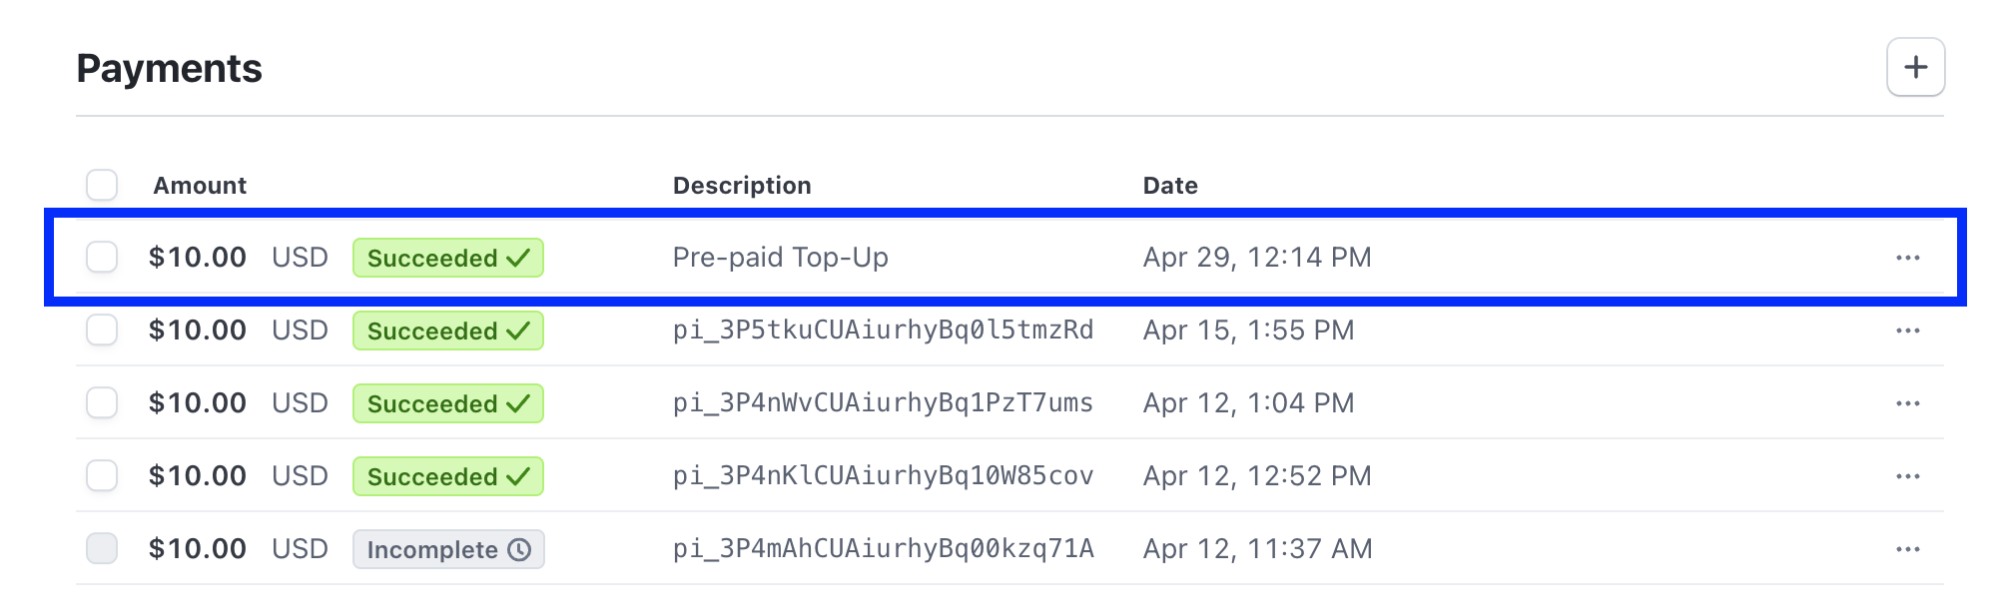
Once complete, the payment will be processed and the amount will be added to the customers account in Stripe. If the payment has successfully been completed, you should see the entry under Payments on the customer’s profile.
Add a Credit to Moesif
Once the amount is added in Stripe, we can then create the corresponding entry in the Moesif ledger so that Moesif can control access to the API in real-time.
To add the amount to Moesif, you will need to go to the customer’s Company profile. This can be done by going to the Companies page in Moesif and finding the company in the Lookup screen. Once found, click on the customer’s Company ID.
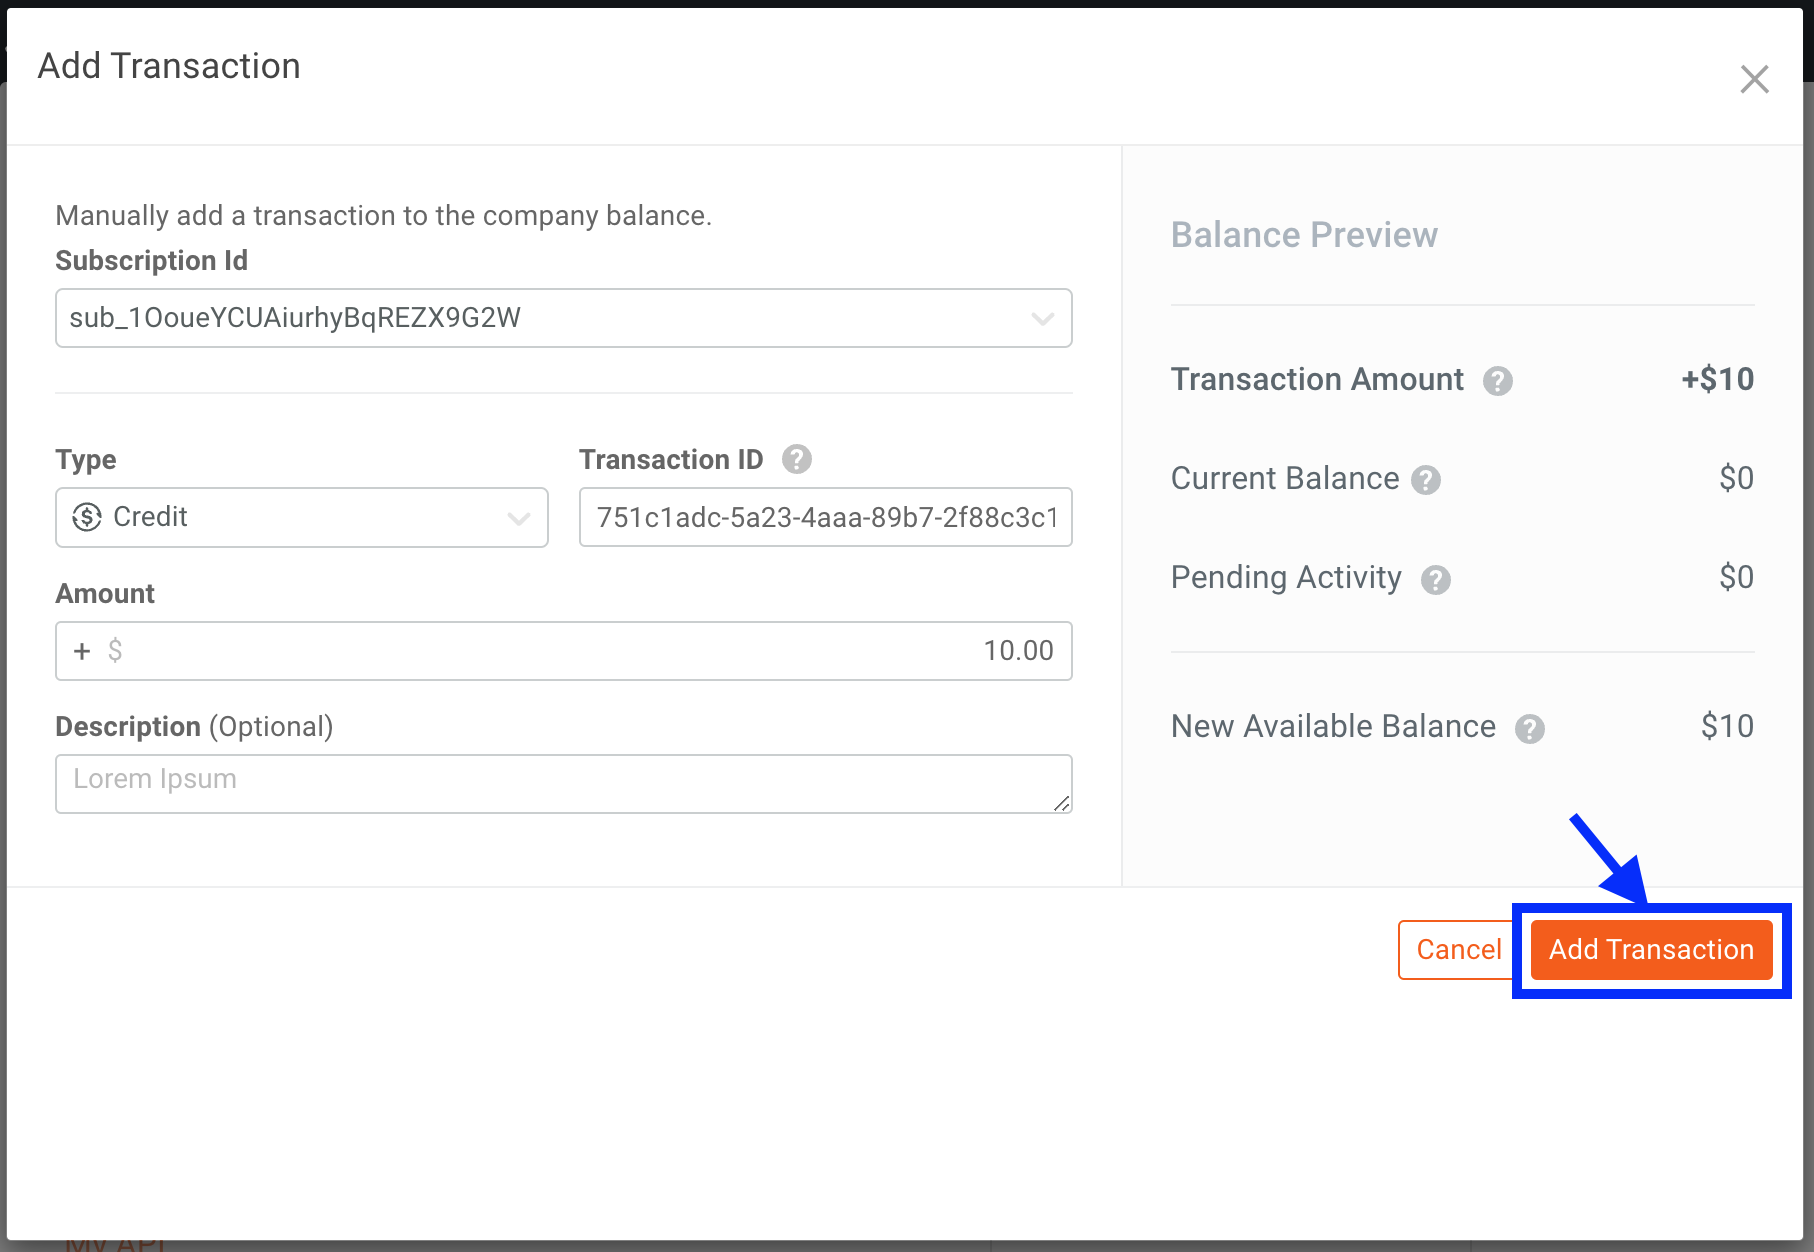
To add the credits to Moesif, do the following:
- On the Company Profile screen, click on the pencil icon beside Current Balance.
- In the modal that appears, make sure the Type is set to Credit and then add “$10.00” into the Amount field.
- If you have multiple subscriptions for the customer, make sure that the Subscription Id field value matches the subscription you want to apply the credits towards.
- Once the form is completed, click Add Transaction.
Within a few minutes, you should see the balance added to the company’s account.
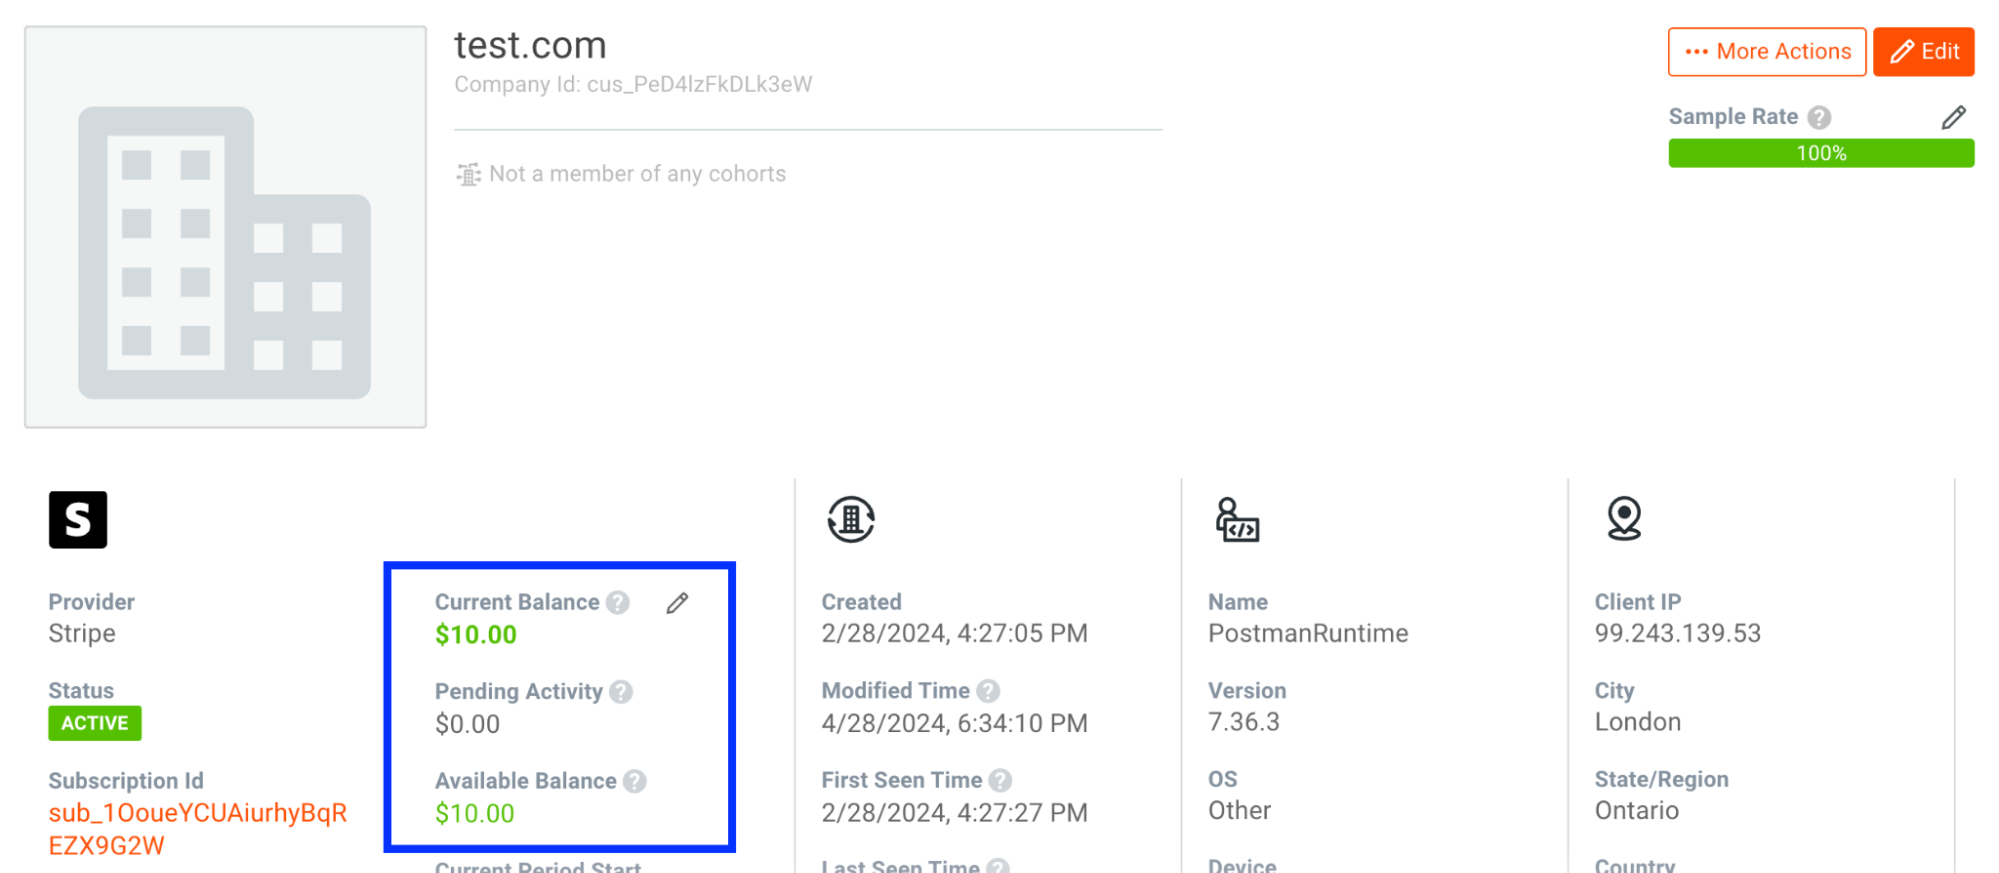
Now, metered API calls immediately deduct from our pre-paid balance within Moesif and are periodically synced to Stripe. Access is automatically restricted through Governance rules for users without a balance.
Conclusion
This guide offered a comprehensive overview of how we’ve set up pre-paid billing with Stripe using Moesif. It included instructions on integrating Stripe with Moesif, creating plans and prices, establishing a billing meter, and implementing a governance rule to restrict access for users without credits. We’ve supplemented the guide with detailed steps and examples to facilitate the setup process, making it an ideal resource for businesses looking to implement a pre-paid billing model with Stripe.


Related Articles

API Strategy
Leveraging AI For a Better API Strategy
Learn how to leverage AI to build and fortify your API strategy. Improve design, governance, documentation, and align APIs with business outcomes.
API Strategy
The 5 Best Mixpanel Alternatives of 2025
Learn about the best Mixpanel alternatives to determine the right analytics solution for your use case.

API Development
How to Leverage Moesif Effectively for API Observability
Effectively leverage Moesif for API observability through best practices for integration, event enrichment, custom actions, and engineering workflow integrat...
API Strategy
How to Build an Internal Chargeback Model for Your API and AI Usage Using Moesif
Use Moesif to implement internal chargebacks and enable precise API and AI cost attribution for better transparency and resource optimization.