How to Track Number of API Calls Made by Each Partner or Customer’s API Key

If you’re a B2B company, there is a high probability you want to expose some of your internal APIs to teams outside your organization. These could be customers paying for your API, or partners of yours. Either way, when that API is exposed, it’s critical to track how many API calls each partner or customer is making. By doing so, you can discover if one customer is consuming the majority of your API resources or if your API is not seeing much adoption. Tools like Moesif make this kind of visibility straightforward by providing user-level analytics and detailed breakdowns of API usage across tenants. With Moesif, teams can monitor API consumption by customer, identify usage patterns, and even set up automated workflows for quota enforcement or anomaly detection—all without building custom tracking infrastructure.
Understanding API Monitoring
API monitoring is the process of tracking and analyzing the performance, functionality, and reliability of your APIs. It involves keeping a close eye on API calls, requests, and responses to ensure they are functioning correctly and efficiently. A well-structured API log includes essential details such as timestamps, HTTP methods, endpoints accessed, request and response details, client information, latency, and more. By leveraging an API monitoring tool, you can gain real-time insights into your API’s performance and reliability, allowing for quick troubleshooting and data-driven decision-making. This proactive approach helps in maintaining optimal application performance monitoring and ensuring that your APIs meet the expected standards.
Why Track API Calls?
Tracking API calls is crucial for the growth and success of your API. By monitoring API calls, developers can identify performance issues, detect errors, and optimize API performance. This process also helps in understanding customer behavior, identifying trends, and making data-driven decisions. Tracking API calls enables developers to improve customer satisfaction by ensuring that APIs are reliable and efficient. Additionally, it helps in reducing downtime and increasing revenue by providing insights into how customers interact with your API. Understanding these interactions can lead to better customer relationship management and more effective customer analytics.

Handling expiring API keys
Tracking number of API calls per partner can be done through two mechanism depending on how your API keys are issued. If your API keys are permanent tokens that never expire and each customer can have at most one token, then tracking becomes relatively simple, every time you see an API call for a specific token, you can increment a counter in memory. These counters can be persisted to disc via a fast key value store like Redis. The counters can reset every month on the 1st of the month.
However this scheme can have issues for the following cases:
-
Your API tokens expire after a short duration such as hours or minutes
-
Your customer can create multiple API keys such as if you enable changing the scope of the token
If so, your tracking becomes more complicated. The best way to handle this is via an alias table
Session alias table
A session alias table will keep track of all outstanding tokens a customer has created and map those to a single user_id. When tracking API requests, it is also important to log the status code of each response to understand the outcome of the requests. You can keep an alias table in Redis where the key is the API key and the value is user_id. This way, when your API server receives a new API request, it can lookup the user_id via the API key.
Step 1. Capturing API API data
You will need to create middleware for your API framework that can capture and process API requests as they come in and call your service. If you’re looking for a managed service, Moesif already has prebuilt middleware for many popular frameworks such as the Moesif Express SDK Otherwise, if you’re trying to roll your own analytics service, the middleware source code are available on GitHub. The middleware should meet certain requirements:
-
Event processing is done asynchronous and out-of-band from core business logic
-
Sensitive data is be scrubbed before being sent to downstream analytics service
An example with Node.js
Let’s walk through an example creating an API built on Node.js and adding middleware to
track the number of requests for each partner. First, let’s create an app.ks and
import the Express framework. We’ll set up a single endpoint /api that
returns some basic JSON.
Because, APIs generally require authentication via some type of API key or token,
let’s add the express-jwt library.
const express = require('express');
const jwt = require('express-jwt');
const app = express();

// Add JSON Web Token Library for authentication
const jwtMiddleware = jwt({
  secret: Buffer.from('12345'),
});

app.use(jwtMiddleware);
app.get('/api', (req, res) => {
    res.json({
      my_object: {
        my_message: 'Hello World!'
      }
    }));
});

app.listen(8080, () => console.log('API listening on port 8080!'));
Add the logging middleware
Next let’s create a simple middleware that can capture specific information around who is calling the API
const moesifExpress = require('moesif-express');

const moesifOptions = {

  applicationId: process.env.MOESIF_APPLICATION_ID, // You should set your APPLICATION_ID as an environment variable

  identifyUser: function (req, res) {
    // The subject of the JWT (i.e. the user_id) is automatically saved to req.user via JWT middleware
    if (req.user) {
      return req.user.id;
    }
    return undefined;
  },

  identifyCompany: function (req, res) {
    // Our company id is in the form of the URL via GET /accounts/1234/items
    const extracted = req.path.match(/accounts\/\d+[\/-]/);
    const companyId = extracted && extracted[0];
    return companyId;
  },

  getSessionToken: function (req, res) {
    return req.headers['Authorization'];
  }
};
Once we set up our options for fetching the required information, we can add the moesif logging middleware:
const express = require('express');
const jwt = require('express-jwt');
const app = express();

// Add JSON Web Token Library for authentication
const jwt = jwt({
  secret: Buffer.from('my_super_secret'),
});

app.use(jwtMiddleware);
app.use(moesifMiddleware);

app.get('/accounts/:id/message', (req, res) => {
    res.json({
      my_object: {
        my_message: 'Hello World!'
      }
    }));
});

app.listen(8080, () => console.log('API listening on port 8080!'));
Step 2. Starting your API and creating traffic
Once the middleware is hooked up. Start your node server.
node app.js
We’ll need to generate a fake partner API token. Since we’re using JWT, we can generate one quickly via JWT.io. To makes things easier, check out my pre-populated jwt.io link.
The JWT has a few key elements:
- The JWT Secret
my_super_secretis set to the same secret we’re using in our Node.js app. Of course for production you should generate a secure 256-bit secret. - The payload has some key information that our middleware will log:
{
  "sub": "513",
  "name": "John Doe",
  "iat": 1516239022
}
The sub field is an abbreviation for subject and is a technical name for user_id in authentication speak.
We also see there are two other fields, the user’s name and also a field iat which is an abbreviation
for issued at.
We can add any arbitrary fields to the JWT payload such as a tenant_id to the JWT to meet any requirements.
The JWT.io I created is below (which you can copy from the jwt.io website.)
eyJhbGciOiJIUzI1NiIsInR5cCI6IkpXVCJ9.eyJzdWIiOiI1MTMiLCJuYW1lIjoiSm9obiBEb2UiLCJpYXQiOjE1MTYyMzkwMjJ9.FPN2Bj5b6OUzeTJ7lrNQPWUkZnnBnhMFYeyMjJ_-tN0
Next make a few API requests to your API using the newly created partner API token
curl -H 'Authorization: Bearer eyJhbGciOiJIUzI1NiIsInR5cCI6IkpXVCJ9.eyJzdWIiOiI1MTMiLCJuYW1lIjoiSm9obiBEb2UiLCJpYXQiOjE1MTYyMzkwMjJ9.FPN2Bj5b6OUzeTJ7lrNQPWUkZnnBnhMFYeyMjJ_-tN0' http://localhost:8080/accounts/abcdef/message
Note for JSON Web Tokens, they are bearer tokens which means anyone that holds the token can access the API. For more info on authentication and authorization for APIs, check out this blog post.
Repeat the curl command with a few additional tokens while varying the sub field such as 1234 and 2560.
Step 3. Visualizing API data
Now that you made a few API calls, log into your www.moesif.com and click on API Analytics -> Event Stream. You should see your API calls logged in Moesif that you created via the curl command. Now, go to API Analytics -> Segmentation and select group by User Id. You should see a chart like below:
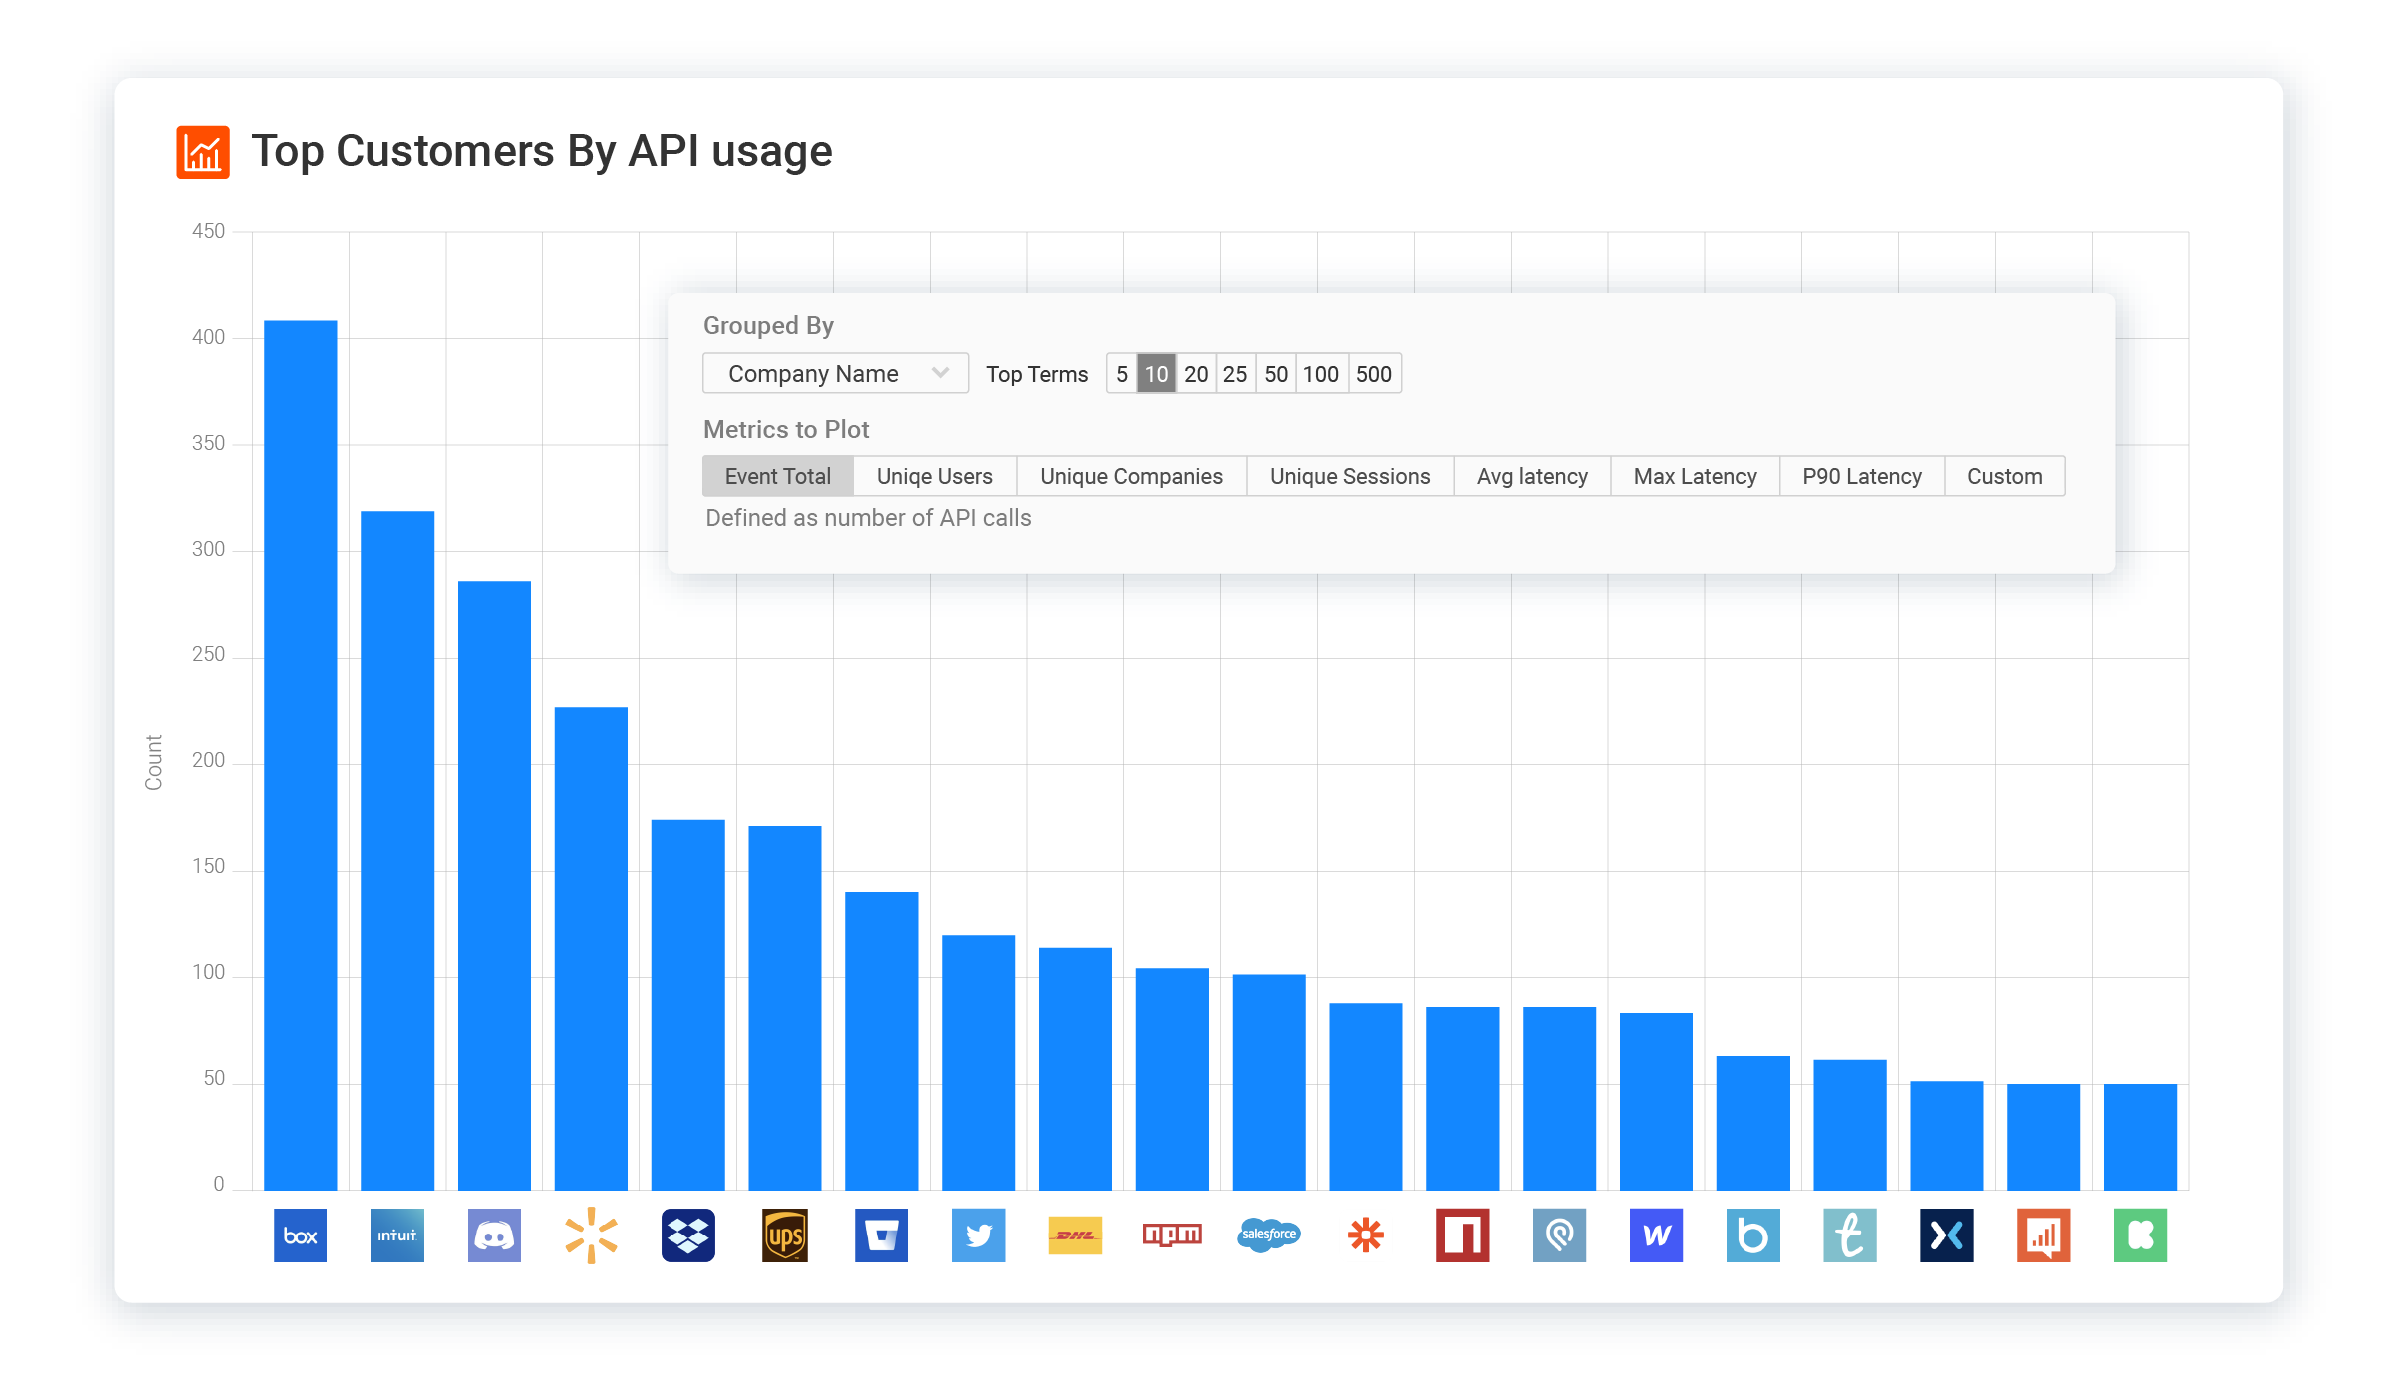
Visualizing API data is crucial for understanding API performance and reliability. API data visualization involves presenting the captured data in a graphical format, such as charts, graphs, and tables. This helps developers quickly identify trends, patterns, and anomalies in API performance. With effective visualization, developers can create custom dashboards, set alerts and notifications, and make data-driven decisions. This not only aids in performance monitoring but also helps in understanding customer behavior and improving overall customer satisfaction.
Closing Thoughts
With the middleware and Moesif, you saw how you can track the customers making the most API calls. By effectively tracking API calls, you can better understand customer behavior and tailor your services to meet their needs. Next you can track which API routes they are hitting and how long they stick with your API platform.


Related Articles

API Strategy
Leveraging AI For a Better API Strategy
Learn how to leverage AI to build and fortify your API strategy. Improve design, governance, documentation, and align APIs with business outcomes.
API Strategy
The 5 Best Mixpanel Alternatives of 2025
Learn about the best Mixpanel alternatives to determine the right analytics solution for your use case.

API Development
How to Leverage Moesif Effectively for API Observability
Effectively leverage Moesif for API observability through best practices for integration, event enrichment, custom actions, and engineering workflow integrat...
API Strategy
How to Build an Internal Chargeback Model for Your API and AI Usage Using Moesif
Use Moesif to implement internal chargebacks and enable precise API and AI cost attribution for better transparency and resource optimization.
