Implementing Subscription Tiers with Moesif and Stripe
As we have seen in the last few years, subscription-based models align customer needs with business growth. Whether you’re a startup or an established enterprise, mastering the art of subscription tiers and learning how to apply them to your API monetization strategy is crucial. In this blog post, we will look at navigating through the implementation of subscription tiers for monetized APIs with the aid of two vital tools: Moesif and Stripe. By the end of this blog, you’ll be equipped to implement a subscription model that caters to your customer’s needs and scales with your business. Let’s begin by looking at what subscription tiers are.
What are subscription tiers?
Subscription tiers are the bread and butter of SaaS business models, especially regarding API monetization. They offer customers a choice of service levels, each with features and price points that suit their needs. This monetization model allows businesses to cater to a wide range of customers. Regarding subscription tiers within the API space, you’ll generally see companies offer a range of options that cover each user’s needs. For individuals or small businesses that may only need access to specific endpoints and low usage quotas, there may be an entry-level or free tier, up to large enterprises requiring full access and larger usage quotas. Once defined, tiers are strategically priced and packaged to encourage upgrades as customer needs evolve. By properly planning your tiers and pricing, you can quickly expand revenue as companies using your service also expand and require more from your service.

An example of API monetization tiers might look something like this:
| Tier Name | Endpoints Available | Quota Limit | Price |
|---|---|---|---|
| Bronze | Basic Endpoints | 1000 calls/month | $100 |
| Silver | Basic + Intermediate Endpoints | 100,000 calls/month | $250/month |
| Gold | All Endpoints | 1,000,000 calls/month | $1000/month |
The table above showcases a tiered strategy where each ascending tier offers more endpoints and a higher quota limit, with the price reflecting the increased value. The ‘Starter’ tier serves as an entry point for users to test the API, while the ‘Enterprise’ tier is tailored for large-scale users who may need customized solutions and dedicated support.
What is Moesif?
Moesif is a platform designed to help businesses grow and monetize their API products. Moesif contains many key features that are relevant to API monetization, including:
- Billing Meters: Set up usage-based Billing Meters on API calls and other metrics.
- Billing Provider Integrations: Facilitate easy billing by directly integrating with leading providers or custom providers.
- API Analytics: Real-time event logs to track and understand customer usage of APIs and apps.
- Quotas & Governance: Manage API usage limits and enforce governance policies.
- Developer Portal: An open-source portal for developers to subscribe and access monetized APIS.
- Behavioral Cohorts and Emails: Understand user behaviors and send targeted communications based on subscription status, quota limits, etc.
- Conversion Funnels: Optimize user onboarding and journeys to drive revenue and customer adoption.
Moesif’s monetization capabilities allow for the setup of metered billing, creating billing rules, and automating invoicing by integrating with billing providers. Overall, Moesif aims to help API providers effectively generate revenue from their APIs with an easy-to-use interface and features.
Implementing the subscription tiers
Implementing subscription tiers for API monetization is a multi-stage process that weaves together the functionalities of Stripe and Moesif. Below, we will set up an implementation that uses the prices defined in Stripe to enforce usage quotas in Moesif. This will require using Moesif’s Billing Meters and Governance Rules features. Let’s get started!
Note that the setup below will only work if you use a Moesif SDK or Plugin that supports governance. Please check the documentation to ensure that governance is supported in your setup.
#1 - Define the tiers in Stripe
First, we will create our subscription tiers in Stripe. To do so, perform the following steps in Stripe.
- Go to your Stripe Dashboard.
- Go to Product Catalog and then select Create product.
- Select Recurring and then select More pricing options.
- Select Recurring and choose Usage-based as the pricing model and choose the usage amount as unit.
- Define your price amounts.
-
In the Meter section, select the plus icon + to create a billing meter to associate the price with.
a. Enter the meter name.
b. Enter the event name for which the billing meter reports usage.
c. Select the aggregation method for meter events. Moesif supports the Sum and Last aggregation methods.
d. Expand Advanced Options and make sure that Event Time Window is set to Raw.
- In the Advanced section, enter a description for the price.
- Select Next.
- Select Add another price and repeat the same steps to add more tiers.
- After you finish defining your tiers, select Add product.
After you’ve created your tiers, you should see that the Stripe Product catalog now contains your product and prices.

#2 - Define the Billing Meter in Moesif
Now that we have our product and prices defined in Stripe, we must set up a Billing Meter for each tier we have created. To do so, we will perform the following steps:
- Log into Moesif.
- In the left-side menu, select Billing Meters.
- On the Billing Meters screen, click Add Billing Meter in the top-right corner.
- On the Add Billing Meter screen, give your Billing Meter a name to match the tier you are creating it for.
- Under Link to > Billing Provider, select “Stripe” from the dropdowns and the Product and Price corresponding to your tier.
- Then, set up a Filter that will outline which API calls you’d like to count towards the user’s usage ( See example below for specifics).
- Lastly, select the Metric that you would like to use, like “Event Count”, which will count every API call as a unit of usage.
- Repeat the steps above for each tier you’d like to implement.
Here’s an example of what this might look like.

Note that the filter also includes the Stripe Price ID that corresponds to the tier the meter is for. For this, you’ll need to add a filter on the Company metadata like so:
company.metadata.stripe.subscription.items.data.price.nickname. If the name of your price does not show up, carefully type it in to match the name you input in Stripe, as this will be case and whitespace-sensitive.
Once this is done, we will enforce the limits based on the tier the user has subscribed to with Moesif’s Governance Rule feature.
#3 - Define the Governance Rules in Moesif
To ensure customers stay within their subscription bounds, we will set up Governance Rules within Moesif. This requires two steps:
- Create the appropriate cohort for the users within a specific tier.
- Create the governance rule in Moesif to apply quota management to users within that cohort/tier.
To do these two things, we will need to do the following in Moesif:
- Navigate to the Quotas & Governance screen by clicking on the corresponding menu item in the left-side menu.
- On the Quotas & Governance screen, click the Add New button in the top-right corner of the screen and select Start from blank in the modal that appears.
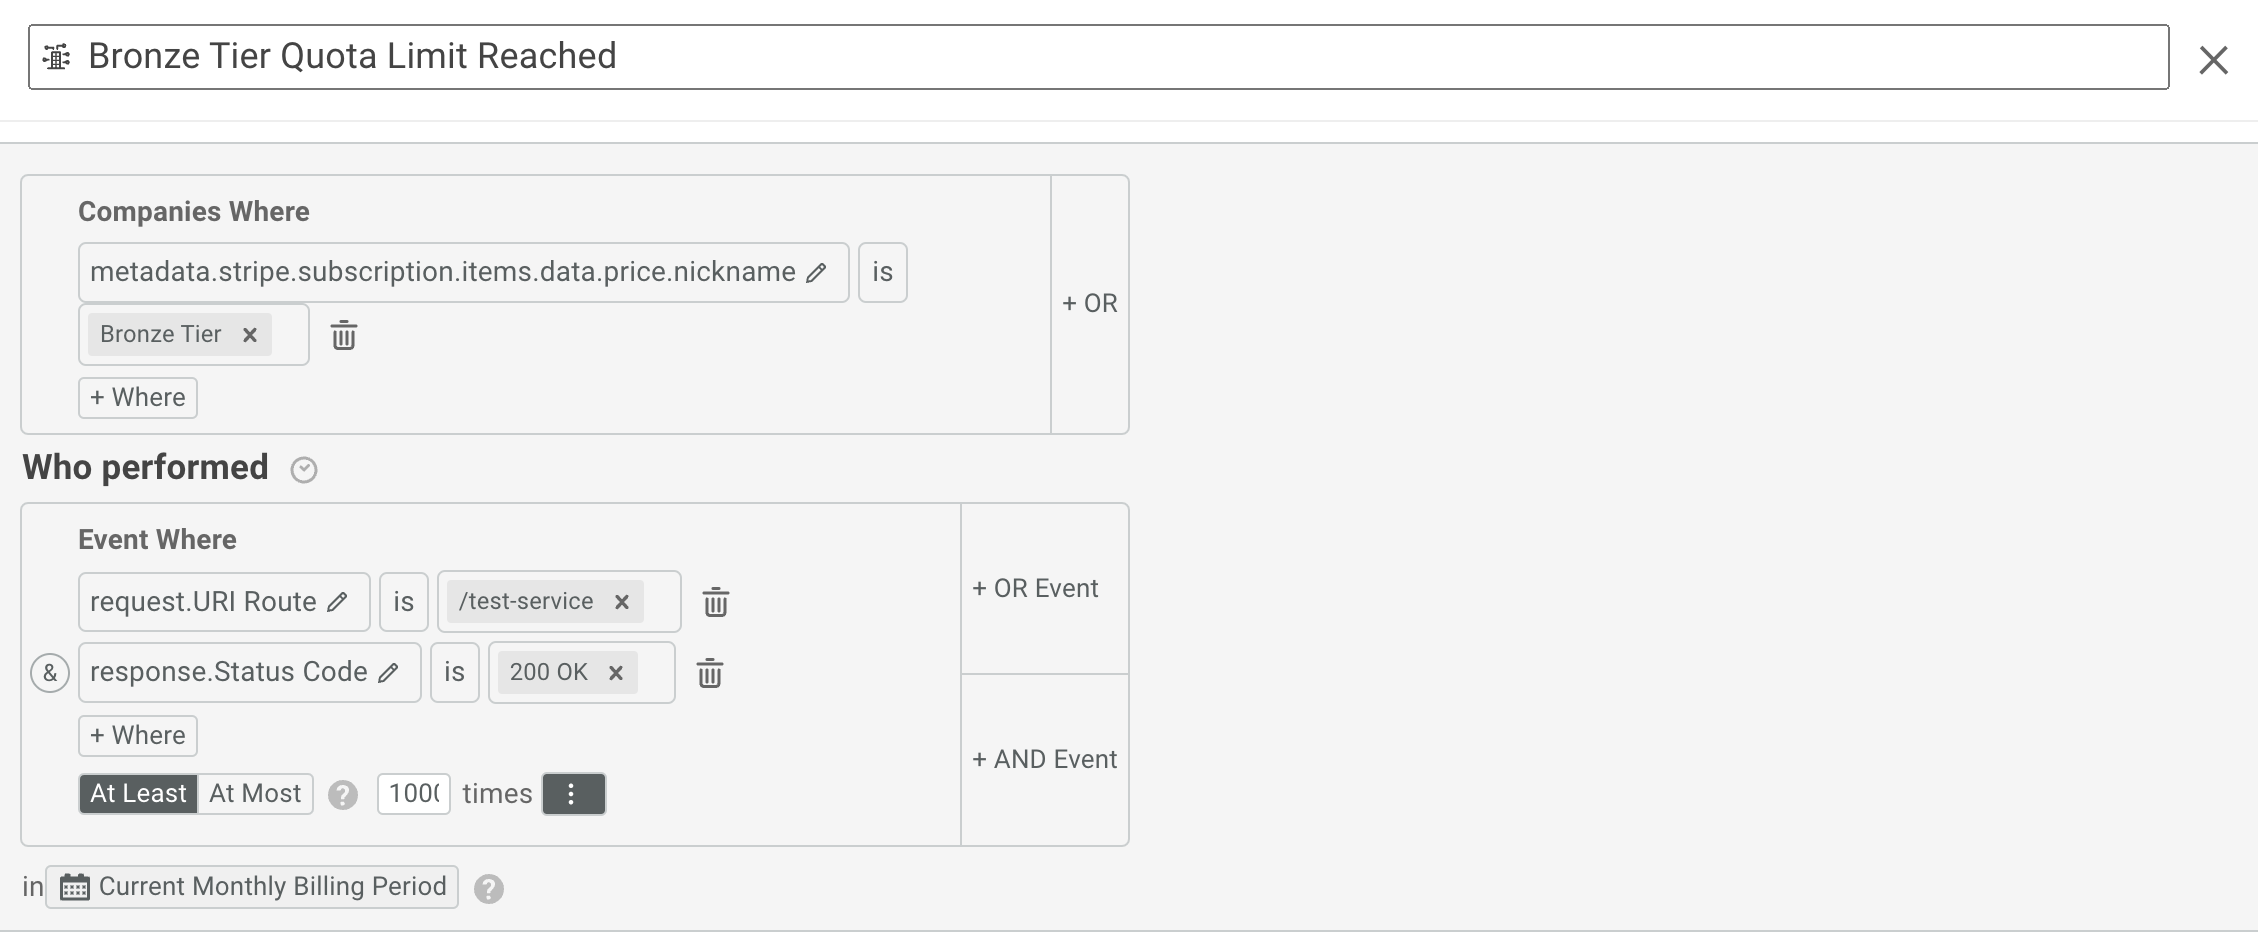
- On the Add Governance Rule screen, we will select Create New Company Cohort in the Applicable Cohorts dropdown.
- For the company cohort input under Companies Where we will once again use the price identifier we used above (
company.metadata.stripe.subscription.items.data.price.nickname) as part of the filter. We will set this to match the tier that the cohort should be applied to. - Next, we will set the Who Performed> Event Where criteria to match the filter we added in the Billing Meter (minus the Stripe Price filter since it was already added above in this case). We will also set the filter to At least “1000” times, or whatever the quota limit is for your tier.
- Lastly, we will set the Period selector to “Current Monthly Billing Period” and click Create Cohort in the bottom right.
An example of this can be seen below:
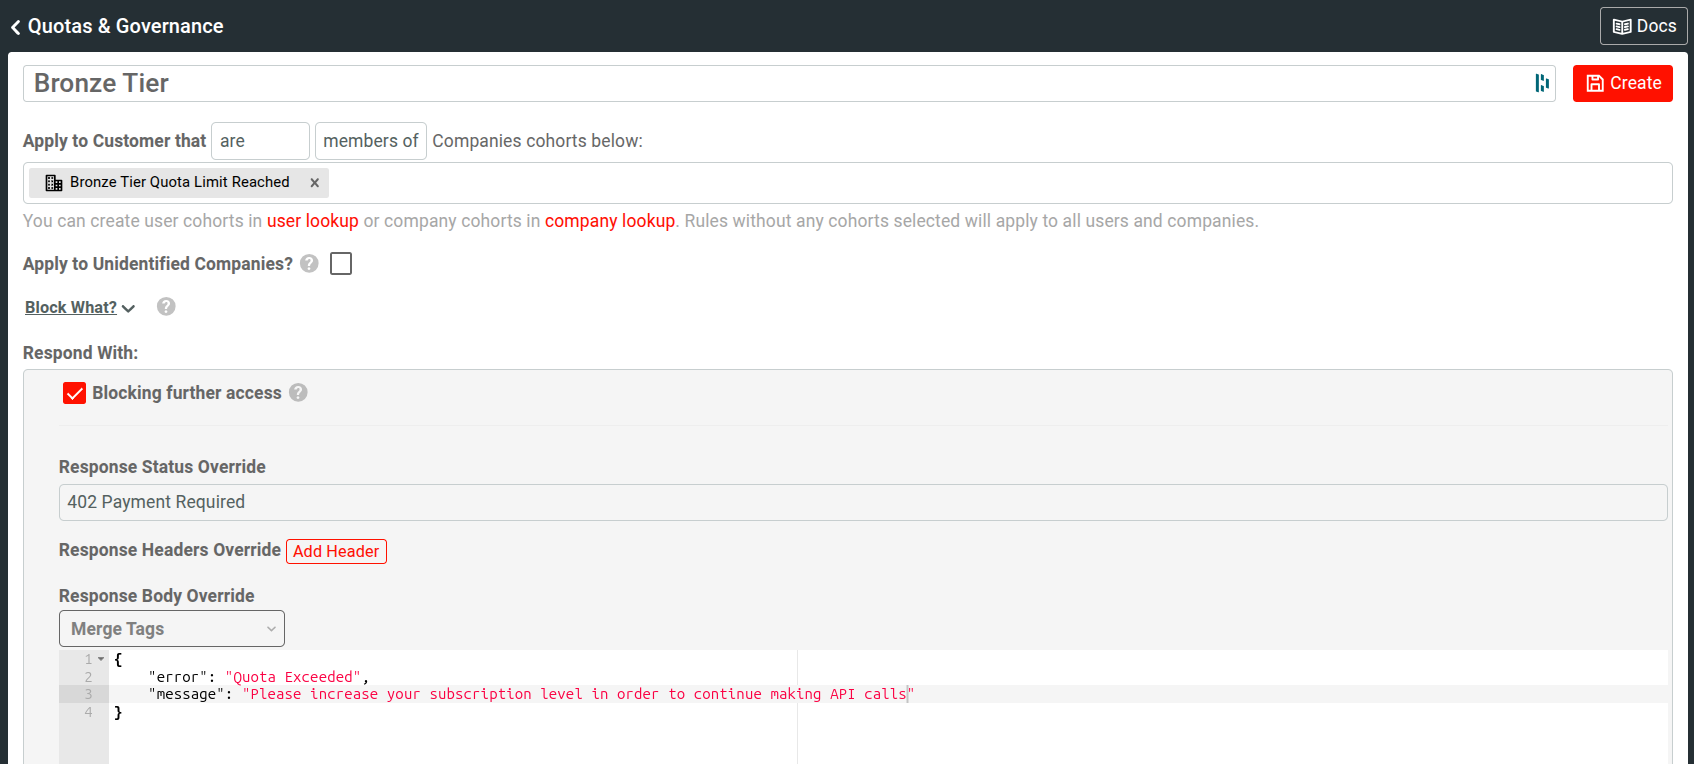
After the cohort is created, you’ll be brought back to the Create Governance Rule screen. Here, we will do the following:
First, add a name for the Governance Rule in the Name field. Next, ensure that the cohort for the tier is selected in the Applicable Company Cohorts dropdown. Also, ensure that the Apply to Companies in above Cohorts option is selected. Ensure that Blocking is set to true/checked off. Then, set the Override Response Status and Override Response Body to the values you would like to return when the user has reached their usage limit/quota. Click Create/Save Cohort to save the cohort.
Below is an example of what this might look like in practice.
Ensure the Governance Rule is set to ON, or the quota will not be enforced.
Once you have implemented the above steps for each tier in your pricing scheme, you’ll be ready to launch your APIs. As each tier quota is met, Moesif will inform the SDK or Gateway (via the applicable Moesif plugin) to block traffic and return a custom response to the user. This ensures that users stay within their quota and protects upstream APIs from abuse.
Conclusion
Integrating Stripe and Moesif to manage subscription tiers is a strategic move that can significantly enhance your offering to your customers. By defining subscription tiers in Stripe and setting up Billing Meters and Governance Rules in Moesif, you can create a robust API monetization ecosystem that scales and maximizes revenue.
If the above setup is the missing piece you require for your API monetization strategy, contact the Moesif team today to discuss how our team of API monetization experts can help—looking to take Moesif for a spin first? You can also sign up for an account and get started in minutes. Let us help you get started with API monetization using Moesif and Stripe.


Related Articles

API Strategy
Leveraging AI For a Better API Strategy
Learn how to leverage AI to build and fortify your API strategy. Improve design, governance, documentation, and align APIs with business outcomes.
API Strategy
The 5 Best Mixpanel Alternatives of 2025
Learn about the best Mixpanel alternatives to determine the right analytics solution for your use case.

API Development
How to Leverage Moesif Effectively for API Observability
Effectively leverage Moesif for API observability through best practices for integration, event enrichment, custom actions, and engineering workflow integrat...
API Strategy
How to Build an Internal Chargeback Model for Your API and AI Usage Using Moesif
Use Moesif to implement internal chargebacks and enable precise API and AI cost attribution for better transparency and resource optimization.