End-to-End API Monetization with The Kong Developer Portal, Stripe, and Moesif
Many API developers and companies struggle to find ways to set up systems to monetize their APIs easily. Some are simple but not customizable, and some are complex and require massive engineering effort to get them all running.
To make things easier, the Moesif platform includes Billing Meters which gives massive customizability to API monetization efforts with a minimal amount of code and engineering effort.
For this example, which could be used out of the box, we will use Moesif, Kong, and Stripe to charge users for API usage. For this setup there are a few assumptions:
- You have a running instance of Kong (with an endpoint and a route created)
- Your Kong instance has key-auth enabled for your endpoint(s)
- You have enabled the Kong Dev Portal (Enterprise License is required for this)
- You have an active Stripe account
- You have an active Moesif account
- You have installed and configured the Moesif plugin in Kong
For this particular instance, we will use the Kong Developer portal to register the user in Kong, Stripe, and Moesif. The user will then be able to generate API keys to access monetized endpoints. As traffic flows into the endpoint, Moesif will record and send the usage statistics over to Stripe so that users can be charged.
Now, let’s first jump into creating some products and prices in Stripe that we can subscribe users to and begin to generate revenue.

1 - Create Your Product and Price in Stripe
The first step we will take is to create a product and price in Stripe. It’s best to do this step first because then when you integrate Stripe into Moesif you’ll already have some pricing plans for Moesif to pull in. A pricing plan can then be associated with specific billing criteria set up within a Billing Meter in Moesif.
First make sure to meet these prerequisites.
To create a product and price, log into Stripe and proceed to the Products page in the Stripe UI. Once there, click on the + Add Product button in the top right corner.
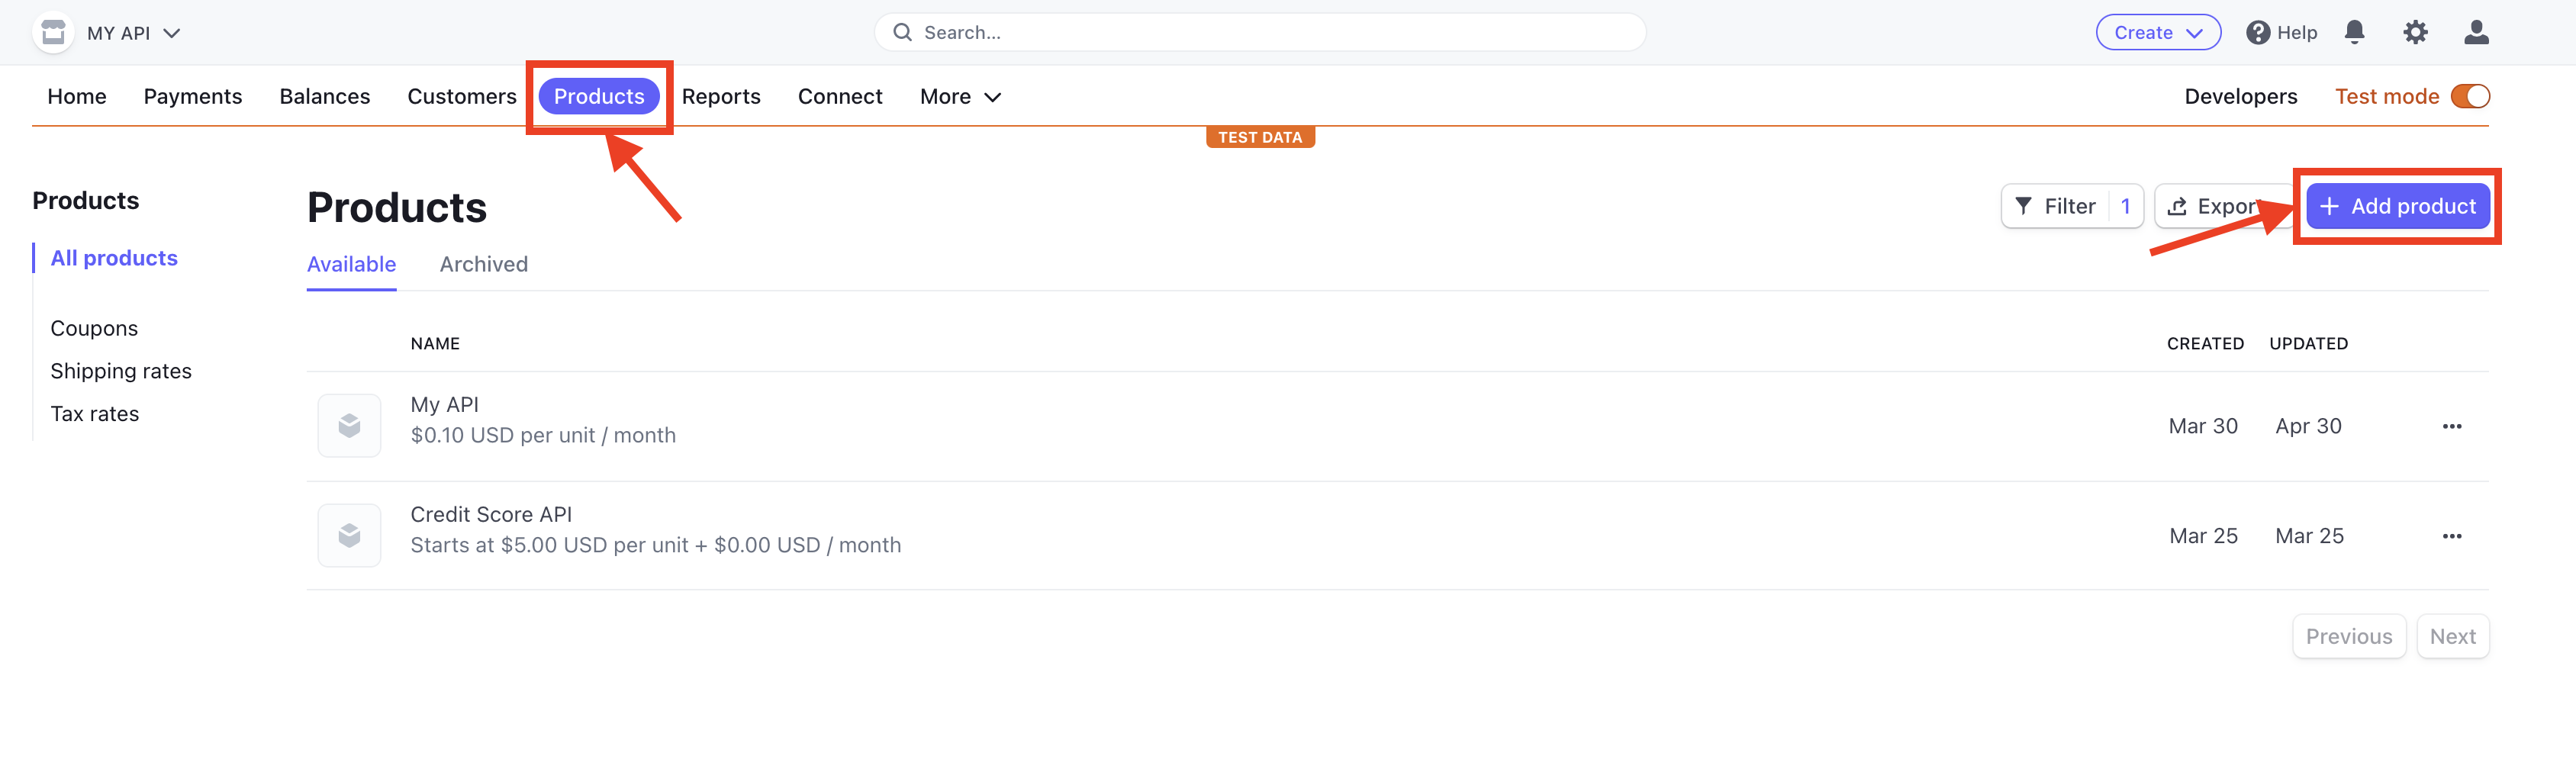
You’ll then be able to add in the details for your product and price(s) for it. The form for your product will have a few fields to fill out.
Product Information
Name
- This is the name of your product. In the example below, we use the name “My API”.
Description
- This field is optional but you could put a brief description of the product here. In the example below, we use a description of “This is a monetized API”.
Image
- Optionally upload an image that can help you easily recognize a item on the Products page. We’ll be using the default placeholder image in this example.
Pricing Information
You can choose between Recurring and One-off pricing for your product.
Recurring Pricinng
In recurring pricing, your customers pay an ongoing fee according to the pricing model you define. After selecting Recurring, you can enter the amount you want to charge and the billing period.
To further configure your recurring pricing, select More pricing options. This allows you to specify the pricing model, amount, billing period, price description, and more.
The following pricing models are available in Stripe for recurring pricing:
- Flat rate
- A fixed price for a single unit or package.
- Package pricing
- Charge for API usage by the package, or a group of units. For example, you could set it up to charge $10 for every 1000 API calls. Every time the user goes over the 1000 API call threshold, they are charged another $10.
- Tiered pricing
- Offer different price points for based on unit quantity.
- Usage-based
- Pay-as-you-go billing based on metered usage. You can charge per package, per unit , or per tier and define the prices and units accordingly. You can also set up a billing meter for the price to meter usage. See Creating a Product and Price in Stripe for instructions on how to set up a usage-based scheme.
One-Off Pricing
In one-off pricing, you charge a one-time fee rather than recurring amount in each billing period. After selecting One-off, you can enter the amount you want to charge in the Amount field.
Similar to recurring pricing, you can select More pricing options and configure your pricing further by specifying the pricing model, amount, price description, and more.
The following pricing models are available for one-off pricing:
- Package pricing
- Charge for API usage by the package, or a group of units. For example, you could set it up to charge $10 for every 1000 API calls. Every time the user goes over the 1000 API call threshold, they are charged another $10.
- Flat rate
- A fixed price for a single unit or package.
- Customer chooses price
- The customer sets a custom price. You can set a limit and define a preset amount to suggest to the customer.
Billing period
The billing period can be set as the following for recurring pricing models:
- Daily
- Weekly
- Monthly
- Every 3 months
- Every 6 months
- Yearly
- Custom
For your configuration with Moesif, we recommend setting the billing period as Monthly.
Price description
This is an optional field but recommended. Here you can put a brief description of your price. This will allow you to more easily decipher which price you are selecting in the billing meter in Moesif, especially if you have multiple prices for a single product.
Once you’ve input all of the details for your price, you can select Next and then select Add product
As you create products, you will be able to view and edit them on the Product Catalog screen.
2 - Enable the Moesif-Stripe Integration
Once your products and prices are created, it’s time to begin to integrate Stripe with Moesif. To begin configuring Stripe in Moesif, go to the Billing Meters page and click the Edit Billing Provider dropdown in the top right corner of the screen.
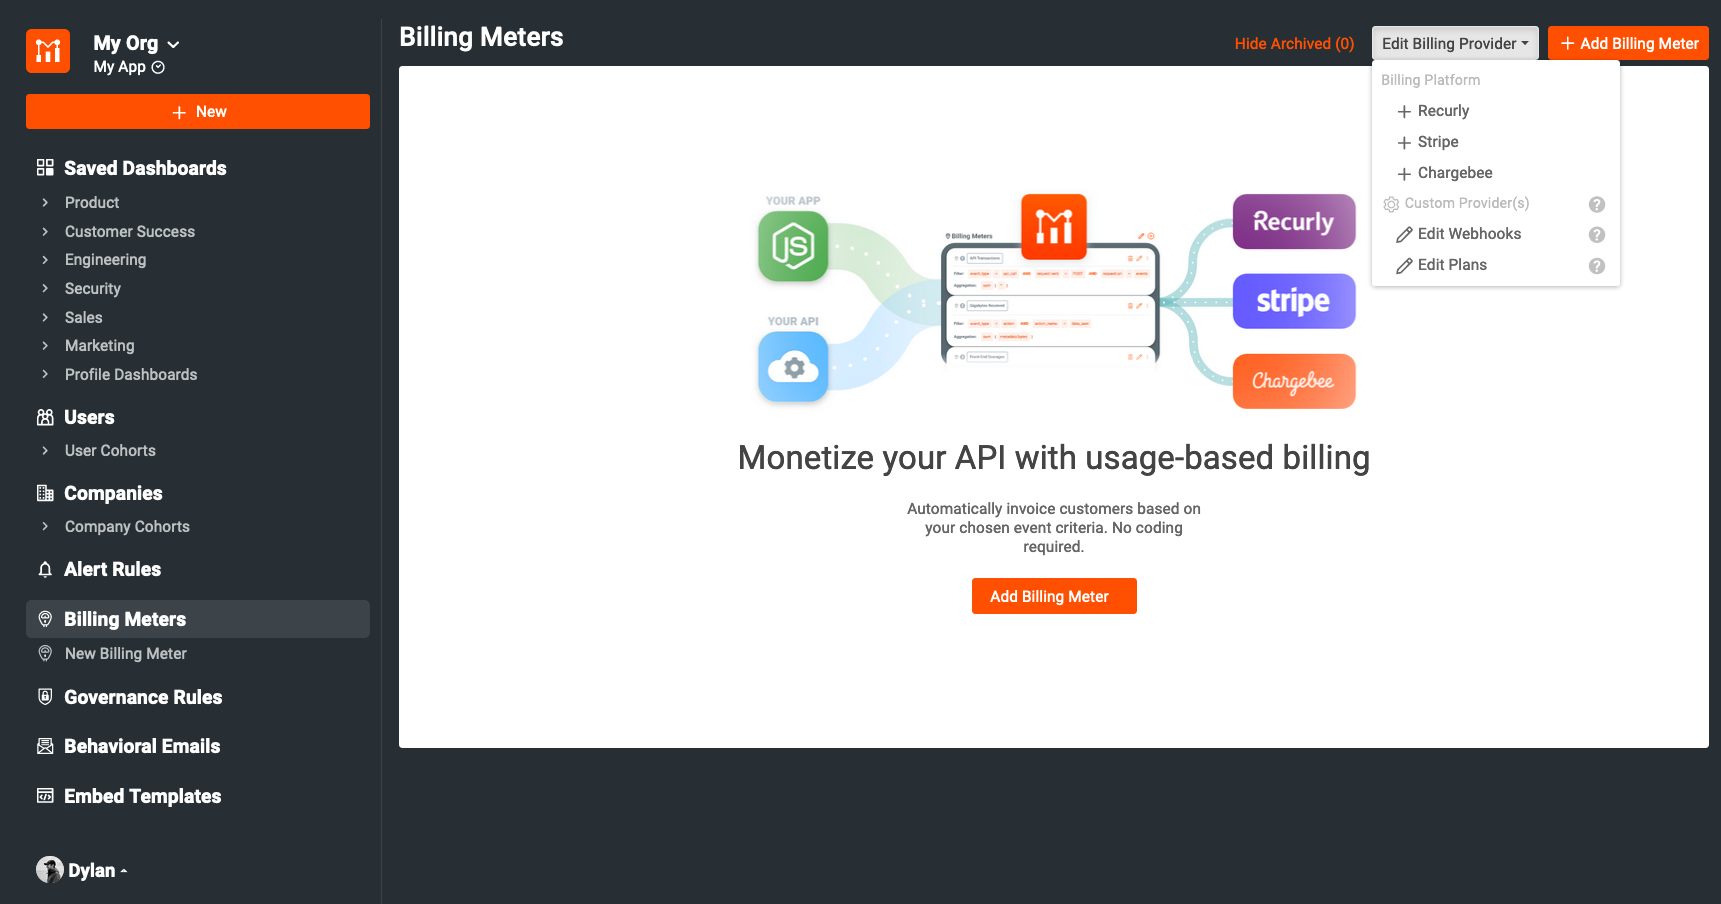
This will bring up the Stripe configuration screen walking you through the integration. From this screen, you can get all of the info needed to plug Stripe into Moesif. Each step for configuration is covered within the modal.
Add the Moesif Webhook to Stripe
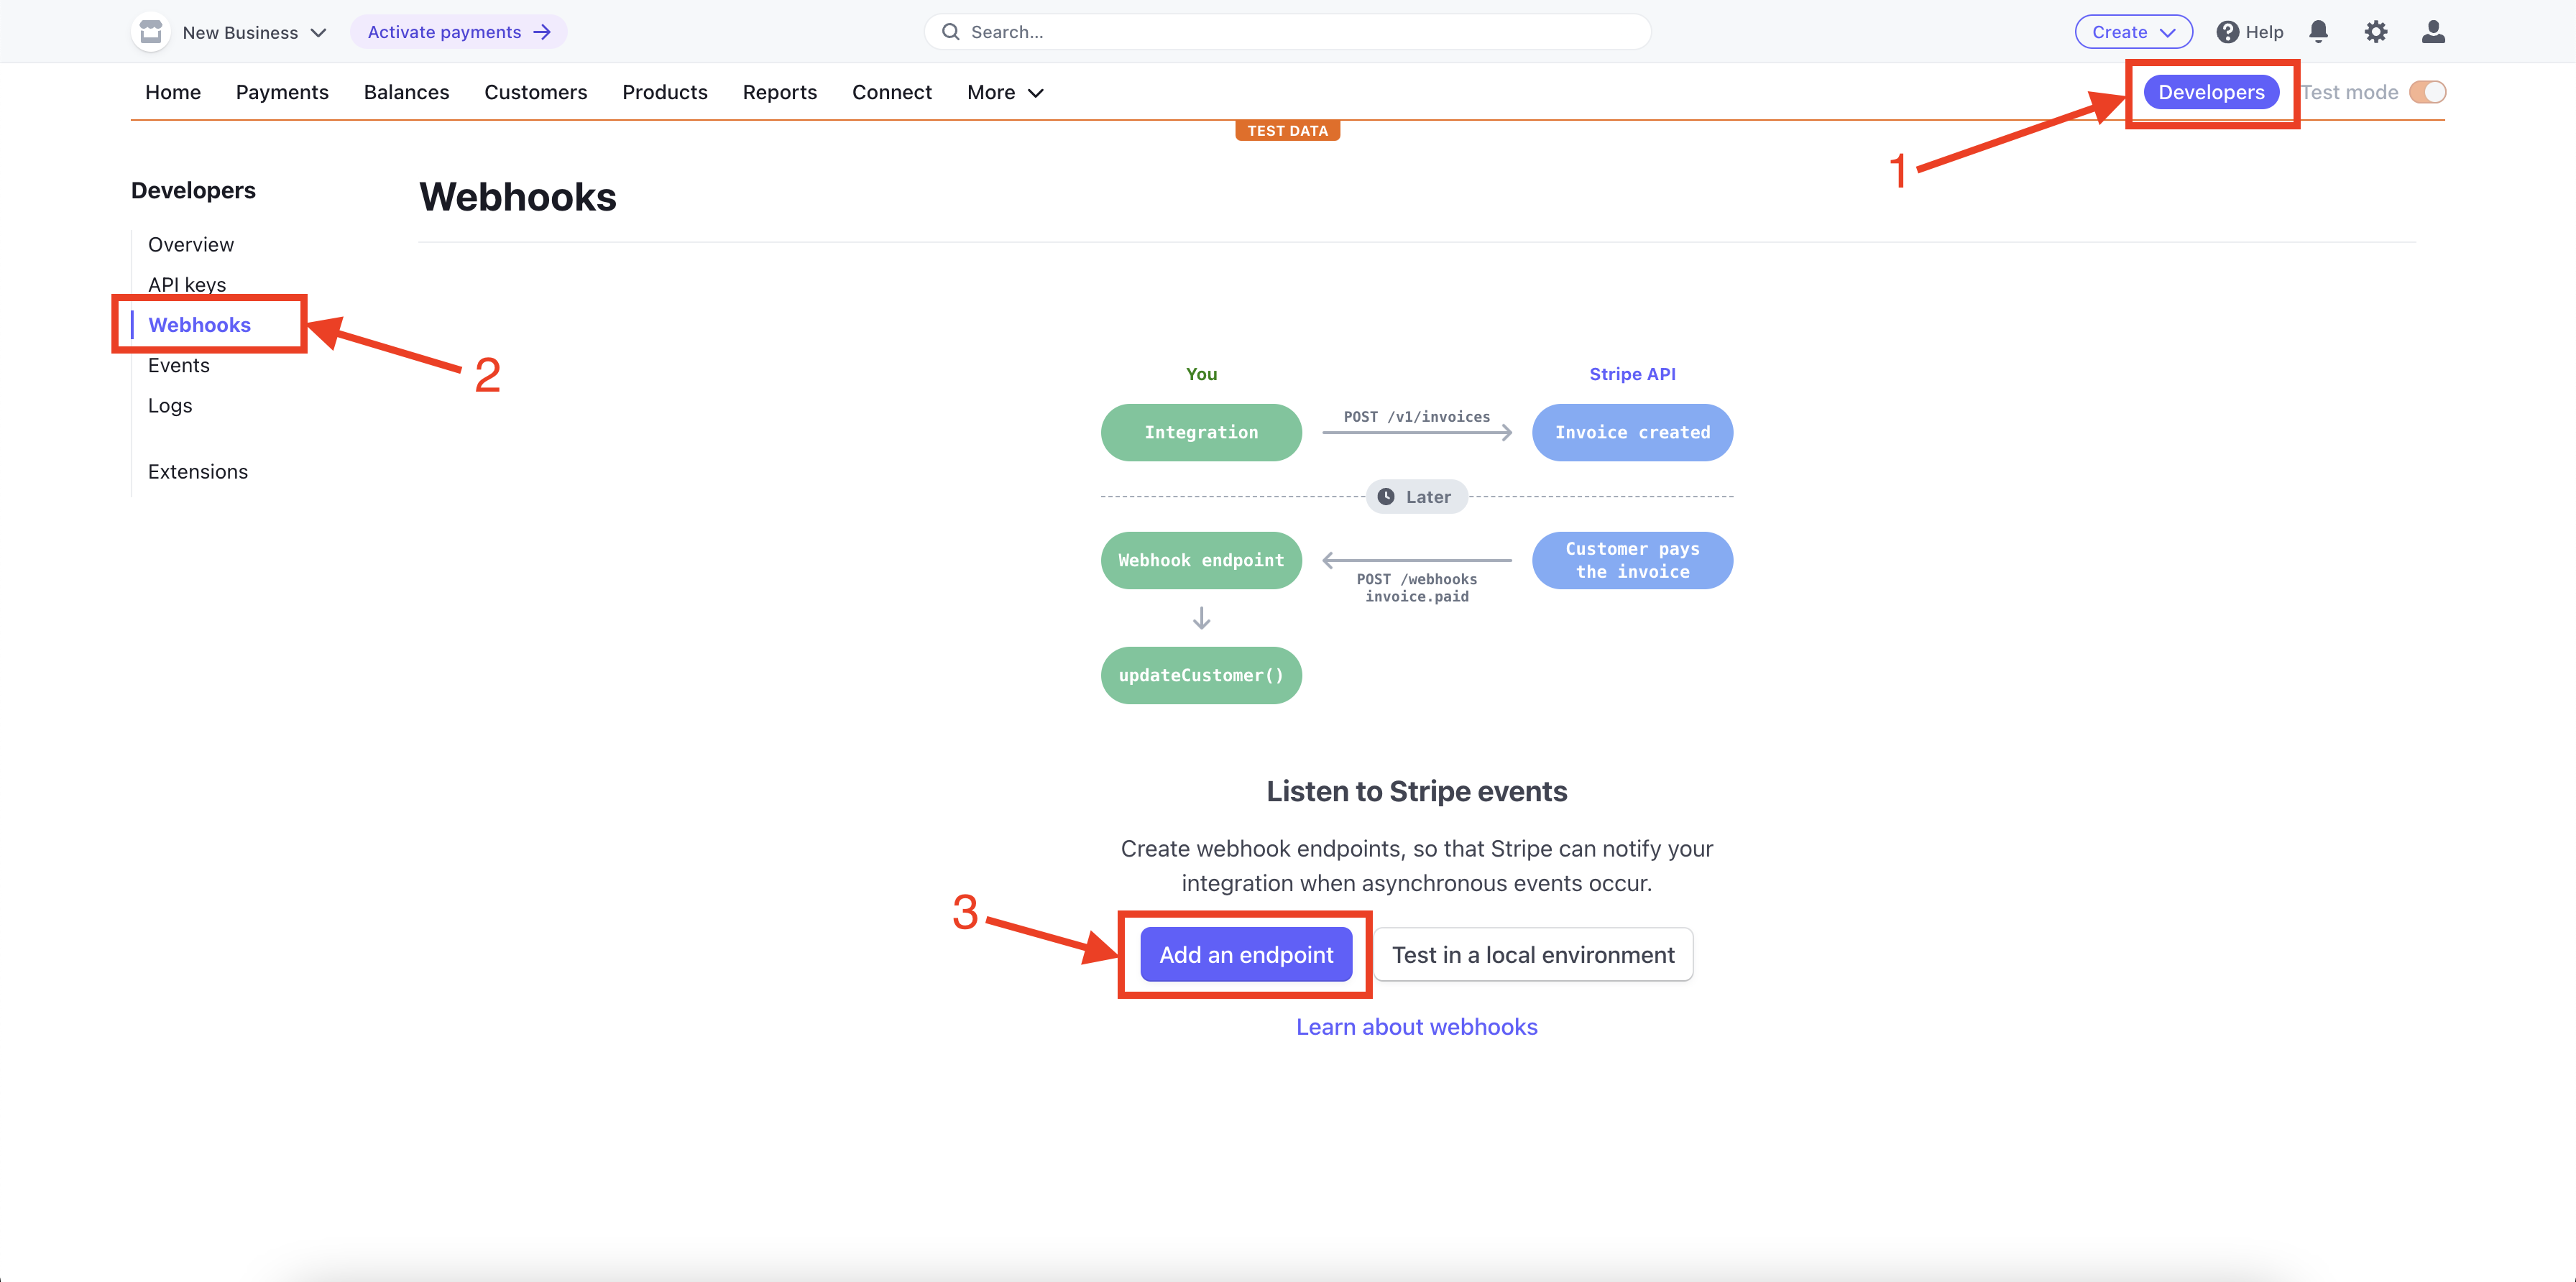
The first step in the integration is to add the Moesif webhook into the configuration in Stripe. Adding this allows Stripe to send subscription updates to Moesif.
To add the Moesif webhook to Stripe, from the upper right-hand side click on Developers, and then Webhooks in the left-side menu. This will bring you to the Webhooks page where you can view existing webhooks and add new ones. To add a new webhook we will click the Add an endpoint button at the bottom of the screen.
From here, we will plug in our Moesif API endpoint URL and configure the events to listen to. You’ll want to copy your Moesif Webhook URL into the Endpoint URL field and then click the + Select Events button.
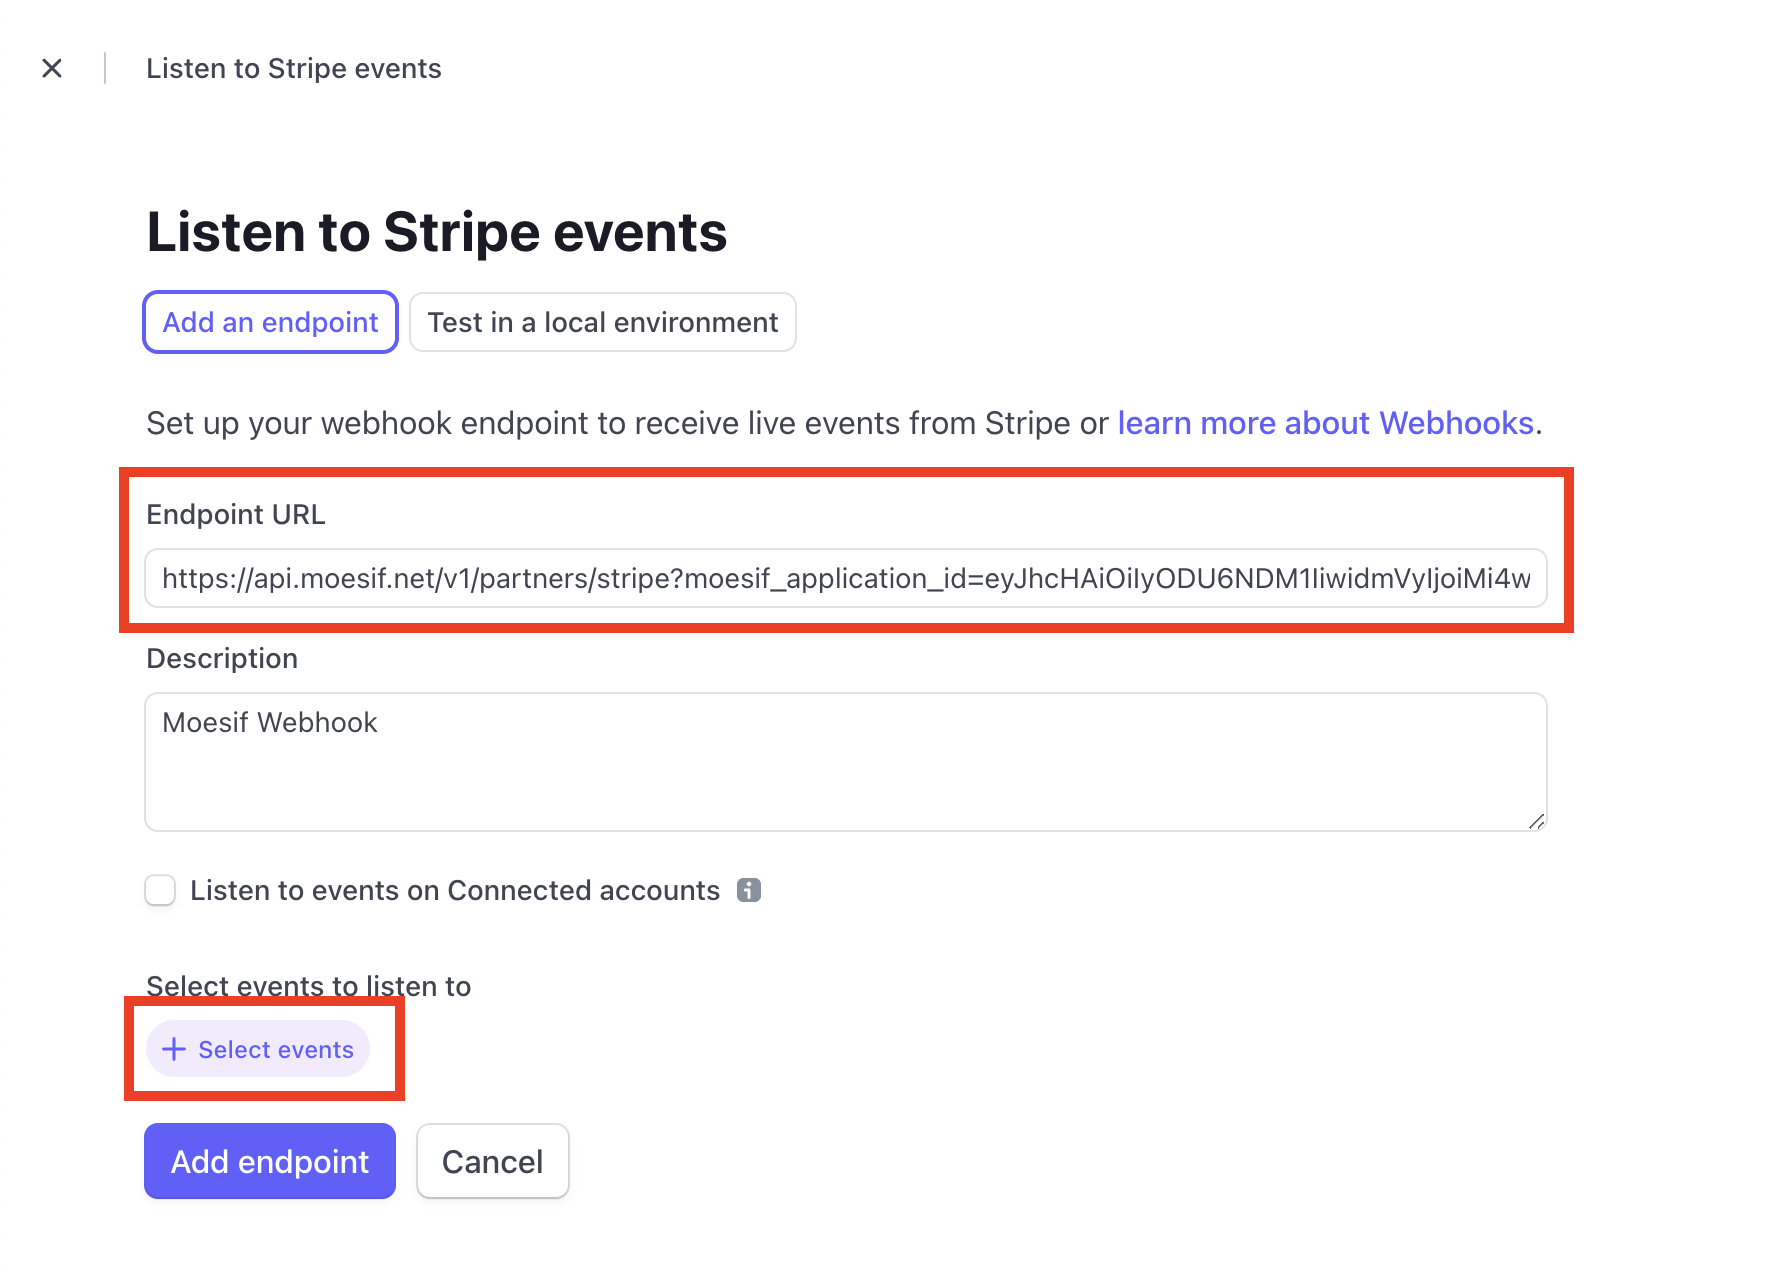
These details can all be found on the Stripe configuration page in Moesif mentioned in the previous section.
You should select the option under Customer for Select all Customer events. After this, click the Add events button at the bottom of the screen.
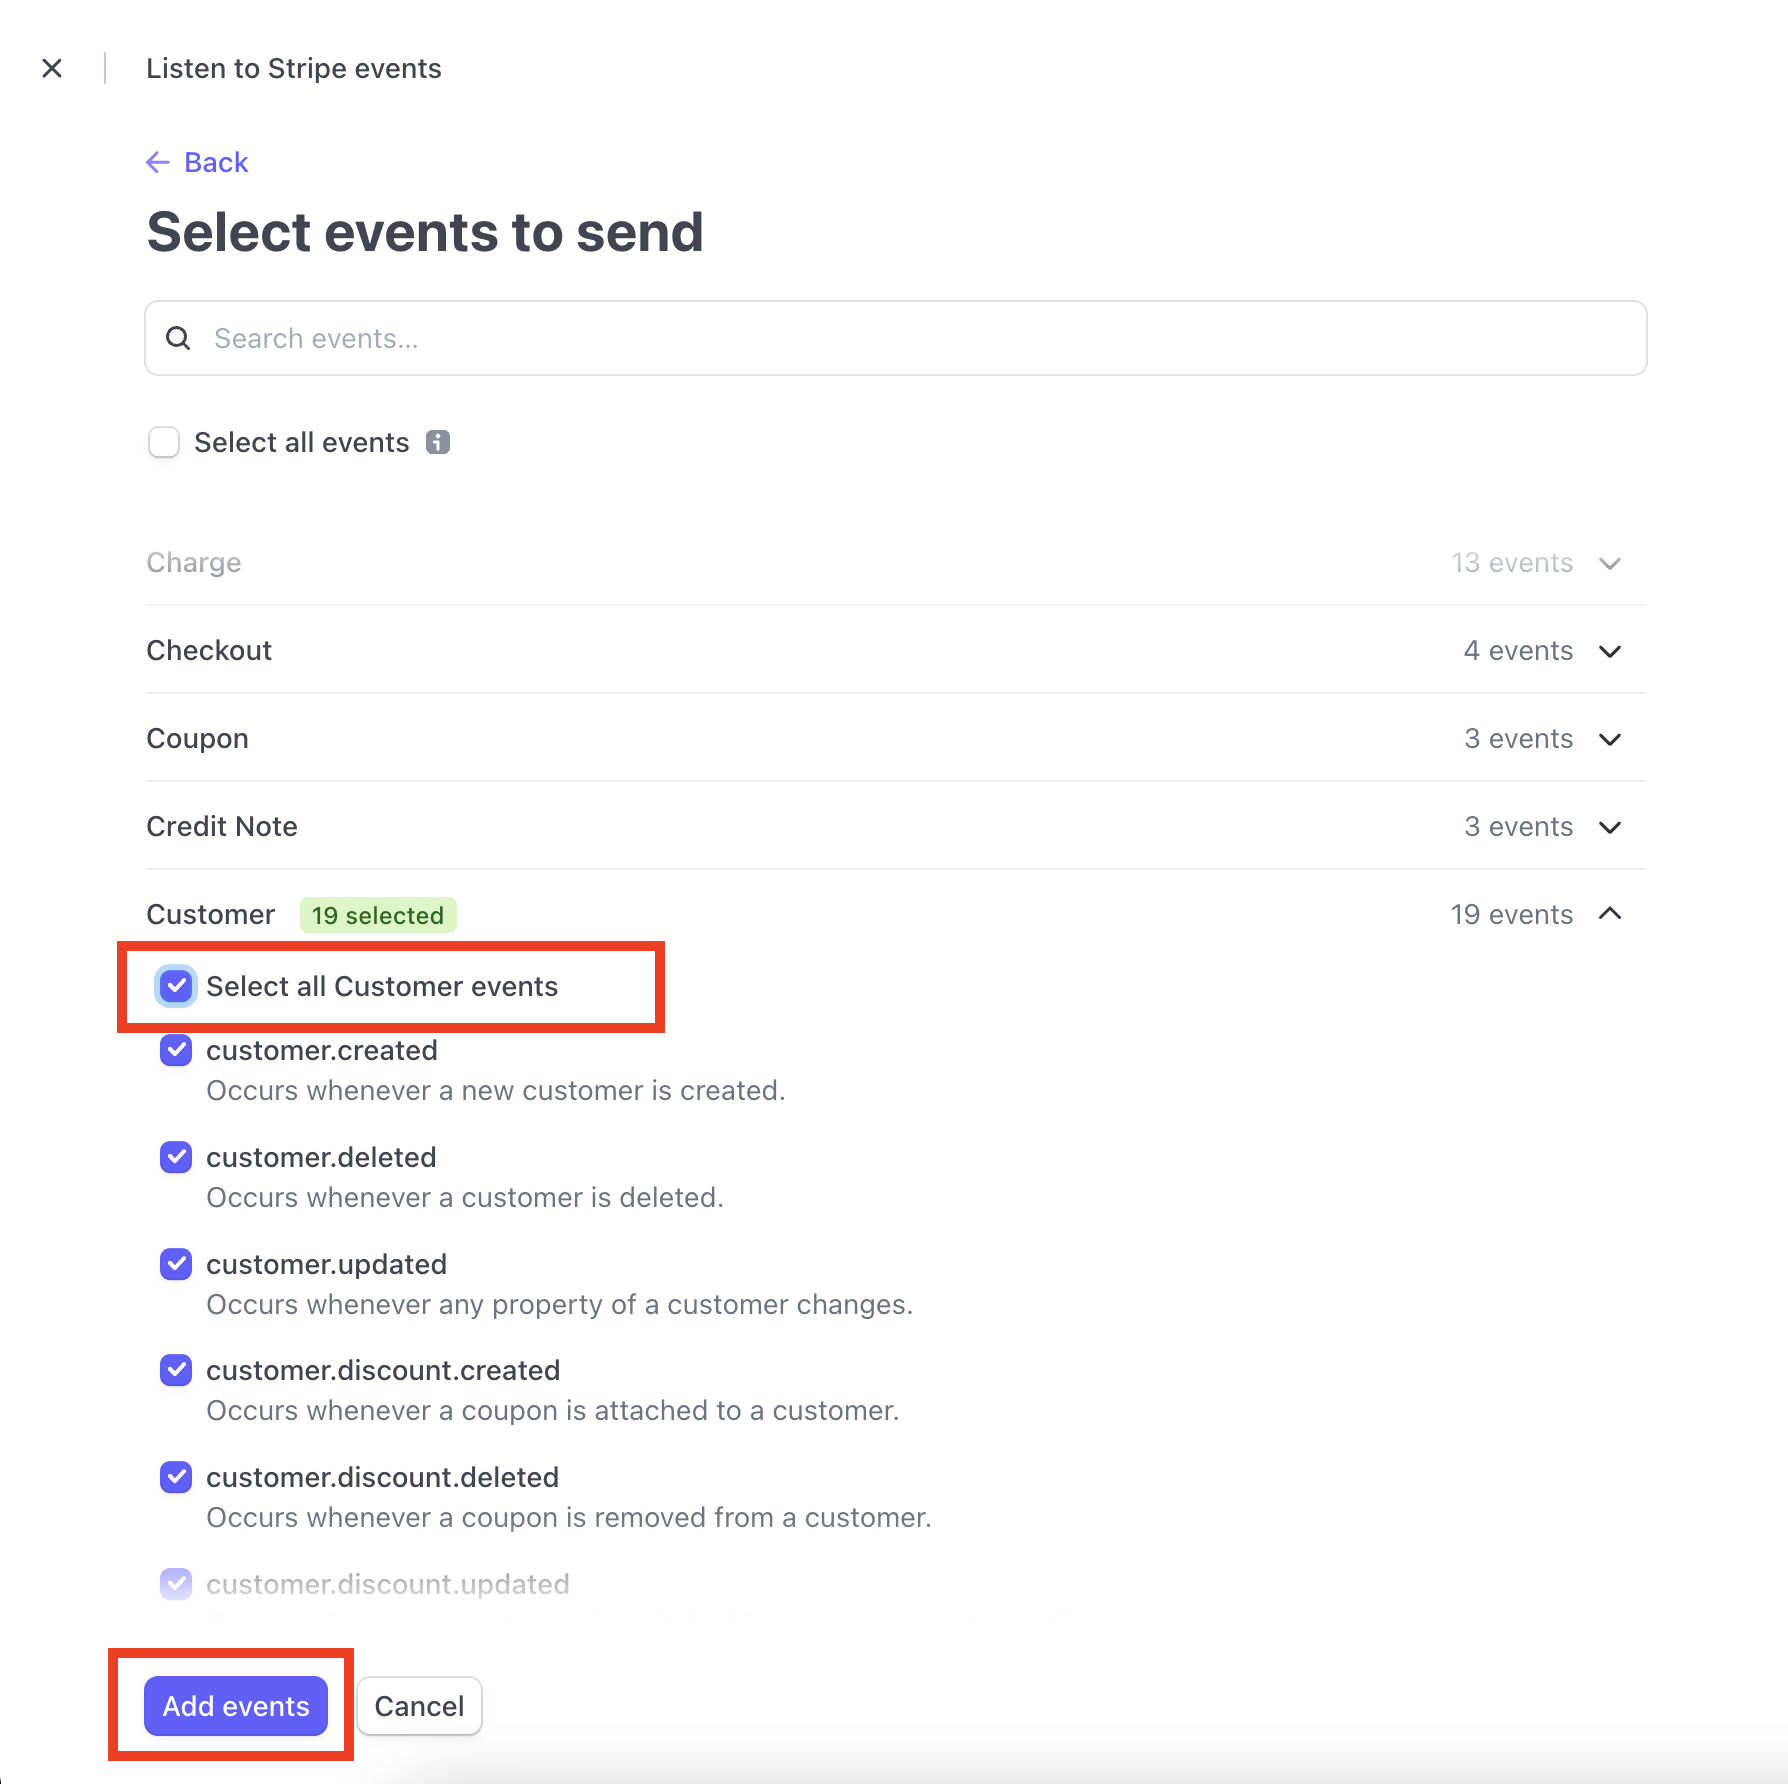
After this, you’ll be returned back to the original screen where you added the endpoint details. Scroll to the bottom of the screen and click Add endpoint to save the endpoint to Stripe.

Plug the Stripe API Details into Moesif
For Moesif to add usage quantities to subscriptions in Stripe, we need to add the Stripe API details into Moesif. This is done in the Stripe configuration screen in Moesif, the same screen we’ve been working with previously.
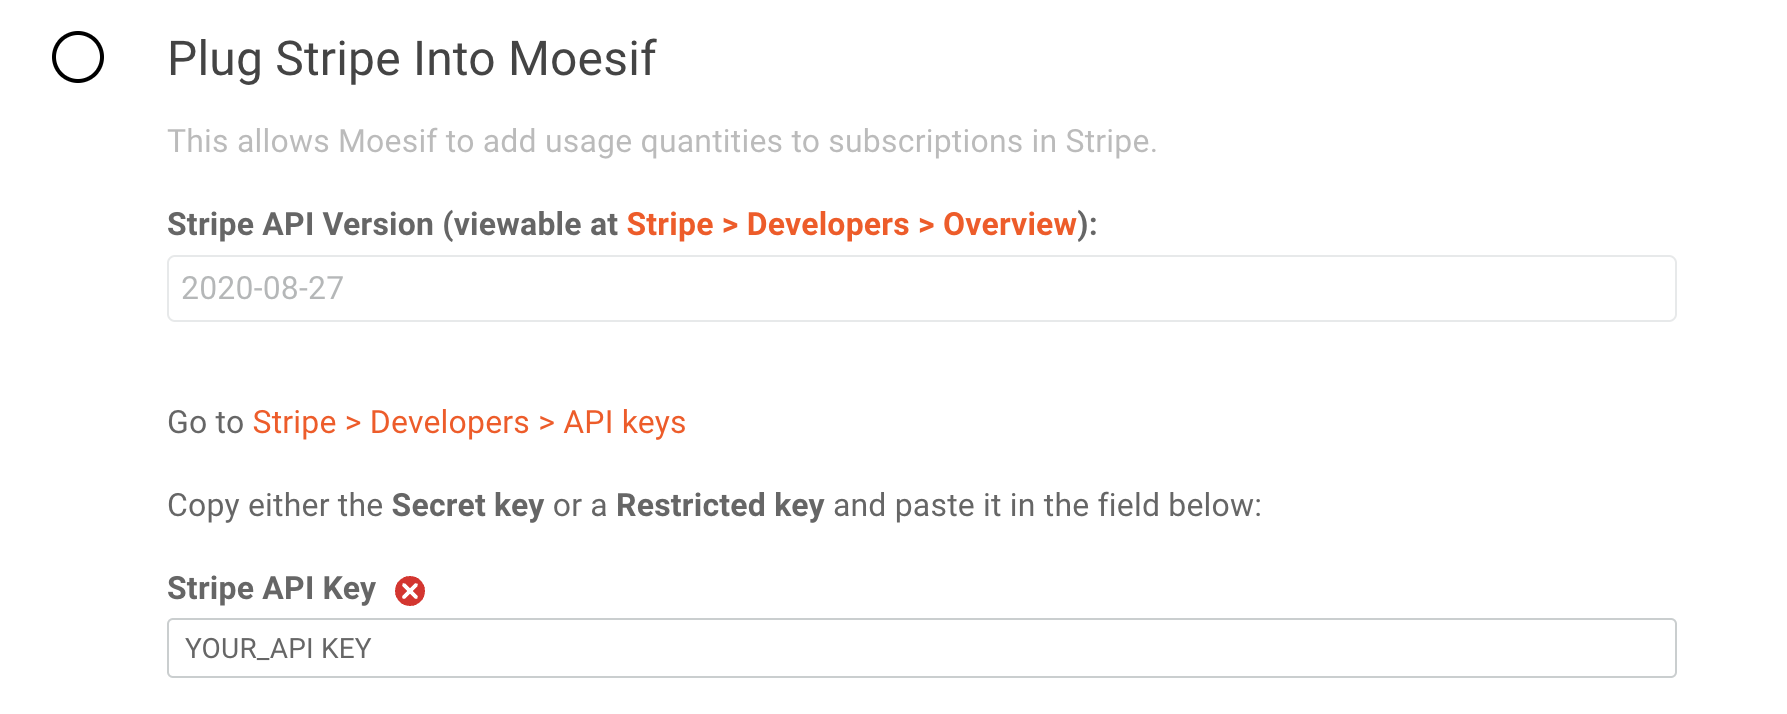
Currently, Moesif only supports version 2020-08-27 of the Stripe API so that field defaults for the Stripe API Version field.
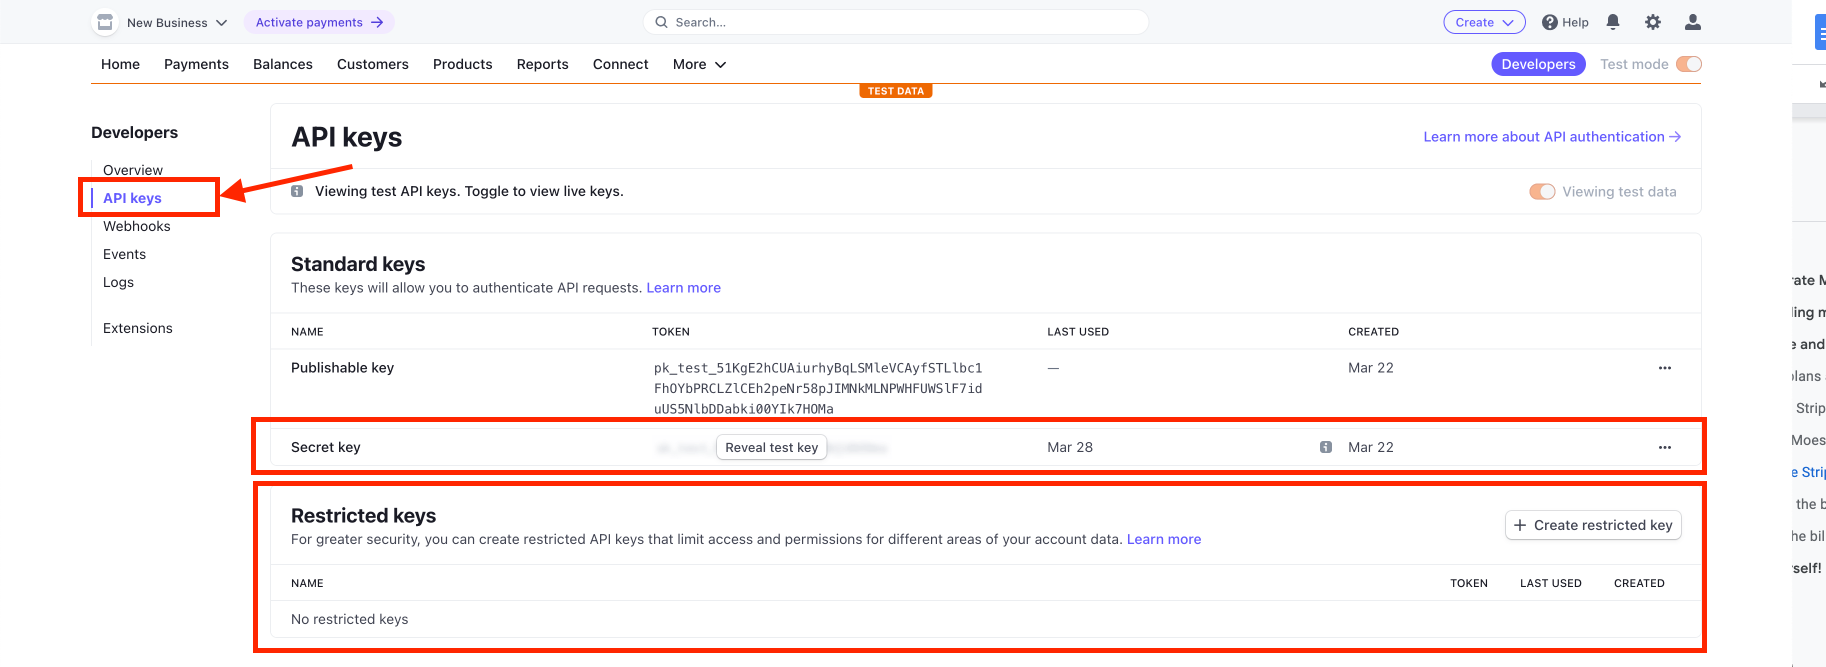
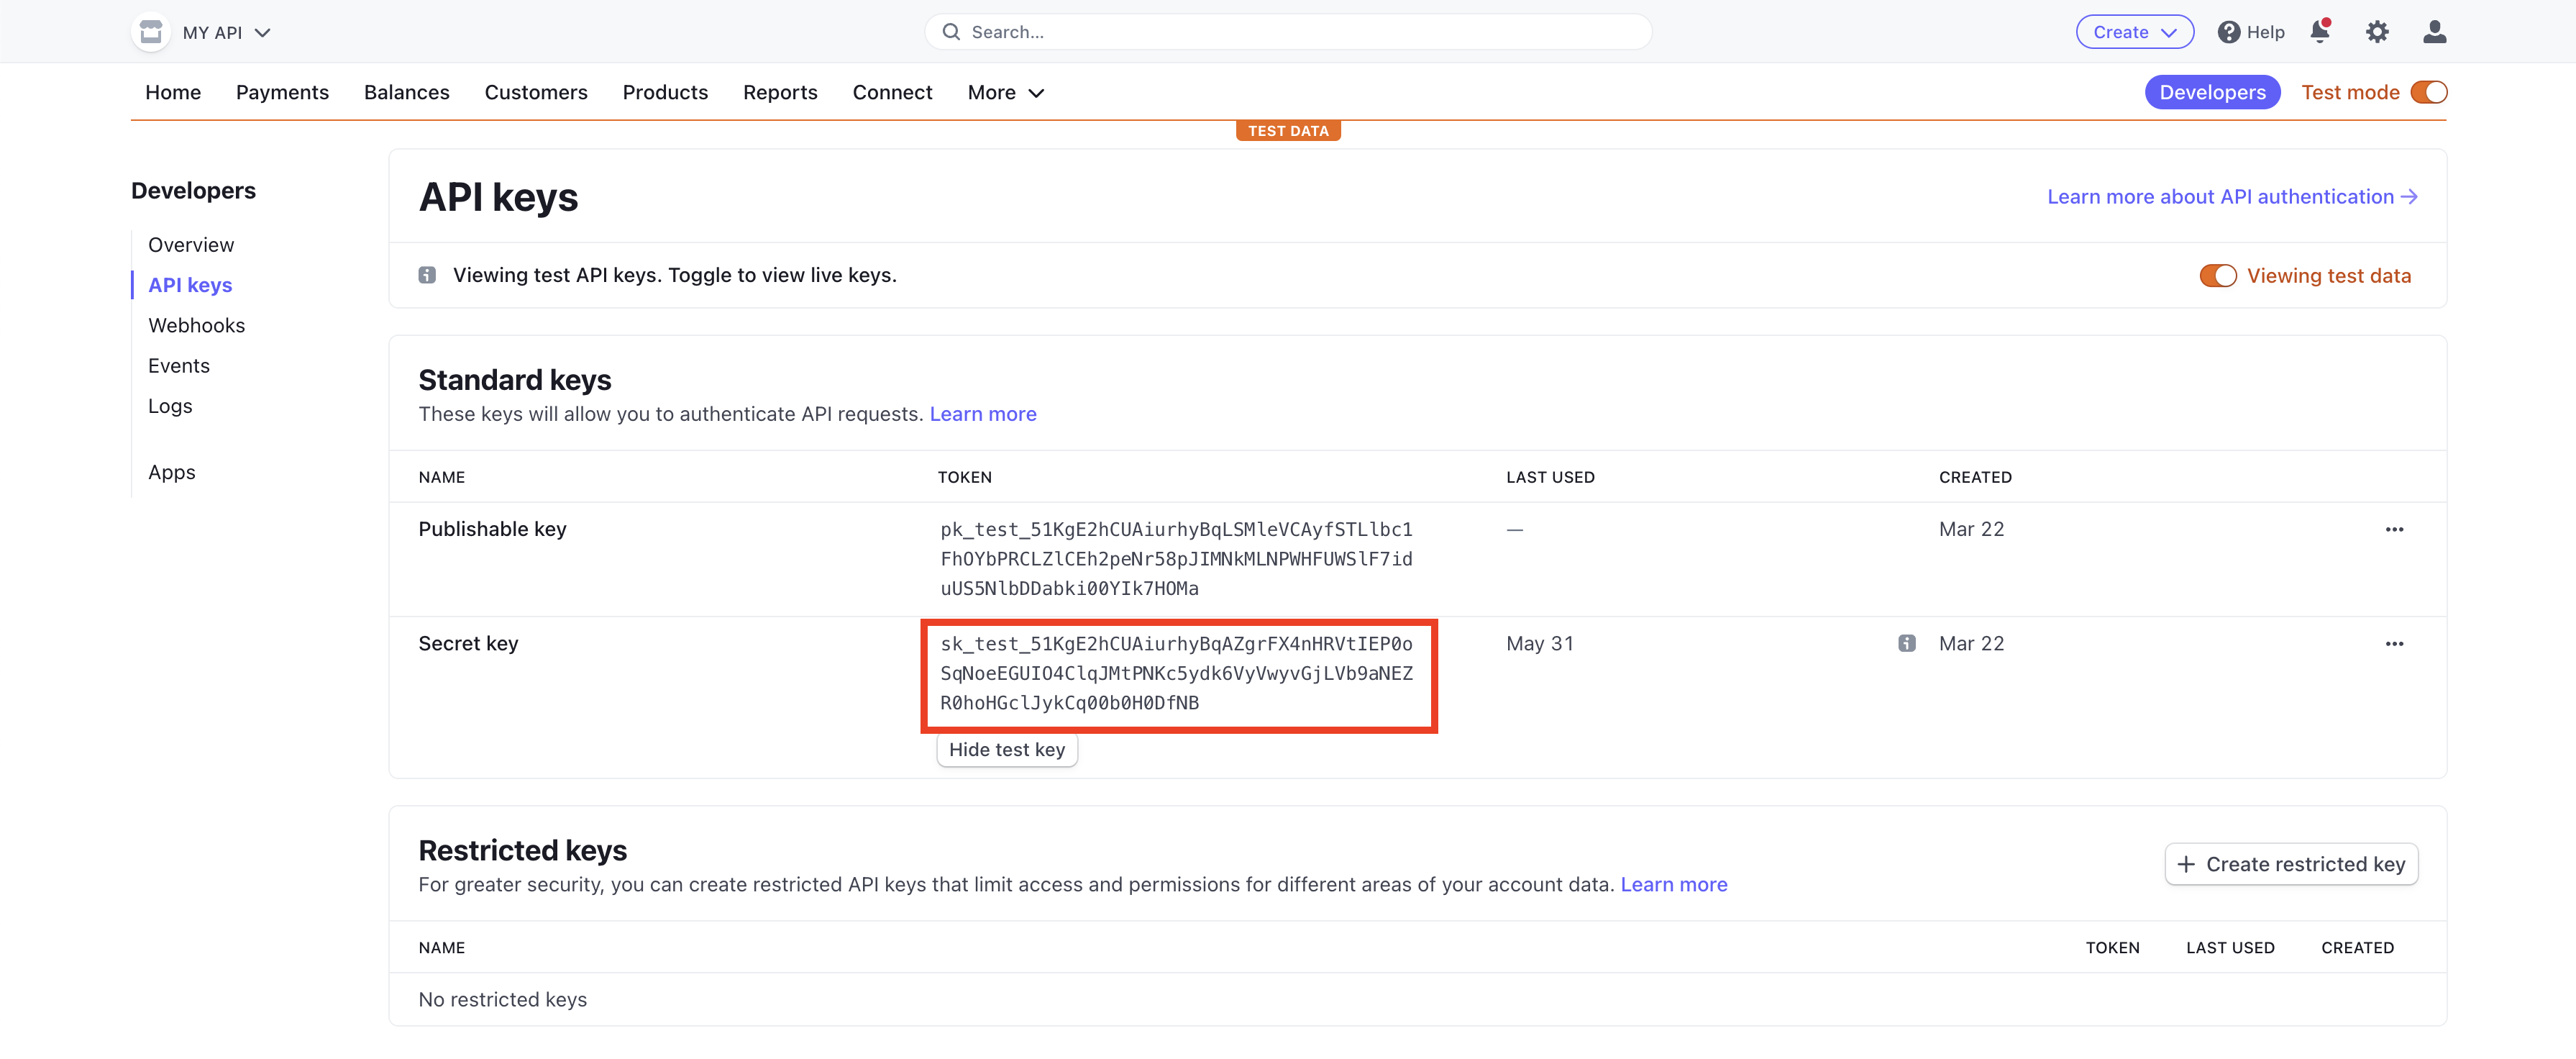
For the Stripe API Key field, you’ll need to retrieve the API key from Stripe to plug it in. From the Developers screen, the same one we used in the previous step, you’ll click on API Keys. You’ll then be able to see the private key for your API in either the Secret key or a generated Restricted keys field on the screen. Either key can be used.
After copying the key from Stripe, you’ll paste this key into the Stripe API Key field back in Moesif. After doing this, back in Moesif you can scroll down to the bottom of the screen and click Save to save the configuration.
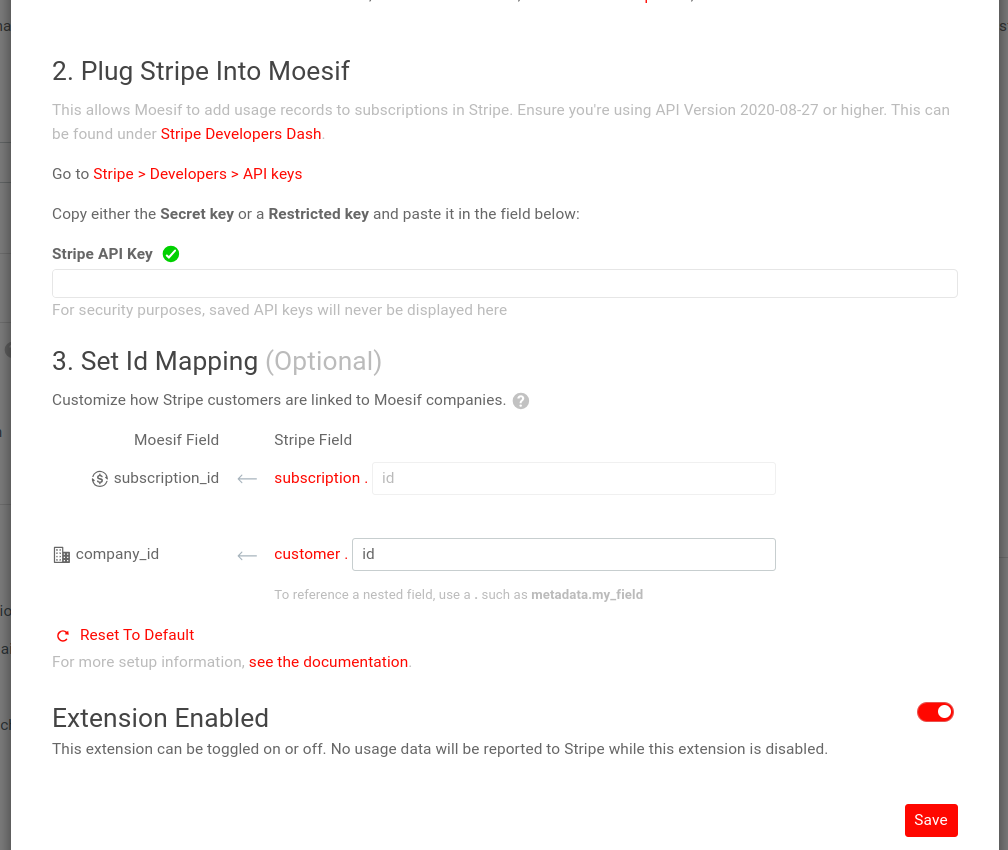
Optionally, you have the ability to customize the company_id in Moesif as well. The default should work fine for most purposes. However, you can fully customize it to specify how to map Stripe Subscription and Customer objects to Subscription ID and Company ID in Moesif respectively:
- A Stripe Customer maps to Moesif Company.
- A Stripe Subscription maps to a Moesif Subscription.
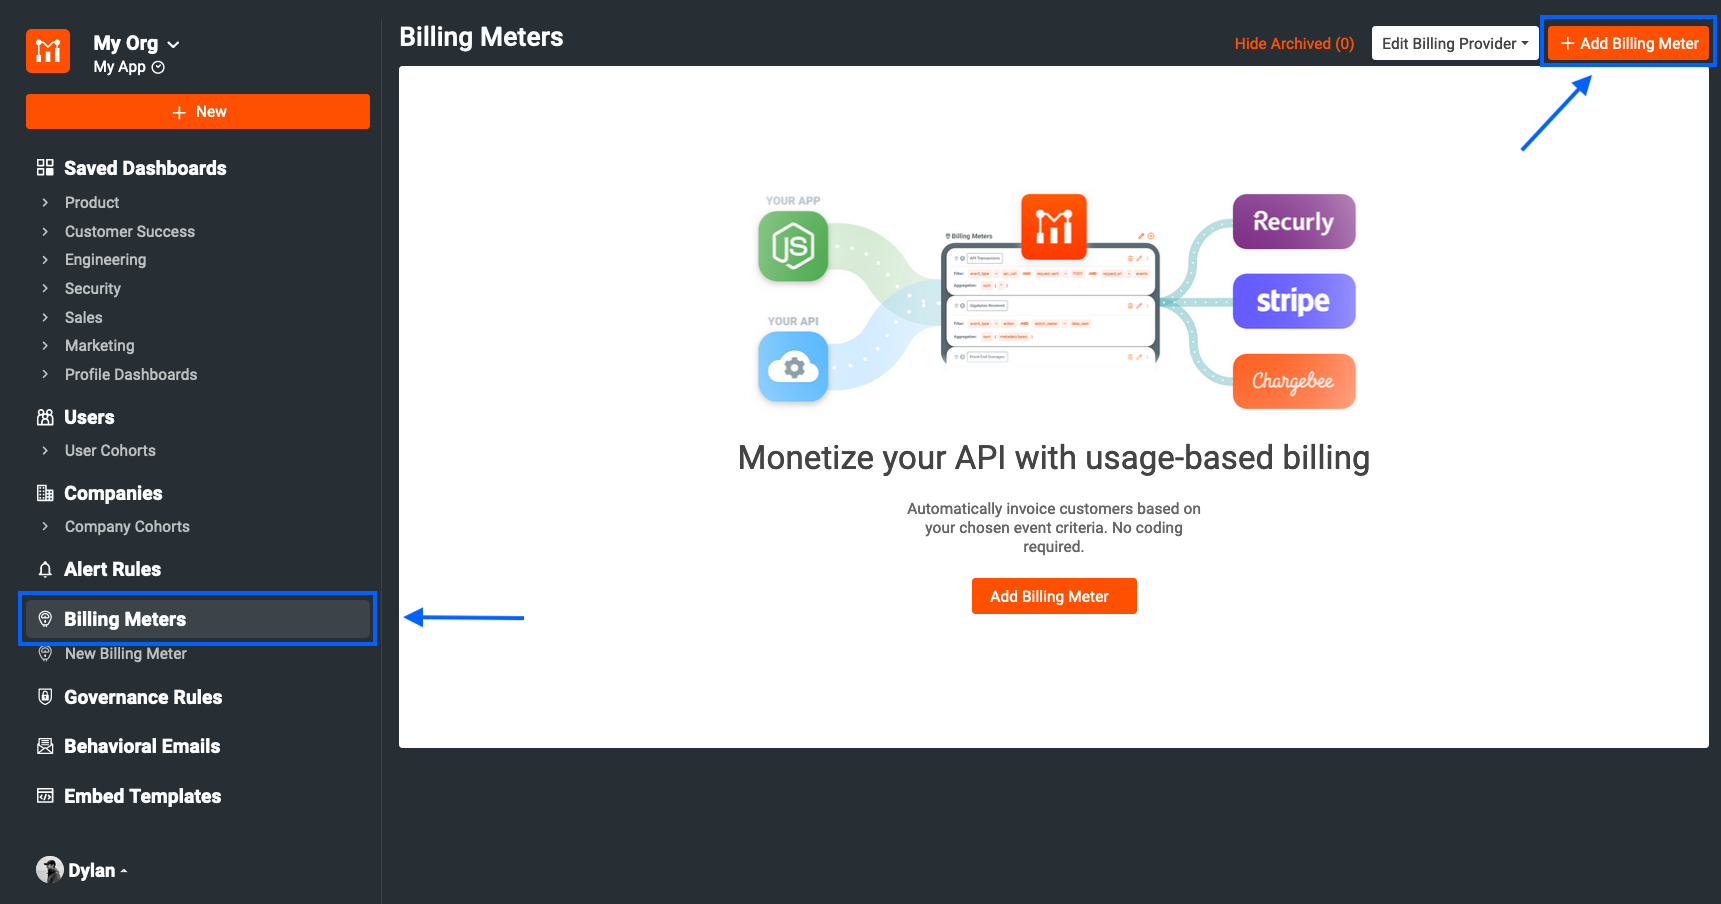
3 - Create a Billing Meter
Once you have the Stripe integration active in Moesif, you can begin to set up your billing meter. Billing meters created in Moesif do two things: track usage based on specific criteria and report that usage to the billing provider. Moesif allows you to set up very simple and very complex billing meters with relative ease.
To create the Billing Meter, in Moesif you will navigate to the Billing Meter screen. You can do this from the left-side menu. On the Billing Meter’s screen, you’ll then click + Add Billing Meter in the top-right corner of the screen.
The next screen is where you can actually input the criteria for your Billing Meter.
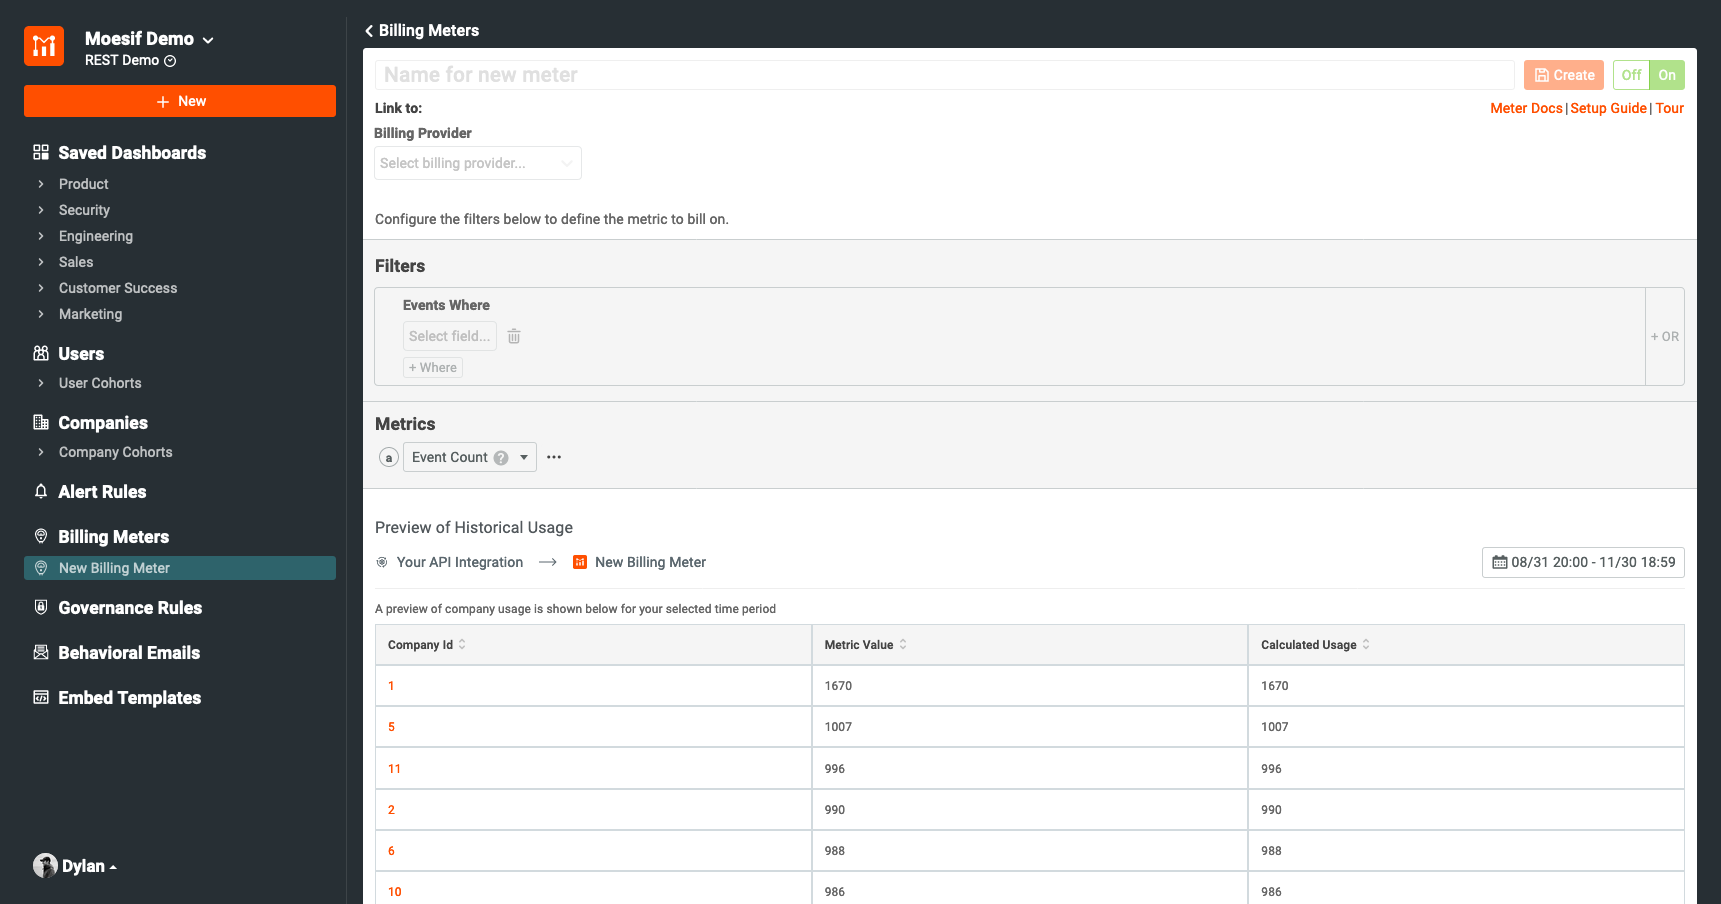
Fields on this screen include:
-
Billing Meter Name
- This is the Moesif internal name of your new Billing Meter
-
Billing Provider
- In this dropdown you can choose the billing provider you want to send your usage metrics to.
-
Product (Stripe only)
- Here you can choose which Product that you’ve set up in Stripe you want your usage metrics to be tied to.
-
Price (Stripe only)
- The last field in the Billing Provider settings for the Billing Meter, here you will choose which Price you want to tie your usage metrics to.
-
Filters
- Under the Filters configuration, you will configure your billing criteria to only include requests that fit a certain criteria.
-
Metrics
- Here you can choose which metric you would like to bill on. Available options include:
-
Event Count
- This will increment usage for every event that fits the criteria outlined in the Filter criteria.
-
Unique Users
- This will increment usage whenever a unique user sends a request that fits the Filter criteria. For every unique user, the count will be incremented by 1 regardless of the event count for that user.
-
Unique Companies
- This will increment usage whenever a unique company sends a request that fits the Filter criteria. For every unique company, the count will be incremented by 1 regardless of the event count for that company.
-
Unique Sessions/API Keys
- This will increment usage whenever a unique session or API key is used to send a request that fits the Filter criteria. For every unique session or API key, the count will be incremented by 1 regardless of the event count for that particular session or API key.
There are other options under Metrics as well but the above 4 tend to be the most applicable to usage-based billing.
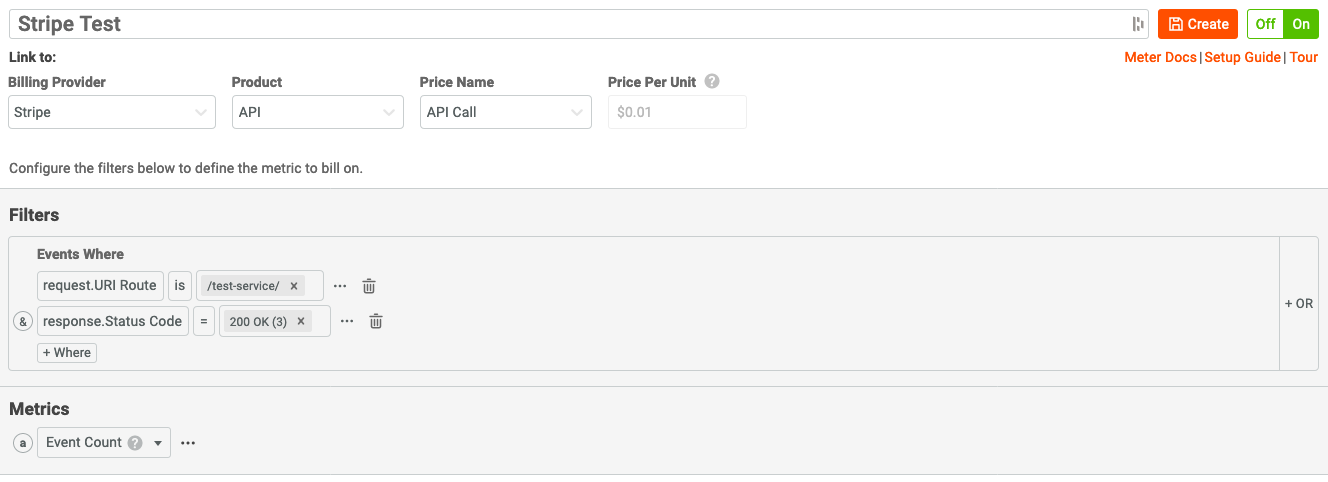
As an example, for this guide we will create a Billing Meter that will filter traffic for a single endpoint, named /test-service, and where requests received a successful HTTP 200 response. We will use the Event Count metric to make sure that every request is added to the tally and sent to the billing provider.
In Moesif, the billing meter will be configured as shown below.
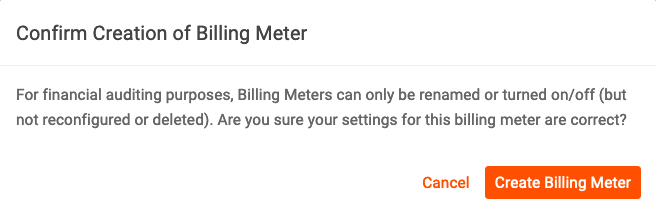
We will then click Create. This will create and activate the Billing Meter. A modal will appear notifying you that the billing meter has been created and presents a walk-through to ensure the meter is correctly configured.
First, we will set up a flow to get users registered, subscribed, and create a JWT so they can use our monetized API. Once that is complete we will come back and proceed with the walk-through.
4 - Setting Up the Kong Developer Portal
Next, we will customize the Kong Developer Portal to accommodate monetization. For this, we will add a few files and change a few that are already created by default. The flow will allow users to sign up for access to the developer portal and the APIs within it. When the user signs up, they will automatically be subscribed to the “My API” product we created in the previous steps.
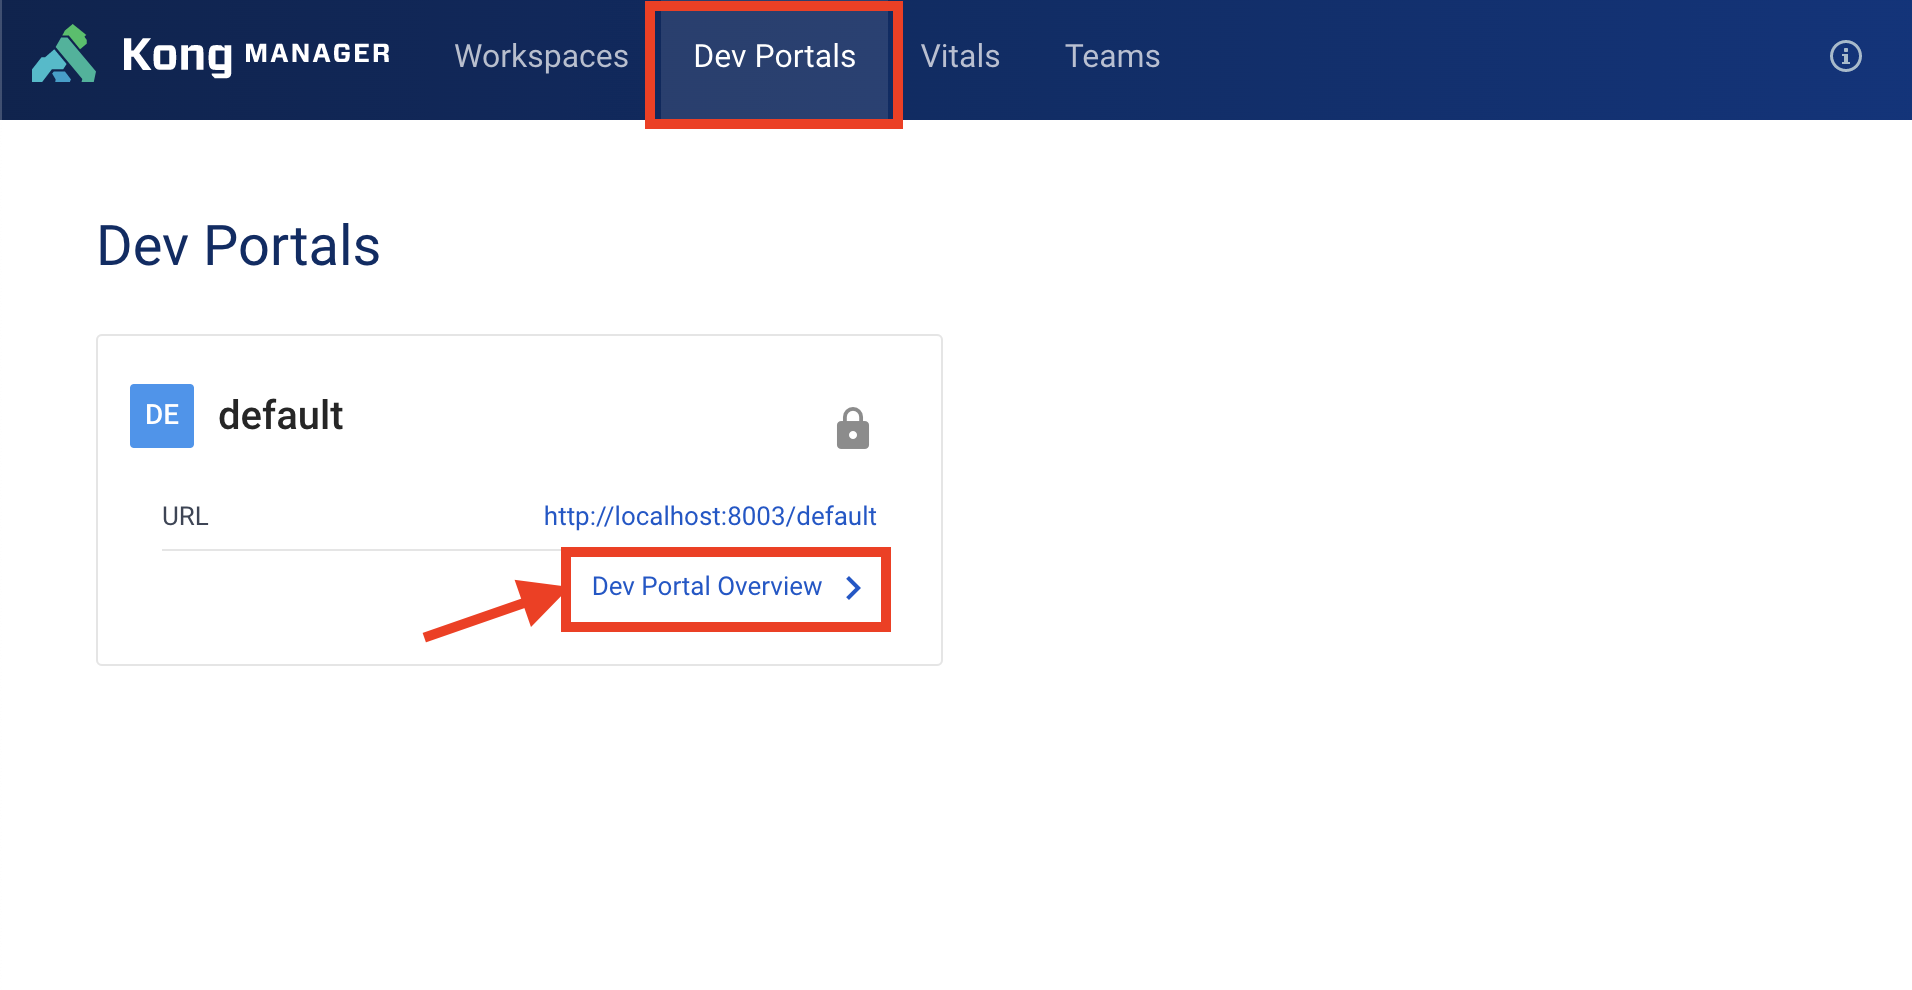
The first step in customizing the portal for monetization is to log into the Kong Management UI. This usually is running on your Kong server on port 8002. Once you are in the Kong Management UI, click on the Dev Portals menu item at the top of the screen. Once on the Dev Portals screen, you’ll click the Dev Portal Overview link.
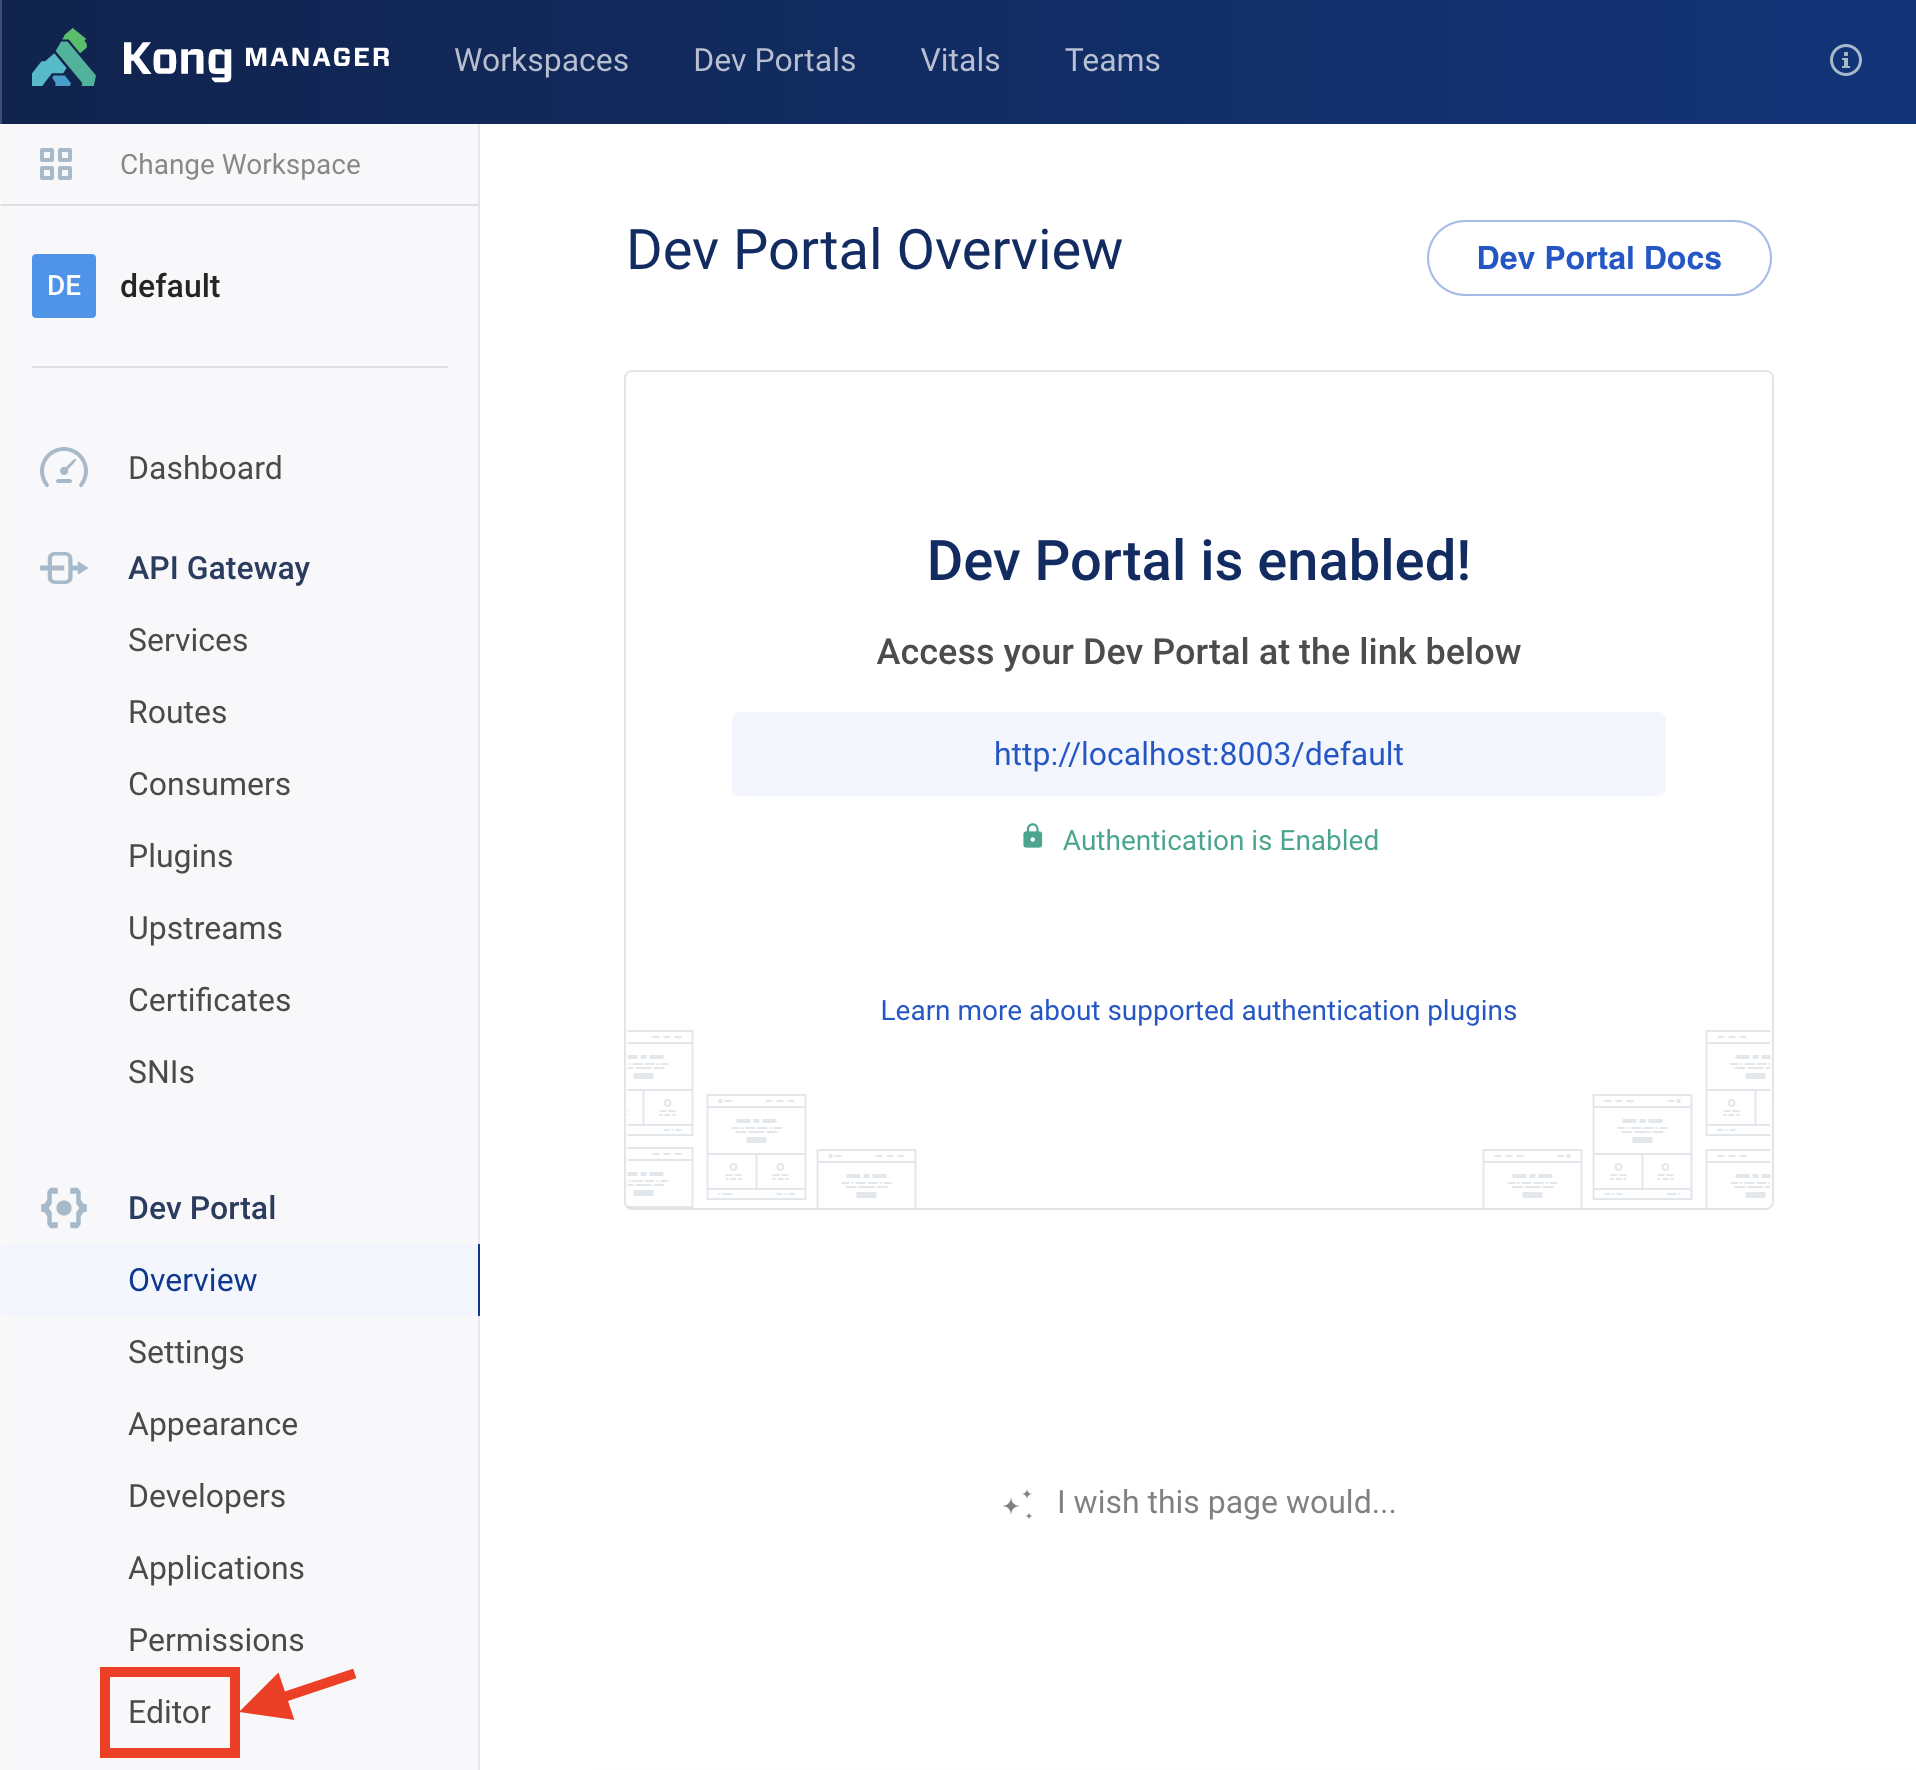
Once on the Dev Portal Overview screen, in the navigation on the right, click the Editor menu item to go to the Dev Portal editor.
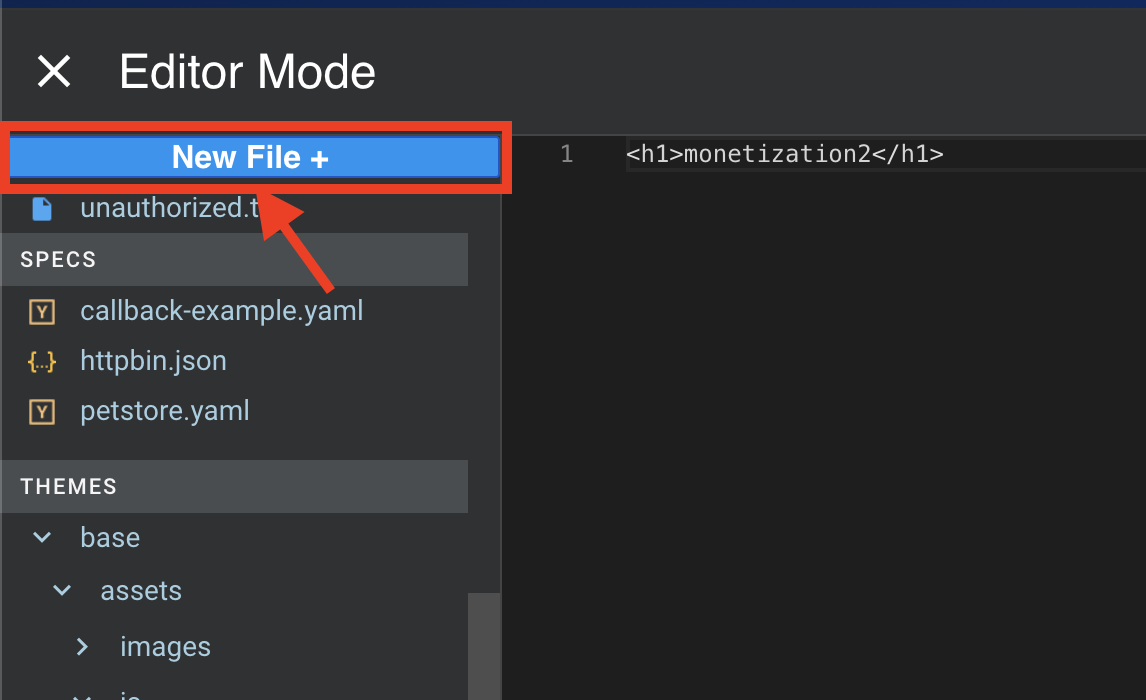
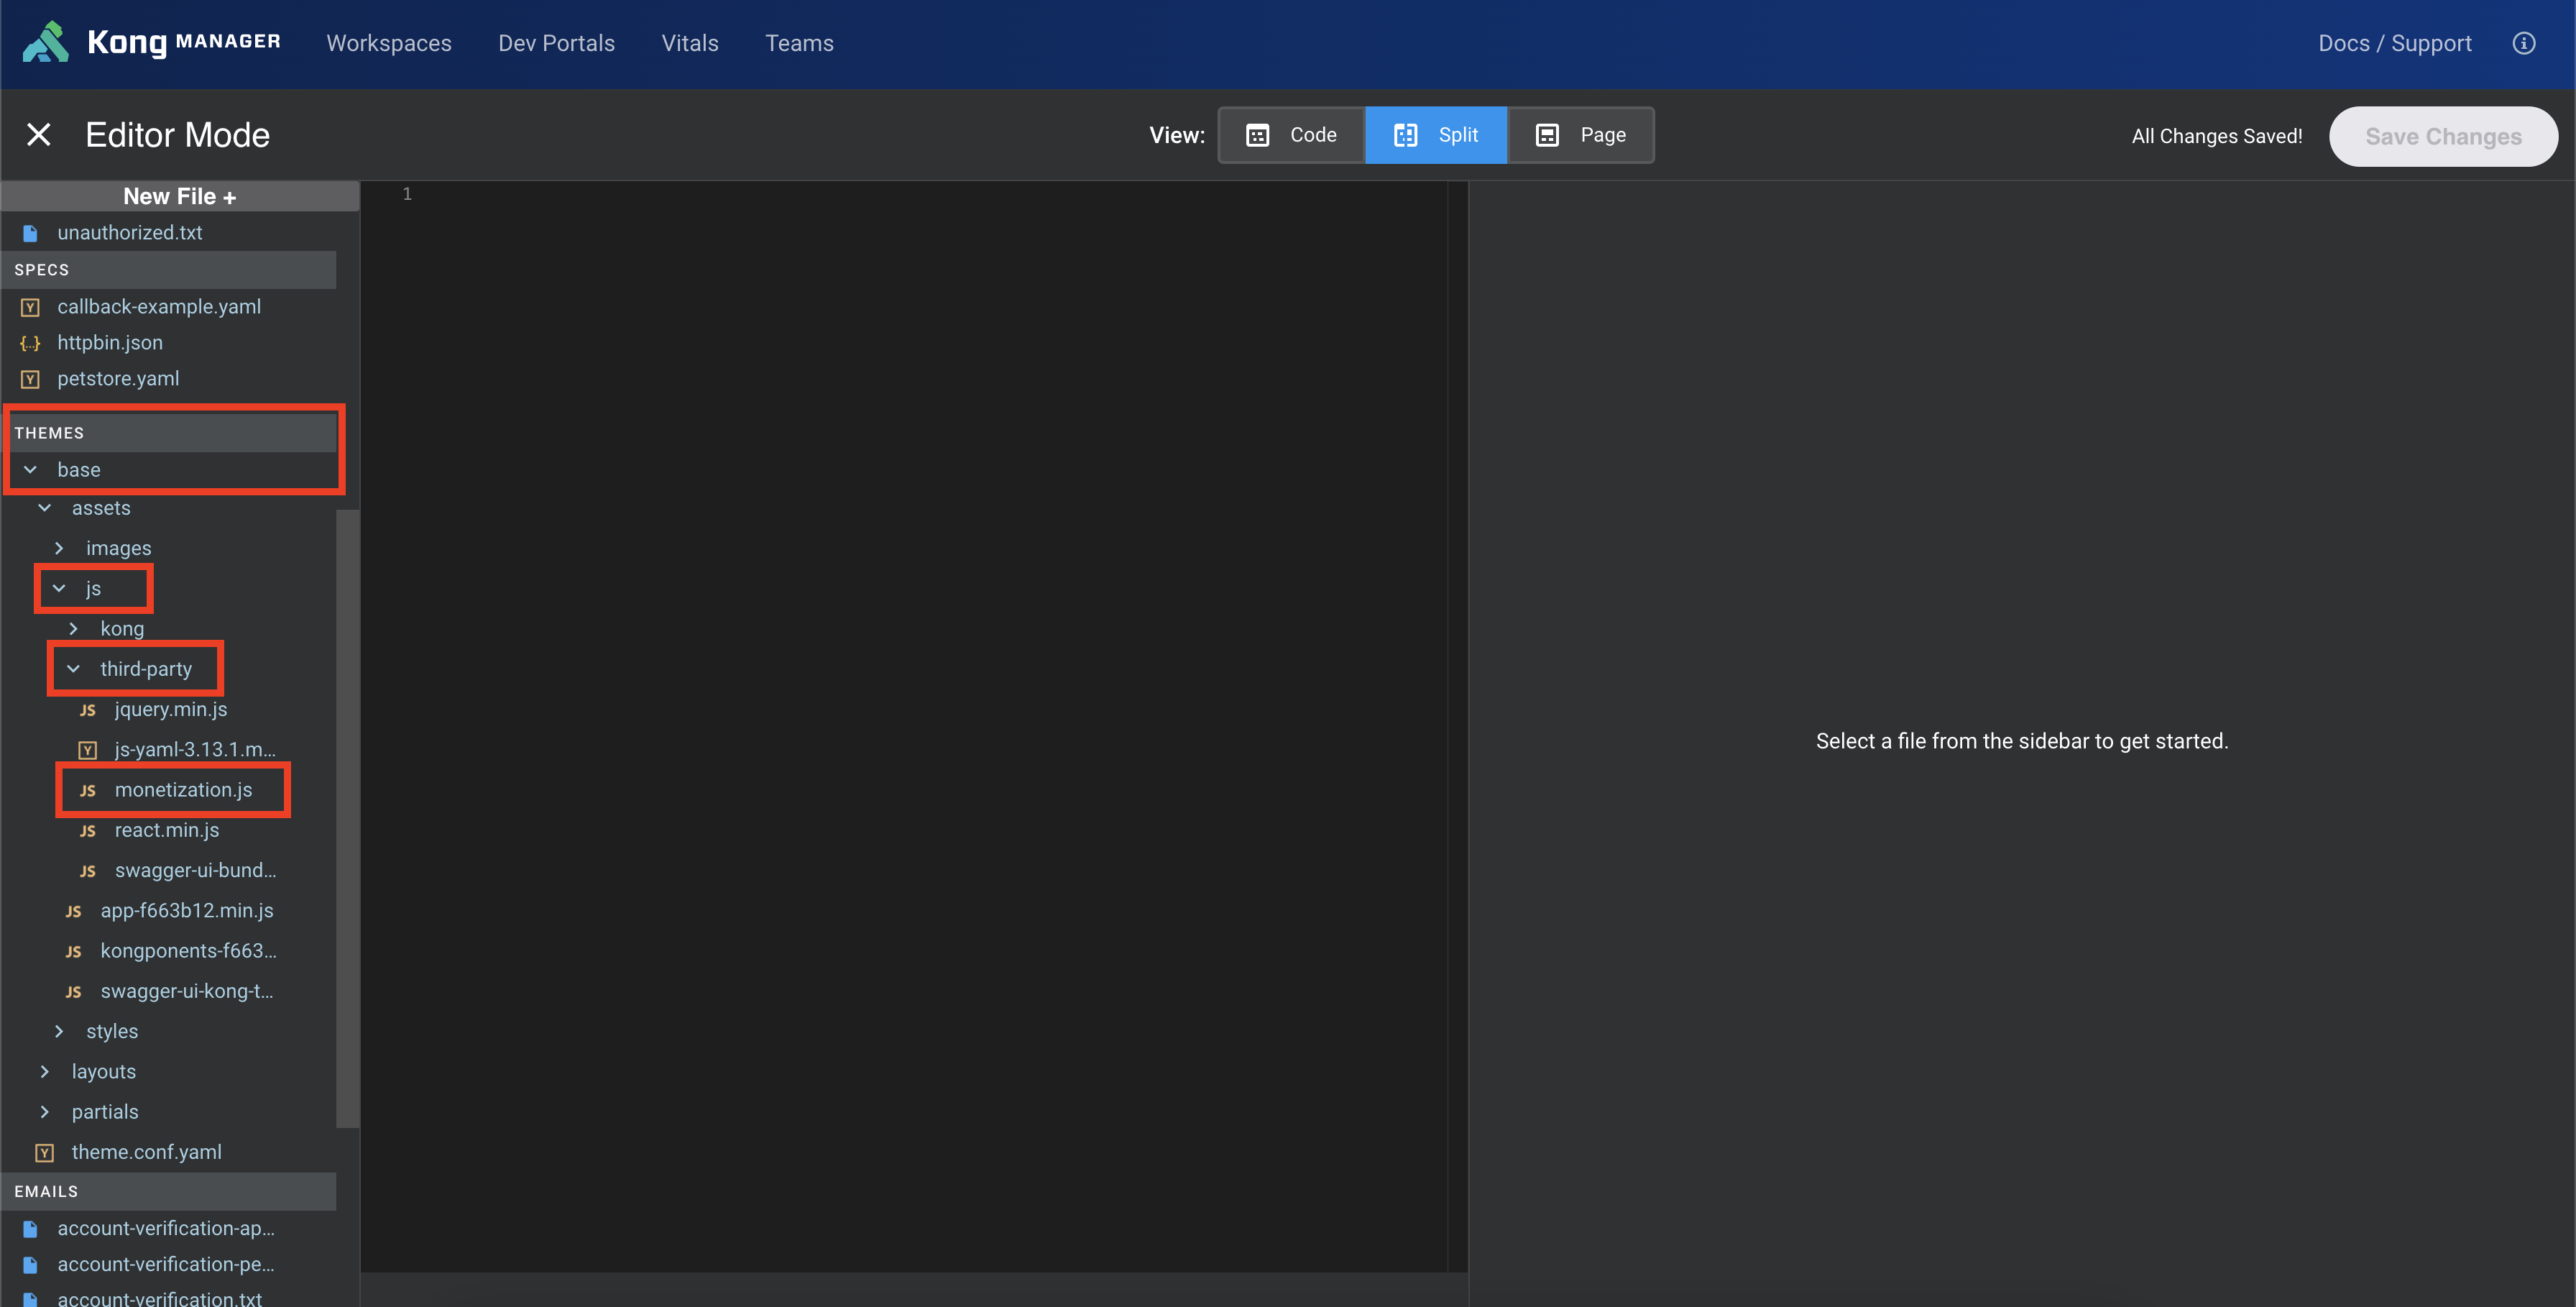
Once in the Editor screen, we will add a monetization.js script. To do this, click the New File button in the top left of the screen.
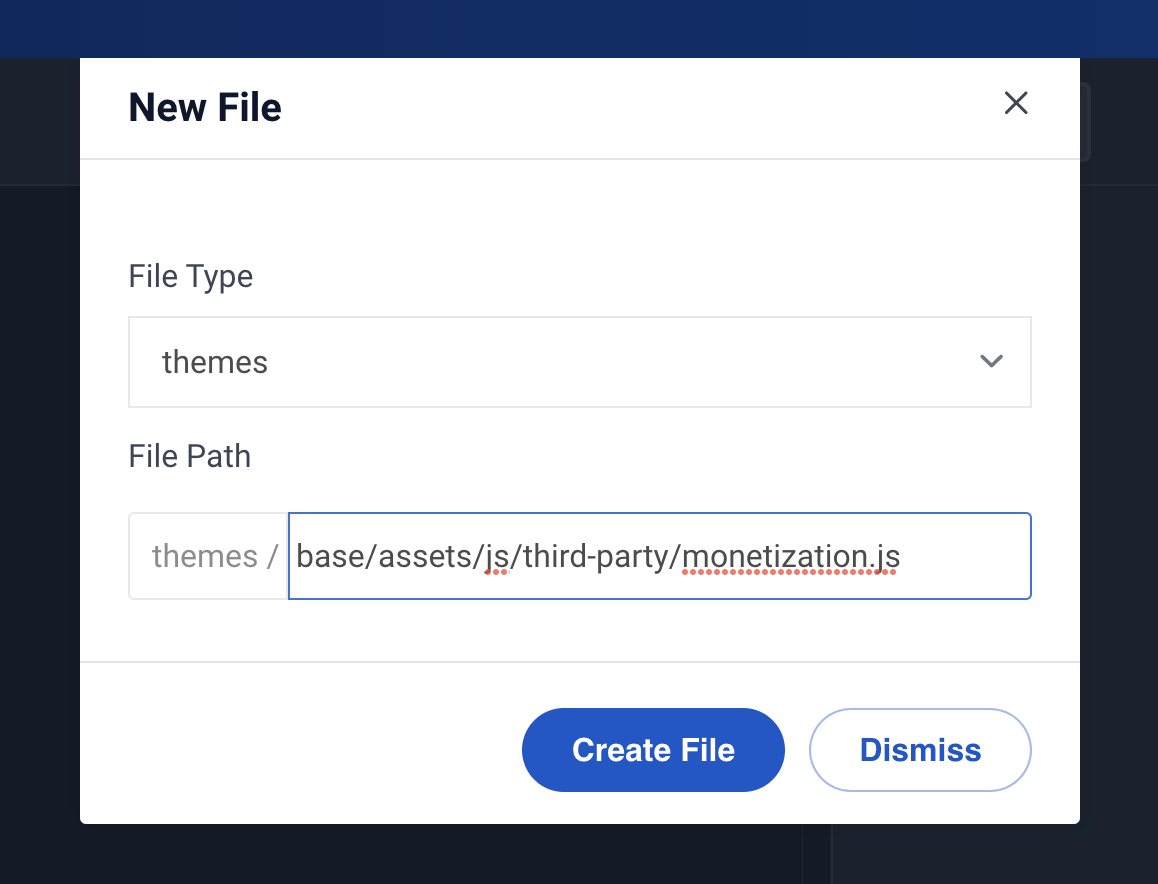
In the modal that pops up, we will select themes from the File Type dropdown. In the File Path, we will input base/assets/js/third-party/monetization.js to create our monetization.js file in the correct directory. Once the fields are filled out, click Create File.
You should now see that the file has been added to the specified file path.
At the top of the monetization.js file, we will add a credentials object so that we can add our Stripe API Key and Moesif Application ID.
const credentials = {
   stripe_api_key: 'Bearer STRIPE_API_KEY',
   moesif_app_id: 'MOESIF_APP_ID',
}
Obtaining Your Stripe API and Price Key
Your Stripe API Key can be found in the same place we grabbed the key for our Stripe and Moesif integration we did earlier for the Billing Meter. You can actually use the same key for both or create a restricted key with just the scope needed for each function.
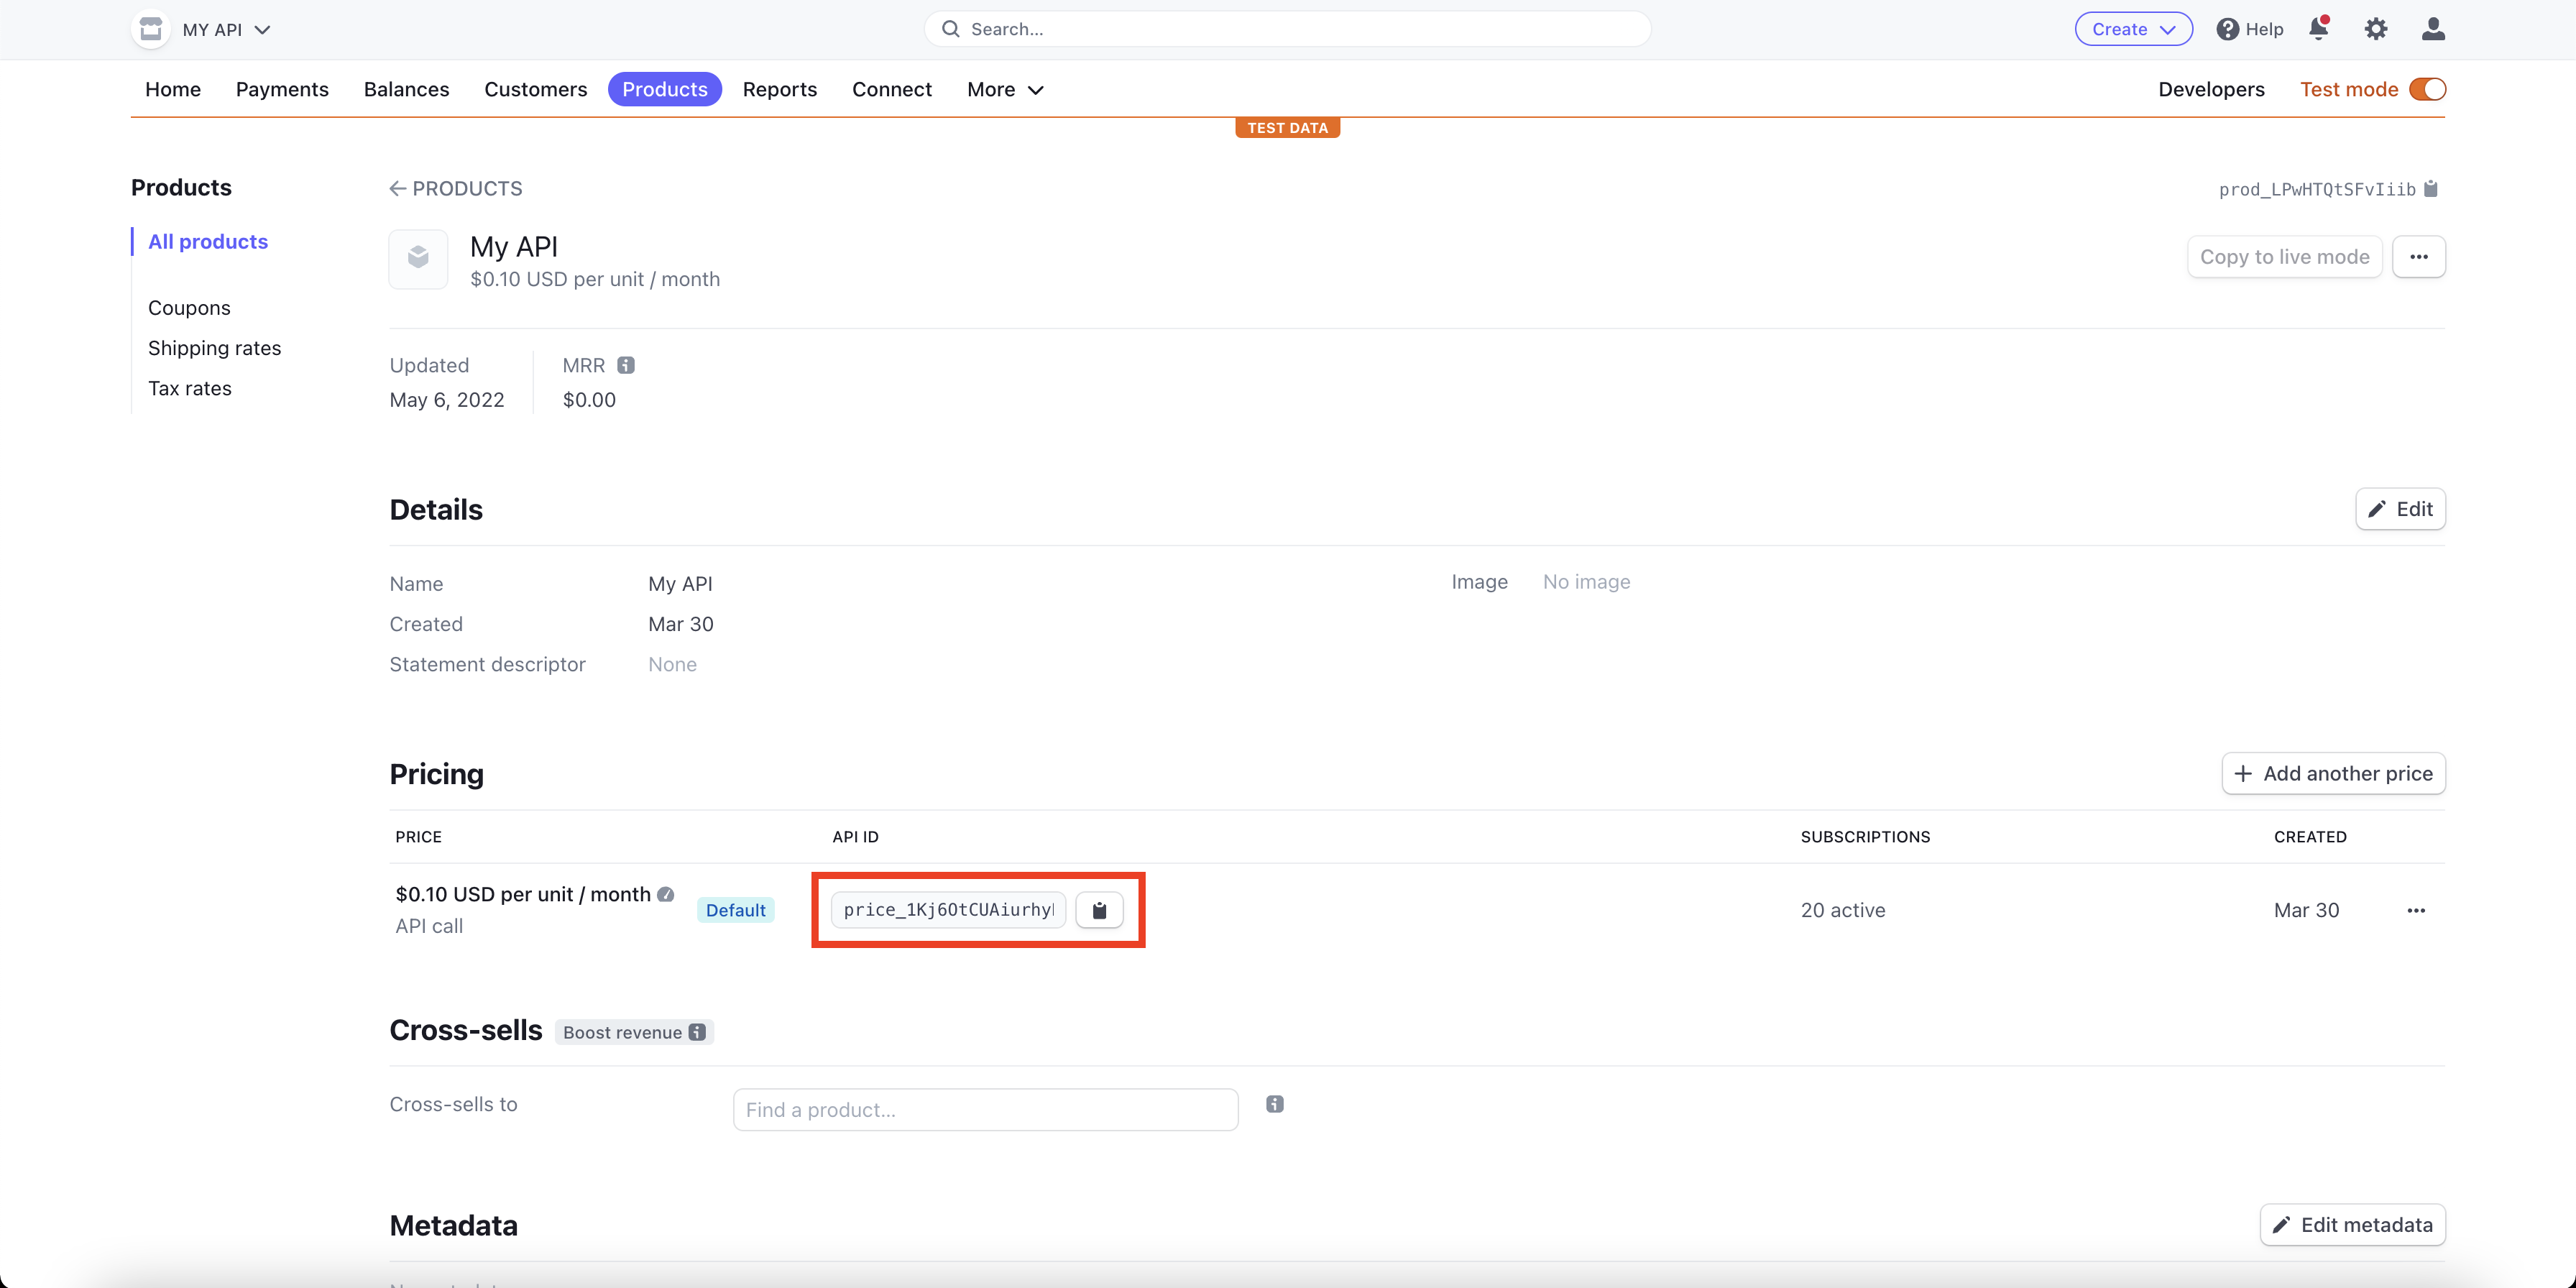
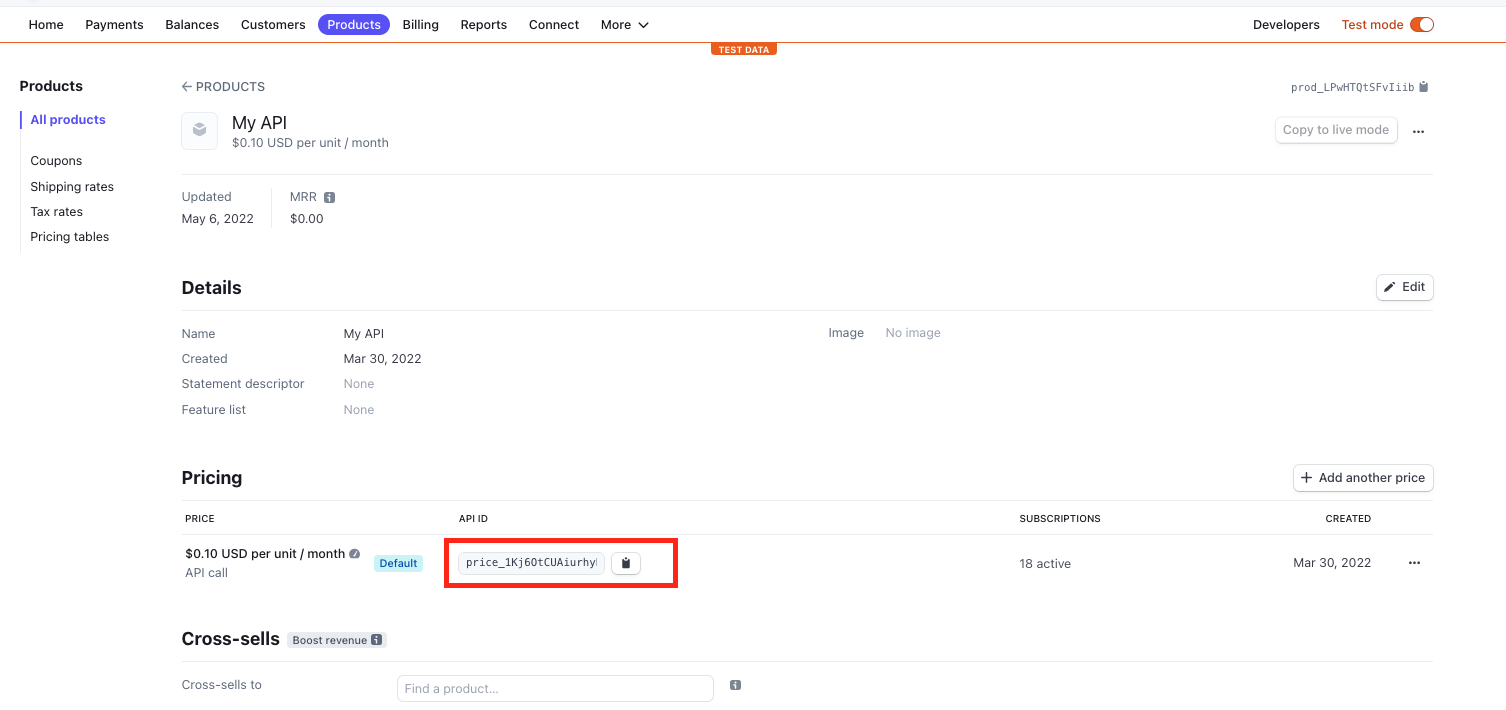
While we’re at it, lets grab our Stripe product’s price key. We will need it in the next section. Your Stripe price key is an identifier for the price you created earlier in Stripe. This can be found by going to the product in Stripe and grabbing the value from the API ID column.
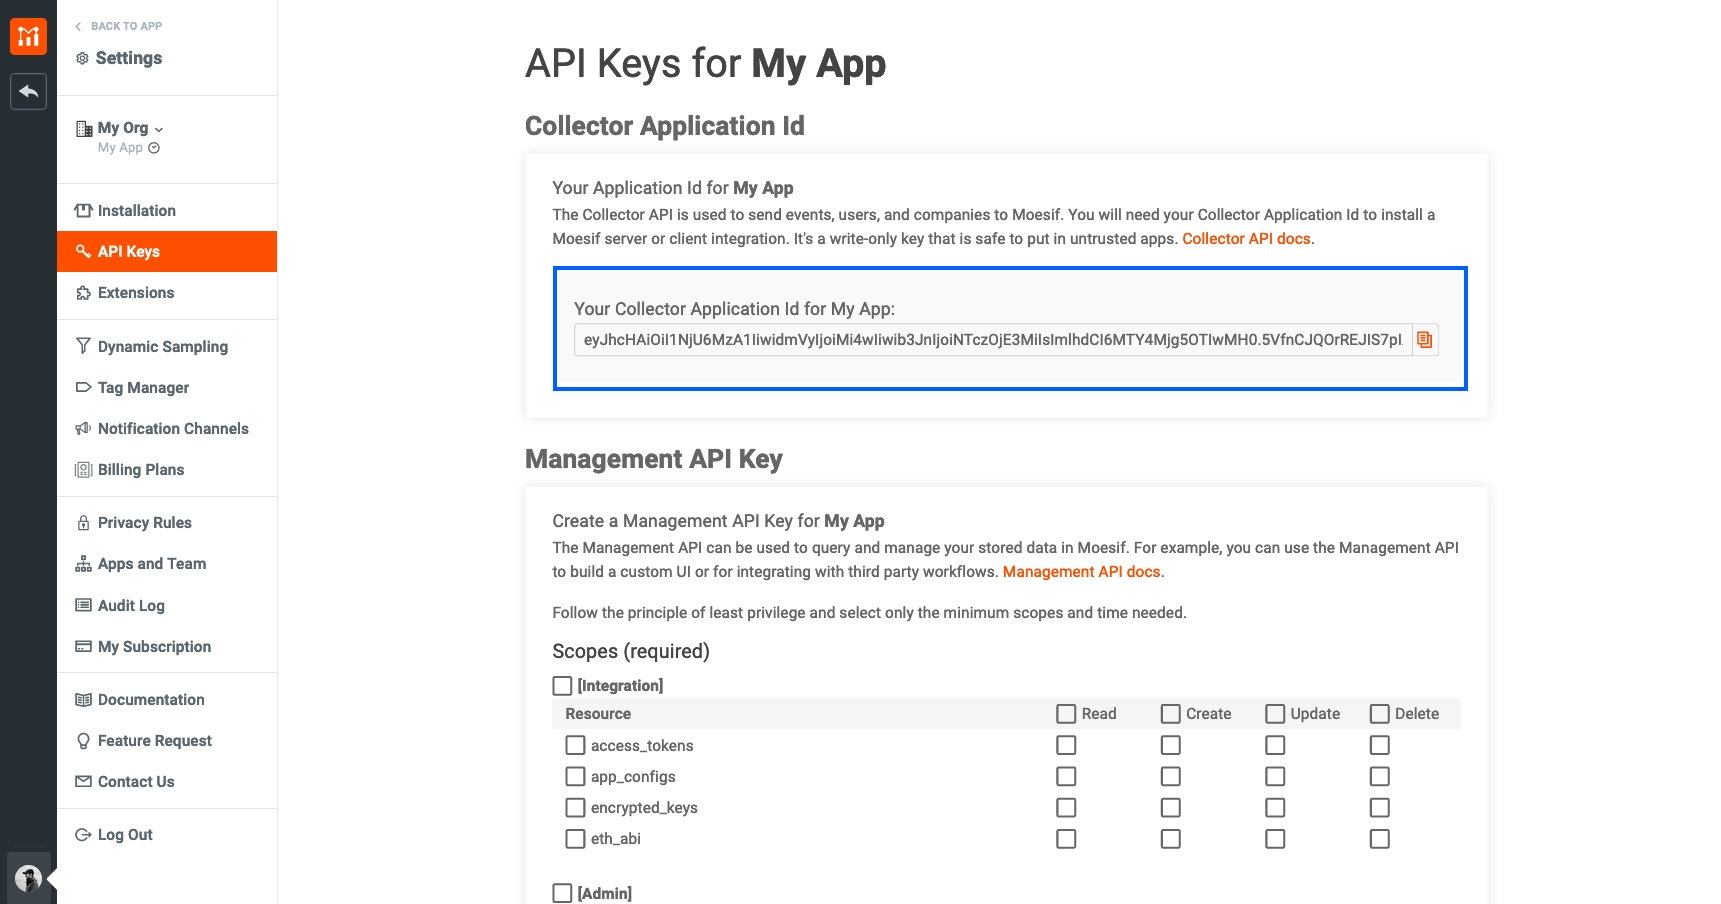
Obtaining Your Moesif Application ID
Your Moesif application ID is found in Moesif by going to the menu link in the bottom-left of the screen (which will show your name) and selecting API Keys.
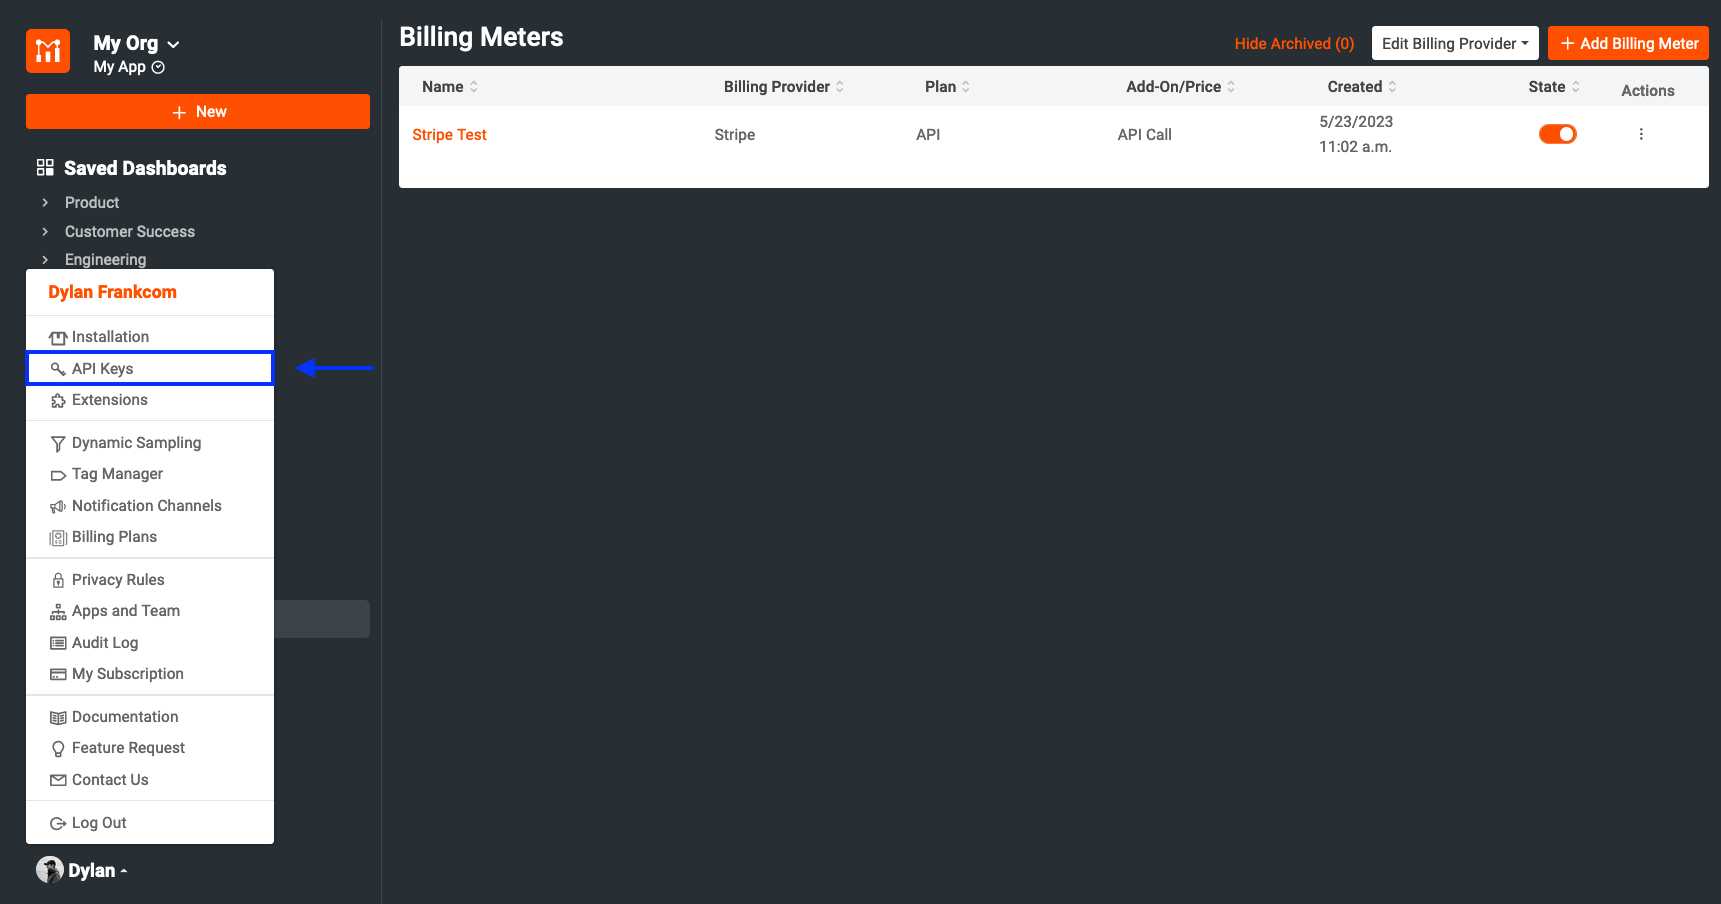
The key will then be on the page that appears under Collector Application Id.
Under the credentials object, we will add a function to create a customer in Stripe. We will name the function createStripeCustomer and make a call to the Stripe /customers endpoint. The endpoint will return the Customer ID of the newly created Stripe customer. The fully-implemented function can be seen below.
const createStripeCustomer = function(full_name, email) {
   var stripeCustomerID = undefined;


   $.ajax({
       type: 'POST',
       url: 'https://api.stripe.com/v1/customers',
       async: false,
       headers: {
           Authorization: credentials.stripe_api_key
       },
       data: {
           "email": email,
           "name": full_name,
       },


       success: function(data) {
           stripeCustomerID = data.id
       },


       error: function(xhr, ajaxOptions, throwError) {
           console.log(xhr.responseJSON);
           rej({
           message: xhr.responseJSON ? xhr.responseJSON.message : null,
           xhr: xhr,
           ajaxOptions: ajaxOptions,
           throwError: throwError
           });
       }
   });


   return stripeCustomerID;
}
Under our createStripeCustomer function, we will create another function to create a new Stripe subscription. We will call the /subscriptions Stripe endpoint that will subscribe the customer to the Stripe Price provided.
const createStripeSubscription = function(stripeCustomerID, stripe_price_key) {
   var stripeSubscriptionID = undefined;


   $.ajax({
       type: 'POST',
       url: 'https://api.stripe.com/v1/subscriptions',
       async: false,
       headers: {
           Authorization: credentials.stripe_api_key
       },
       data: {
           "customer": stripeCustomerID,
           "items": [
               {
                   "price": stripe_price_key
               },
           ],
       },
       success: function(data) {
           stripeSubscriptionID = data.id;
       },
       error: function(xhr, ajaxOptions, throwError) {
               rej({
                   message: xhr.responseJSON ? xhr.responseJSON.message : null,
                   xhr: xhr,
                   ajaxOptions: ajaxOptions,
                   throwError: throwError
               });
       }
   })
   return stripeSubscriptionID;
}
The last function to implement is the createMoesifUser function. This function will call the Moesif API and create a new user with the correct user credentials. As you can see, we are passing a payload that will create a user in Moesif with a UserId that is equal to their email and a CompanyId that is equivalent to their Stripe Subscription ID.
const createMoesifUser = function(email, full_name, stripeSubscriptionID) {
    $.ajax({
       type: 'POST',
       url: 'https://api.moesif.net/v1/users',
       async: false,
       headers: { 'Accept': 'application/json', 'X-Moesif-Application-Id': credentials.moesif_app_id },
       data: JSON.stringify({ "user_id" : email, "company_id" : stripeSubscriptionID, "metadata" : { "name" : full_name } }),
       success: function(data) {
           console.log(data);
       },
       error: function(xhr, ajaxOptions, throwError) {
           rej({
               message: xhr.responseJSON ? xhr.responseJSON.message : null,
               xhr: xhr,
               ajaxOptions: ajaxOptions,
               throwError: throwError
           });
       }
    })
}
The complete monetization.js file will look like this:
const credentials = {
   stripe_api_key: 'Bearer sk_test_STRIPE_API_KEY',
   moesif_app_id: 'MOESIF_APP_ID',
}


const createStripeCustomer = function(full_name, email) {
   var stripeCustomerID = undefined;


   $.ajax({
       type: 'POST',
       url: 'https://api.stripe.com/v1/customers',
       async: false,
       headers: {
           Authorization: credentials.stripe_api_key
       },
       data: {
           "email": email,
           "name": full_name,
       },


       success: function(data) {
           stripeCustomerID = data.id
       },


       error: function(xhr, ajaxOptions, throwError) {
           rej({
           message: xhr.responseJSON ? xhr.responseJSON.message : null,
           xhr: xhr,
           ajaxOptions: ajaxOptions,
           throwError: throwError
           });
       }
   });


   return stripeCustomerID;
}


const createStripeSubscription = function(stripeCustomerID, stripe_price_key) {
   var stripeSubscriptionID = undefined;


   $.ajax({
       type: 'POST',
       url: 'https://api.stripe.com/v1/subscriptions',
       async: false,
       headers: {
           Authorization: credentials.stripe_api_key
       },
       data: {
           "customer": stripeCustomerID,
           "items": [
               {
                   "price": stripe_price_key
               },
           ],
       },
       success: function(data) {
           stripeSubscriptionID = data.id;
       },
       error: function(xhr, ajaxOptions, throwError) {
               rej({
                   message: xhr.responseJSON ? xhr.responseJSON.message : null,
                   xhr: xhr,
                   ajaxOptions: ajaxOptions,
                   throwError: throwError
               });
       }
   })
   return stripeSubscriptionID;
}


const createMoesifUser = function(email, full_name, stripeSubscriptionID) {
    $.ajax({
       type: 'POST',
       url: 'https://api.moesif.net/v1/users',
       async: false,
       headers: { 'Accept': 'application/json', 'X-Moesif-Application-Id': credentials.moesif_app_id },
       data: JSON.stringify({ "user_id" : email, "company_id" : stripeSubscriptionID, "metadata" : { "name" : full_name } }),
       success: function(data) {
           console.log(data);
       },
       error: function(xhr, ajaxOptions, throwError) {
           rej({
               message: xhr.responseJSON ? xhr.responseJSON.message : null,
               xhr: xhr,
               ajaxOptions: ajaxOptions,
               throwError: throwError
           });
       }
    })
}
Once your code is complete, make sure to save the file.
Next, we will navigate to Themes/base/partials/theme/required-scripts.html. In this file, we will need to add an entry to include the monetization.js script. That entry will look like this.
<script src="assets/js/third-party/monetization.js"></script>
In the file itself, just under the JQuery script tag, we will add the script tag for monetization.js.
{# /!\ REQUIRED SCRIPTS. REMOVE / EDIT AT OWN RISK. /!\ #}
<script src="assets/js/third-party/jquery.min.js"></script>
<script src="assets/js/third-party/monetization.js"></script>
<script src="assets/js/kong/kong.js"></script>
<script src="assets/js/kong/kong.utils.js"></script>
<script src="assets/js/kong/kong.auth.js"></script>
The import needs to be below the JQuery import since we use JQuery in the functions included in the monetization.js file.
Finally, we can use the functions we defined in monetization.js as part of the developer portal registration flow. For this, we will need to go into the kong.auth.js file. Open the file by going to Themes/base/assets/js/kong/kong.auth.js. Once in the file, we will scroll down to the window.Kong.Auth.register and change the function to add a new Stripe customer, subscribe the new customer to a subscription, and add the user to Moesif.
We will adjust the function by adding the following logic within the success callback.
var customer_id = createStripeCustomer(JSON.parse(fields.meta).full_name, fields.email);
var subscription_id = createStripeSubscription(customer_id, "price_YOUR_PRICE_KEY");
createMoesifUser(fields.email, JSON.parse(fields.meta).full_name, subscription_id);
Note that currently the Stripe Price ID is being hard coded. You’ll need to replace this value with a price key that you’ve created in Stripe. Optimally, somewhere in the signup flow, you would have a dropdown populating this value or something similar. However, this hardcoded approach can work if you only have a single price. In the above code, the
price_YOUR_PRICE_KEYvalue should contain the Stripe Price key that corresponds with the Billing Meter you set up. This will be the price key for the price you created earlier in Stripe. This can be found by going to the product in Stripe and grabbing the value from the API ID column.
The completed register function will look like this:
window.Kong.Auth.register = function(options) {
 var type = options.type
 var fields = { meta: {} }


 for (var i = 0; i < options.fields.length; i++) {
   var field = options.fields[i];


   if (type.FIELDS.indexOf(field.name) < 0) {
     fields.meta[field.name] = field.value;
   } else {
     fields[field.name] = field.value
   }
 }


 fields.meta = JSON.stringify(fields.meta)


 return new Promise((res, rej) => {
   $.ajax({
     type: 'POST',
     url: [options.baseUrl, window.Kong.Auth.REGISTER_ENDPOINT].join('/'),
     data: fields,


     success: function(data) {
       var customer_id = createStripeCustomer(JSON.parse(fields.meta).full_name, fields.email);
       // HARDCODE STRIPE PRICE VALUE BELOW
       var subscription_id = createStripeSubscription(customer_id, "price_YOUR_PRICE_KEY");
       createMoesifUser(fields.email, JSON.parse(fields.meta).full_name, subscription_id);


       return res(data);
     },


     error: function(xhr, ajaxOptions, throwError) {
       rej({
         message: xhr.responseJSON ? xhr.responseJSON.message : null,
         xhr: xhr,
         ajaxOptions: ajaxOptions,
         throwError: throwError
       });
     }
   });
 })
}
With your code added to the file, make sure to save your changes.
Testing Out The Moesif Billing Meter
Now that we have Moesif, Stripe, and the Kong Developer Portal set up, we can begin to test our setup to ensure that everything is working as expected.
Start a Meter Test
For this, we will go back to our Billing Meter and click Test Meter.
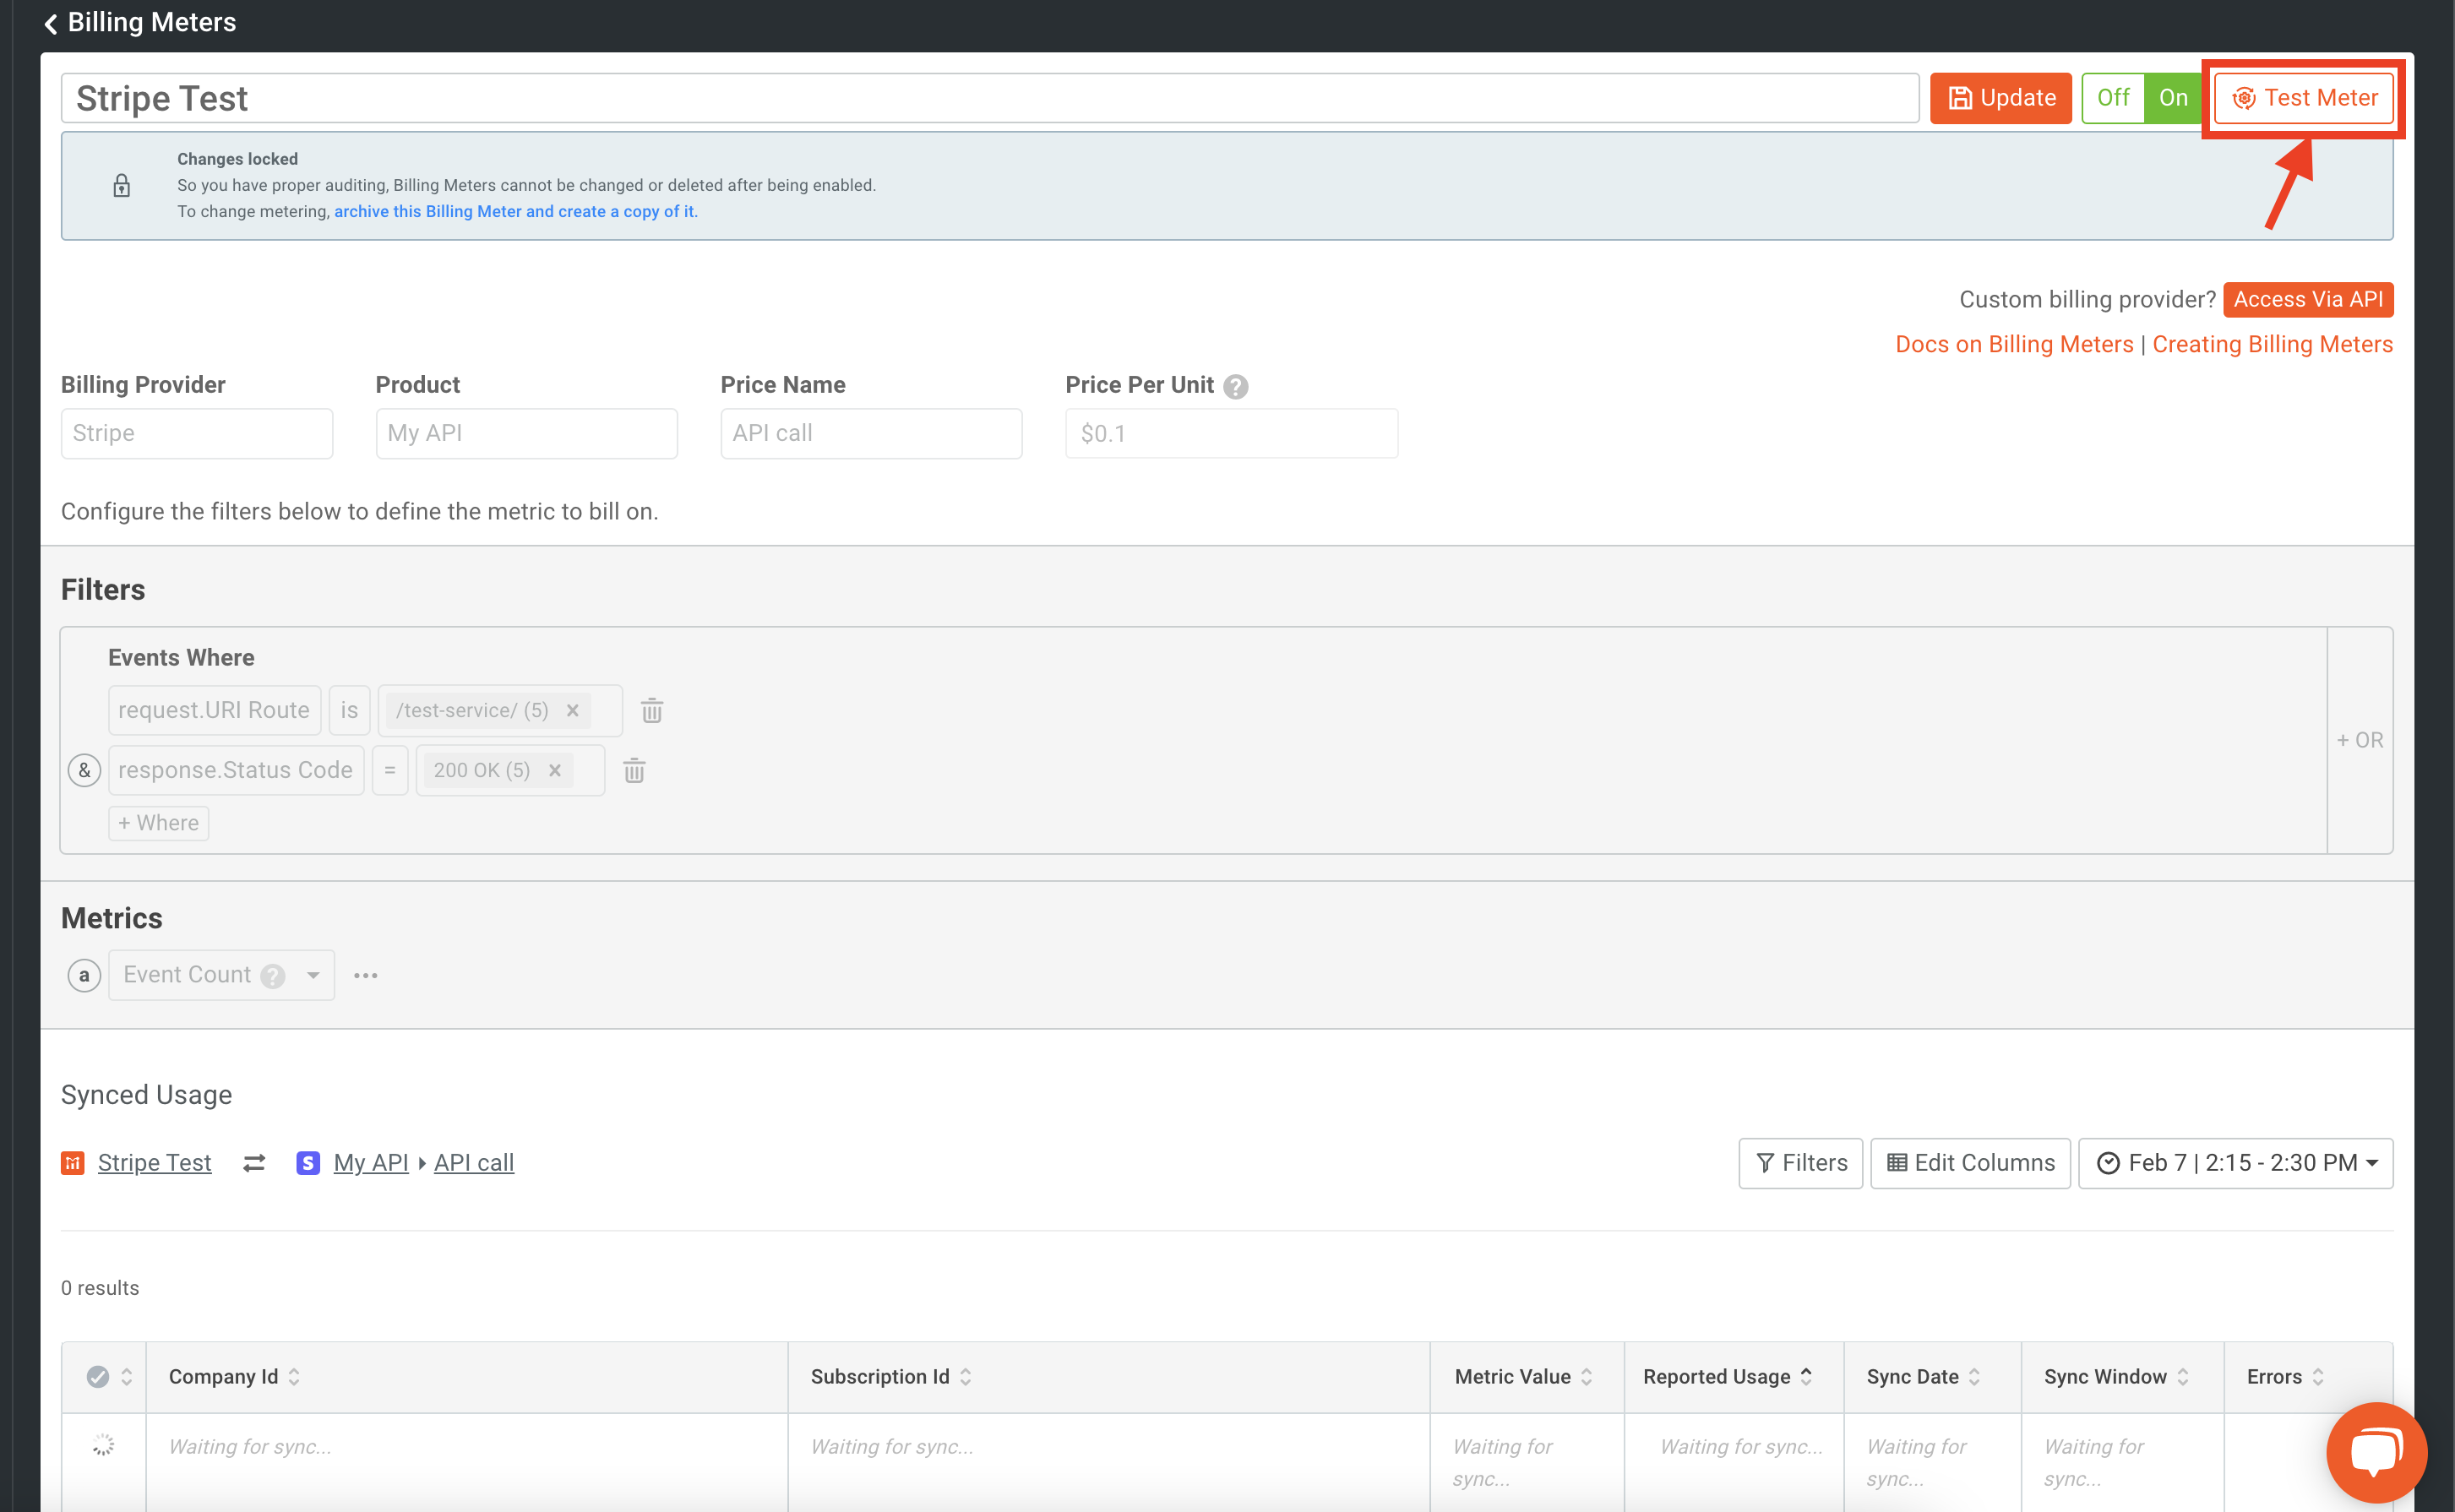
After clicking this, the Test Meter modal will appear. For now, we will leave this tab open in our browser since our first step is to use the Developer Portal in Kong to register a user. Registering a user will create the user in Stripe and create a subscription for them, which is the first requirement in the Test Meter.
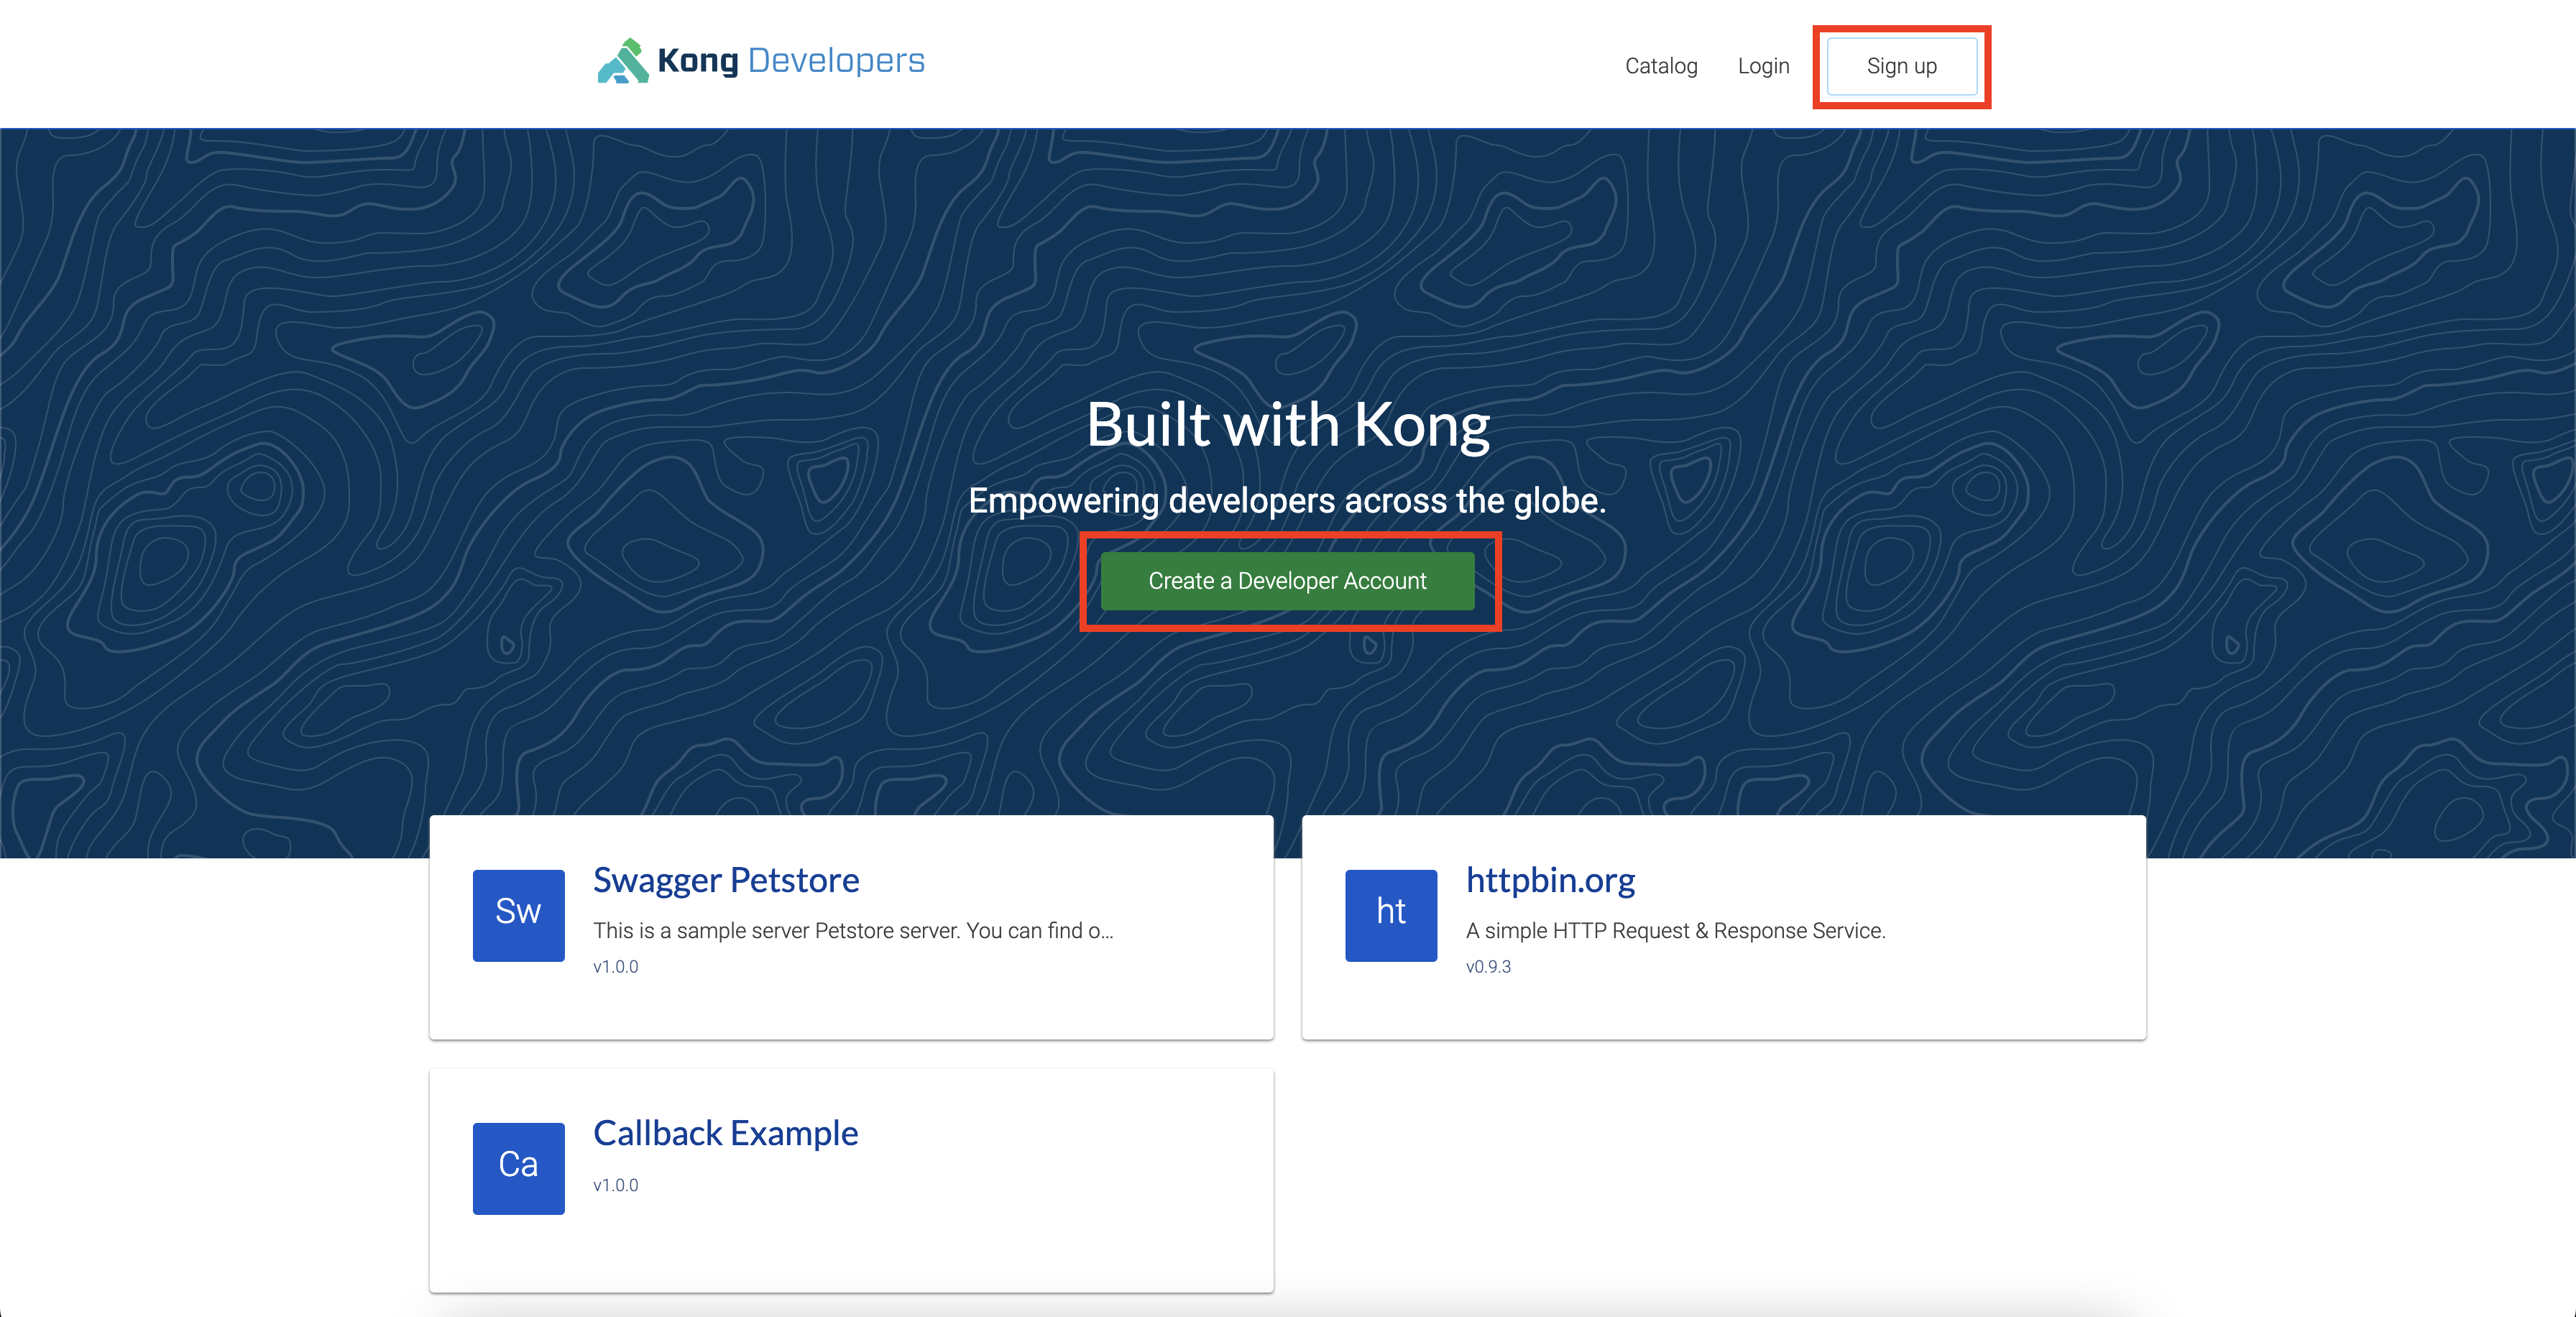
Sign Up in the Dev Portal
To create a user, we need to go into the Kong Dev Portal. Once you’ve navigated to the Kong Developer Portal, you’ll need to begin the registration process. To do this you can either click Sign Up in the top-right corner or click the Create a Developer Account button in the middle of the screen.
On the next screen, there are a few fields required to sign up a new user. Once these fields are filled out, click Create Account.
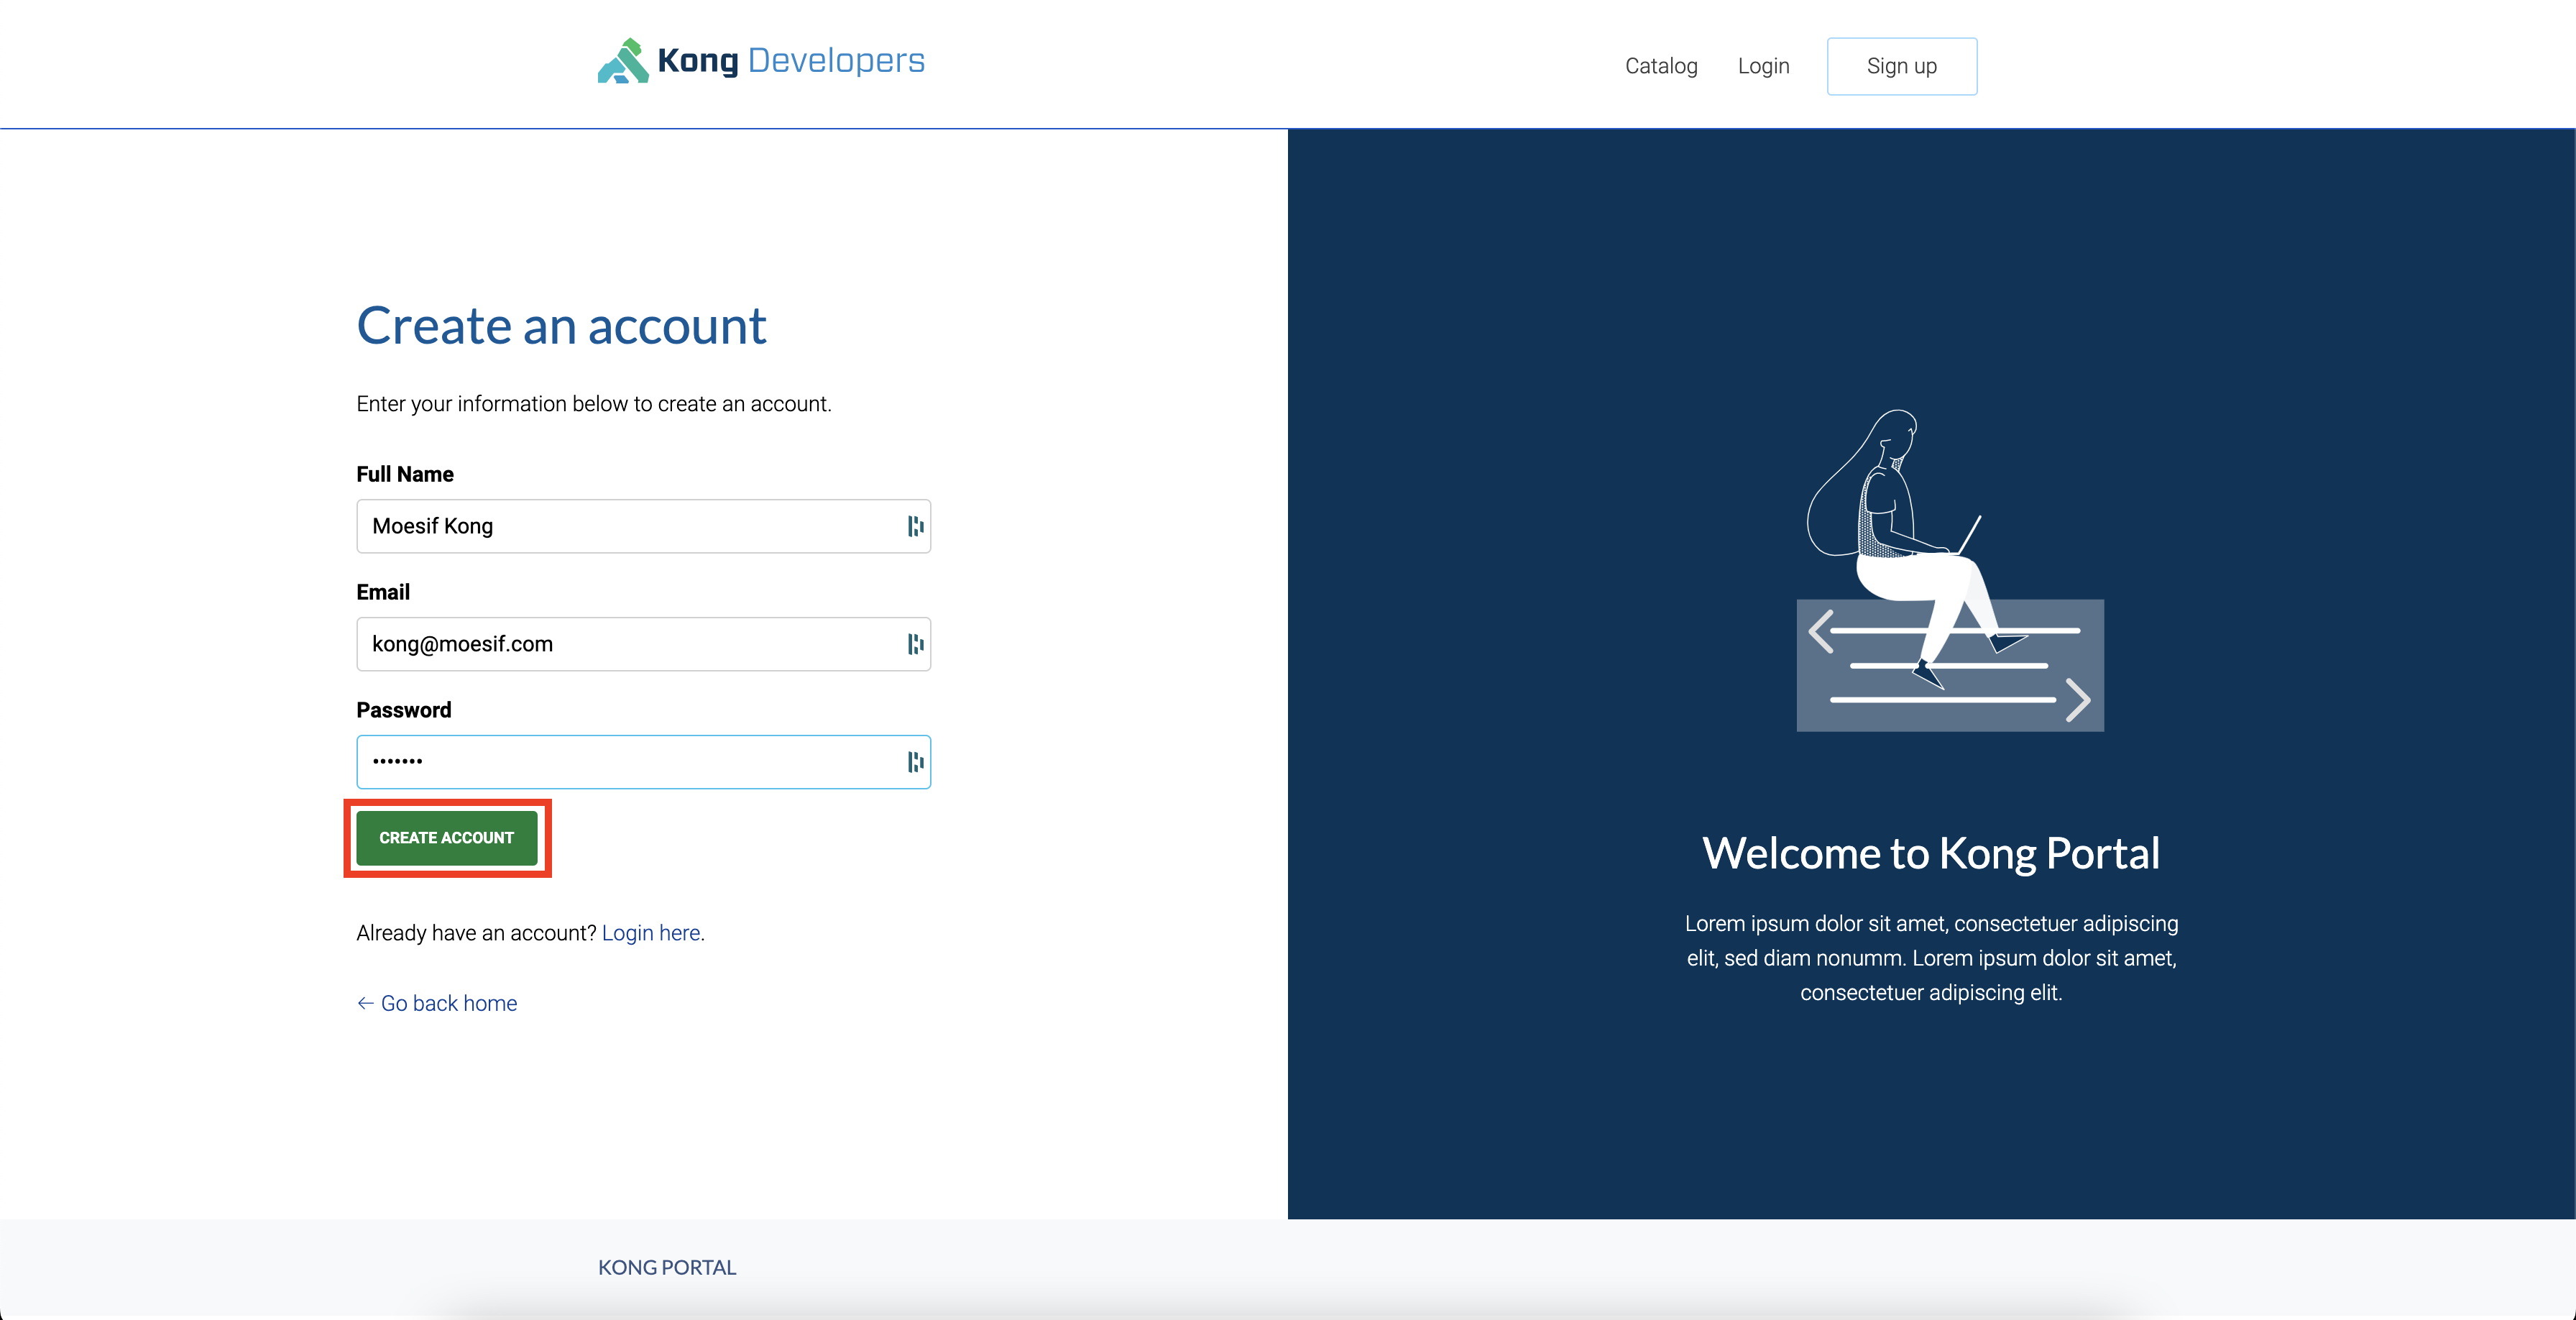
After the Create Account button is clicked, our amended Kong.register function will execute. This will create our user in Stripe and Moesif. Once the registration is complete, you’ll be taken to the Developer Dashboard screen.
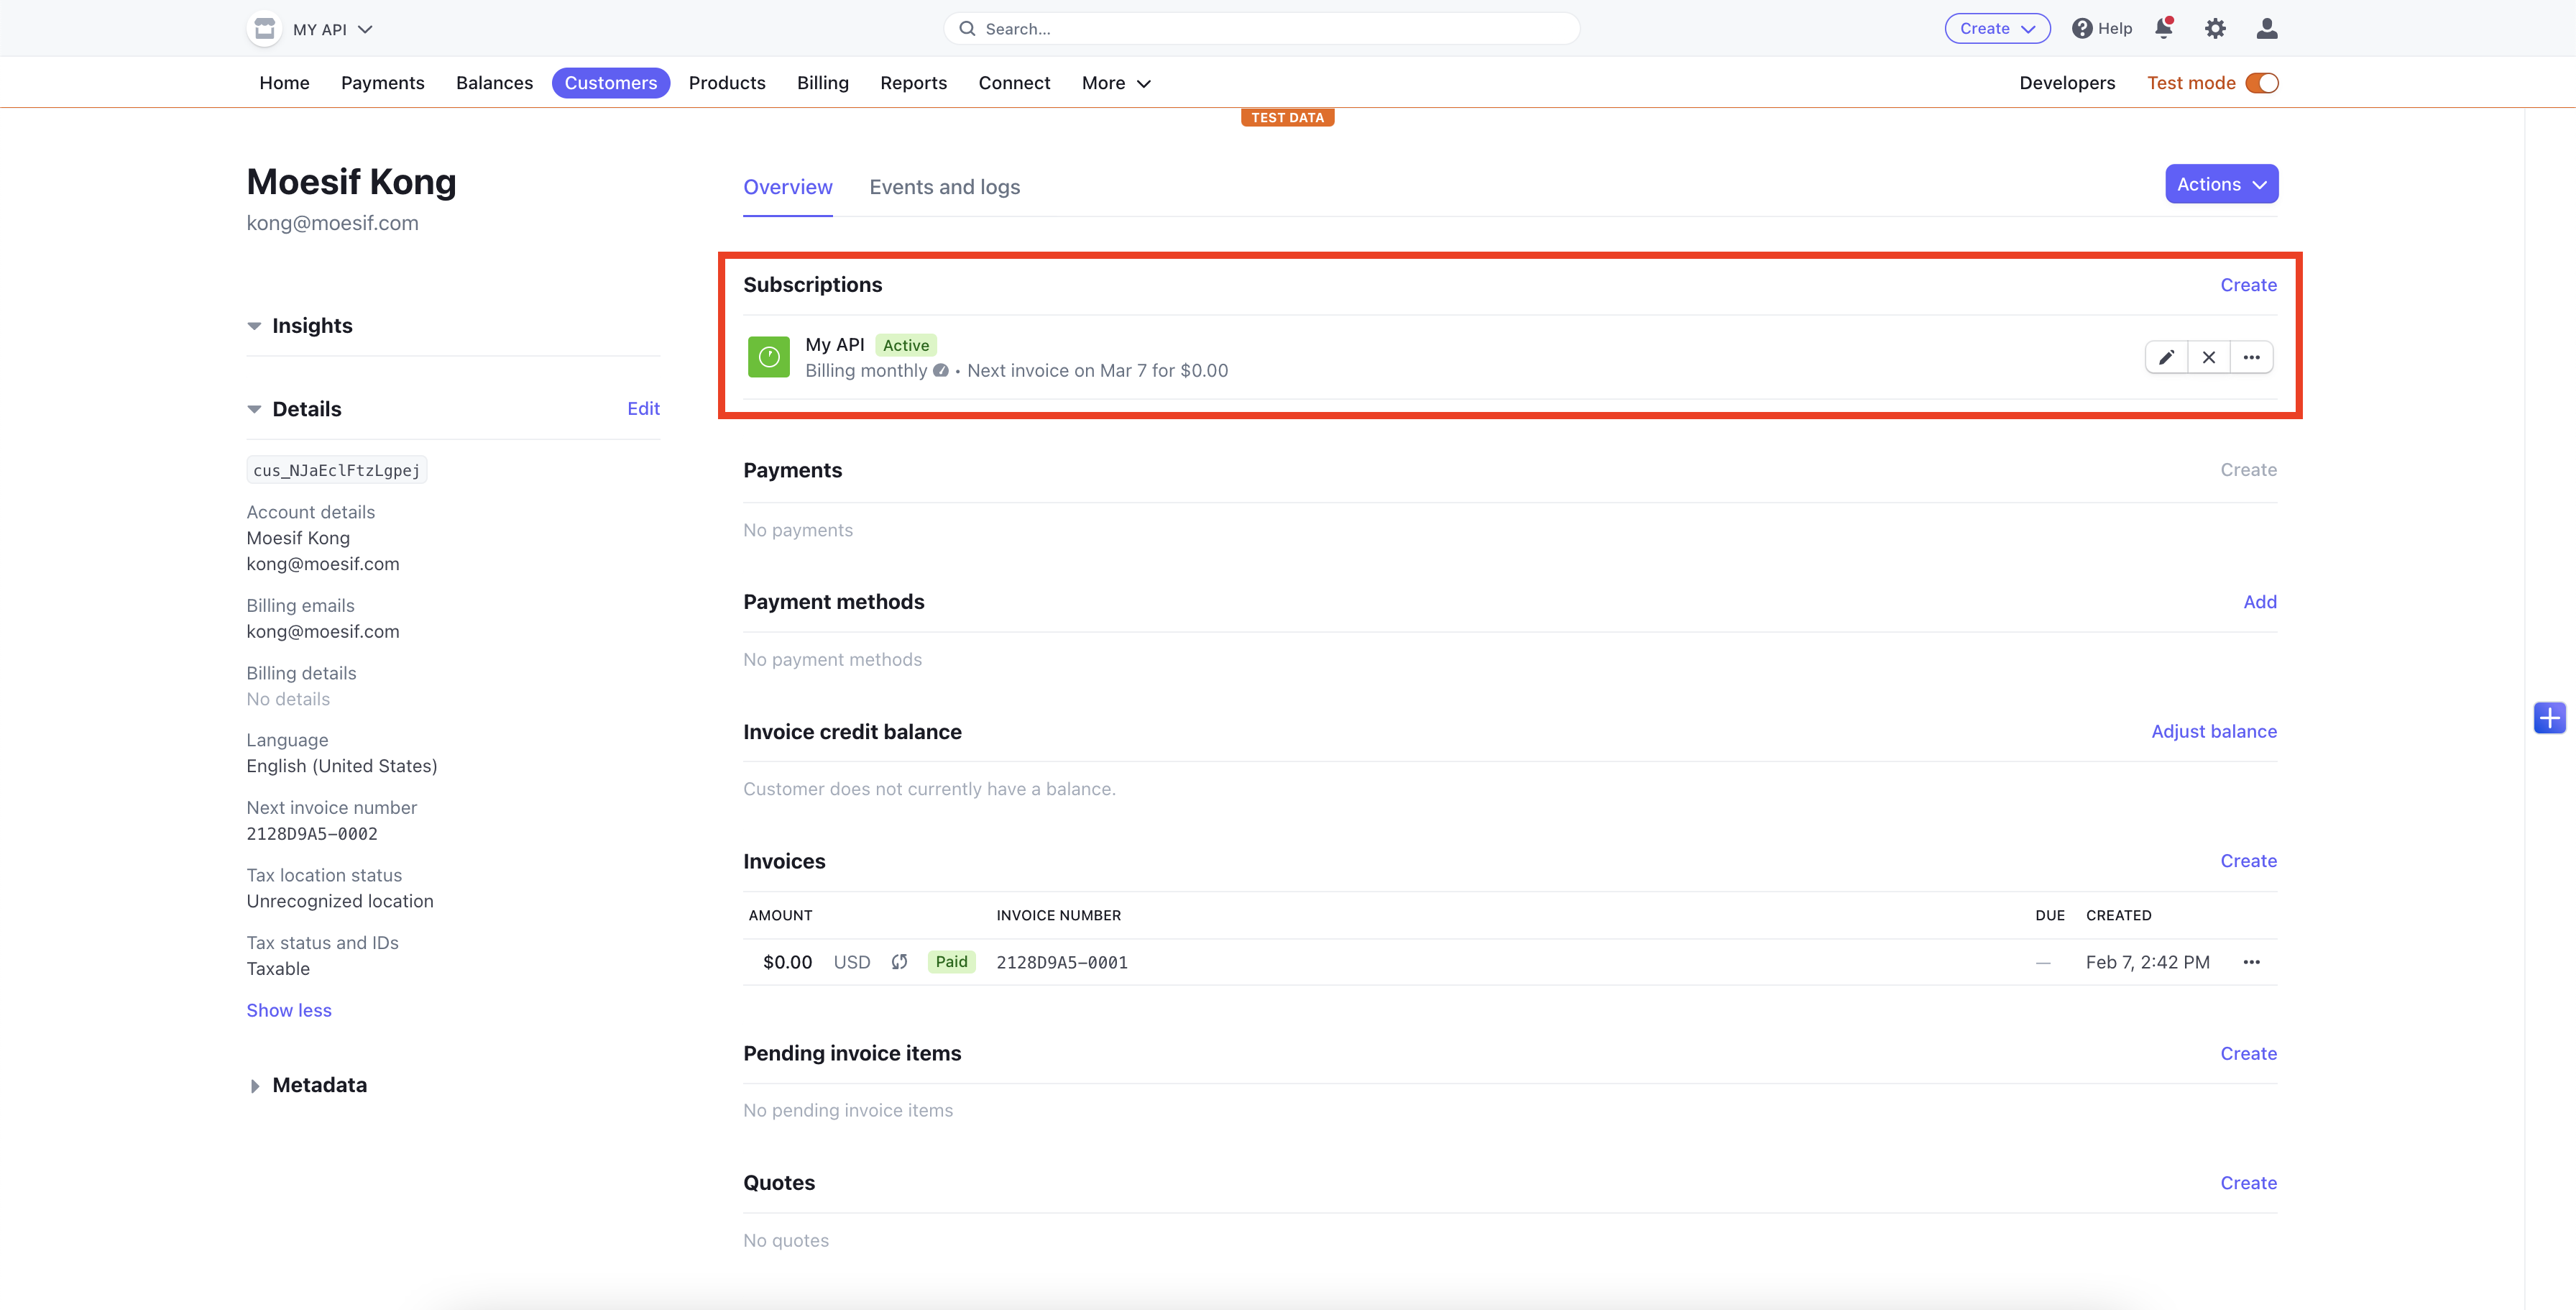
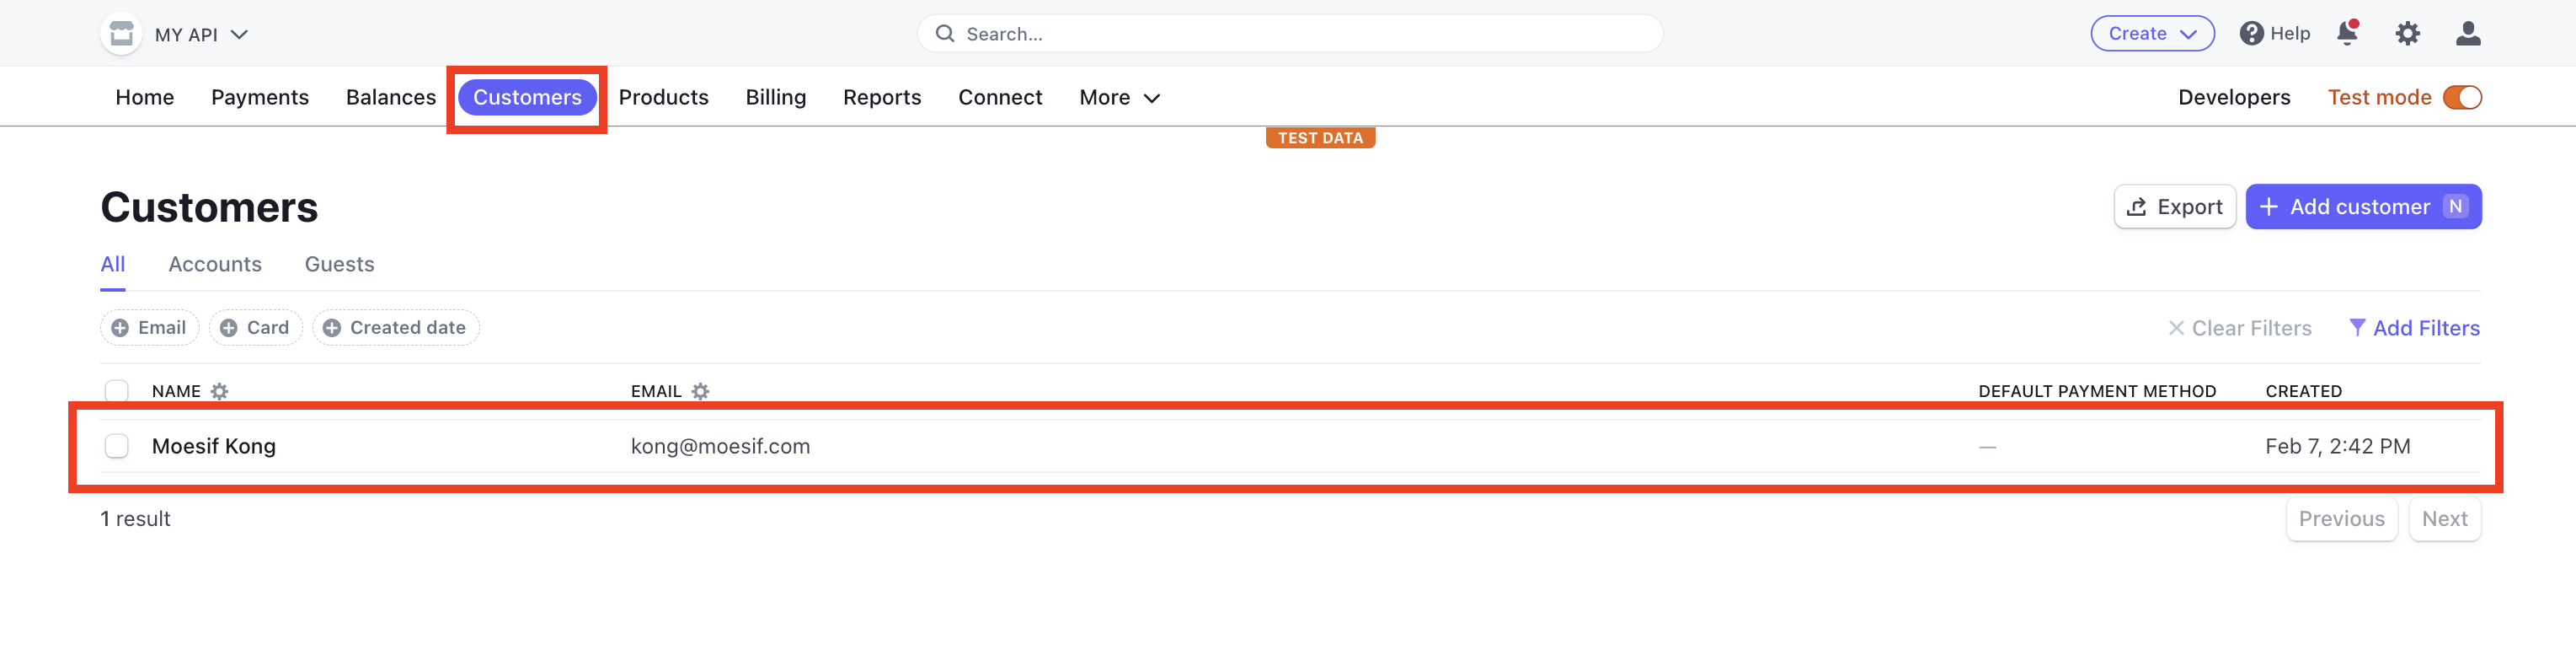
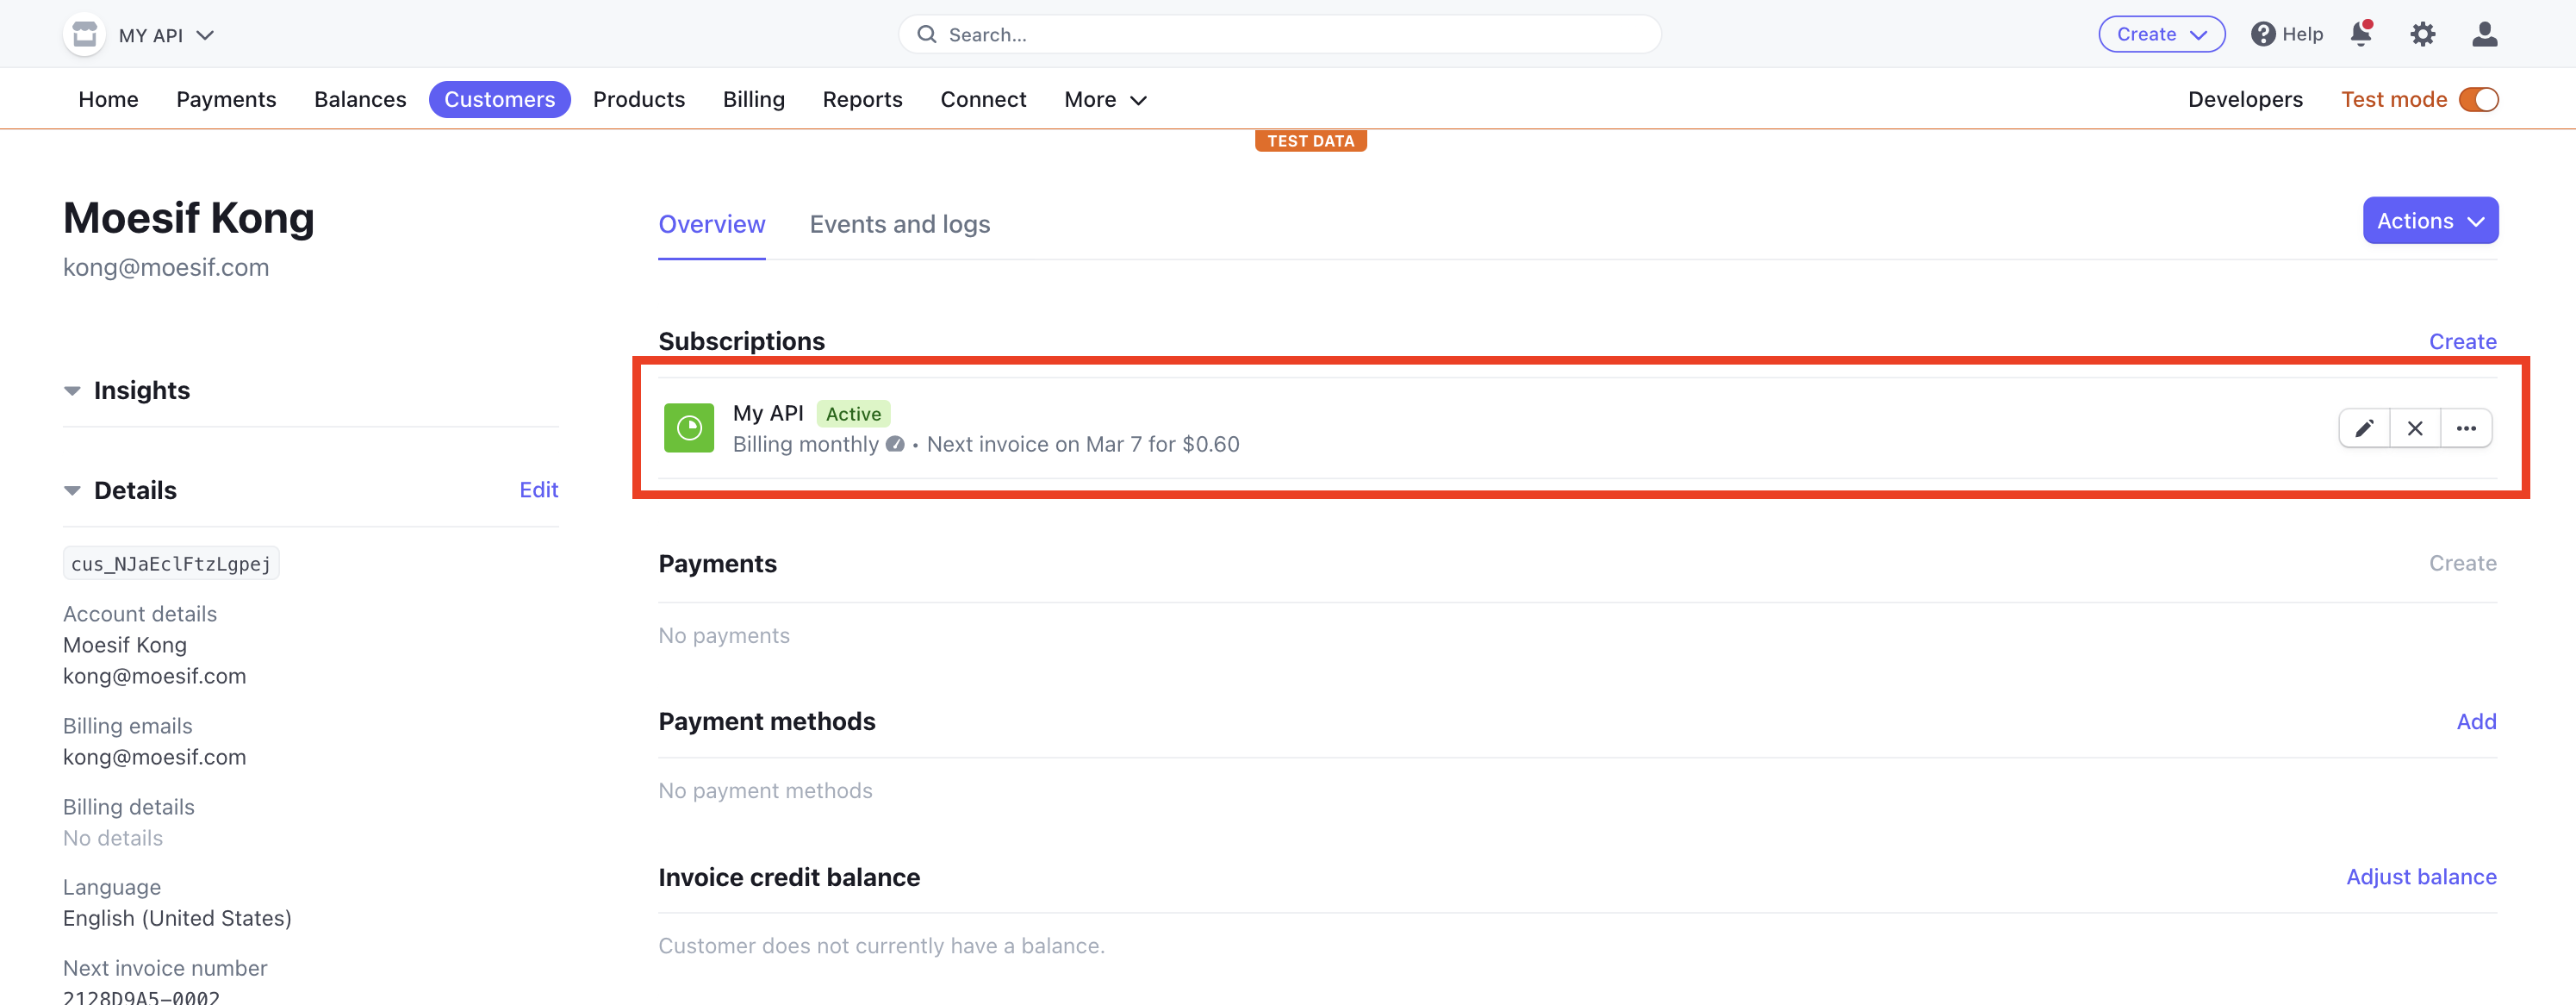
Just to ensure that our code worked successfully, we will navigate back to Stripe and check under the Customers screen that our new customer was created.

By clicking on the customer, we can also confirm that they have been subscribed to the My API product as well.
Now that we have confirmed that the user has been correctly registered and created in Stripe, let’s push some API traffic to our monetized /test-service endpoint.
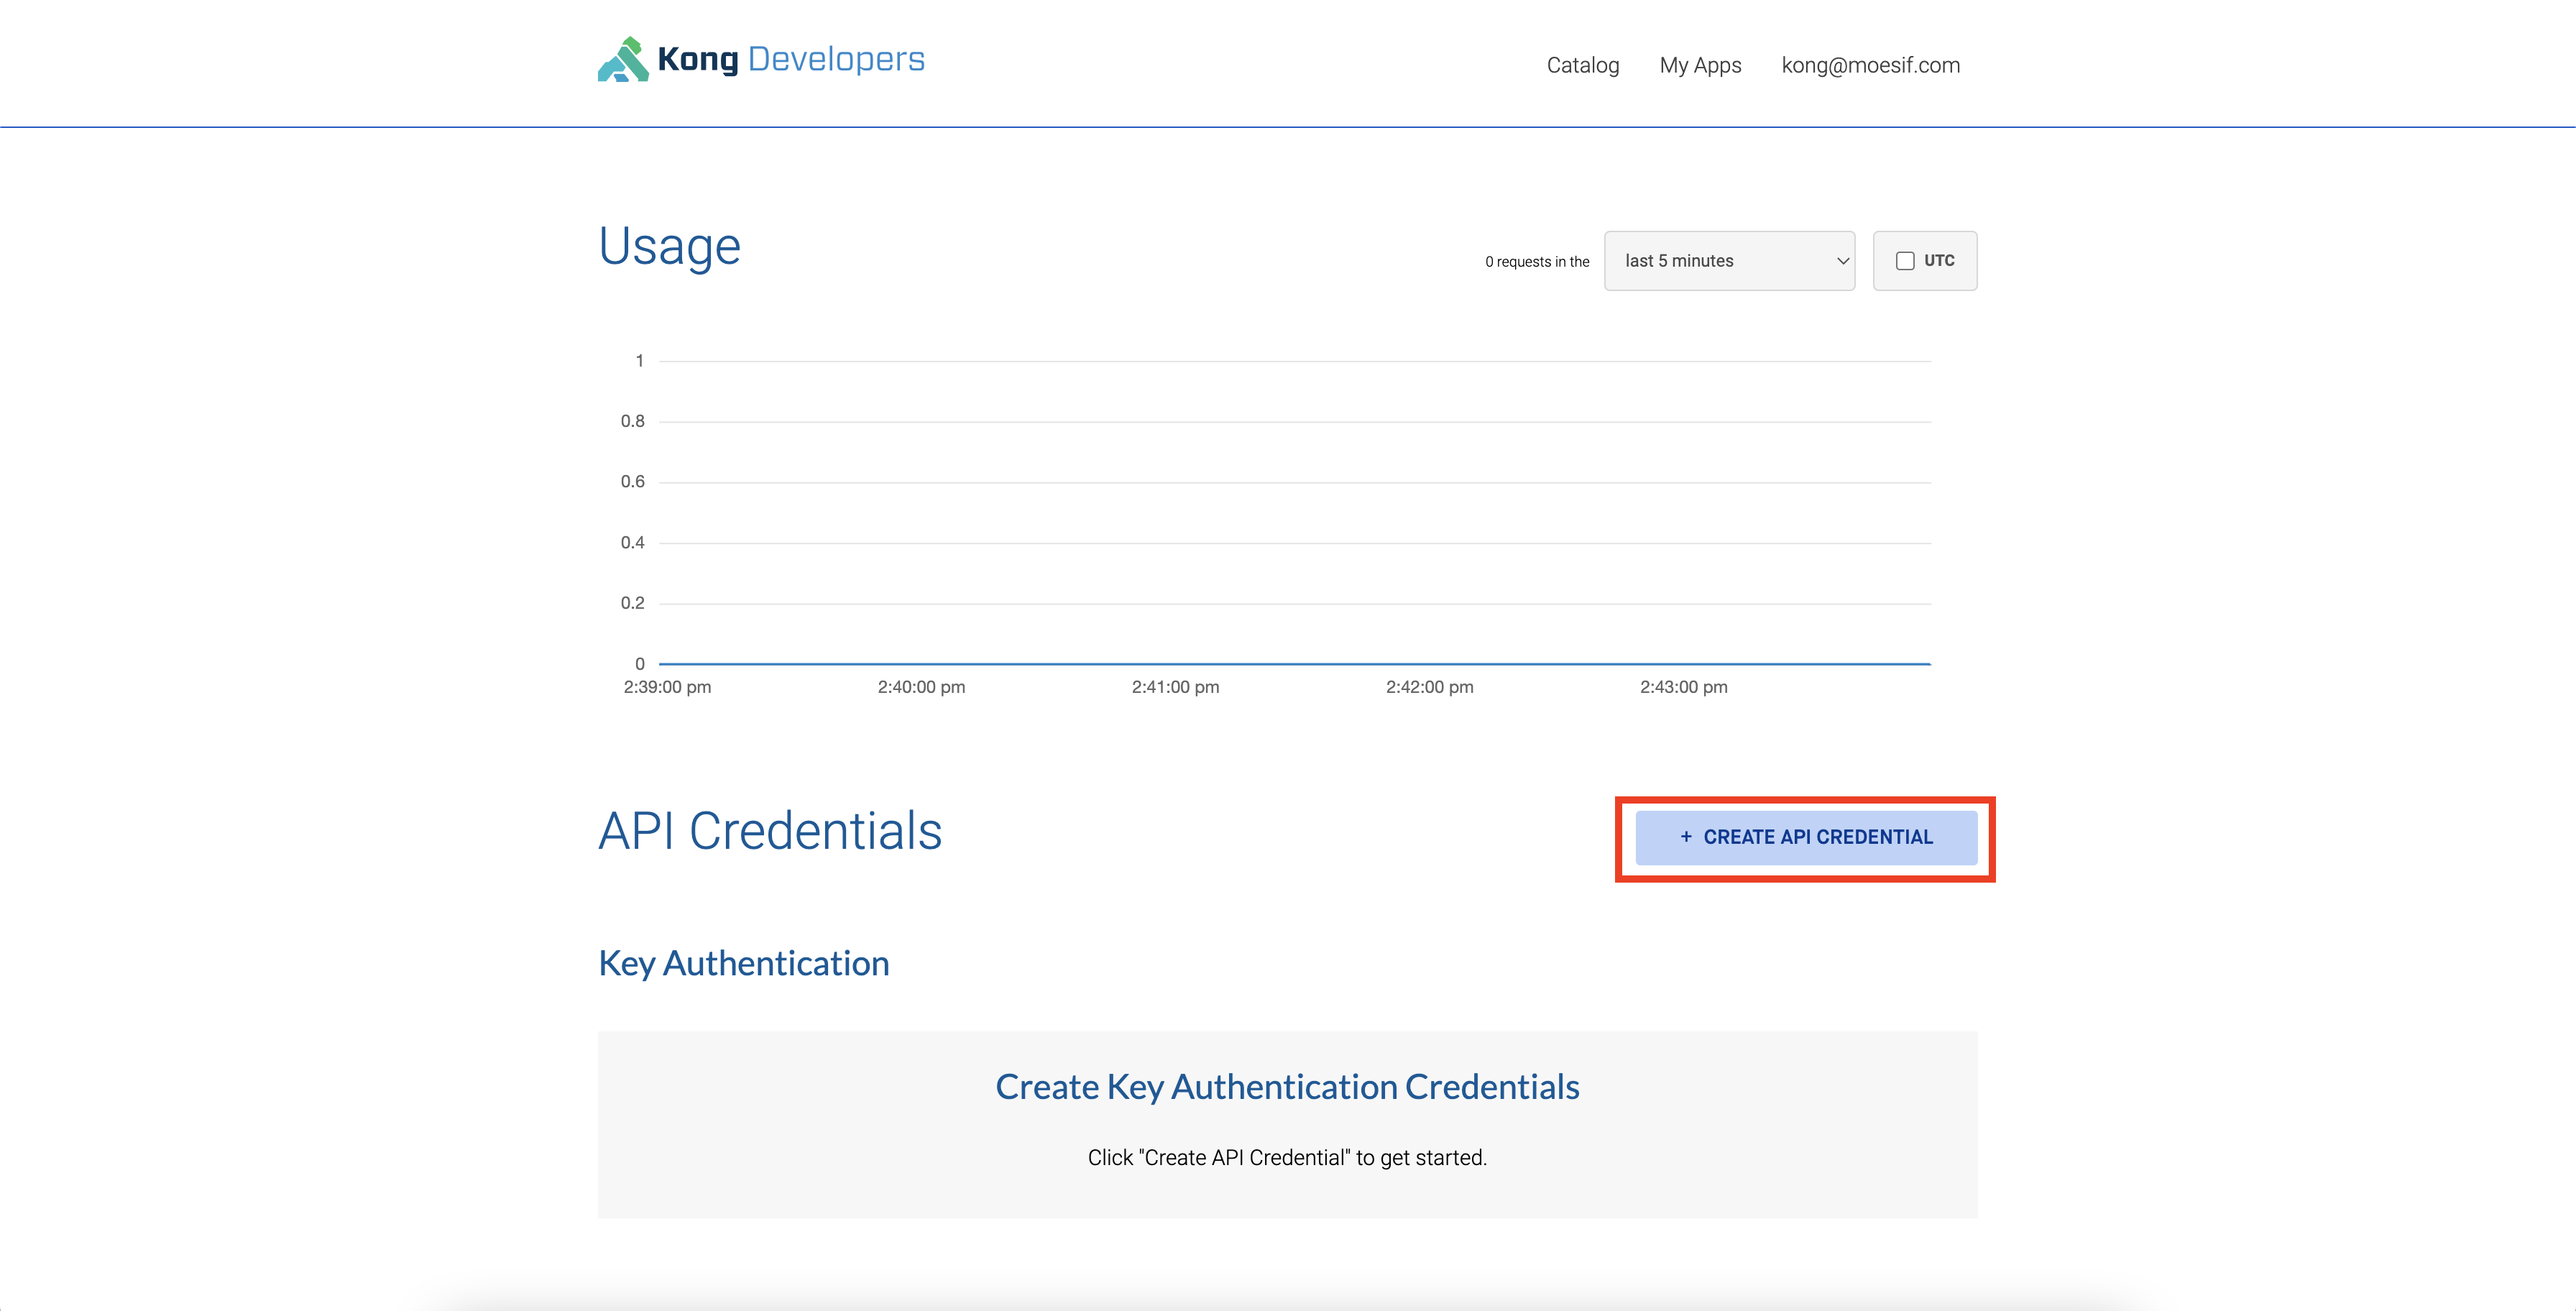
Create an API Key in the Developer Portal
To be able to access the /test-service endpoint, we will need to generate an API key. This API key will give us access to the endpoint and also attribute usage to our users in Kong, Moesif, and Stripe. To generate an API key, from the dashboard in the API Portal, click Create API Credential.
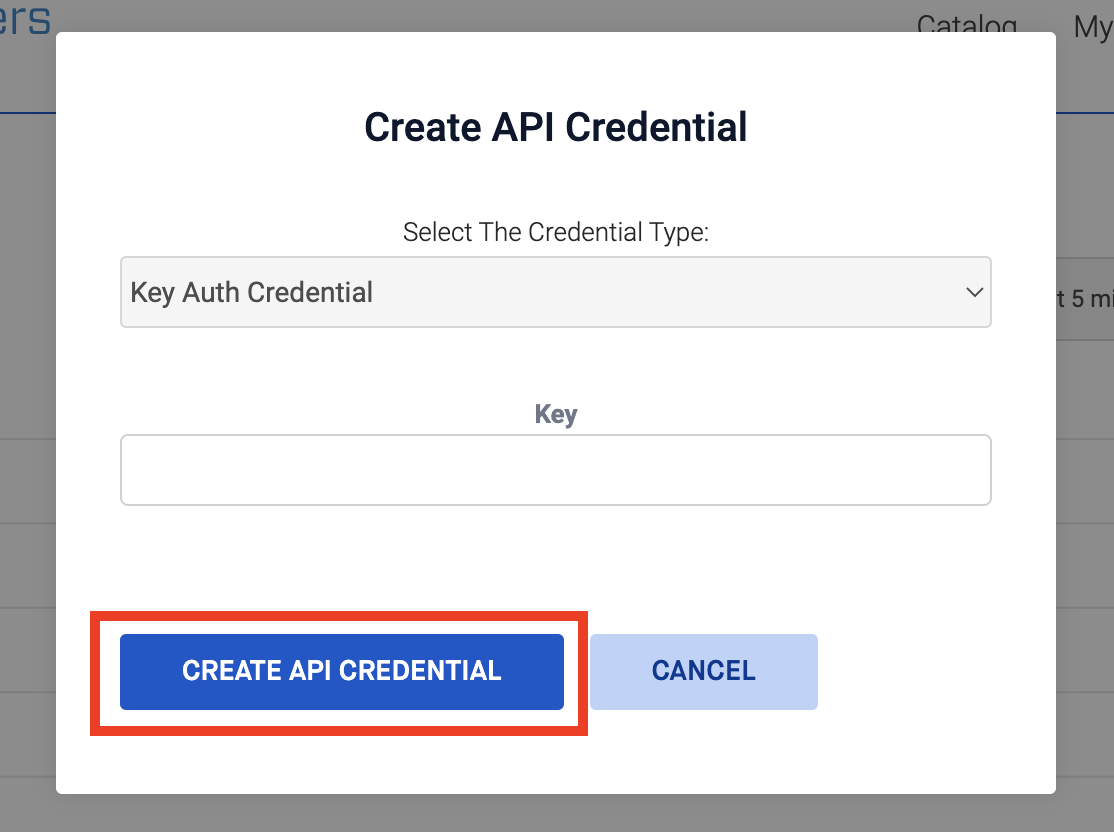
A modal will appear. Ensure that the Credential Type is set to Key Auth Credential and we will leave the Key field blank so that one will be auto-generated for us. Then, click Create API Credential.
The newly created API key will then be available on the dashboard screen.
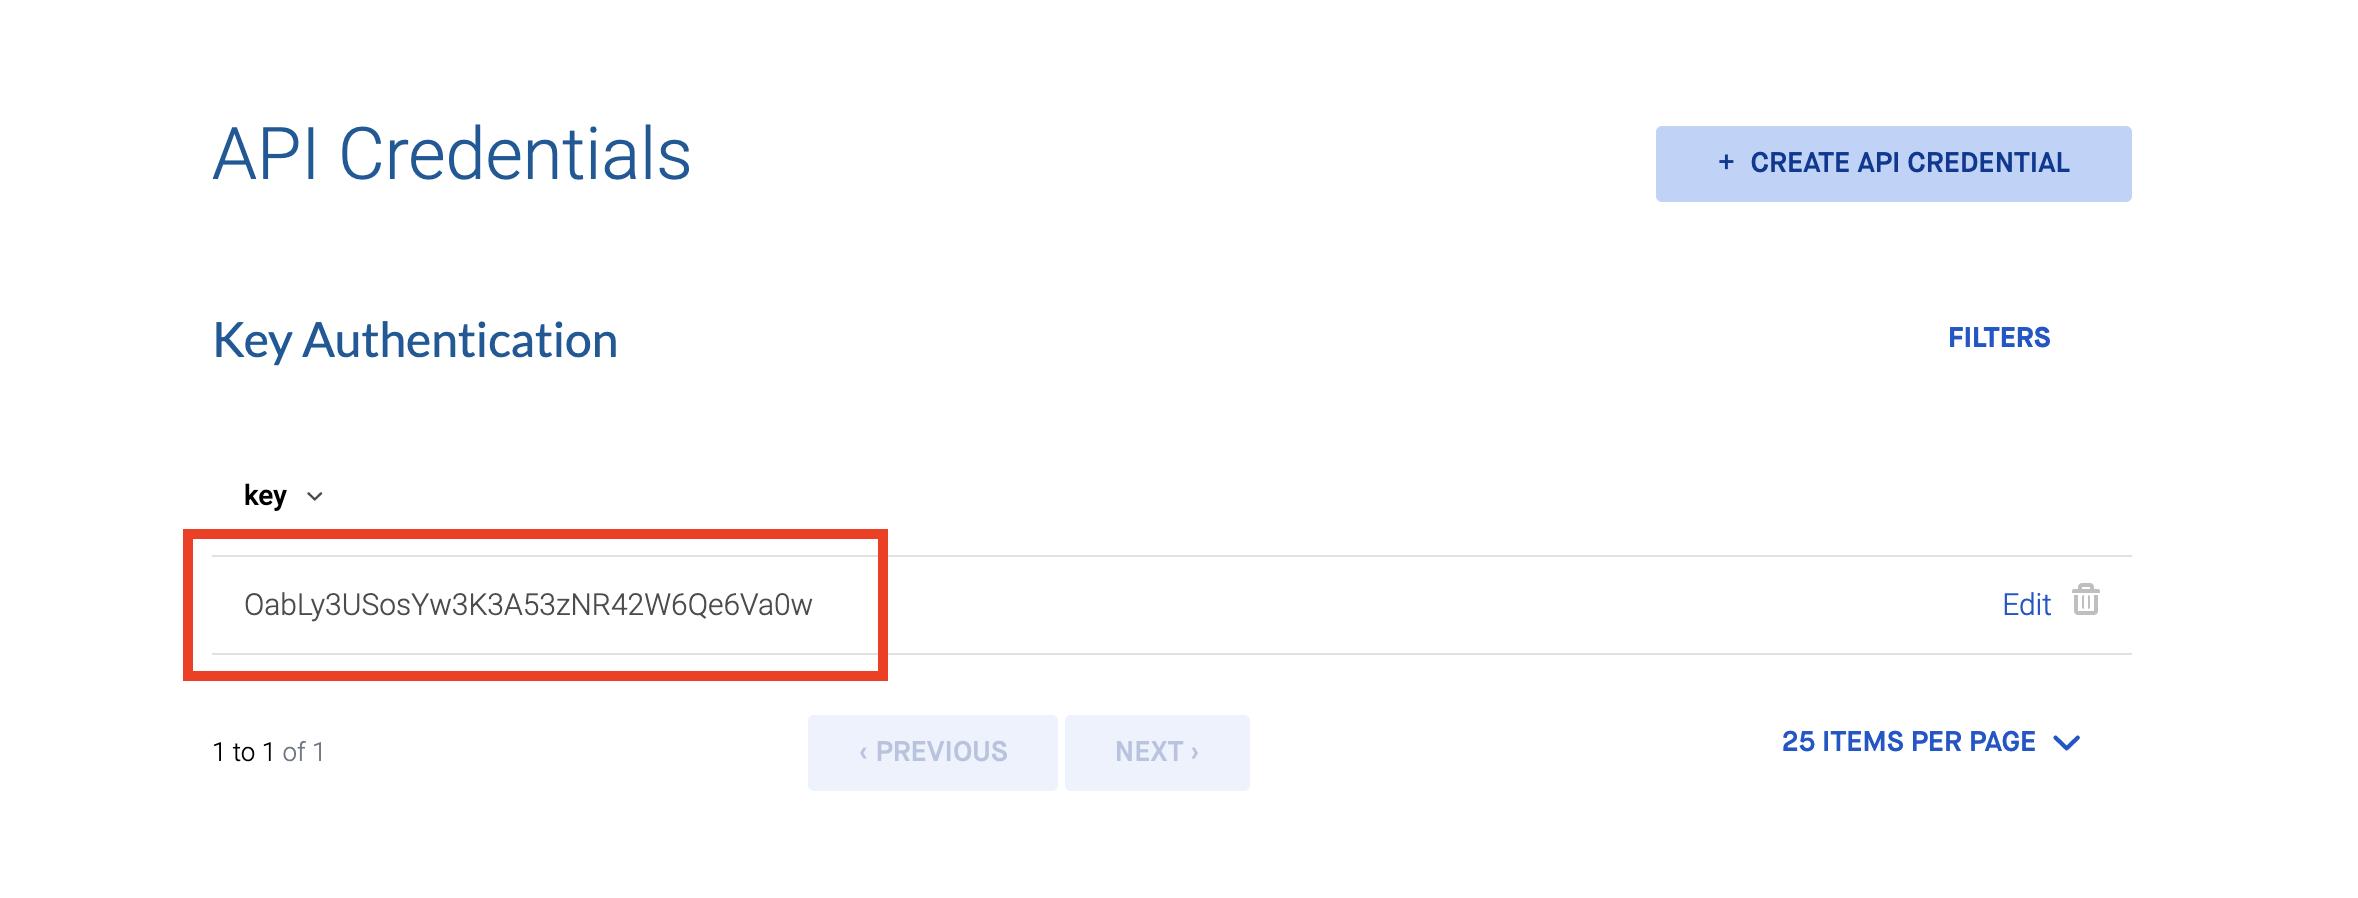
Copy this credential and have it ready to populate into the “apiKey” header of our request in Postman.
Use Postman to Test The Endpoint
Our next step is to actually use our generated API key. We will then confirm that all the correct information is added to Moesif. The data we are confirming includes:
- The users’ email is mapped to the Moesif User ID
- The Stripe Subscription ID is mapped to the Moesif Company ID
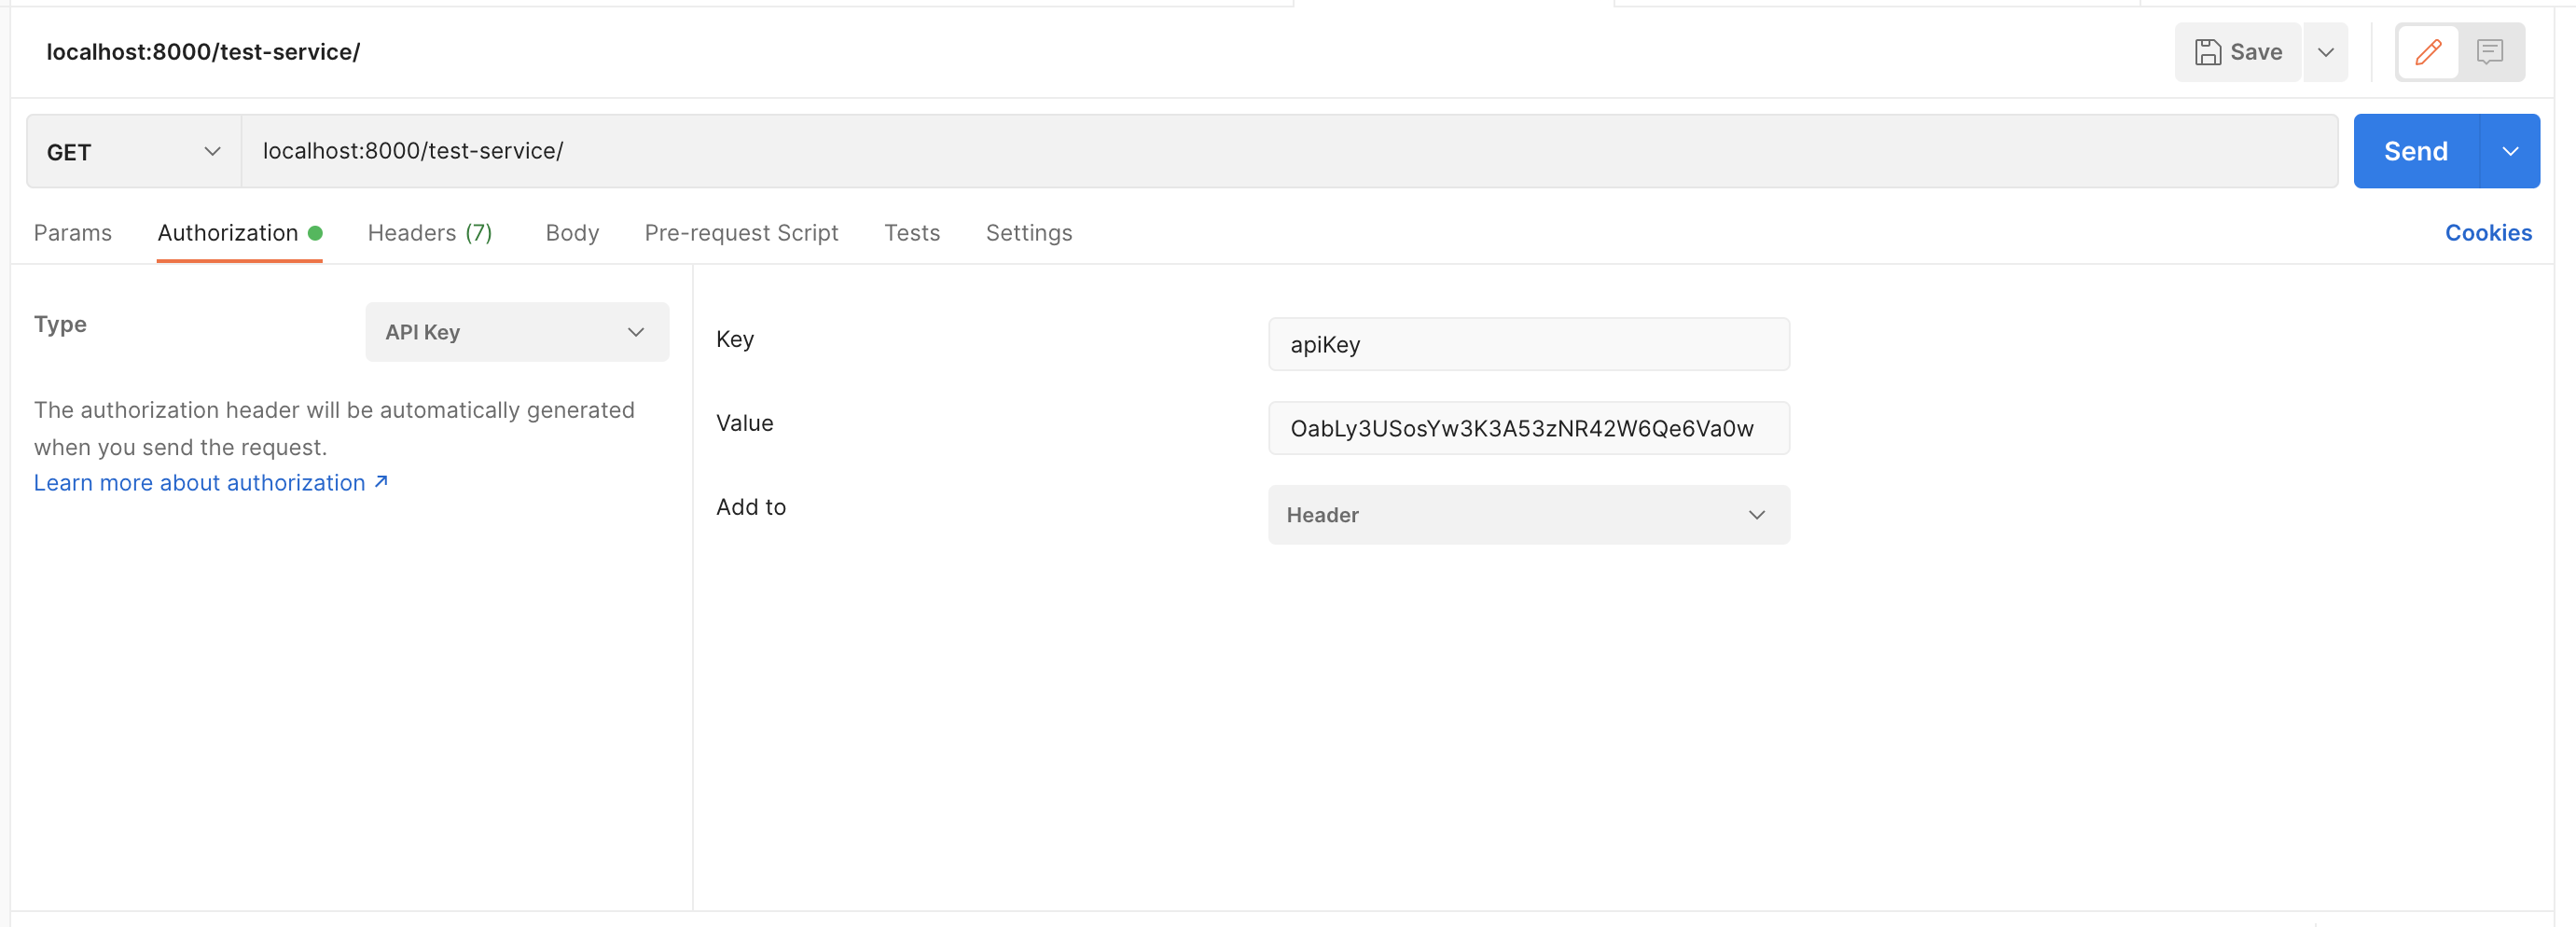
Next, let’s use Postman, or another platform, to send a request to the /test-service endpoint. This is the endpoint that we set up the billing meter in Step 3, above.
In Postman, we will:
- Put the /test-service API endpoint as the request URL
- Select the Authorization tab
- Select the Type as API Key
- Populate the API key details
- Set the Key as “apikey”, or whatever you have the Key set to in Kong
- Set the Value as the generated API key
- Set the Add to field value to “Header”
Below is an example of the populated request configuration in Postman.
To send the request to our endpoint, click Send.
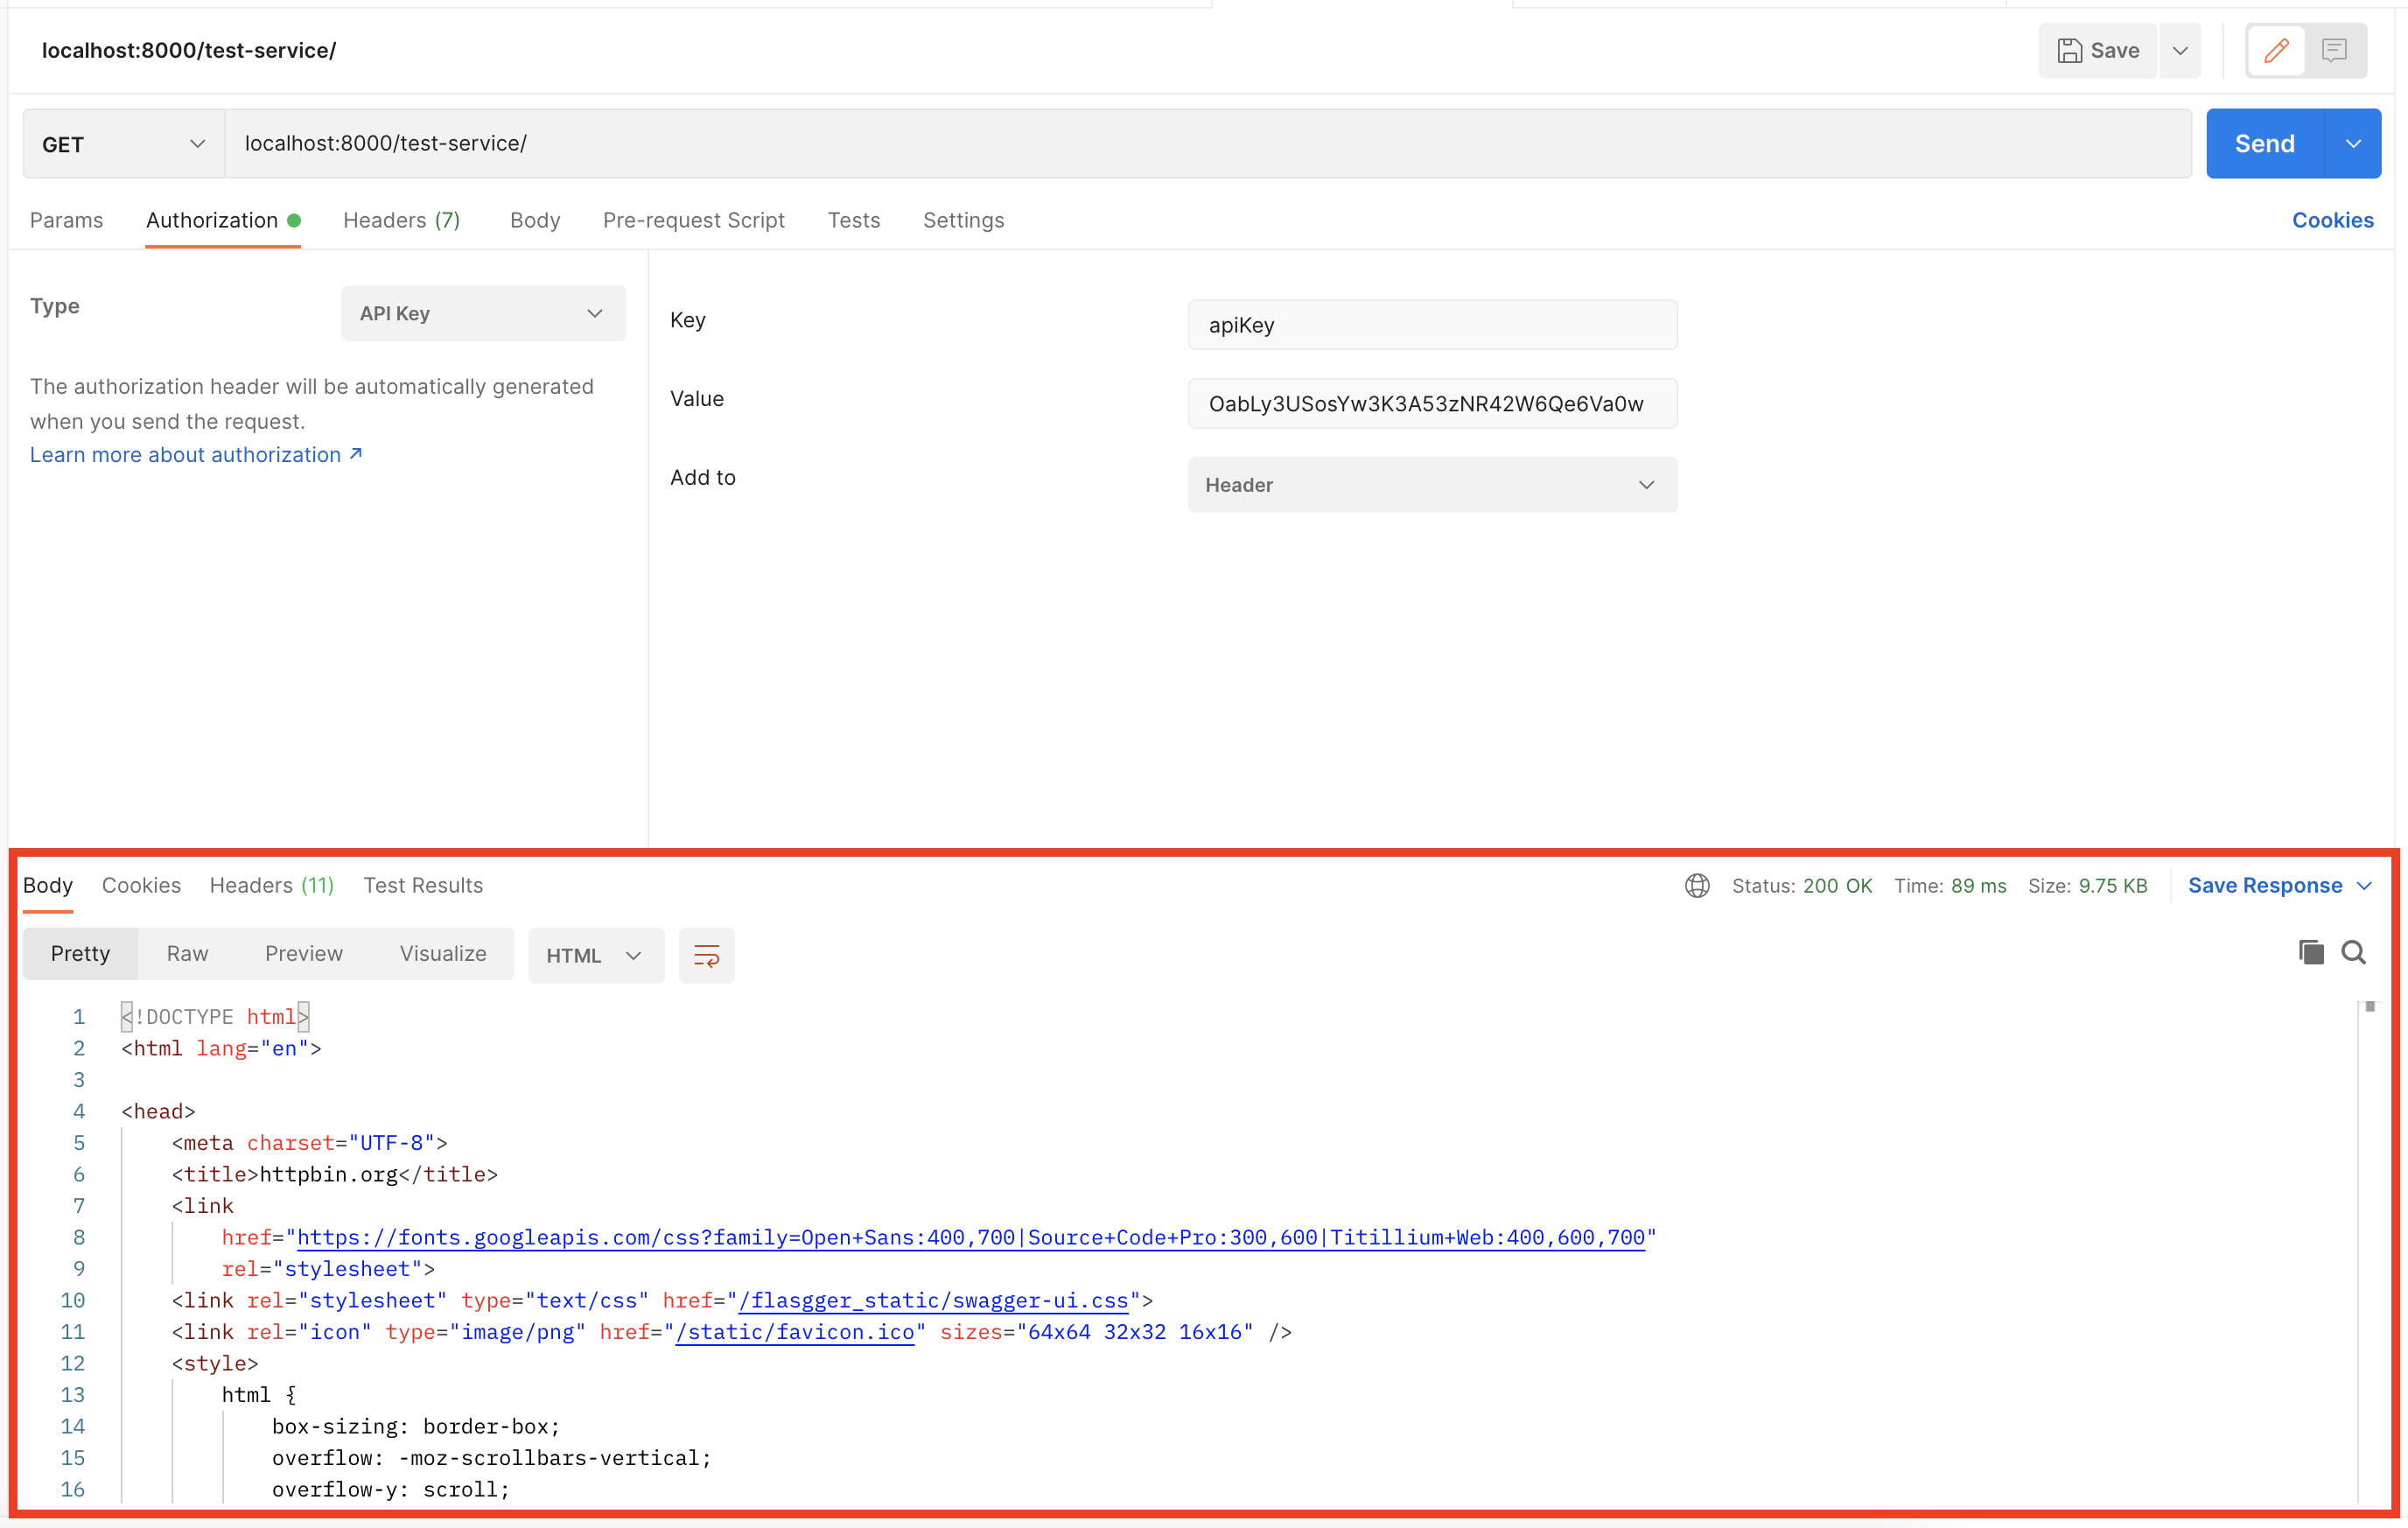
Once sent, your request should be proxied through Kong and the API call analytics should land in Moesif.
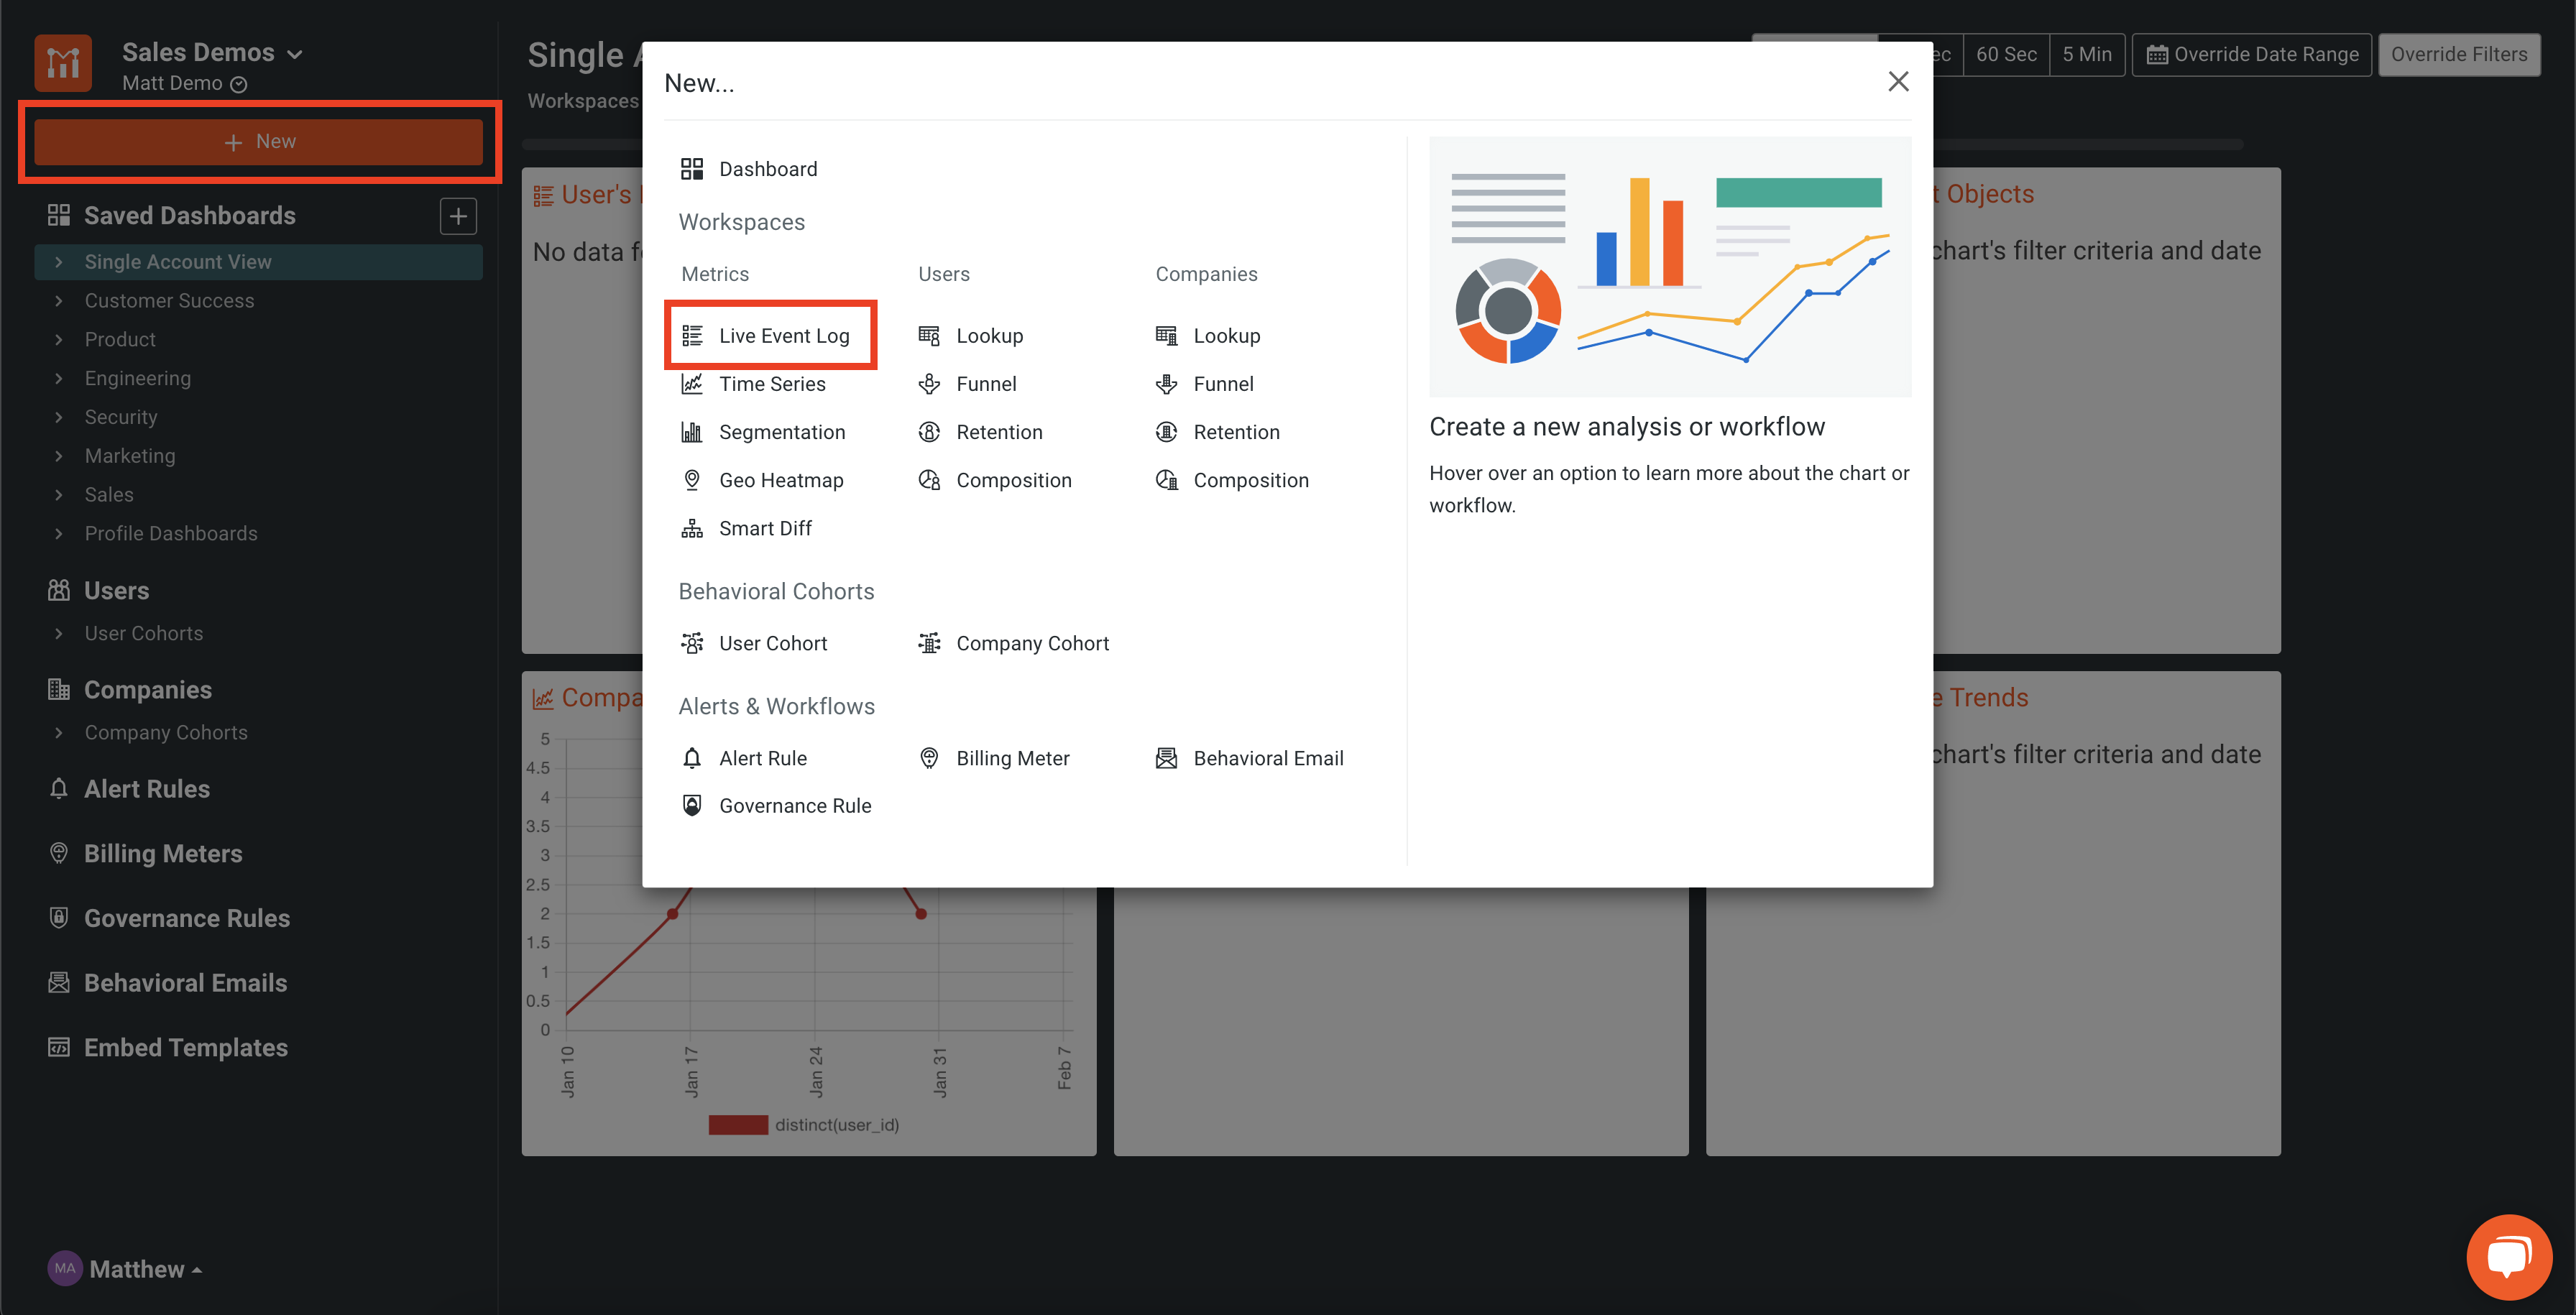
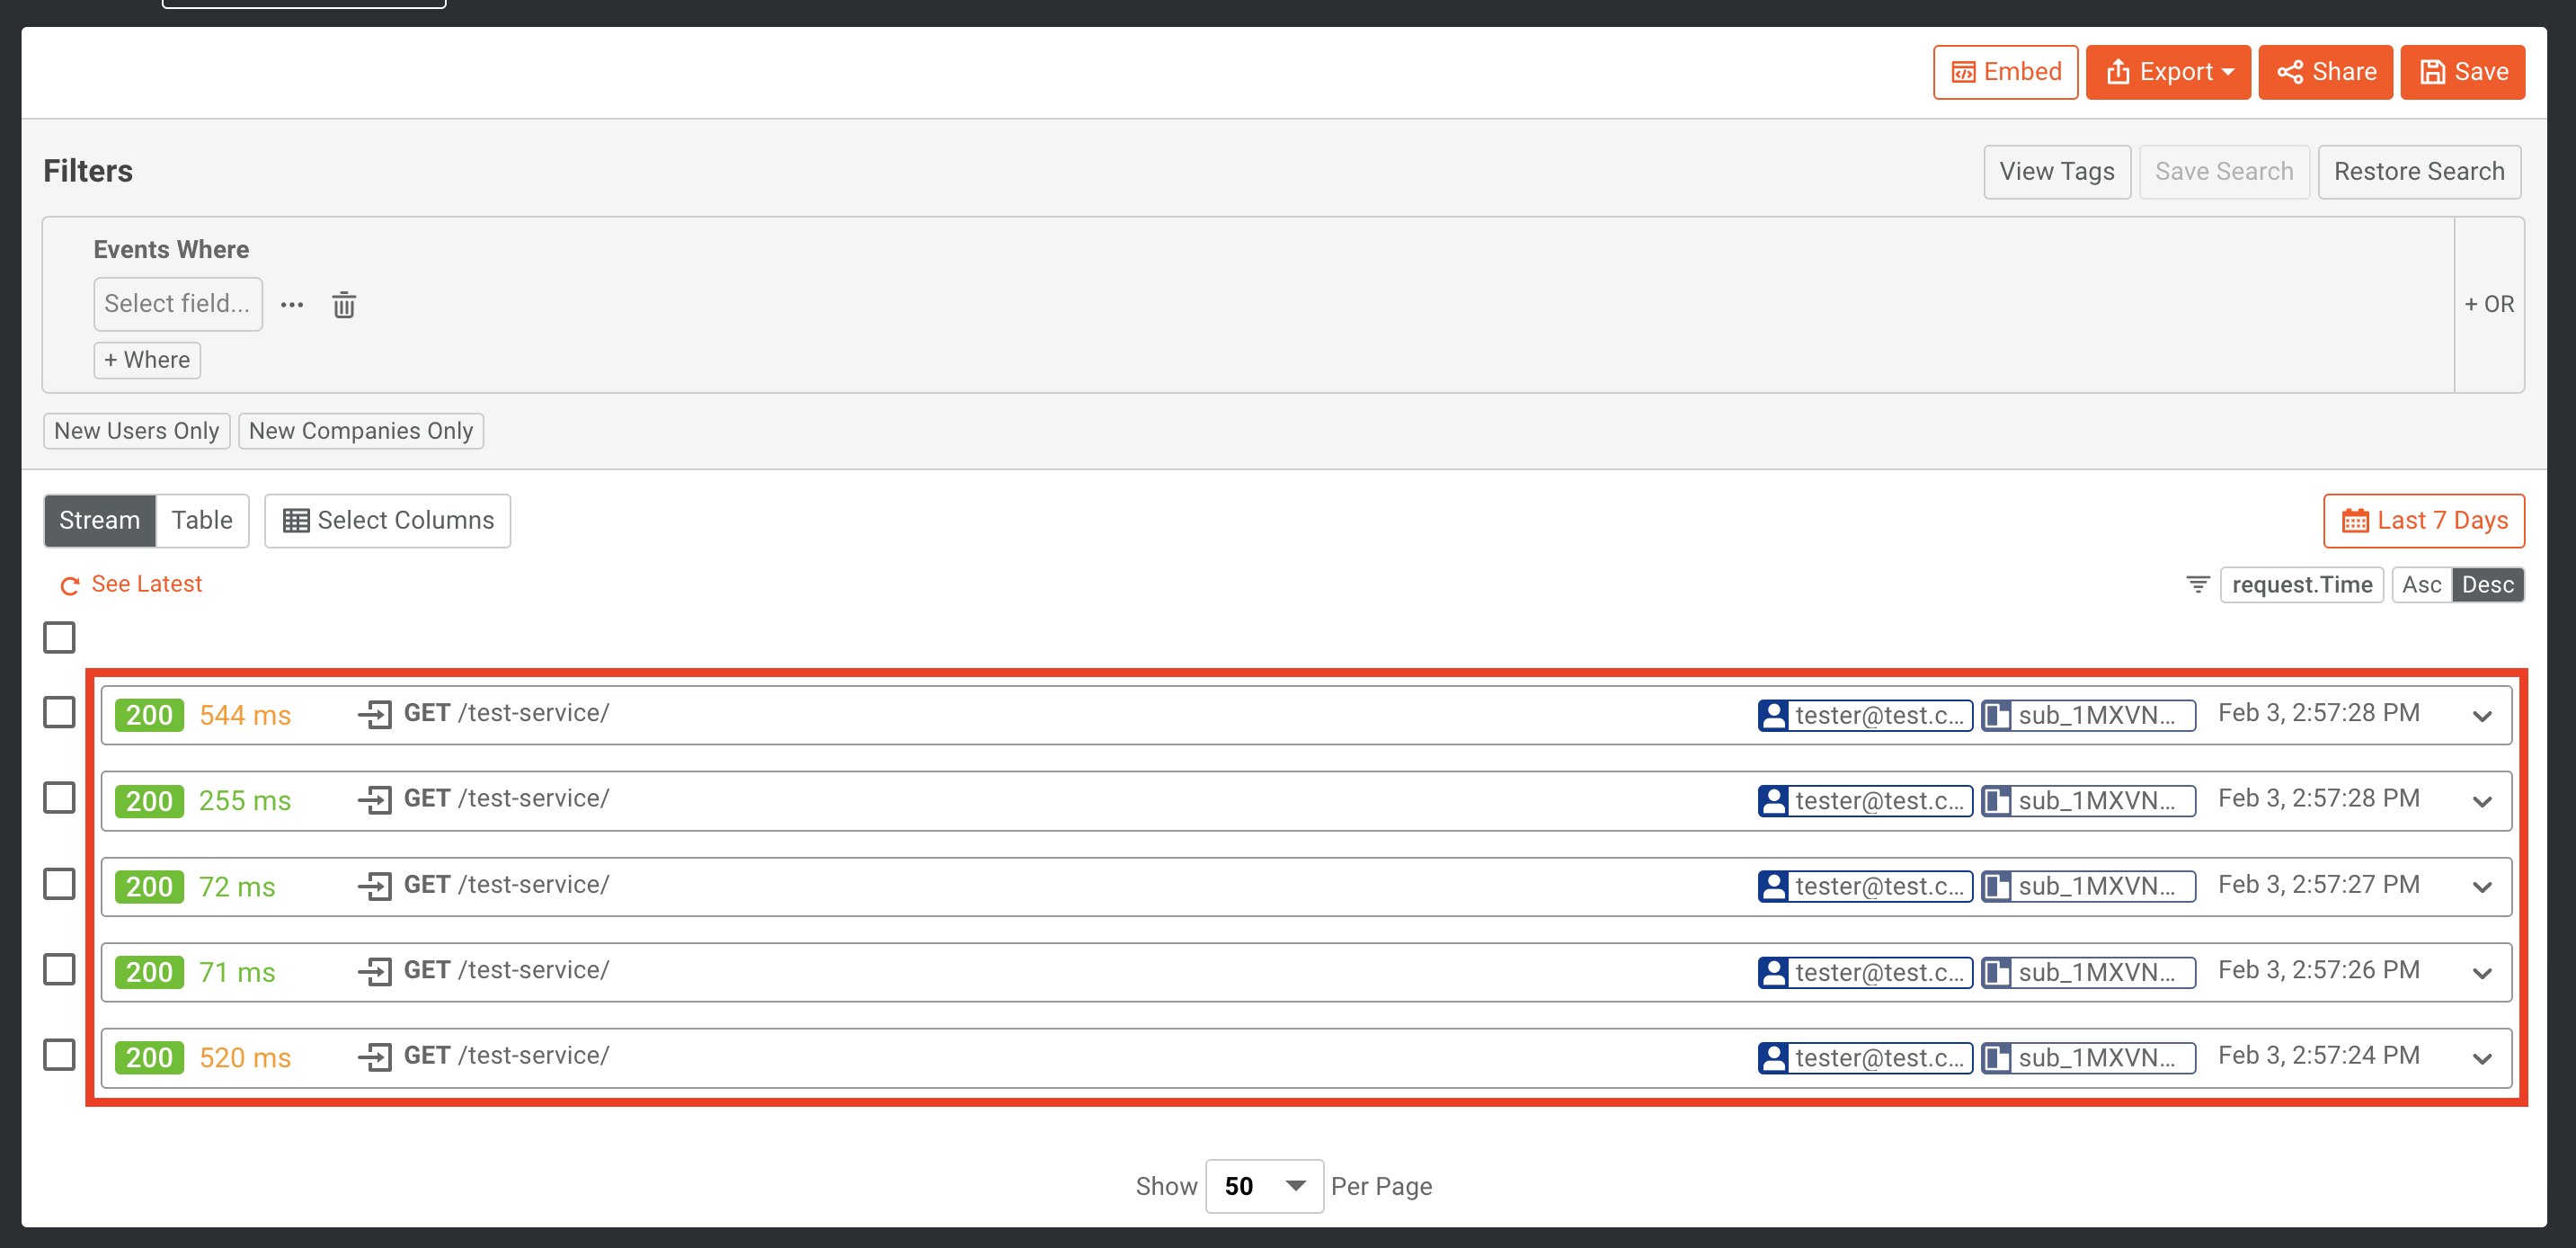
Confirm The Request Landed in Moesif
Back in Moesif, you’ll navigate to the Live Event Log where you should see the request you just sent. You should see the entry has both a User ID and Company ID populated with the user’s email and Stripe subscription ID respectively.
Since your Meter Test is already underway, in a new tab in your browser, open up a second tab to view Moesif. To get to the Live Event Log, in Moesif, Click the + New button in the top-left corner of the screen. From the modal that appears, click Live Event Log.
The entries should look like this:
Resume the Meter Test
Back in the Meter Test you started in the earlier steps, we can continue on to ensure that everything is working. With API call data landing in Moesif, we should be able to proceed.
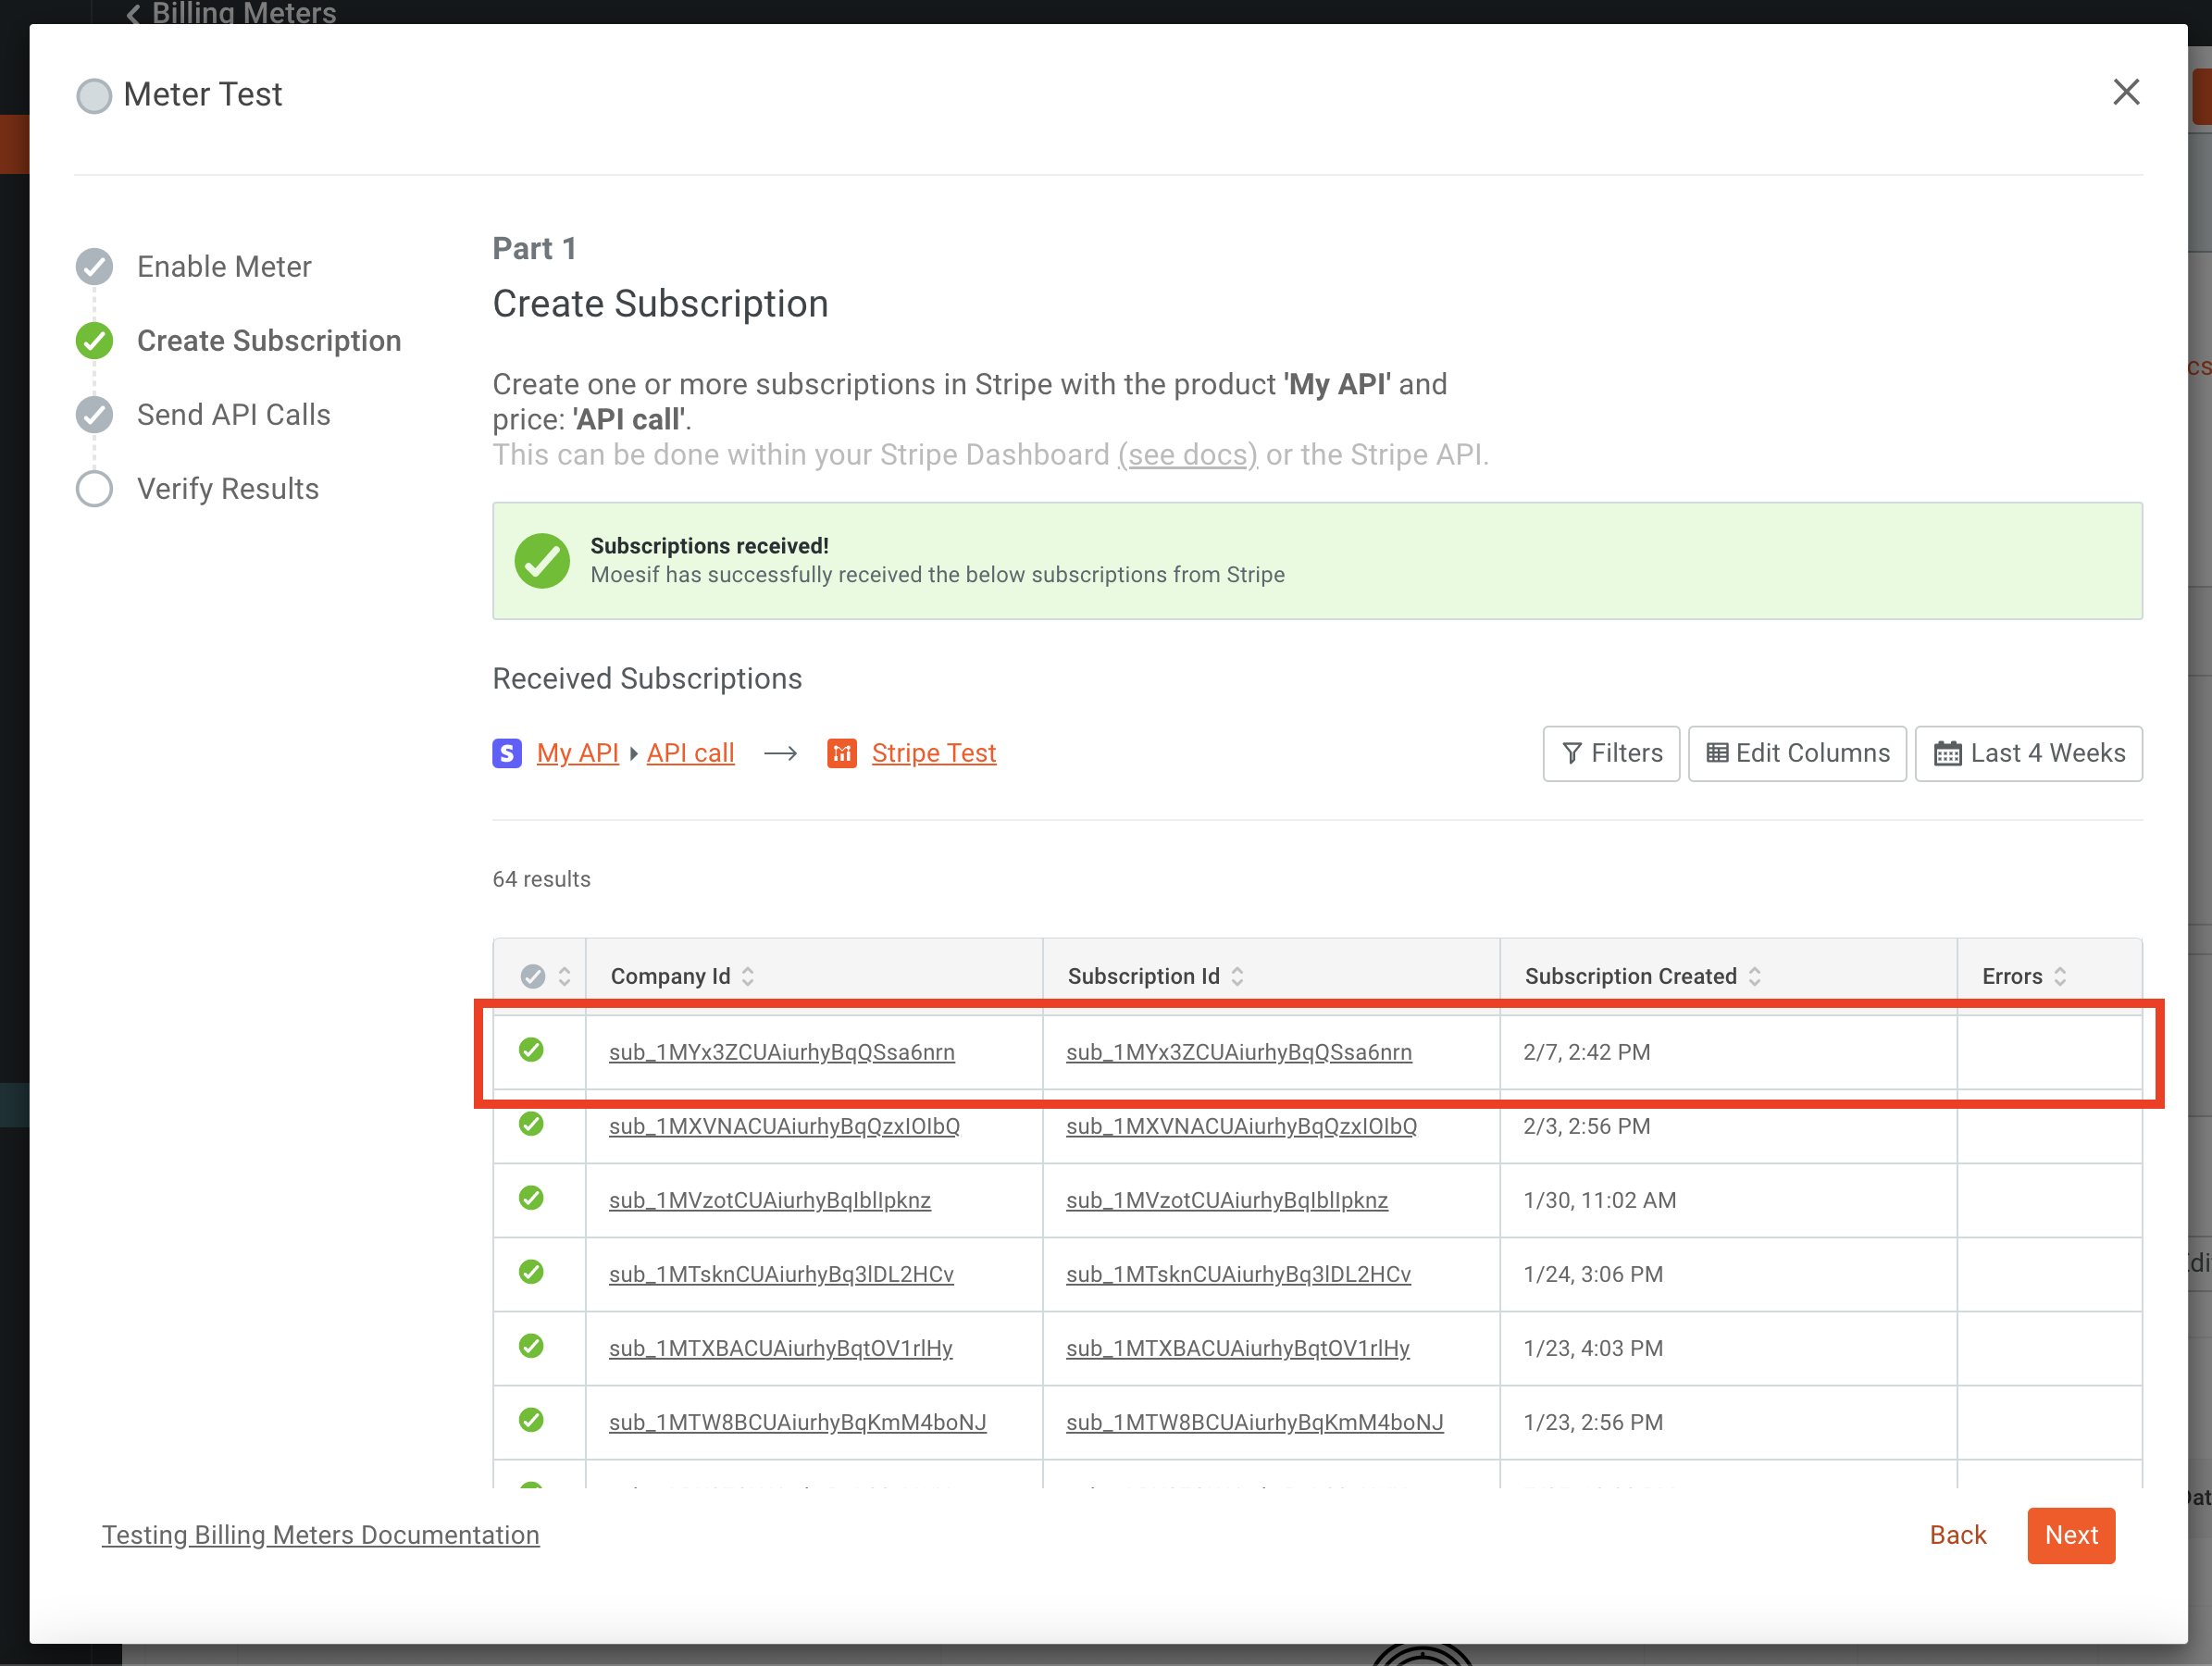
Part 1 of the Meter Test will confirm that our Subscription data has been synced into Moesif. As you can see in the screenshot below, you should see a subscription for the user you created in the portal. Once confirmed, click Next.
Next, we should see that the API calls that we sent through are being correctly recorded for the billing meter/subscription. After you’ve confirmed this step, click the Next button.
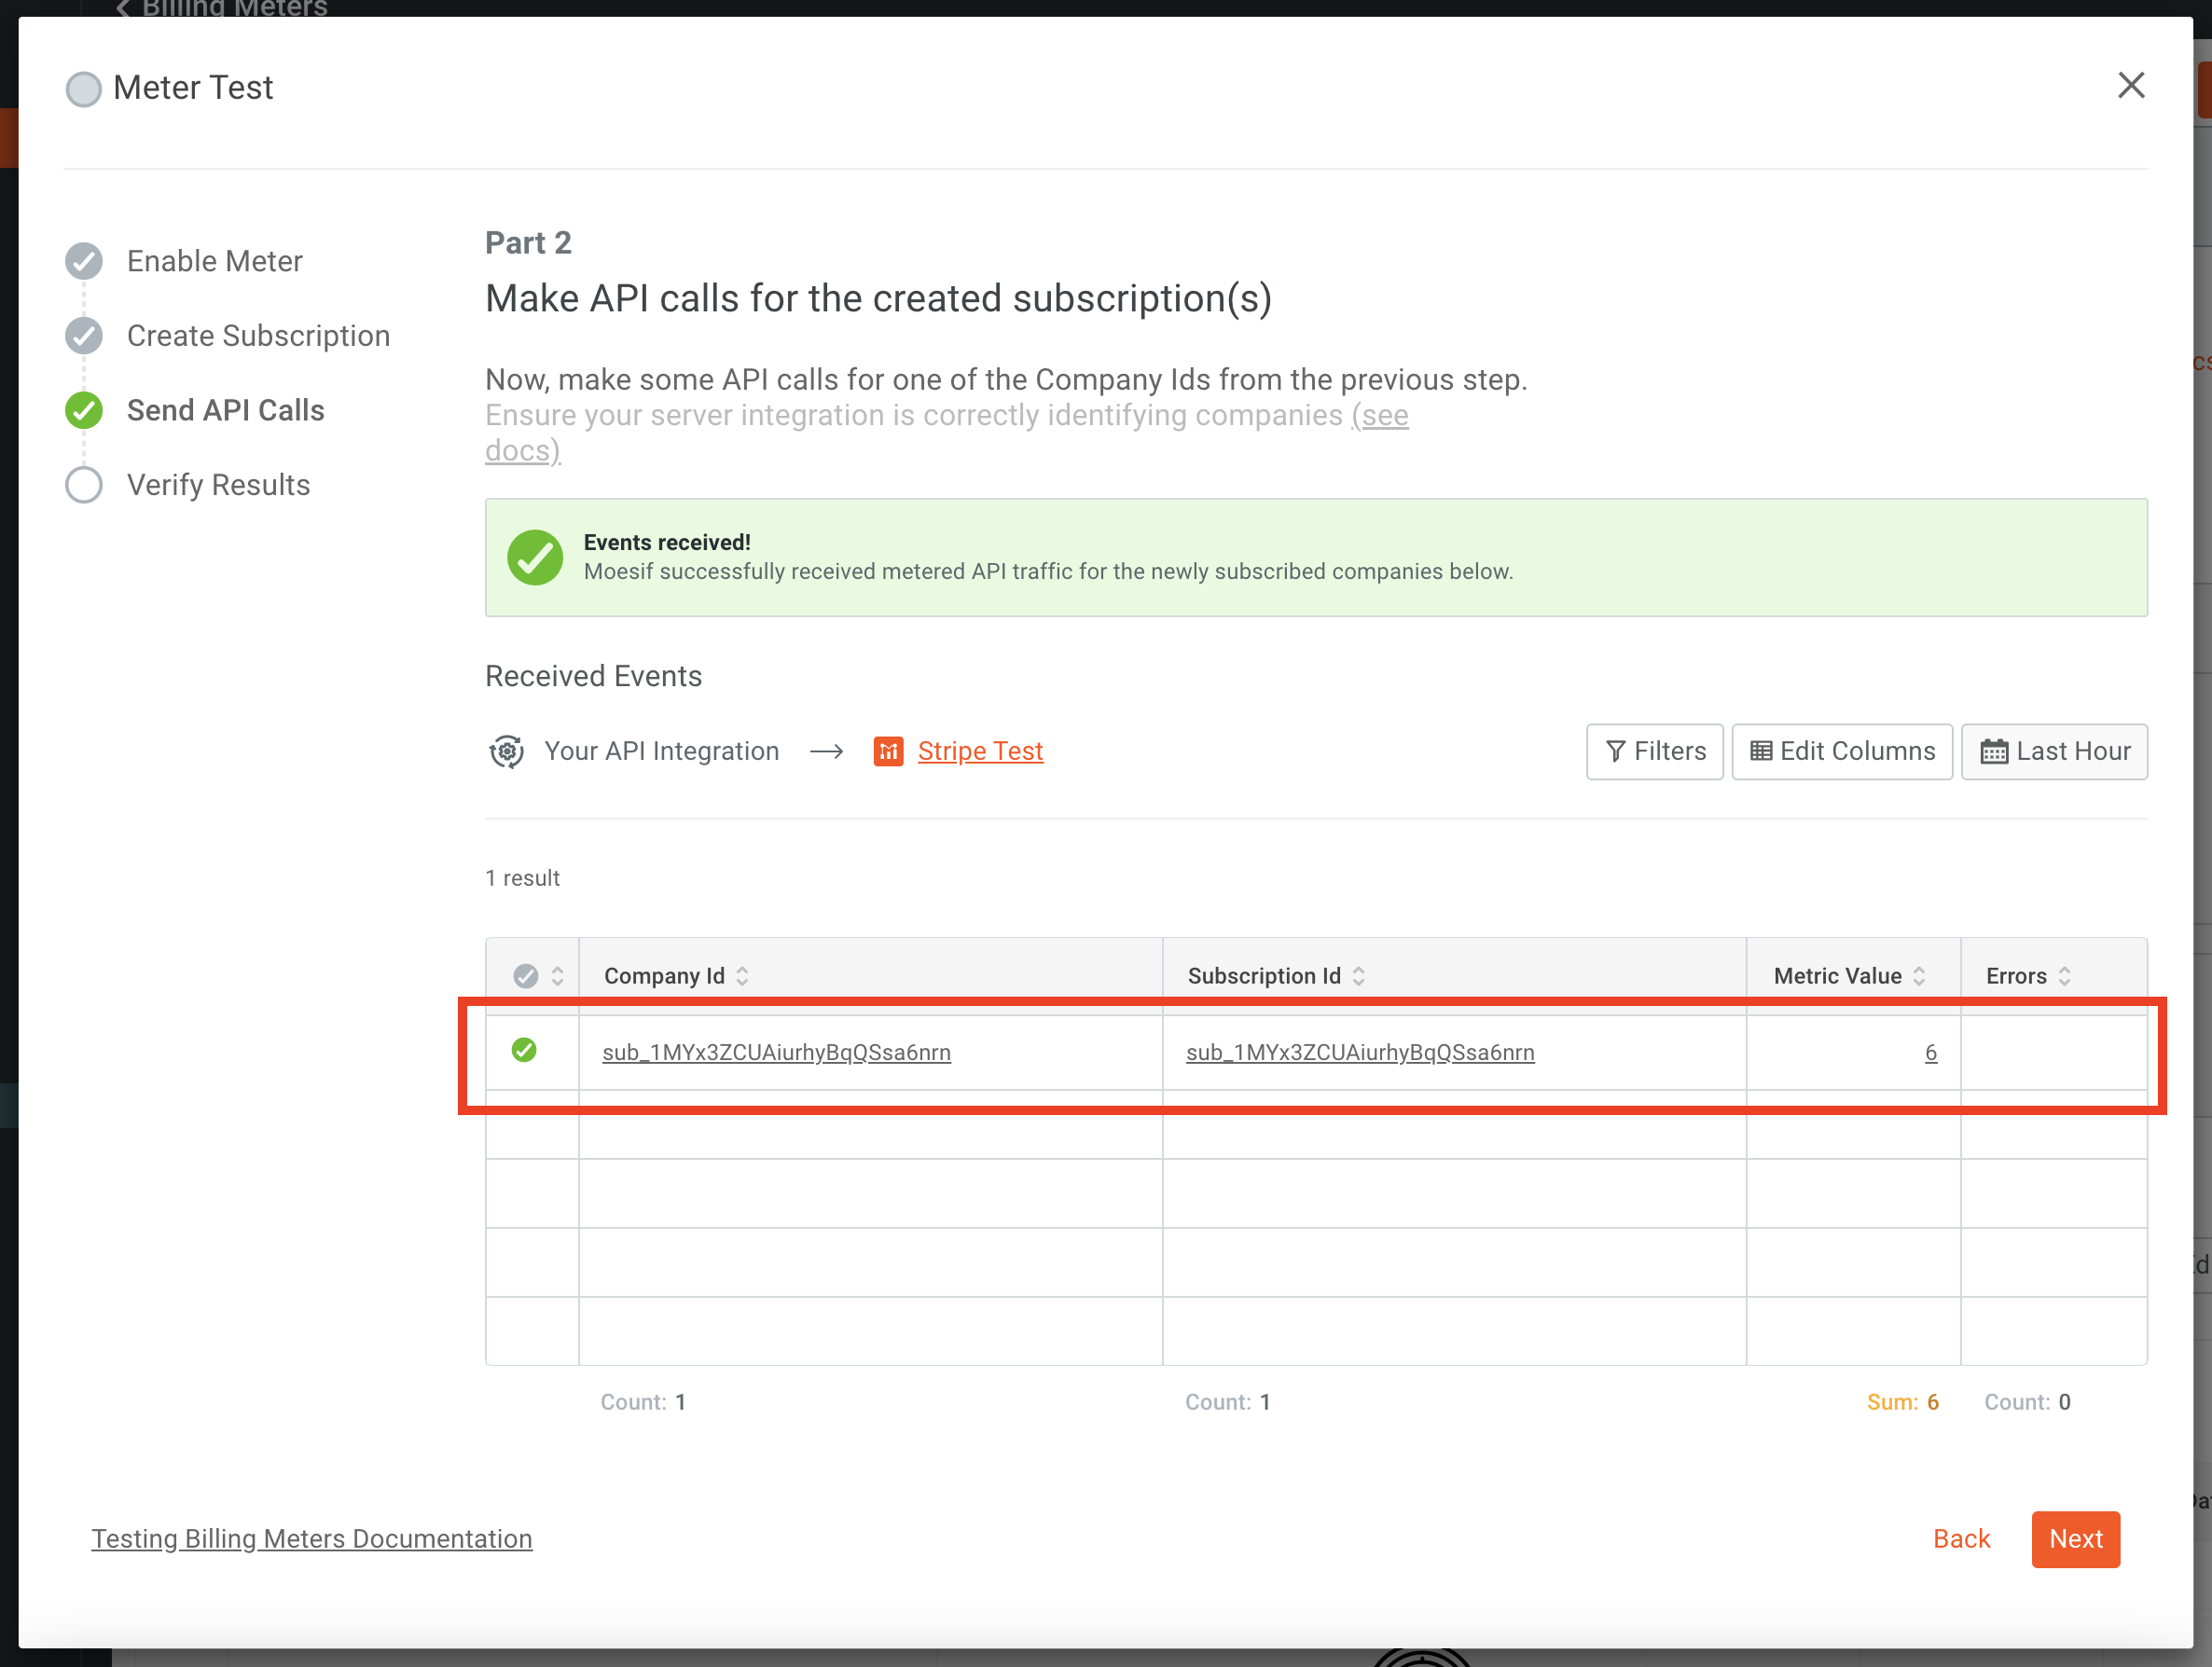
This may take a minute or two but should show up relatively quickly.
The last step in the Meter Test is Step 3. This step will ensure that usage data has been synced over to Stripe. Currently, as of the writing of this tutorial, Moesif syncs data to Stripe every 15 minutes. When you first get to the screen, you will likely see that it is waiting to sync data from Moesif to Stripe. The screen will look like this:
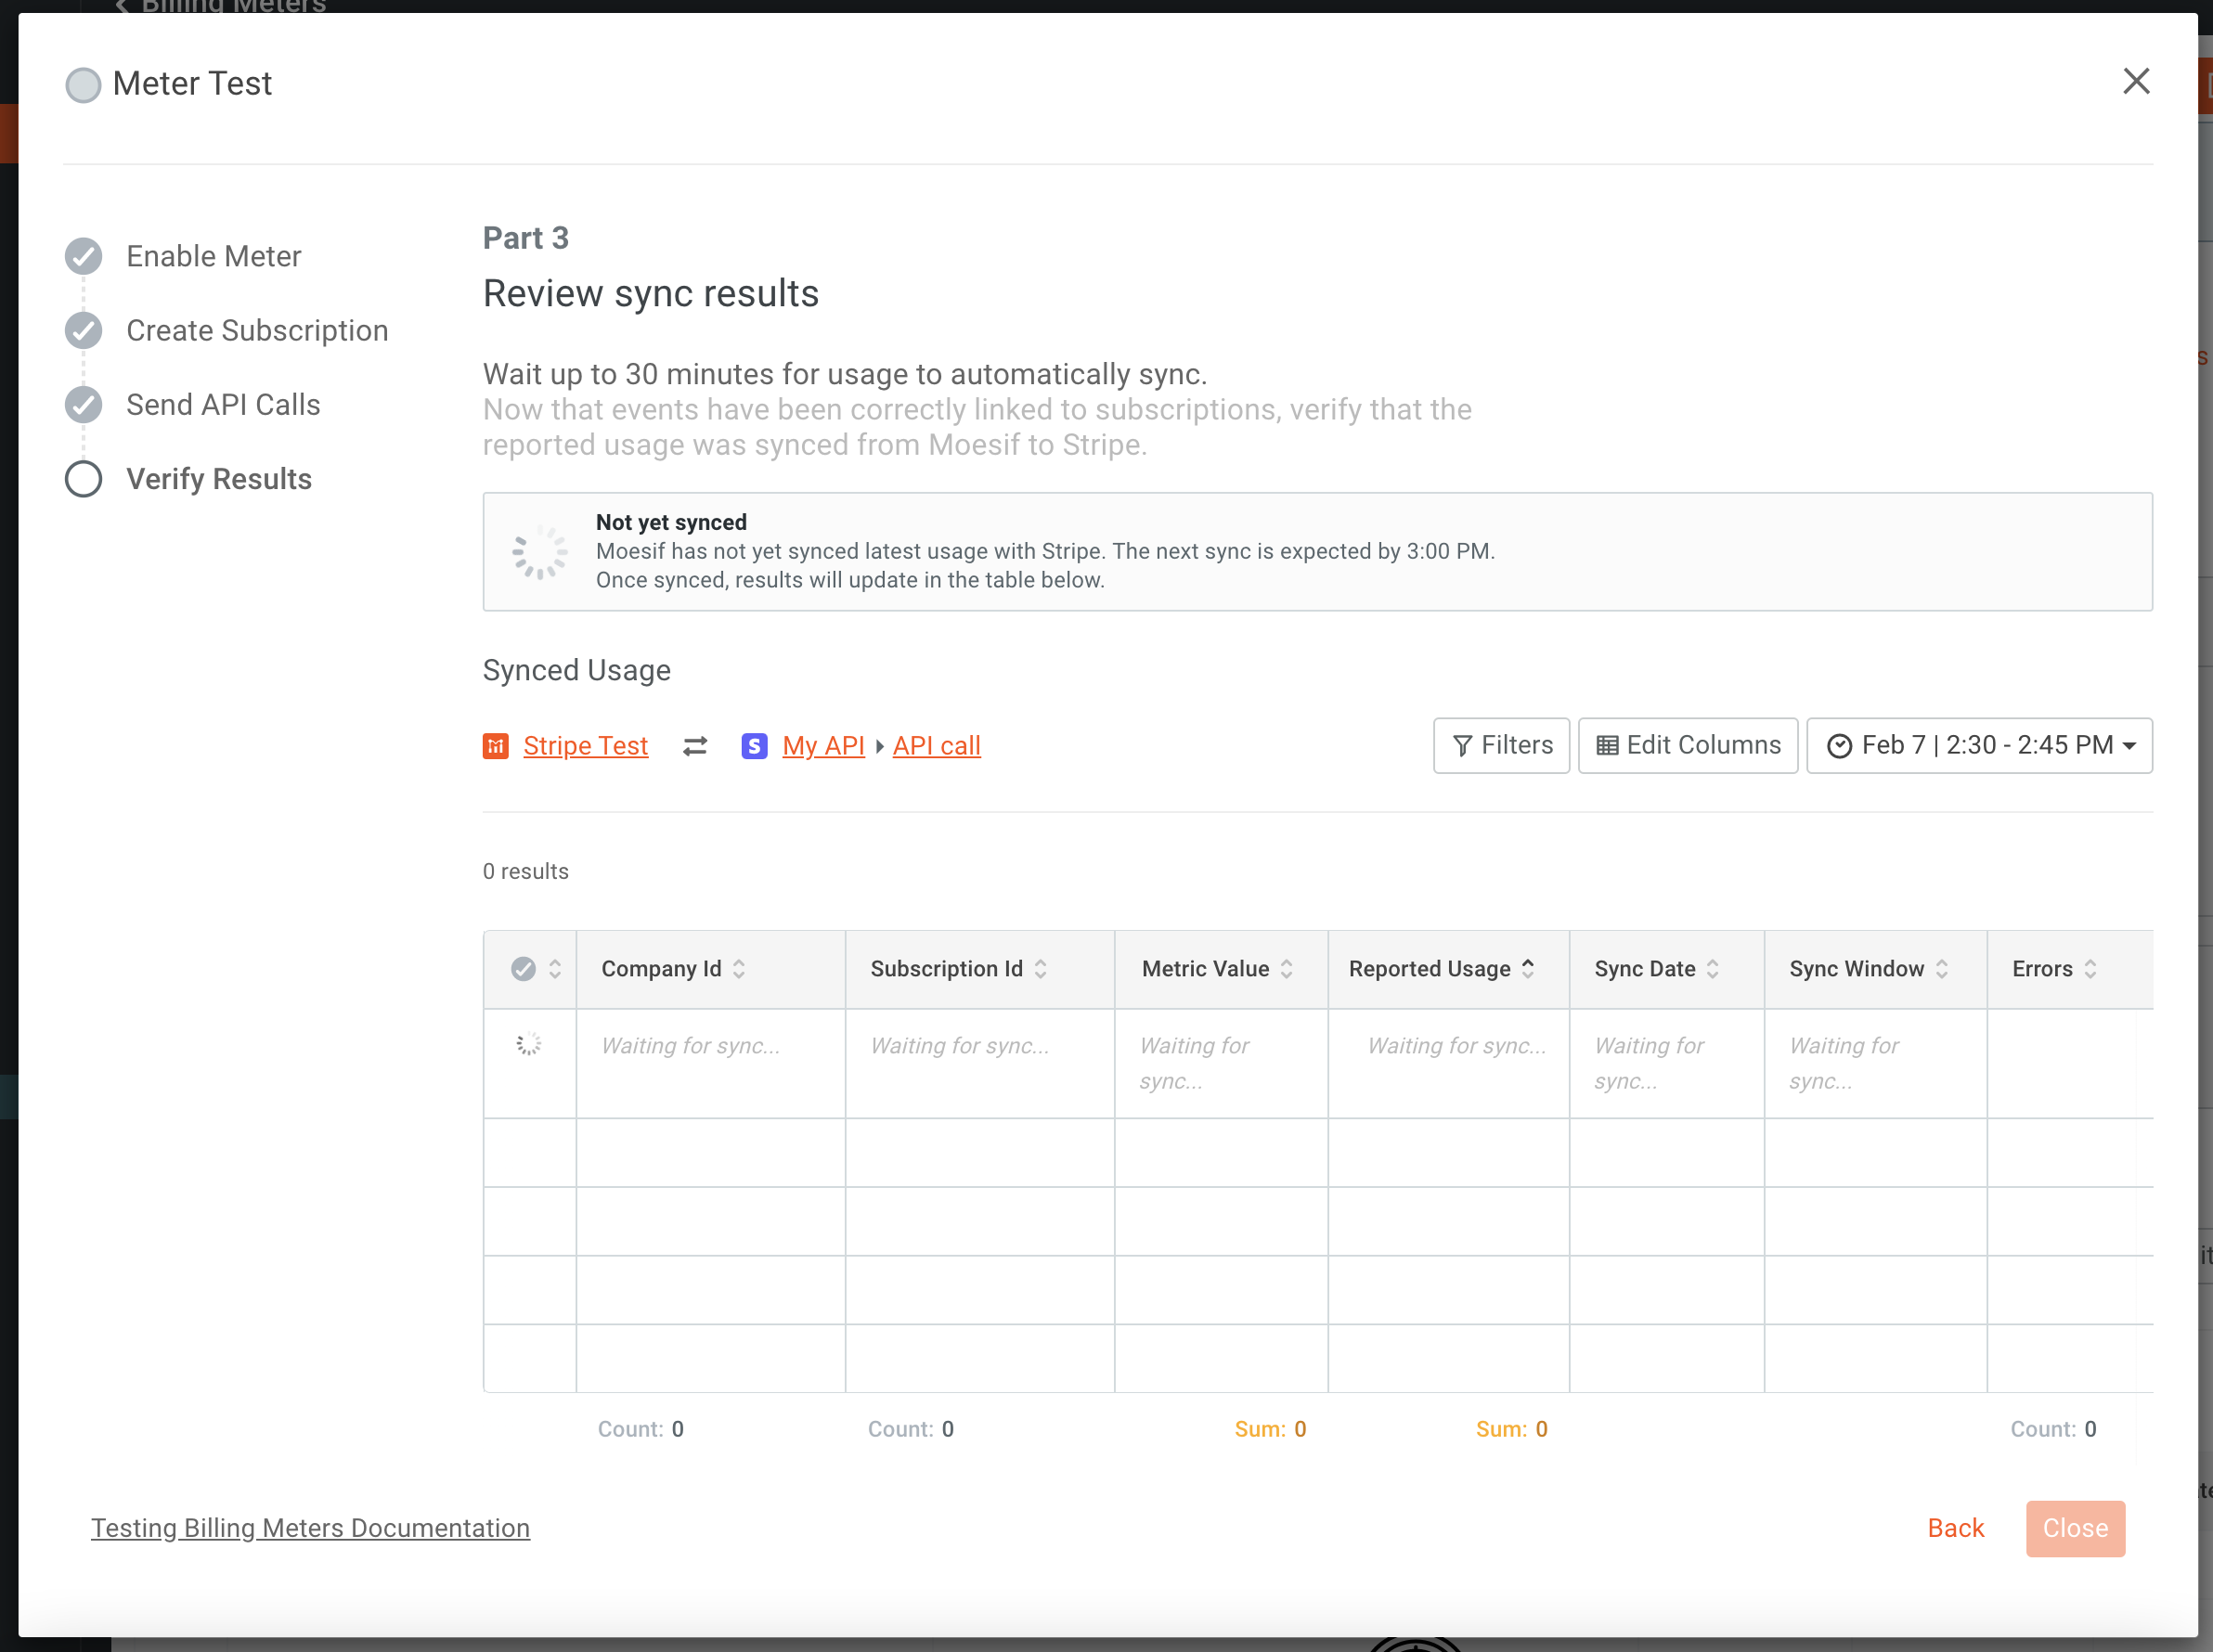
On the screen, you should see when the next sync will occur. Once the sync window has elapsed and Moesif has sent the data to Stripe, you should see this screen update.

Once completed, you can click Close. Your meter is now 100% functional and will accurately record and send usage data to Stripe.
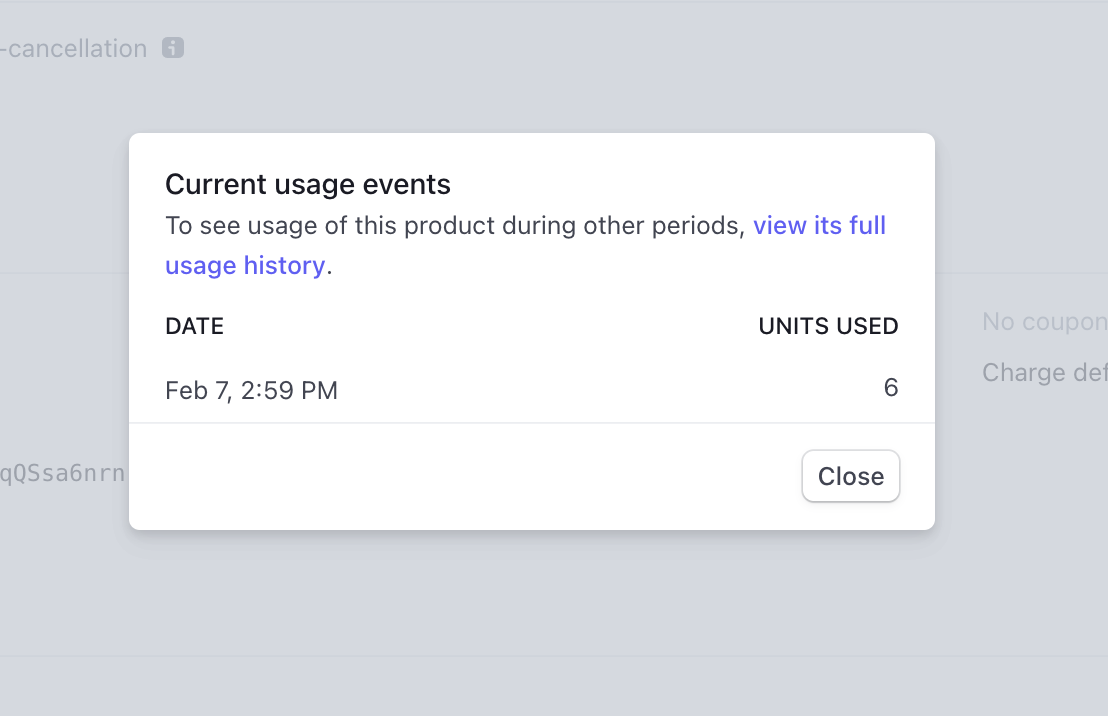
Check Stripe for Usage
As an extra step, you can also go into Stripe to confirm that usage is being added to a user’s subscription. Be sure that you’ve sent a few requests through in order to make sure you have some data that should be sent to Stripe.
To check the usage, in Stripe you’ll want to navigate to the Customers screen and select the customer that you made the API call with.
The subscription we are billing towards is the one we created earlier named My API. Click on the subscription entry on the customer details screen.
On the next screen, click on View Usage beside the price entry.

A modal should now pop up showing you the usage for the API that has been reported to Stripe from Moesif.
Wrapping up
Monetization has always been a tough hurdle to get past. Many custom solutions offered flexibility but at a very high engineering and support cost. With Moesif, API monetization is possible in an extremely minimal amount of time. As demonstrated in this article, With a little bit of configuration and minimal amount of code we can create a production-ready, post-paid monetization scheme in minimal time.


Related Articles

API Strategy
Leveraging AI For a Better API Strategy
Learn how to leverage AI to build and fortify your API strategy. Improve design, governance, documentation, and align APIs with business outcomes.
API Strategy
The 5 Best Mixpanel Alternatives of 2025
Learn about the best Mixpanel alternatives to determine the right analytics solution for your use case.

API Development
How to Leverage Moesif Effectively for API Observability
Effectively leverage Moesif for API observability through best practices for integration, event enrichment, custom actions, and engineering workflow integrat...
API Strategy
How to Build an Internal Chargeback Model for Your API and AI Usage Using Moesif
Use Moesif to implement internal chargebacks and enable precise API and AI cost attribution for better transparency and resource optimization.
