Using Moesif, Kong, and Stripe to Monetize Your AI APIs - Part 2: Setting Up Metering and API Access

This is the second part of a four-part series about AI API monetization. You can check out the first part of the series here.
Now that we have set up our API, integrated it with Kong, and connected Stripe with Moesif, we have the infrastructure to begin billing for API usage. Now, we will move into configuring Moesif with the pricing, metering, and access control/governance pieces of the API monetization journey. Let’s kick things off by setting up the prices we want to charge for API usage in Moesif.

Create Your API Pricing in Moesif
In Moesif, we can configure the plans and prices for our APIs using the Moesif Product Catalog. This feature allows you to configure your plans and prices conveniently in Moesif, and Moesif will automatically create them in Stripe. This enables you to do everything within the Moesif platform instead of bouncing between the two.
For our AI API example, we will want to create two distinct prices for our AI API Plan. Of course, if you have multiple plans/tiers, you can duplicate what we do here for each plan you’d like to create. To simplify things, we will create a single plan with two prices, one for each token type: input and output.
To create our plan, in Moesif, you will do the following:
- Click on Product Catalog in the left-side menu in Moesif
- On the Plans screen that appears, click Create New in the top right corner.
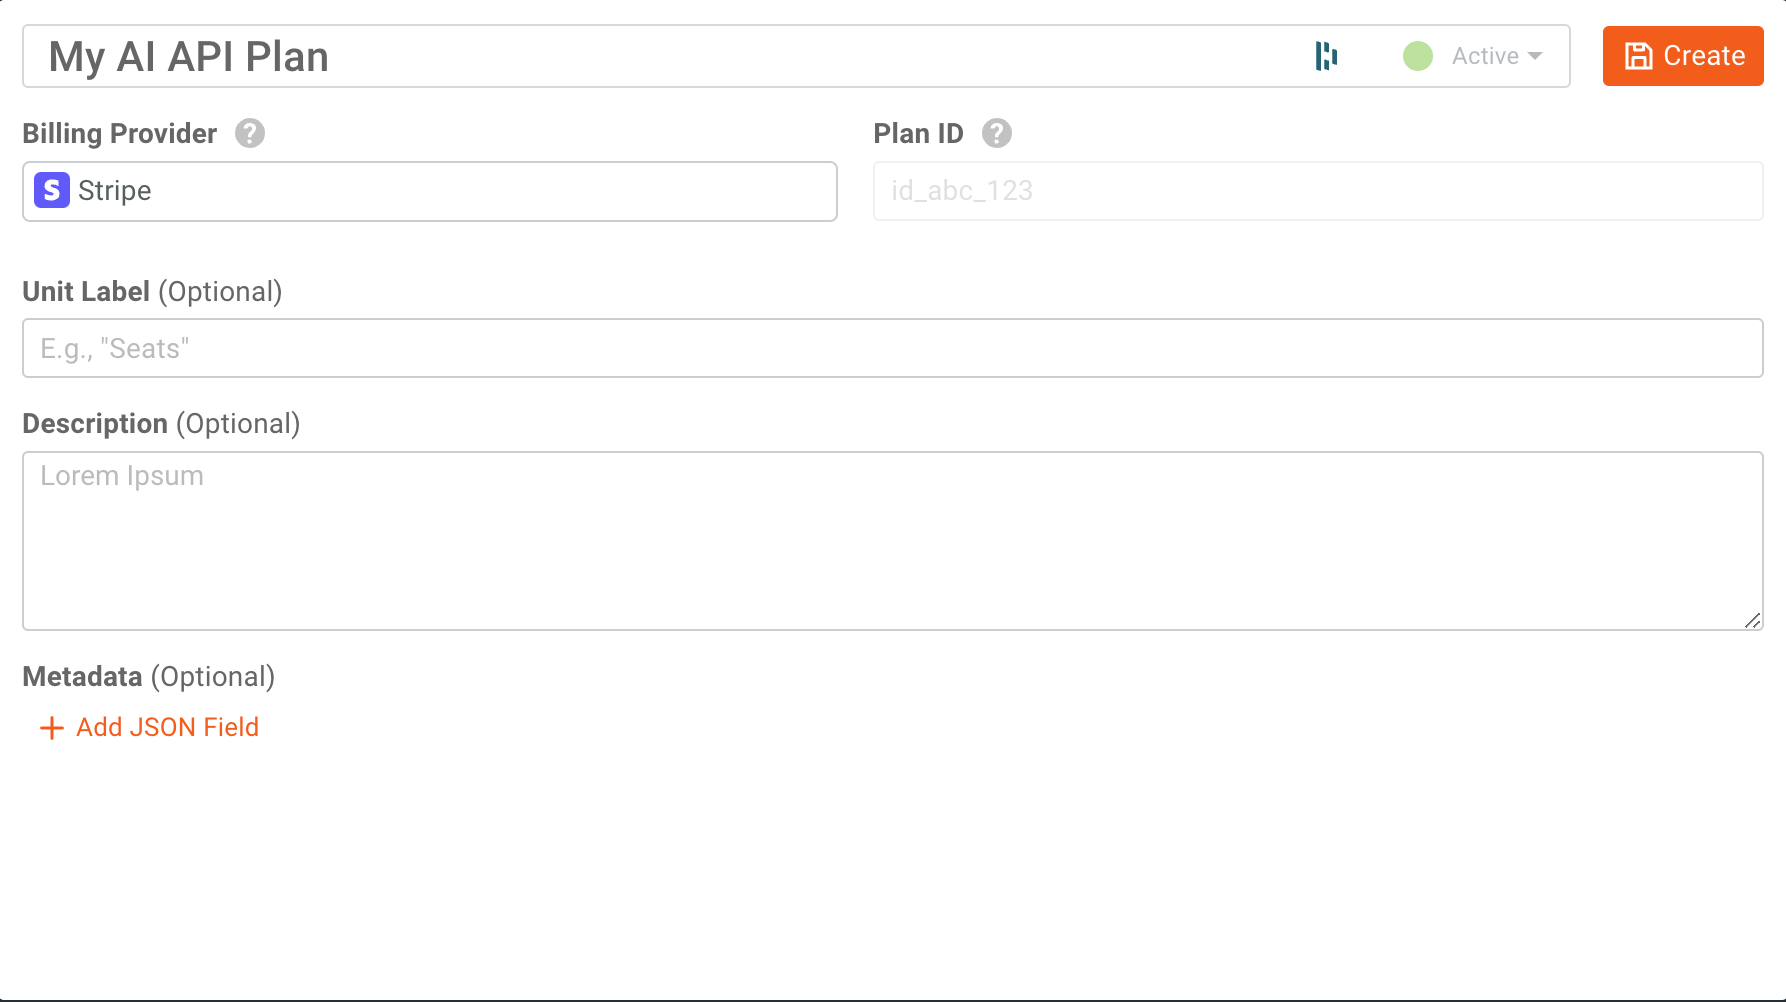
- On the Create New Plan screen, add the following details:
- Add “My AI API Plan” to the Name field
- Select Stripe in the Billing Provider dropdown.
- Once the plan is populated, click Create in the top right corner.
Before you create your plan, this is how the form should look:
With our Plan created, we need to move forward with developing our prices for input and output tokens. After you have clicked Save on the Plan screen, a modal will appear showing that the Plan was successfully created and prompting you to Create a Price. Alternatively, you can click the Prices menu item on the left-hand menu under Product Catalog.
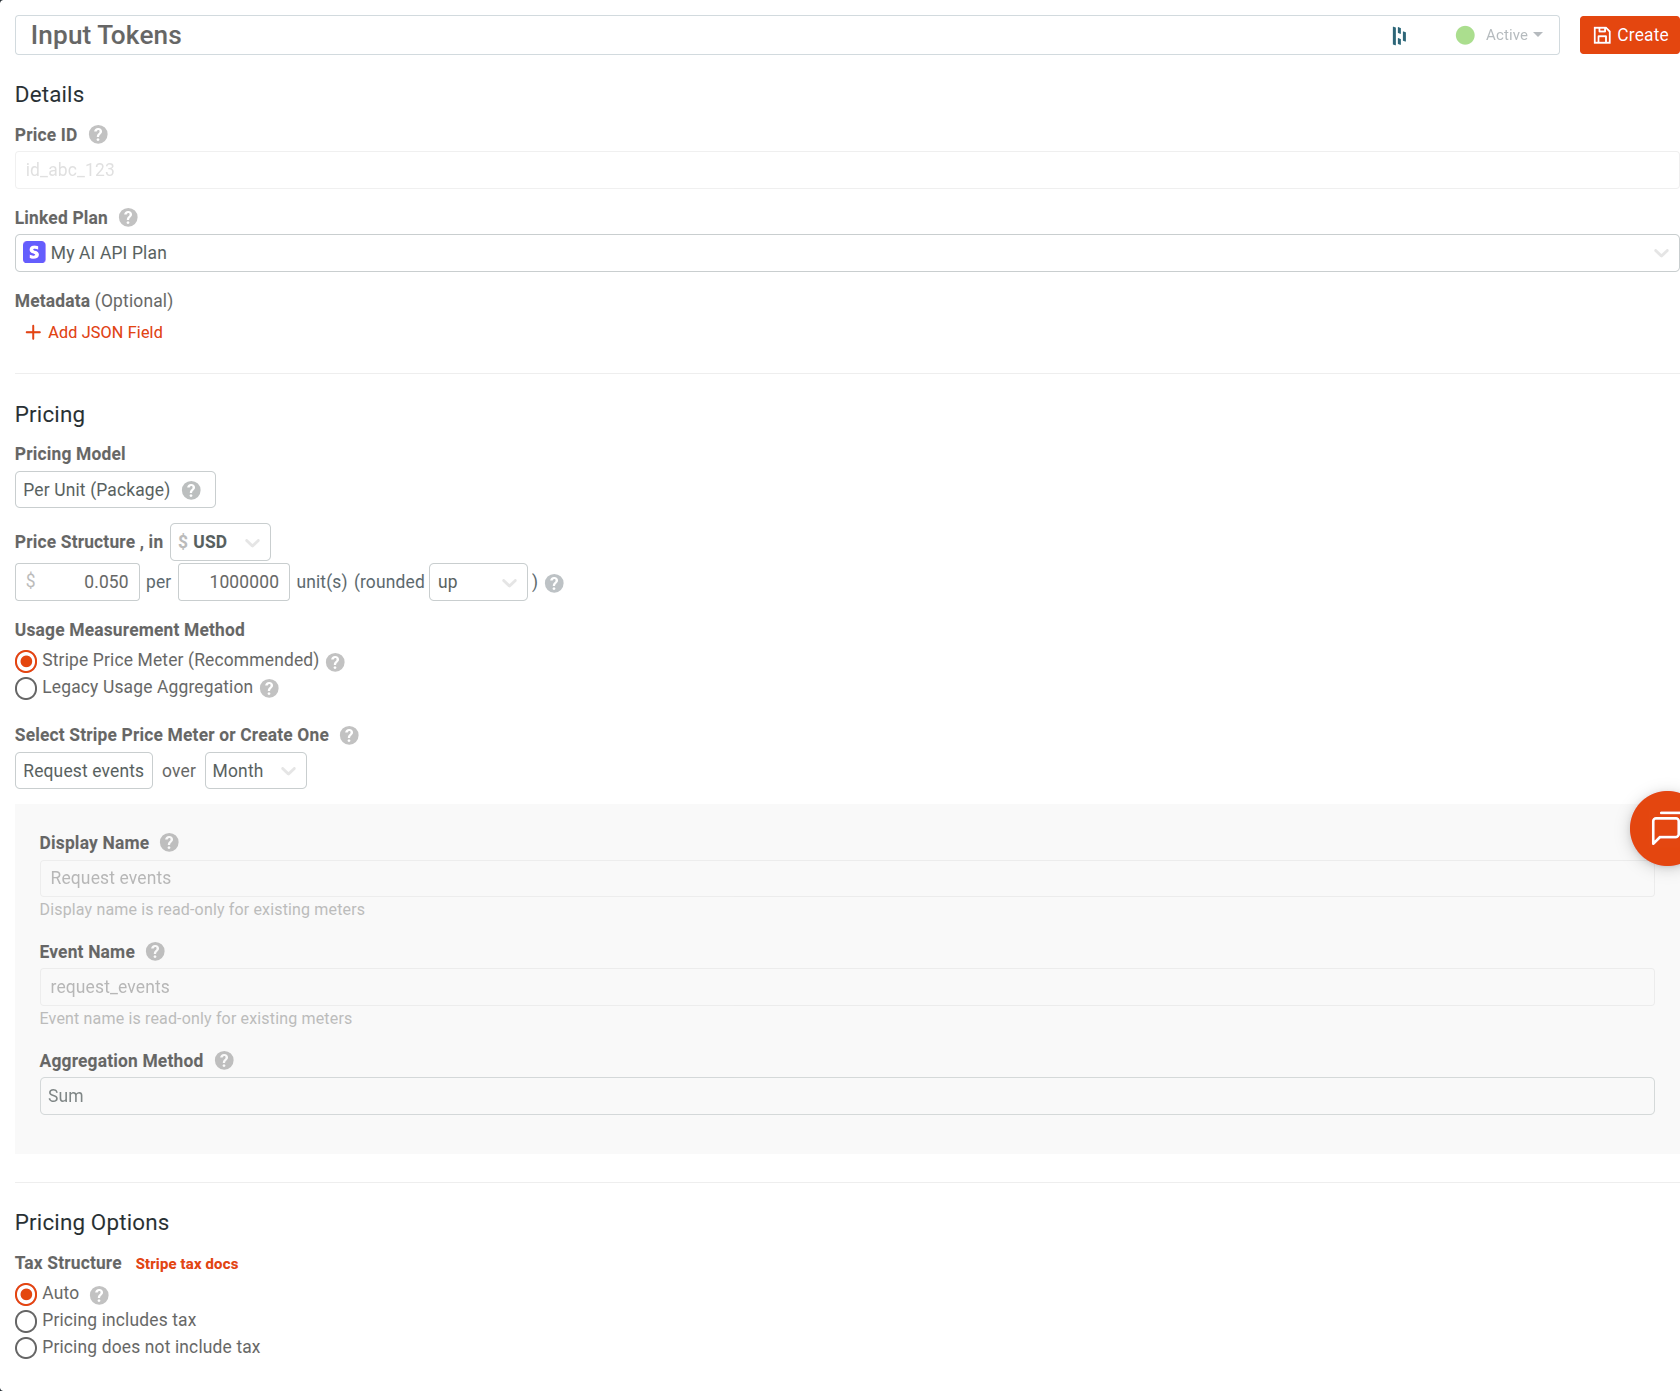
Once you are on the Create Price screen, do the following:
- Populate the Price Name field with “Input Tokens”.
- If not already selected, under Linked Plan, set it to the plan we created in the last step.
- Under the Pricing Model, ensure the value is “Per Unit (Package)”.
- If you have another pricing model you’d like to use, you can select it from the dropdown menu and configure it as required for your use case.
- In Usage Measurement Method, select Stripe Price Meter. Then select from an existing Stripe meter or create a new one. Select Month as the period of time for aggregating usage and Sum as the aggregation method.
- In Price Structure, set the values to “$0.50 per 1000000 (One Million) unit(s) (rounded up)”.
- Keep Tax Structure set to Auto.
- Click Create in the top right corner of the screen to create the price.
Here is what the form should look like before you save the price:
Once you save, a workflow modal will appear to create a Billing Meter or Governance Rule. We will skip this for now and create these components later. For now, exit out of the modal.
Next, we will create another price for output tokens. While still on the previous screen for the input tokens we just created, click Prices in the left-side menu and then click the Create New button at the top of the Prices Main screen. This will return us to the same screen where we created the input token price.
Once you are on the Create Price screen again, do the following:
- Populate the Price Name field with “Input Tokens”.
- If not already selected, under Linked Plan, set it to the plan we created in the last step.
- Under the Pricing Model, ensure the value is “Per Unit (Package)”.
- If you have another pricing model you’d like to use, you can select it from the dropdown menu and configure it as required for your use case.
- In Usage Measurement Method, select Stripe Price Meter. Then select from an existing Stripe meter or create a new one. Select Month as the period of time for aggregating usage and Sum as the aggregation method.
- In Price Structure, set the values to “$1.50 per 1000000 (One Million) unit(s) (rounded up)”.
- Keep Tax Structure set to Auto.
- Click Create in the top right corner of the screen to create the price.
Once the plan and two prices have been created for our input and output tokens, we then need to begin to meter API usage so that it can be reported to Stripe for each of the created plans.
Metering API Usage With Moesif
The way to meter API usage through Moesif is to use a Billing Meter. The Billing Meter will define three things:
- What plan and price the API usage should be reported to/billed against
- What traffic should be metered (routes, response status, etc.)
- How the traffic should be metered (per API call, unique user, etc.)
To create the first billing meter for input tokens, we will do the following:
- Click the New button in the top left of the screen in Moesif and select Billing Meter.
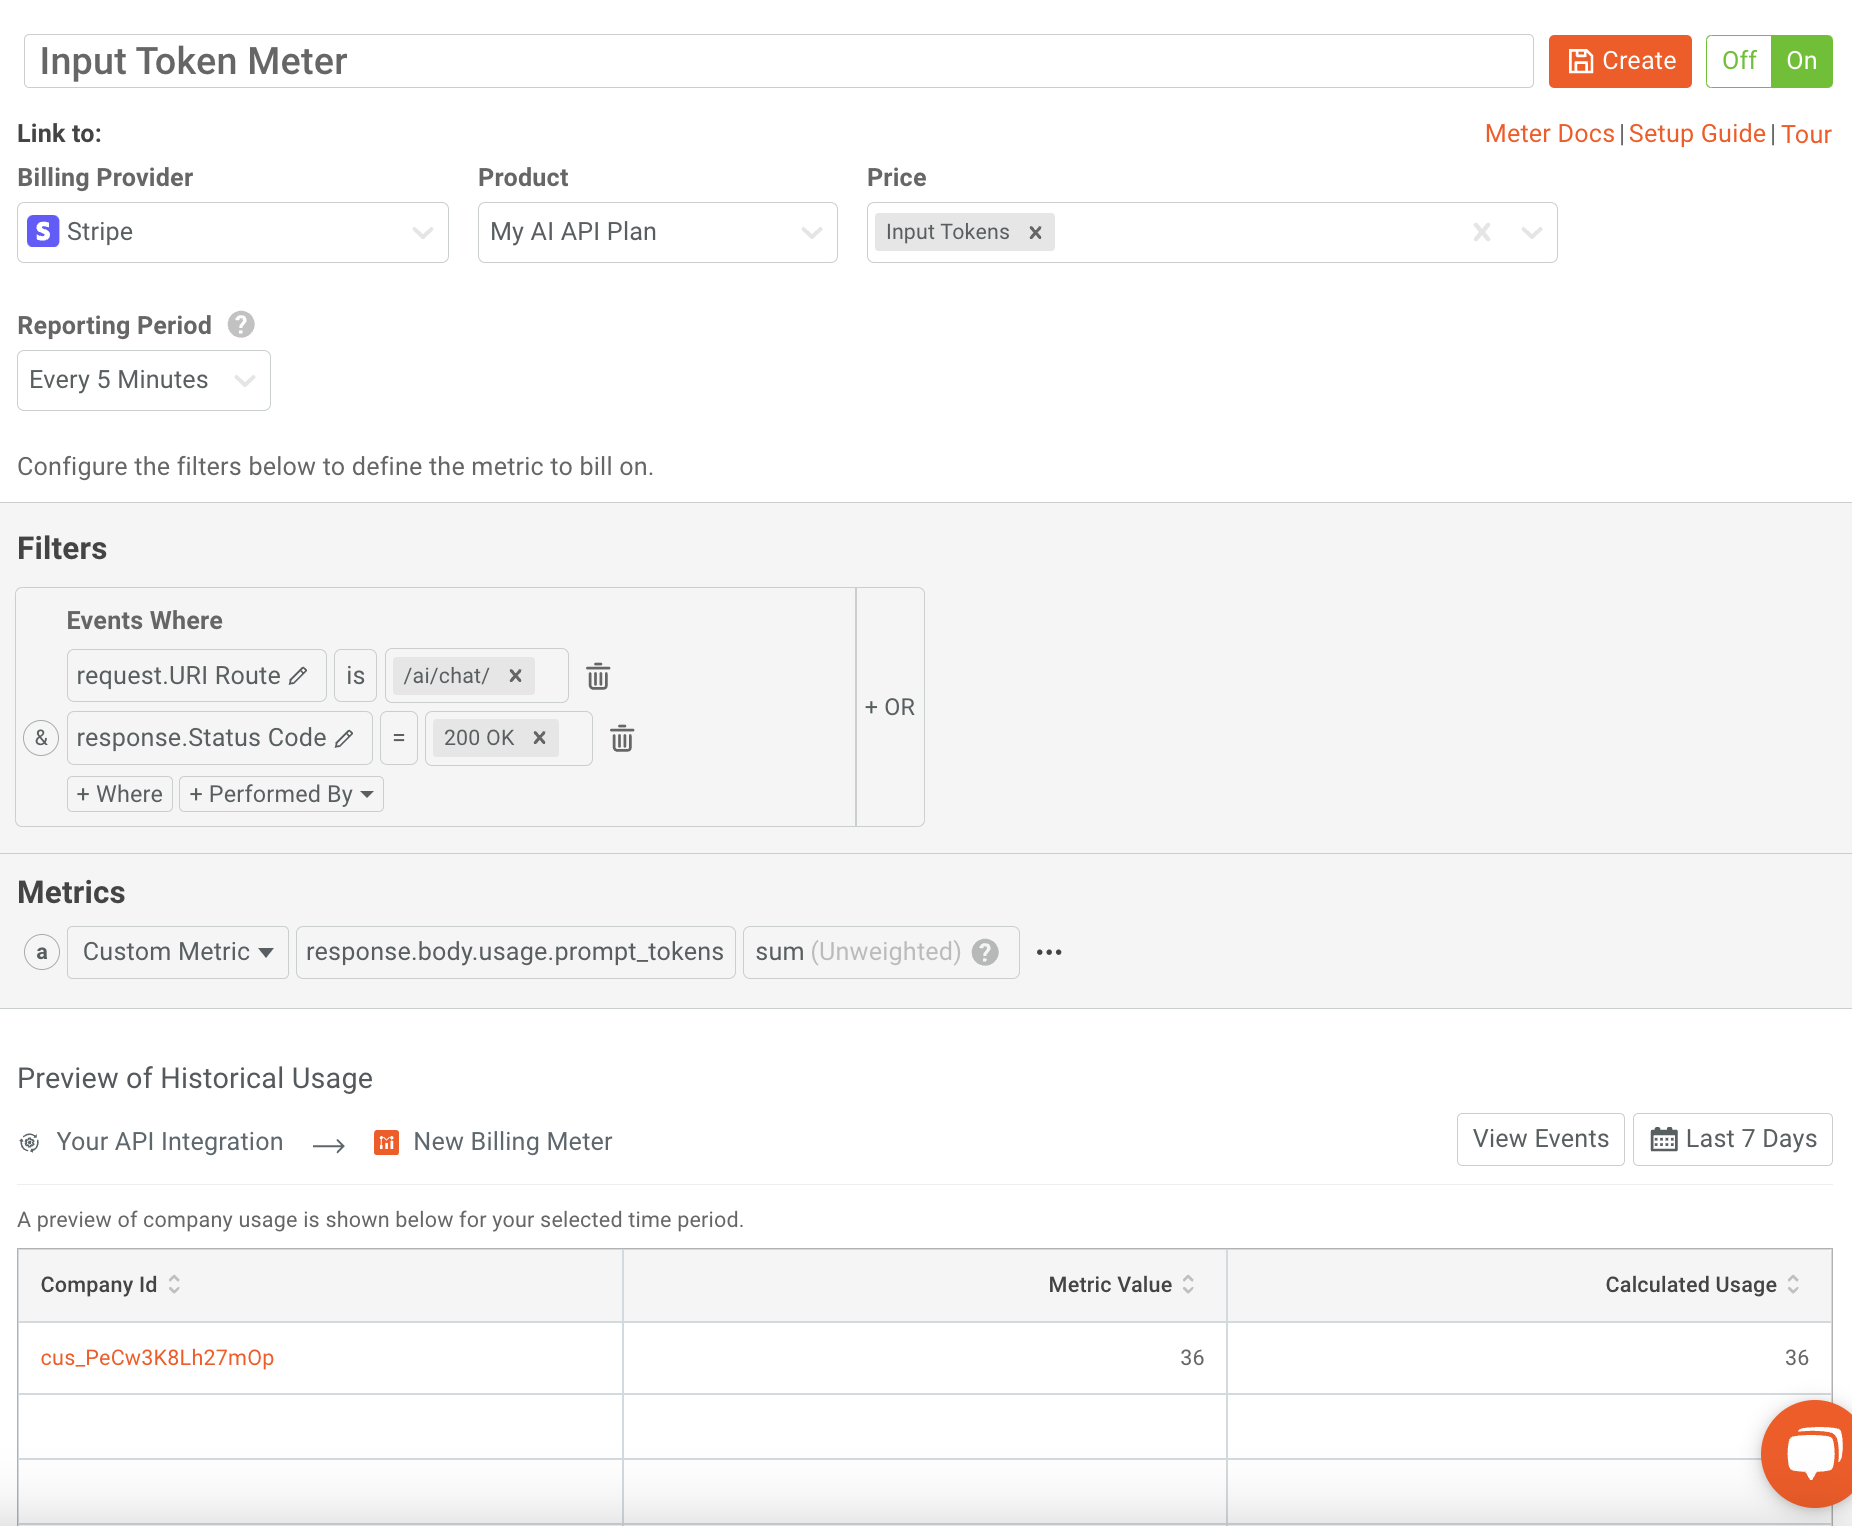
- On the Create New Meter screen, configure the meter with the following:
- Add “Input Token Meter” as the meter name.
- In the Billing Provider dropdown, select “Stripe”.
- Once the products and plans are populated from Stripe, select the Product and Plan created in the previous step. If you’re following along, the product will be named “My AI API Plan”, and the price will be “Input Tokens”.
- The reporting Period dropdown can be left as “Every 5 Minutes”
- Under Filters, we will add the following criteria:
- request.URI Route is /ai/chat
- response.Status Code = 200 OK
- Under Metrics, select “Custom Metric” from the dropdown.
- In the field selector in the dropdown to the right, select “response.body.usage.prompt_tokens” and set the aggregation as “sum (Unweighted)”.
- Click the Create button to create the meter.
- Optionally, you can test the meter by clicking Test Meter on the workflow modal that pops up after it is created or clicking Test Meter beside the meter name input.
Before you create the meter, here is an example of what the Create Meter screen will look like:
Next, we will create the meter for the output tokens in the same way. To generate this meter, do the following:
- As with the previous meter, click the New button at the top left of the screen in Moesif and select Billing Meter.
- On the Create New Meter screen, configure the meter with the following:
- Add “Output Token Meter” as the meter name.
- In the Billing Provider dropdown, select “Stripe”.
- Once the products and plans are populated from Stripe, select the Product and Plan created in the previous step. If you’re following along, the product will be named “My AI API Plan”, and the price will be “Output Tokens”.
- The reporting Period dropdown can be left as “Every 5 Minutes”
- Under Filters, we will add the following criteria:
- request.URI Route is /ai/chat
- response.Status Code = 200 OK
- Under Metrics, select “Custom Metric” from the dropdown.
- In the field selector in the dropdown to the right, select “response.body.usage.completion_tokens” and set the aggregation as “sum (Unweighted)”.
- Click the Create button to create the meter.
- Optionally, you can test the meter by clicking Test Meter on the workflow modal that pops up after it is created or clicking Test Meter beside the meter name input.
For more information on how to test your meter to make sure that it is working as intended, check out our meter testing docs.
At this point, the billing meters we have created will meter usage based on the criteria we set for each API call. Then, they will sync this usage to Stripe so that the user can be accurately charged. Next, we need to put some guardrails on access, blocking users from accessing the API when they are out of pre-paid credits or have an overdue invoice, like when they are post-paid users.
Enforcing Pre-Paid Access to the API With Moesif Governance Rules and Kong
To block our API users from accessing the API when they have run out of credits, we will use a Moesif Governance Rule. In Moesif, we can use plenty of templates to create a rule, including one where the user is blocked upon a zero-credit balance. To make this Governance Rule in Moesif, you’ll need to do the following:
- In Moesif, navigate to the Quotas & Governance screen by clicking on the corresponding menu item on the left-side menu.
- On the Quotas & Governance screen, click the Add New button on the top-right of the screen.
- Select the template for Block When No Available Credits in the modal that appears.
- This will then prompt you to create a cohort for the governance rule automatically. In this next modal, click Continue.
This will then bring you to the configuration screen for the rule you just created. At this point, the rule is active and will enforce that users should have credits to access any endpoint.
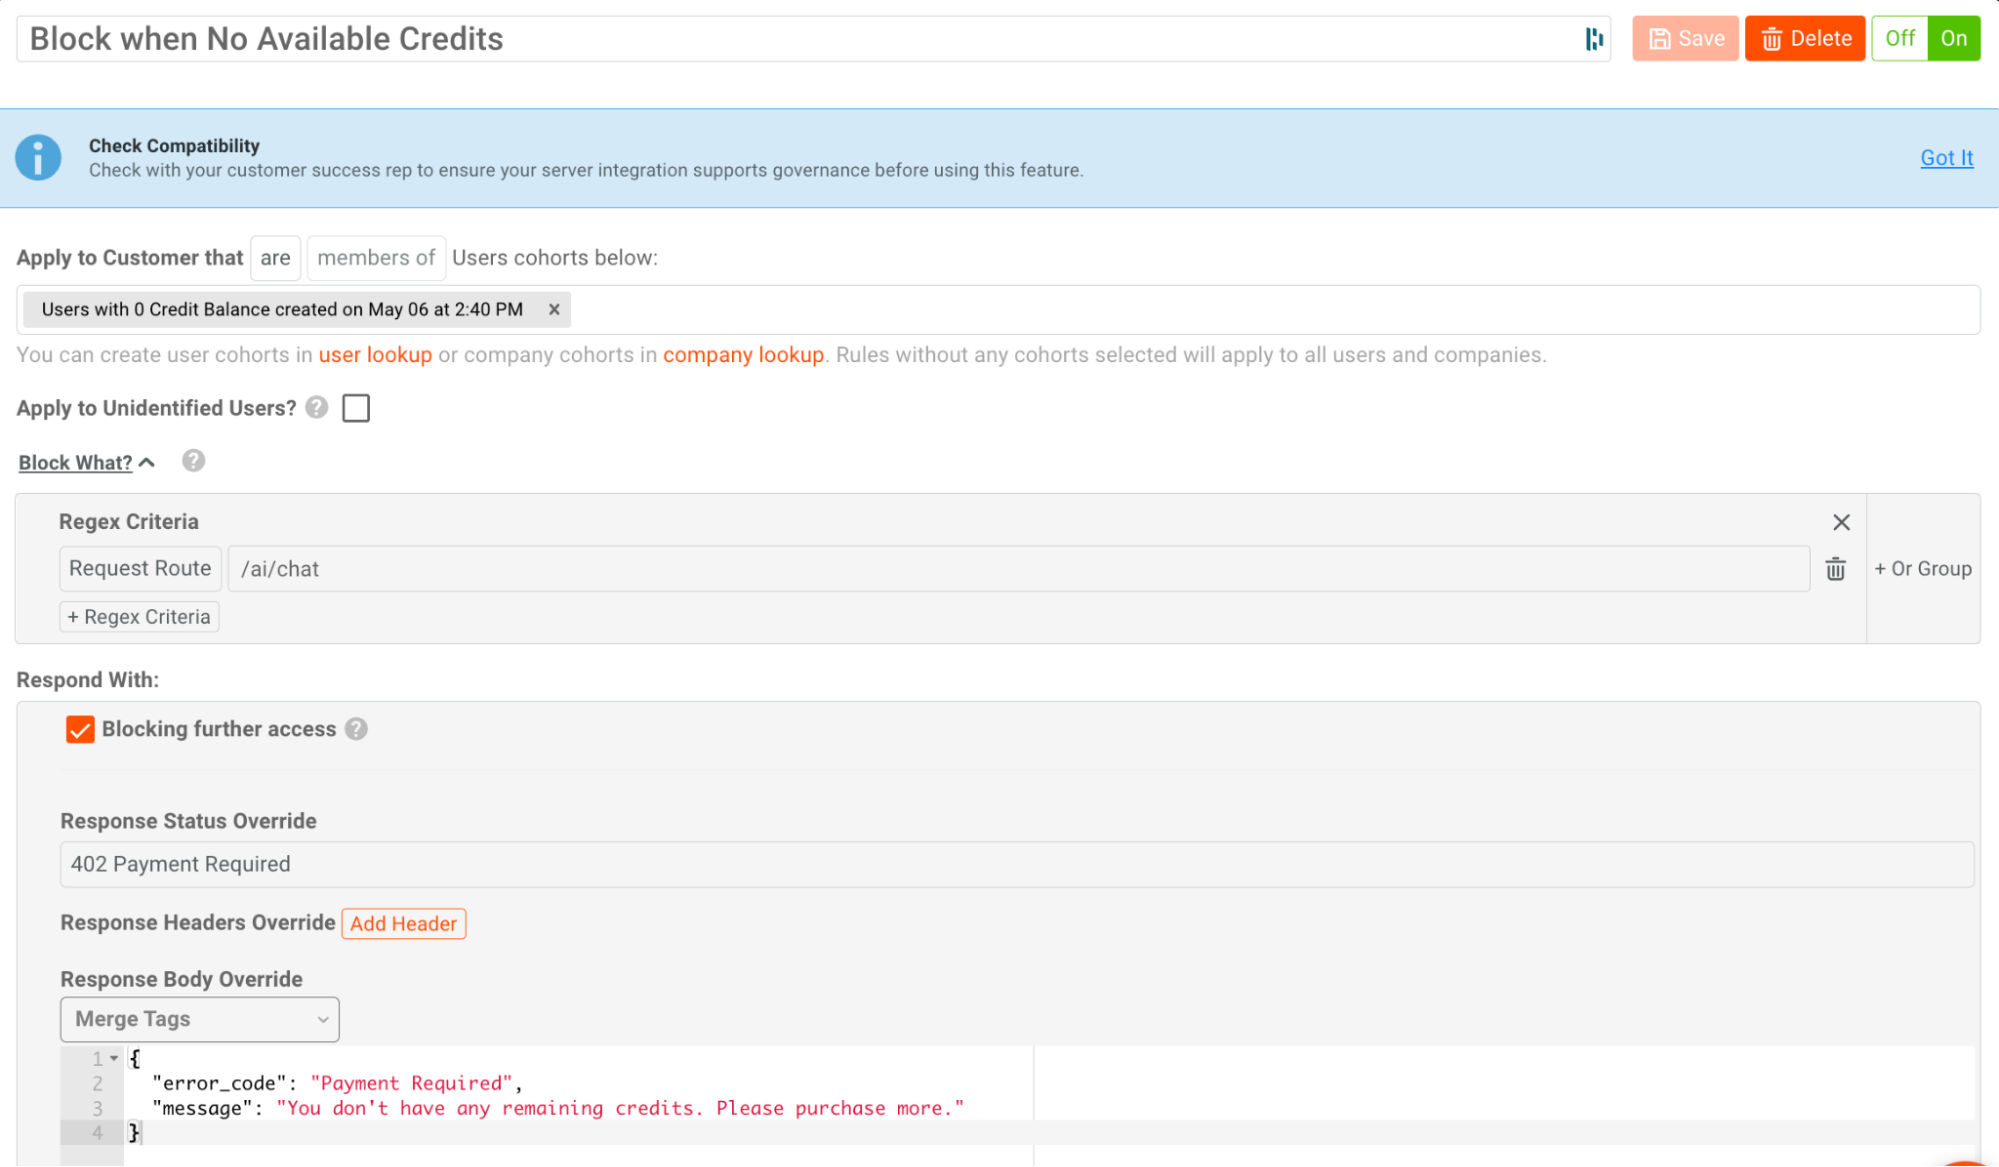
We will dial in the rule to only apply to the /ai/chat route. The rule currently states that every route will be blocked if the user doesn’t have credits. If we only have a single route, this won’t be a problem; however, if we have multiple routes, we may want to ensure that this only applies to specific routes. To make this rule more specific, we will need to change it slightly. To do this, we will need to do the following:
- On the governance rule screen, under the Block What section, expand it so that you can add some input.
- Next, under regex criteria, select Request Route from the first dropdown.
- In the regex input textbox, add “/ai/chat”.
- In the top-right corner, click Save to save the updated regex criteria.
Based on the above configuration, the governance rule input screen will look like this:
After this, the governance rule will block any users without credit trying to access the /ai/chat route. If users are subscribed to a post-paid subscription and you’d like to block them from accessing the API if they have overdue invoices, this will require a slightly different approach. Let’s look at how to implement that next.
Blocking API Access For Users With Overdue Invoices
To block our API users from accessing the API when they have an overdue invoice, we can also use a Moesif Governance Rule. Once again, we can use a built-in templated rule for this scenario to have the rule up and running quickly. To create this Governance Rule in Moesif, you’ll need to do the following:
- In Moesif, navigate to the Quotas & Governance screen by clicking on the corresponding menu item on the left-side menu.
- On the Quotas & Governance screen, click the Add New button on the top-right of the screen.
- Select the template for Block On Unpaid Invoices in the modal that appears.
- This will then prompt you to create a cohort for the governance rule automatically. In this next modal, click Continue.
This will then bring you to the configuration screen for the rule you just created. At this point, the rule is active and will enforce the rule that users with overdue invoices (as defined by the various billing providers) should not have access to the API.
We will dial in the rule to only apply to the /ai/chat route. The current rule is similar to the one we created previously: if the user is delinquent on payment, it will block every route. If we only have a single route, this won’t be a problem; however, if we have multiple routes, we may want to ensure that this only applies to specific routes. To make this rule more specific, we will need to change it slightly. To do this, we will need to do the following:
- On the governance rule screen, under the Block What section, expand it so that you can add some input.
- Next, under regex criteria, select Request Route from the first dropdown.
- In the regex input textbox, add “/ai/chat”.
- In the top-right corner, click Save to save the updated regex criteria.
Based on the above configuration, the governance rule input screen will look like this:

After this, the governance rule will block any users with an overdue invoice from accessing the /ai/chat route. Again, this rule only makes sense to implement if you are using a post-paid billing model. For pre-paid, the previous rule will be all you’d want to implement. In the case that users can use either post-paid or pre-paid, you could leave both rules enforced.
Governance Rules can also be used to enforce pre-paid quotas or keep post-paid subscribers within the ranges they have selected, stopping them from bumping to the following usage tier. More details on how to use governance rules to enforce tier-based billing can be explored here.
Conclusion
In this second tutorial, we went over how to set up pricing for your APIs, how to set up API metering with a Billing Meter, and how to set up access rules using Governance Rules. With this, we have everything in place to ensure that user can be billed for their usage and blocked when they run out of credits or have overdue invoices. At this point, our API and billing infrastructure are ready to be released for the world to use. In the following tutorial in this series, we will cover how to add credits to a user’s account so that they will be able to use the API and burn through credits.
Want to try this for yourself? Sign up for Moesif today and enjoy a free trial to help you get your API monetized quickly and efficiently!
Next Steps
Review adding credit balances and testing in Part 3 of this three part series on monetizing AI APIs with Kong, Moesif, and Stripe.


Related Articles

API Strategy
Leveraging AI For a Better API Strategy
Learn how to leverage AI to build and fortify your API strategy. Improve design, governance, documentation, and align APIs with business outcomes.
API Strategy
The 5 Best Mixpanel Alternatives of 2025
Learn about the best Mixpanel alternatives to determine the right analytics solution for your use case.

API Development
How to Leverage Moesif Effectively for API Observability
Effectively leverage Moesif for API observability through best practices for integration, event enrichment, custom actions, and engineering workflow integrat...
API Strategy
How to Build an Internal Chargeback Model for Your API and AI Usage Using Moesif
Use Moesif to implement internal chargebacks and enable precise API and AI cost attribution for better transparency and resource optimization.