Tracking Salesforce API usage quota with Moesif API Analytics
Tracking your Salesforce API usage
Having visibility into digital resources such as 3rd party APIs is key to ensure you are efficiently using those subscriptions and one team does not starve other teams out of their daily or monthly quota. Without visibility, you won’t know which applications are consuming majority of the resources and how to decrease that usage. SaaS like Salesforce place a limit on the number of API calls hitting their open APIs. If you reach quota limits often, instead of just bumping up the Salesforce tier, you may want to get to the root of why the usage limits keeps getting hit.
In this guide, we’ll show you how to set up Moesif API analytics in a few minutes to track your Salesforce API usage.
- How do you determine the number of API call a specific application or department made over a period of time?
- How many
REQUEST_LIMIT_EXCEEDED: TotalRequests Limit exceedederrors occurred? - How do you determine which geographical location the API calls were made from?
- How can I get insight into an API call that took place on a certain date for one of the connected apps?
In this tutorial we will discuss how to track Salesforce API usage with Moesif.
How to create a Salesforce account/instance
If you don’t have a Salesforce account already, you could create a new account on Salesforce’s sign up page.
Once you log in, the instance your organization uses is indicated in the URL of your browser’s address bar. Example URL: https://na132.lightning.force.com/lightning/setup/SetupOneHome/home
In this section we will create a series of REST requests. In each request, a base URI will be used in conjunction with the REST resource. The base URI for these examples is https://yourInstance.salesforce.com/services/data.
Below we will submit a request to retrieve information about each available Salesforce version.
curl https://na132.lightning.force.com/services/data/
The output of this request, including the response header -
Content-Length: 88
Content-Type: application/json;
charset=UTF-8 Server:
[
    {
        "version":"20.0",
        "url":"/services/data/v20.0",
        "label":"Winter '11"
    }
    ...
]
How to create a Cloud Proxy
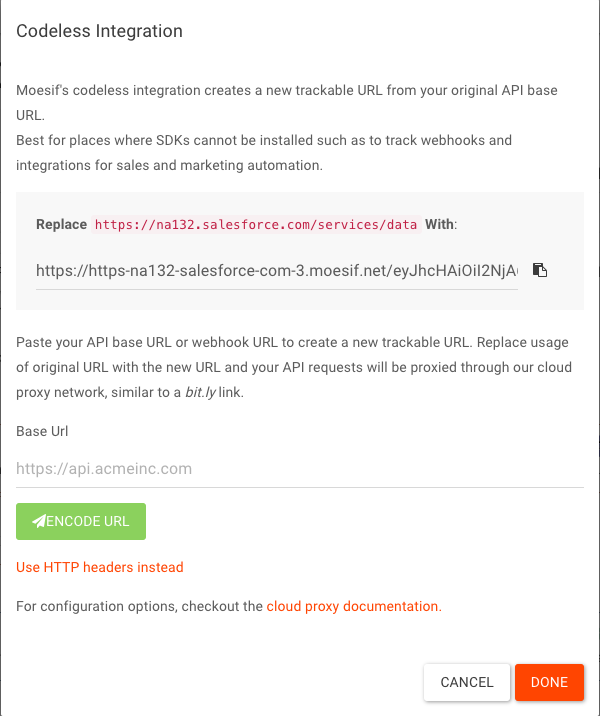
Sign into your Moesif Dashboard, and go to Top Right Menu -> Installation -> Codeless Proxy Integration. You will see a box to enter your API domain or host. Moesif’s codeless integration will create a new trackable URL from your original API base URL.
You need to replace the original URL with the new URL and your API requests will be proxied through the cloud proxy network and we’ll see all the requests are being captured by Moesif.
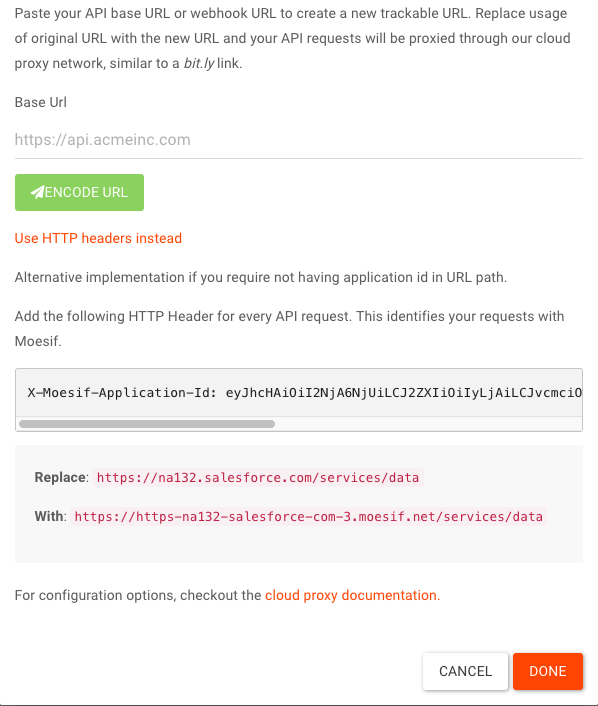
For some reason if we don’t want the application Id in the URL path, we could add the following HTTP Header for every API request:
View the capture event in Moesif
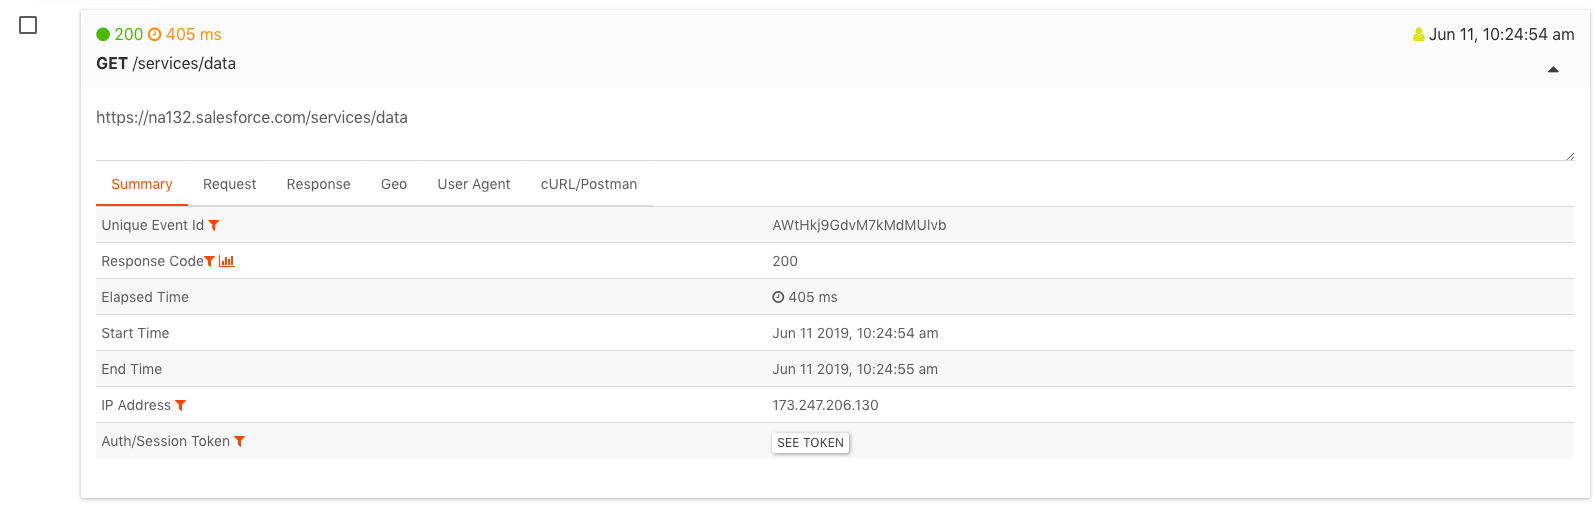
After the configuration is completed, we can use this trackable URL to make requests.
curl -XGET 'https://https-na132-salesforce-com-3.moesif.net/<ApplicationId>/services/data'
NOTE: The applicationId in the above request should be replaced by your Moesif ApplicationId.
We can verify the events are captured by logging into Moesif and looking at the API Analytics -> Live Event Stream.
Conclusion
Using the above approach, we can track any Salesforce API usage using Moesif and perform advanced analytics.


Related Articles

API Strategy
Leveraging AI For a Better API Strategy
Learn how to leverage AI to build and fortify your API strategy. Improve design, governance, documentation, and align APIs with business outcomes.
API Strategy
The 5 Best Mixpanel Alternatives of 2025
Learn about the best Mixpanel alternatives to determine the right analytics solution for your use case.

API Development
How to Leverage Moesif Effectively for API Observability
Effectively leverage Moesif for API observability through best practices for integration, event enrichment, custom actions, and engineering workflow integrat...
API Strategy
How to Build an Internal Chargeback Model for Your API and AI Usage Using Moesif
Use Moesif to implement internal chargebacks and enable precise API and AI cost attribution for better transparency and resource optimization.