End-to-End API Monetization with AWS API Gateway, Stripe, and Moesif
Many API developers and companies struggle to find ways to easily set up systems to monetize their APIs. Some are simple but not customizable, some are complex and require massive engineering effort to actually get it all running.
To make things easier, Moesif created a feature a few months ago called Billing Meters which gives massive customizability but with a minimal amount of code and engineering effort.
For this example, which could actually be used out of the box, we will use Moesif, AWS API Gateway, and Stripe to charge users for API usage. For this setup there are a few assumptions:
- You have an active AWS Account
- You have a running instance of AWS API Gateway (with an endpoint created)
- Your AWS API Gateway instance is protecting your endpoint(s) with an API key
- You have created a Usage Plan in your AWS API Gateway
- You have an active Stripe account
- You have an active Moesif account
- You have configured the Moesif and AWS API Gateway Integration
When configuring Moesif in the AWS console, the log format must include the follow:
"user": "$context.identity.apiKeyId"this will map the API Key ID to the Moesif UserId This is a crucial configuration step or the example code below will not work as expected.
The setup is pretty simple from the outside. We will create a /register endpoint which:
- Generates an API key using the AWS API Gateway Client SDK
- Added the API key to a usage plan
- Registers the user in Stripe
- Subscribes the user to a product
- Registers the User and Company in Moesif
- Returns the API key to the user
I’ve also created a little frontend for it that is a simple form that registers a user by calling the /register endpoint and then displays the generated API key for the newly registered user.

1 - Create Your Product and Price in Stripe
The first step we will take is to create a product and price in Stripe. It’s best to do this step first because then when you integrate Stripe into Moesif you’ll already have some pricing plans for Moesif to pull in. A pricing plan can then be associated with specific billing criteria set up within a Billing Meter in Moesif.
First make sure to meet these prerequisites.
To create a product and price, log into Stripe and proceed to the Products page in the Stripe UI. Once there, click on the + Add Product button in the top right corner.
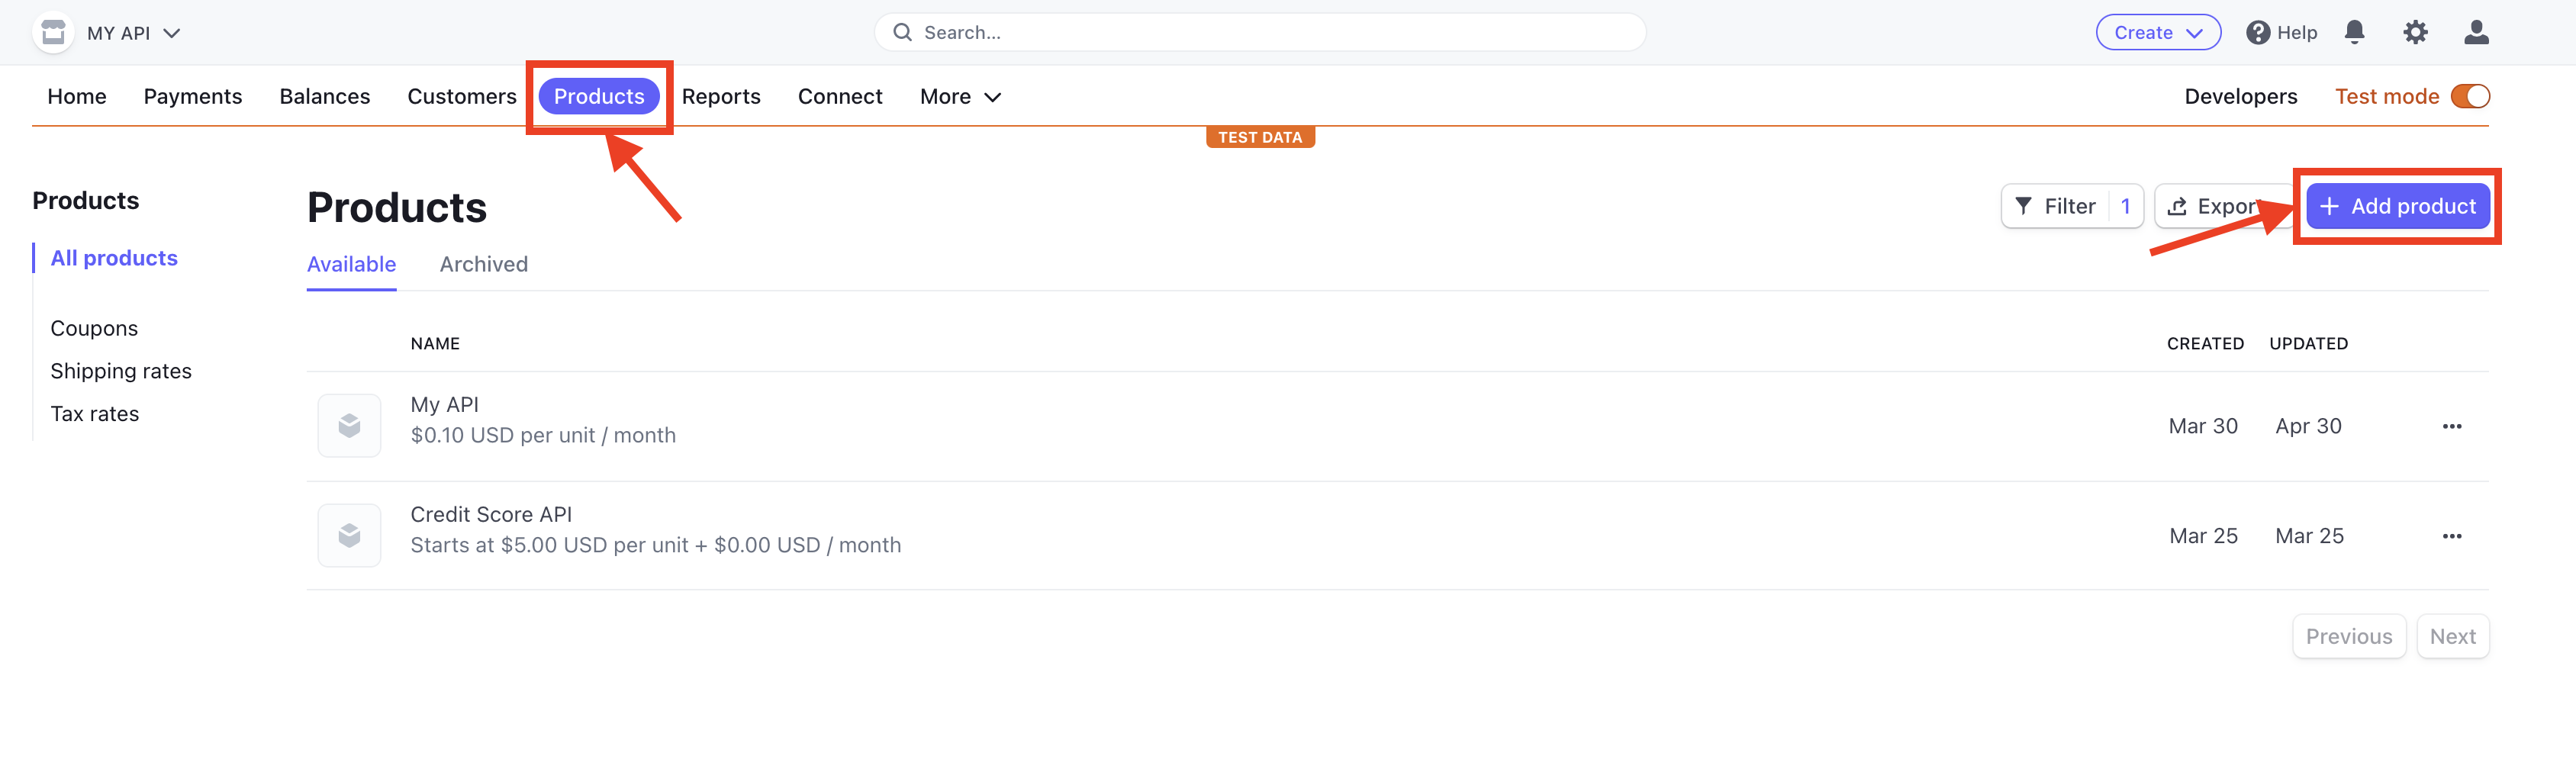
You’ll then be able to add in the details for your product and price(s) for it. The form for your product will have a few fields to fill out.
Product Information
Name
- This is the name of your product. In the example below, we use the name “My API”.
Description
- This field is optional but you could put a brief description of the product here. In the example below, we use a description of “This is a monetized API”.
Image
- Optionally upload an image that can help you easily recognize a item on the Products page. We’ll be using the default placeholder image in this example.
Pricing Information
You can choose between Recurring and One-off pricing for your product.
Recurring Pricinng
In recurring pricing, your customers pay an ongoing fee according to the pricing model you define. After selecting Recurring, you can enter the amount you want to charge and the billing period.
To further configure your recurring pricing, select More pricing options. This allows you to specify the pricing model, amount, billing period, price description, and more.
The following pricing models are available in Stripe for recurring pricing:
- Flat rate
- A fixed price for a single unit or package.
- Package pricing
- Charge for API usage by the package, or a group of units. For example, you could set it up to charge $10 for every 1000 API calls. Every time the user goes over the 1000 API call threshold, they are charged another $10.
- Tiered pricing
- Offer different price points for based on unit quantity.
- Usage-based
- Pay-as-you-go billing based on metered usage. You can charge per package, per unit , or per tier and define the prices and units accordingly. You can also set up a billing meter for the price to meter usage. See Creating a Product and Price in Stripe for instructions on how to set up a usage-based scheme.
One-Off Pricing
In one-off pricing, you charge a one-time fee rather than recurring amount in each billing period. After selecting One-off, you can enter the amount you want to charge in the Amount field.
Similar to recurring pricing, you can select More pricing options and configure your pricing further by specifying the pricing model, amount, price description, and more.
The following pricing models are available for one-off pricing:
- Package pricing
- Charge for API usage by the package, or a group of units. For example, you could set it up to charge $10 for every 1000 API calls. Every time the user goes over the 1000 API call threshold, they are charged another $10.
- Flat rate
- A fixed price for a single unit or package.
- Customer chooses price
- The customer sets a custom price. You can set a limit and define a preset amount to suggest to the customer.
Billing period
The billing period can be set as the following for recurring pricing models:
- Daily
- Weekly
- Monthly
- Every 3 months
- Every 6 months
- Yearly
- Custom
For your configuration with Moesif, we recommend setting the billing period as Monthly.
Price description
This is an optional field but recommended. Here you can put a brief description of your price. This will allow you to more easily decipher which price you are selecting in the billing meter in Moesif, especially if you have multiple prices for a single product.
Once you’ve input all of the details for your price, you can select Next and then select Add product
As you create products, you will be able to view and edit them on the Product Catalog screen.
2 - Enable the Moesif-Stripe Integration
Once your products and prices are created, it’s time to begin to integrate Stripe with Moesif. To begin configuring Stripe in Moesif, go to the Billing Meters page and click the Edit Billing Provider dropdown in the top right corner of the screen.
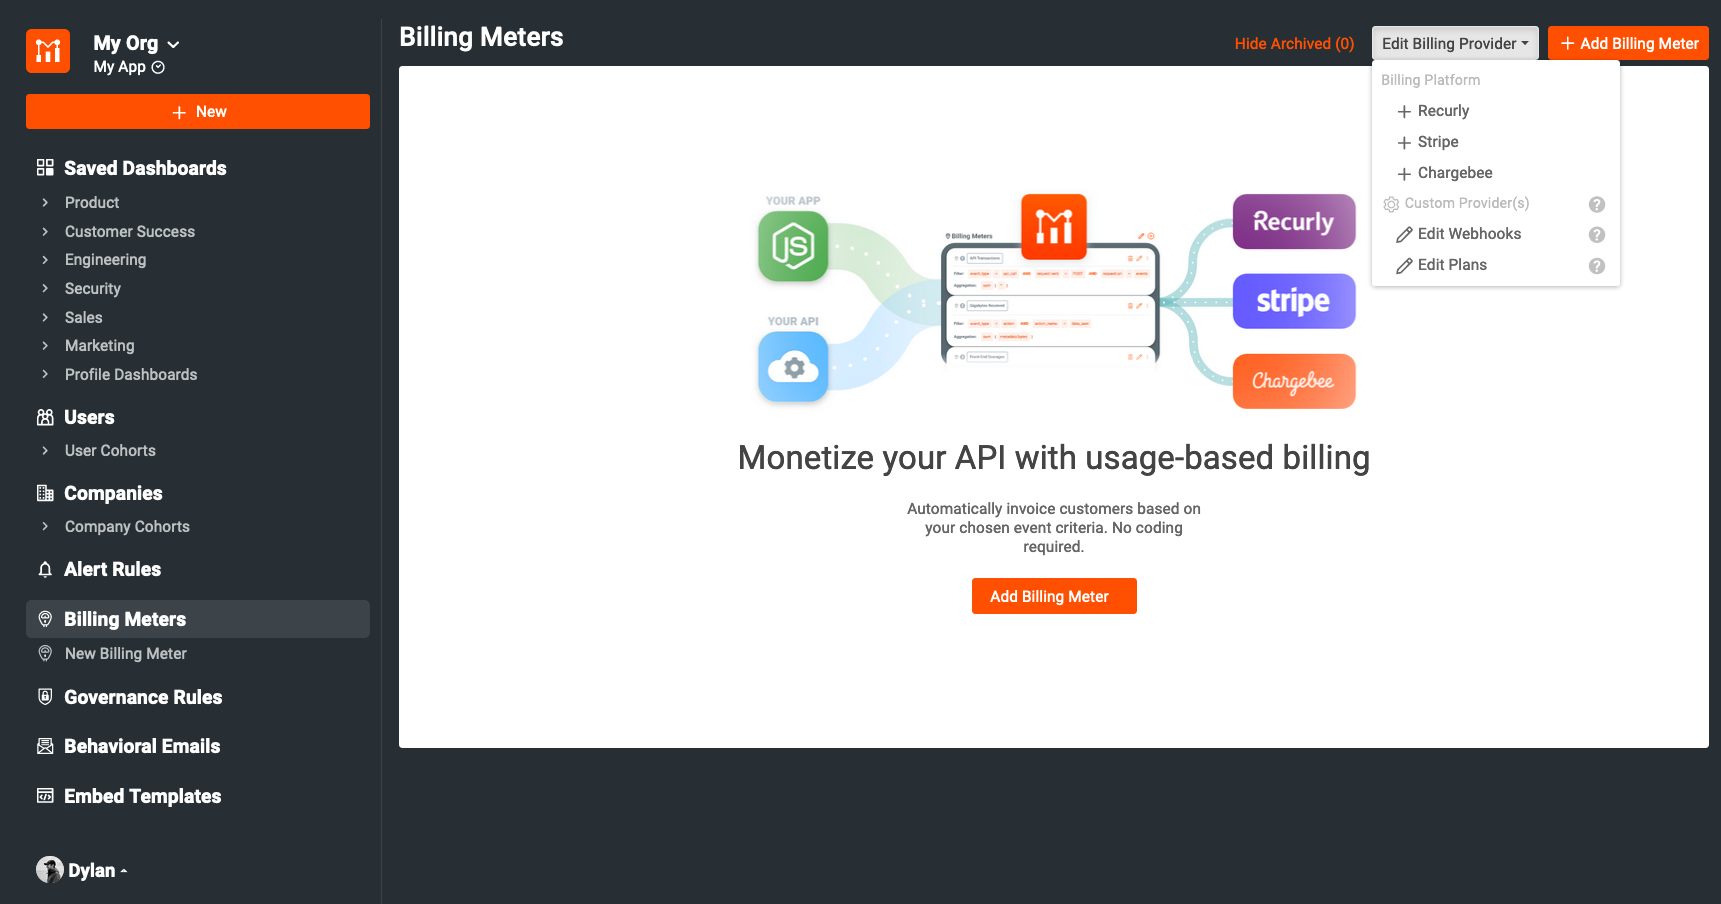
This will bring up the Stripe configuration screen walking you through the integration. From this screen, you can get all of the info needed to plug Stripe into Moesif. Each step for configuration is covered within the modal.
Add the Moesif Webhook to Stripe
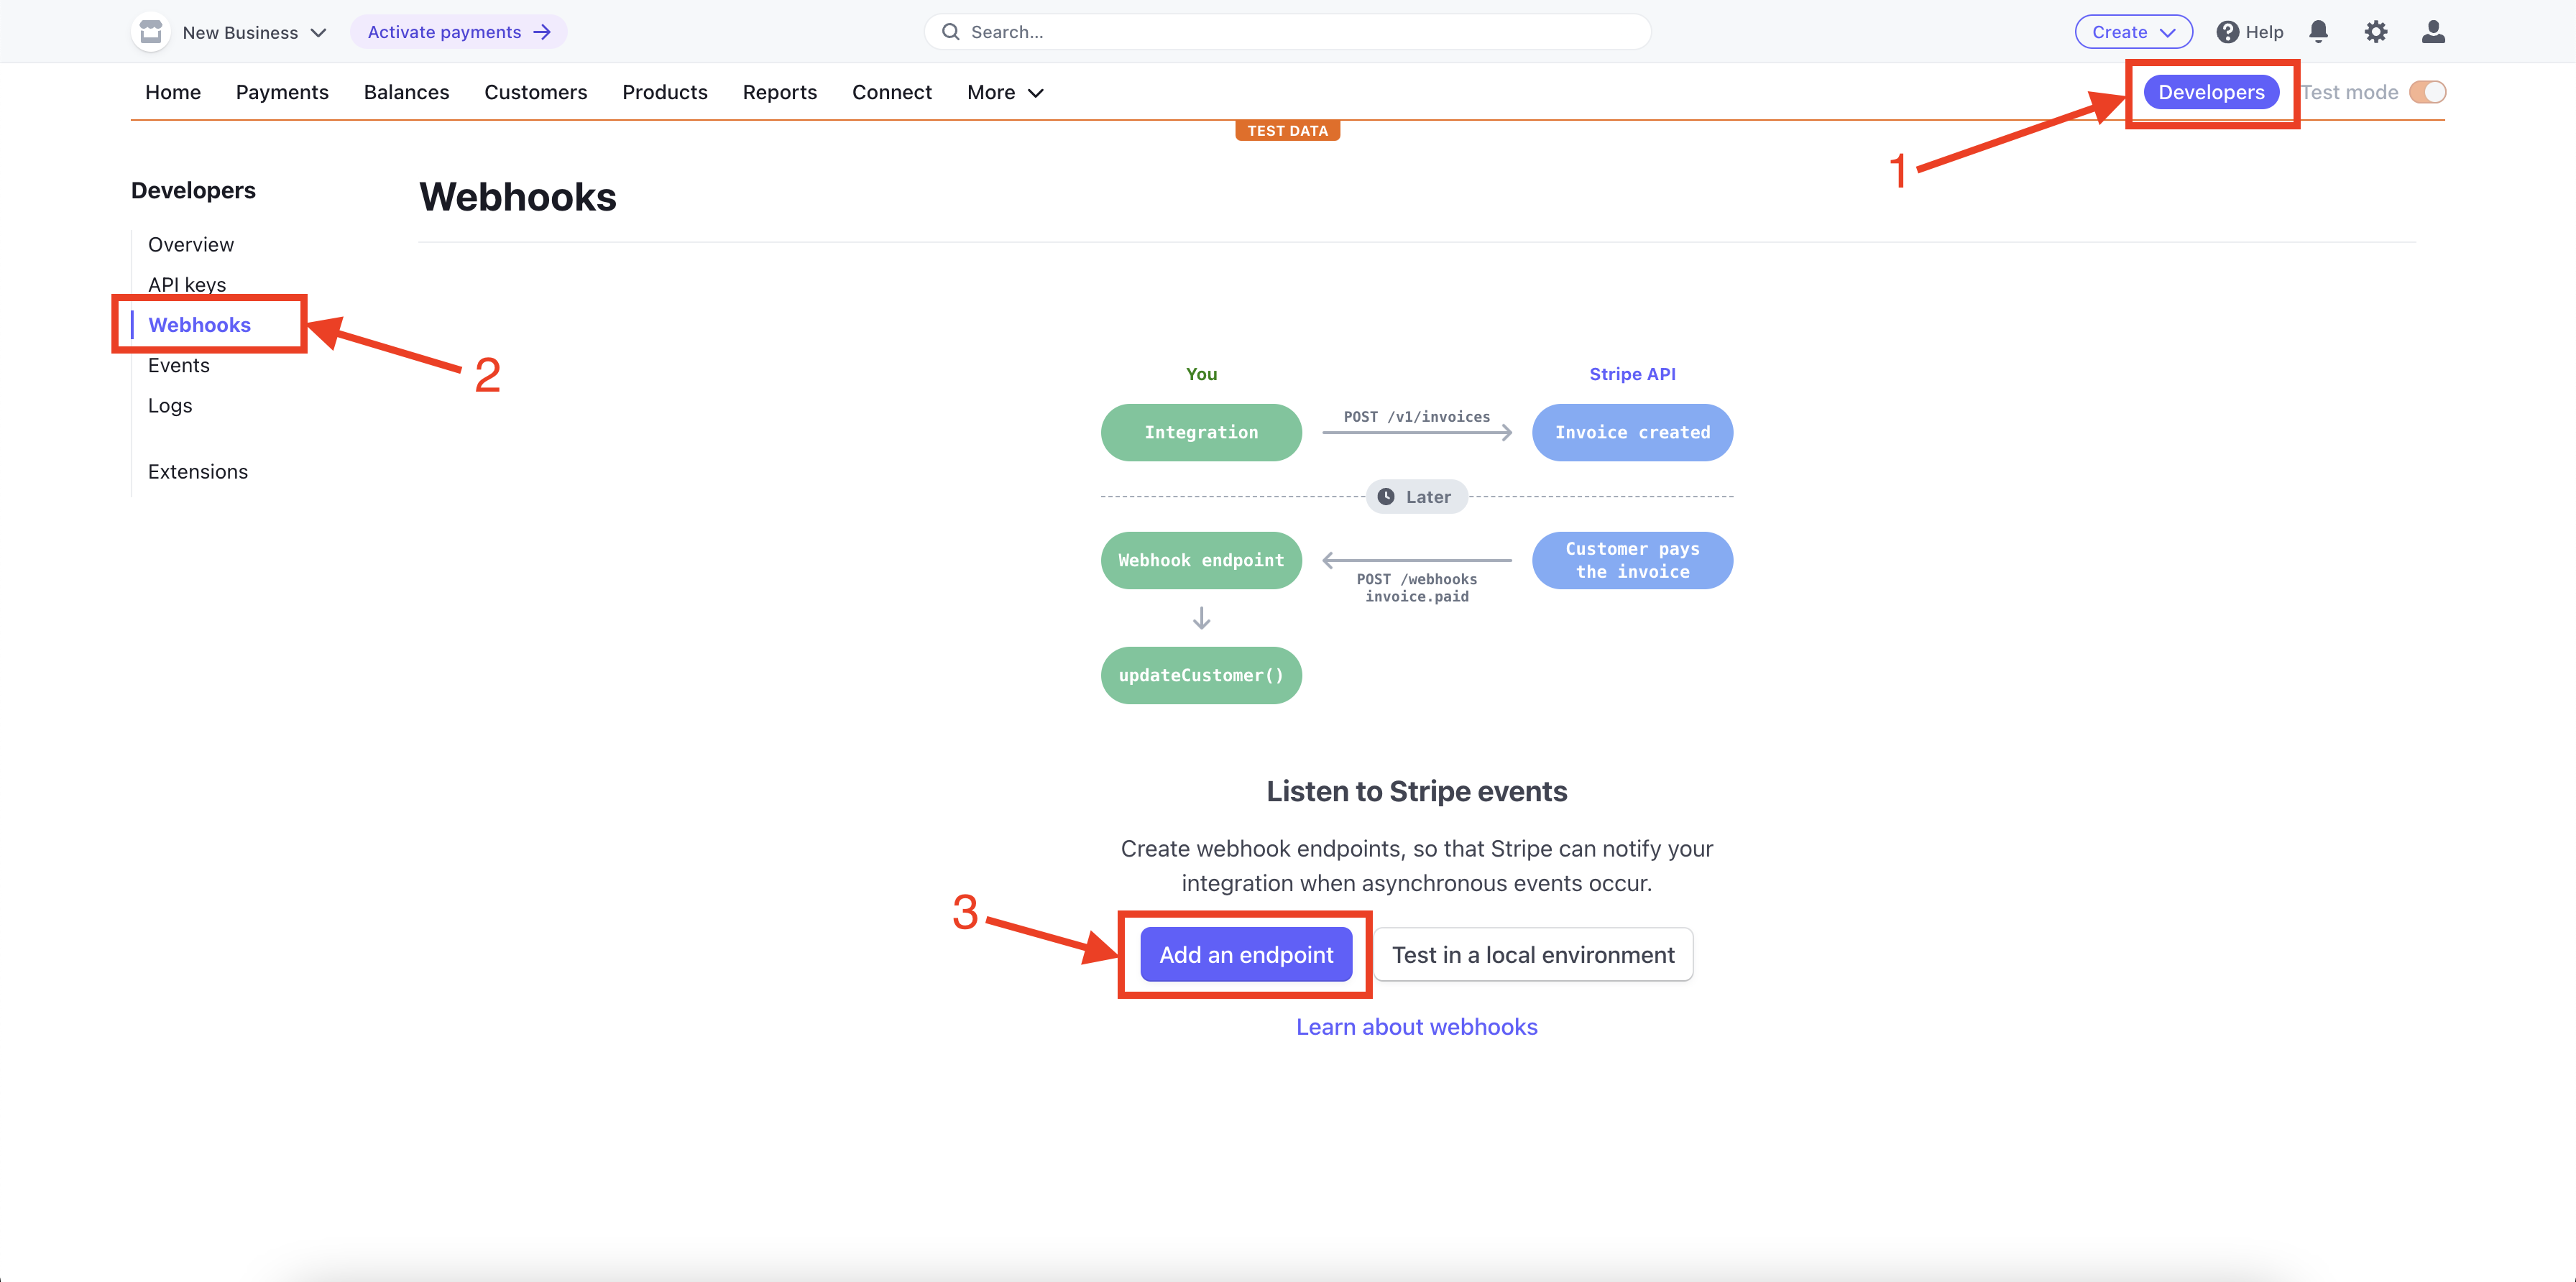
The first step in the integration is to add the Moesif webhook into the configuration in Stripe. Adding this allows Stripe to send subscription updates to Moesif.
To add the Moesif webhook to Stripe, from the upper right-hand side click on Developers, and then Webhooks in the left-side menu. This will bring you to the Webhooks page where you can view existing webhooks and add new ones. To add a new webhook we will click the Add an endpoint button at the bottom of the screen.
From here, we will plug in our Moesif API endpoint URL and configure the events to listen to. You’ll want to copy your Moesif Webhook URL into the Endpoint URL field and then click the + Select Events button.
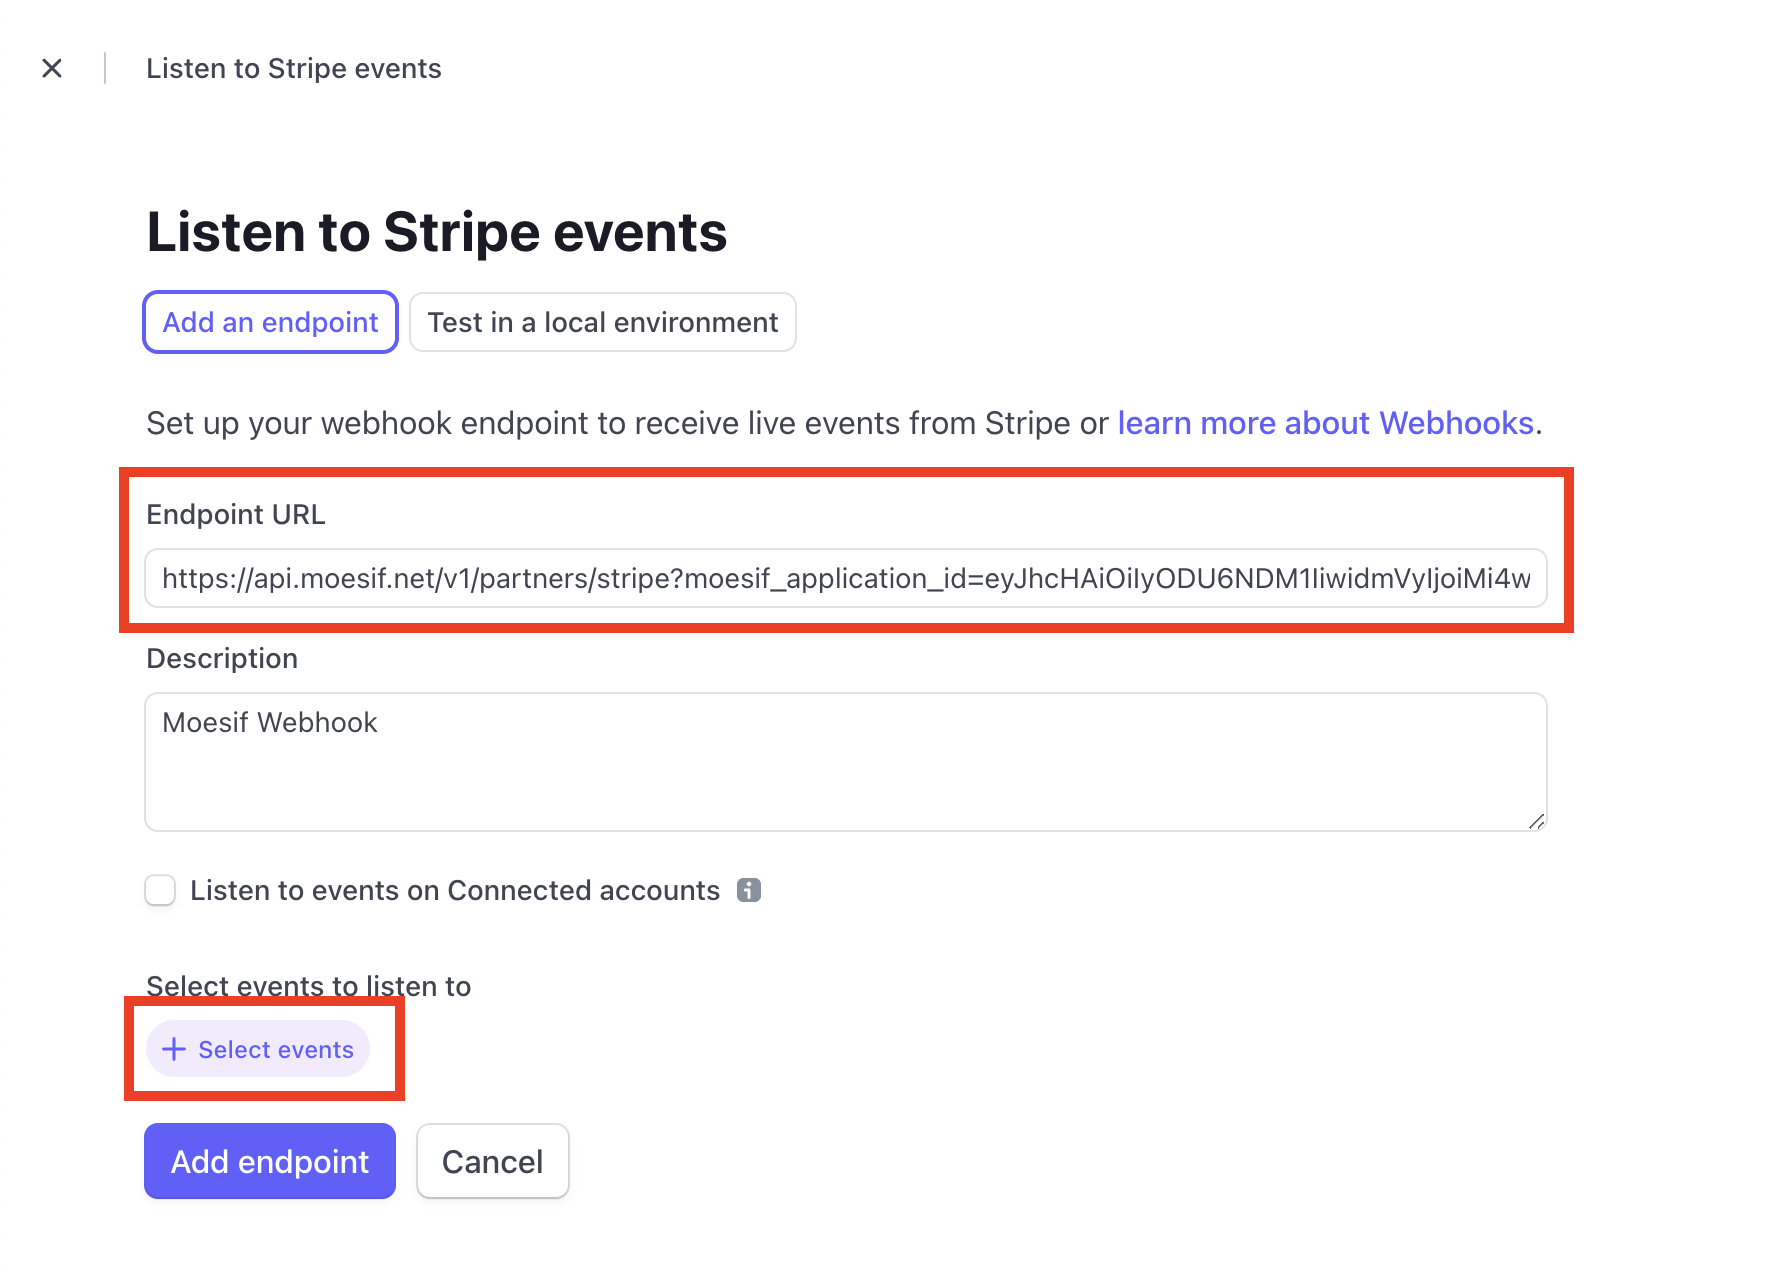
These details can all be found on the Stripe configuration page in Moesif mentioned in the previous section.
You should select the option under Customer for Select all Customer events. After this, click the Add events button at the bottom of the screen.
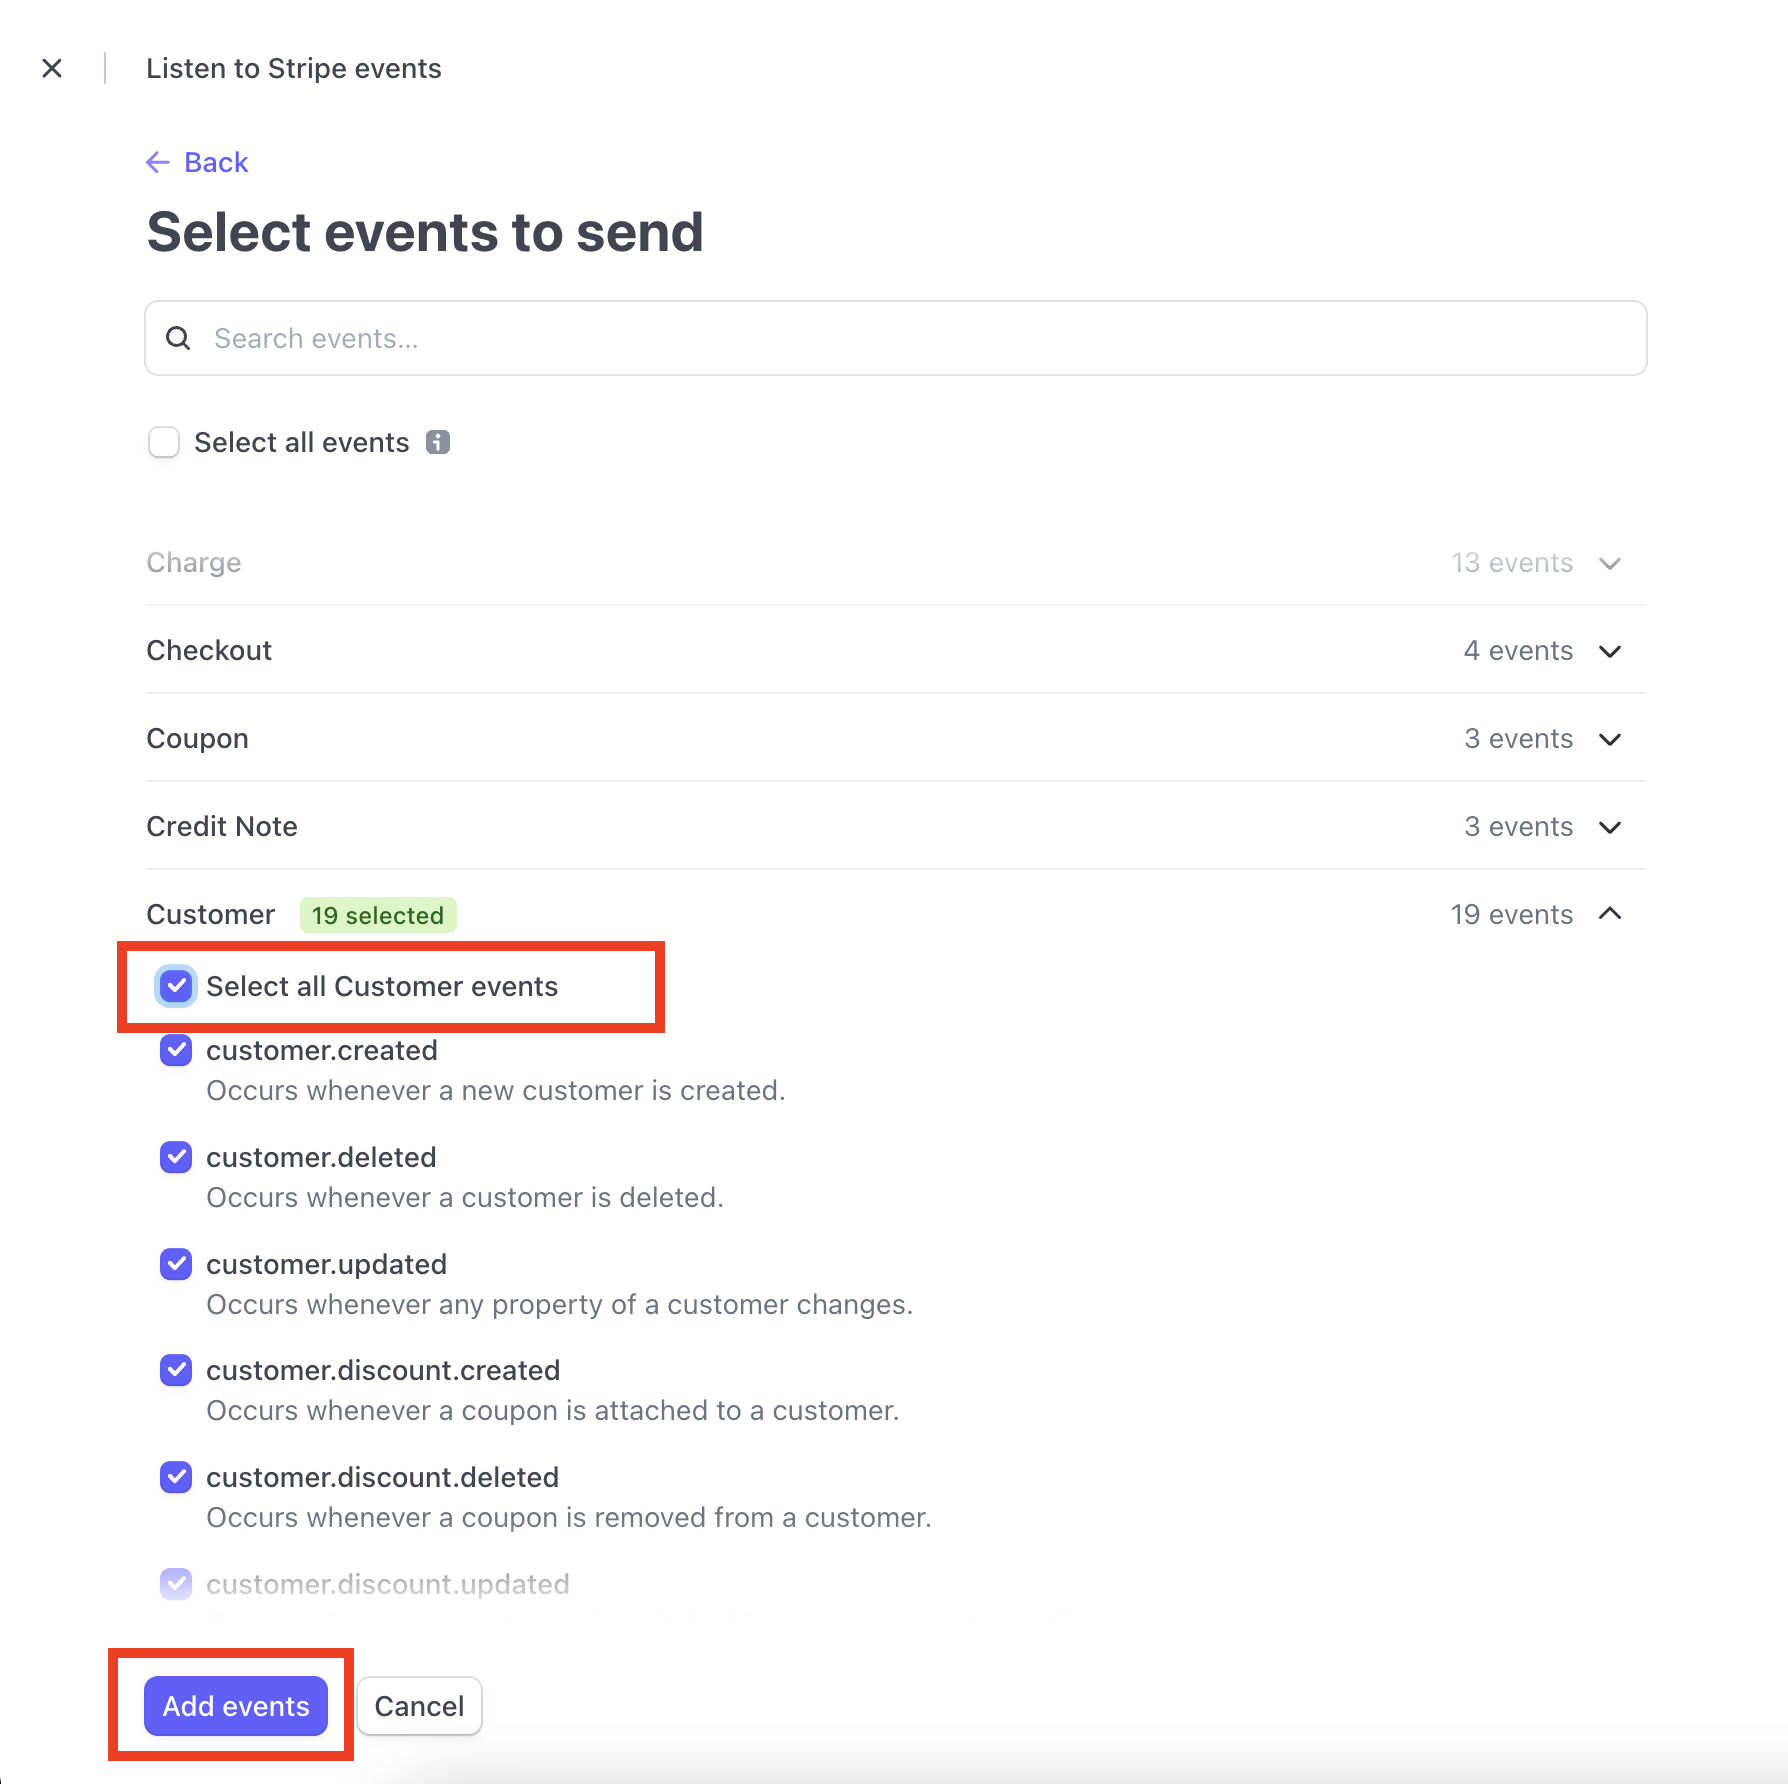
After this, you’ll be returned back to the original screen where you added the endpoint details. Scroll to the bottom of the screen and click Add endpoint to save the endpoint to Stripe.

Plug the Stripe API Details into Moesif
For Moesif to add usage quantities to subscriptions in Stripe, we need to add the Stripe API details into Moesif. This is done in the Stripe configuration screen in Moesif, the same screen we’ve been working with previously.
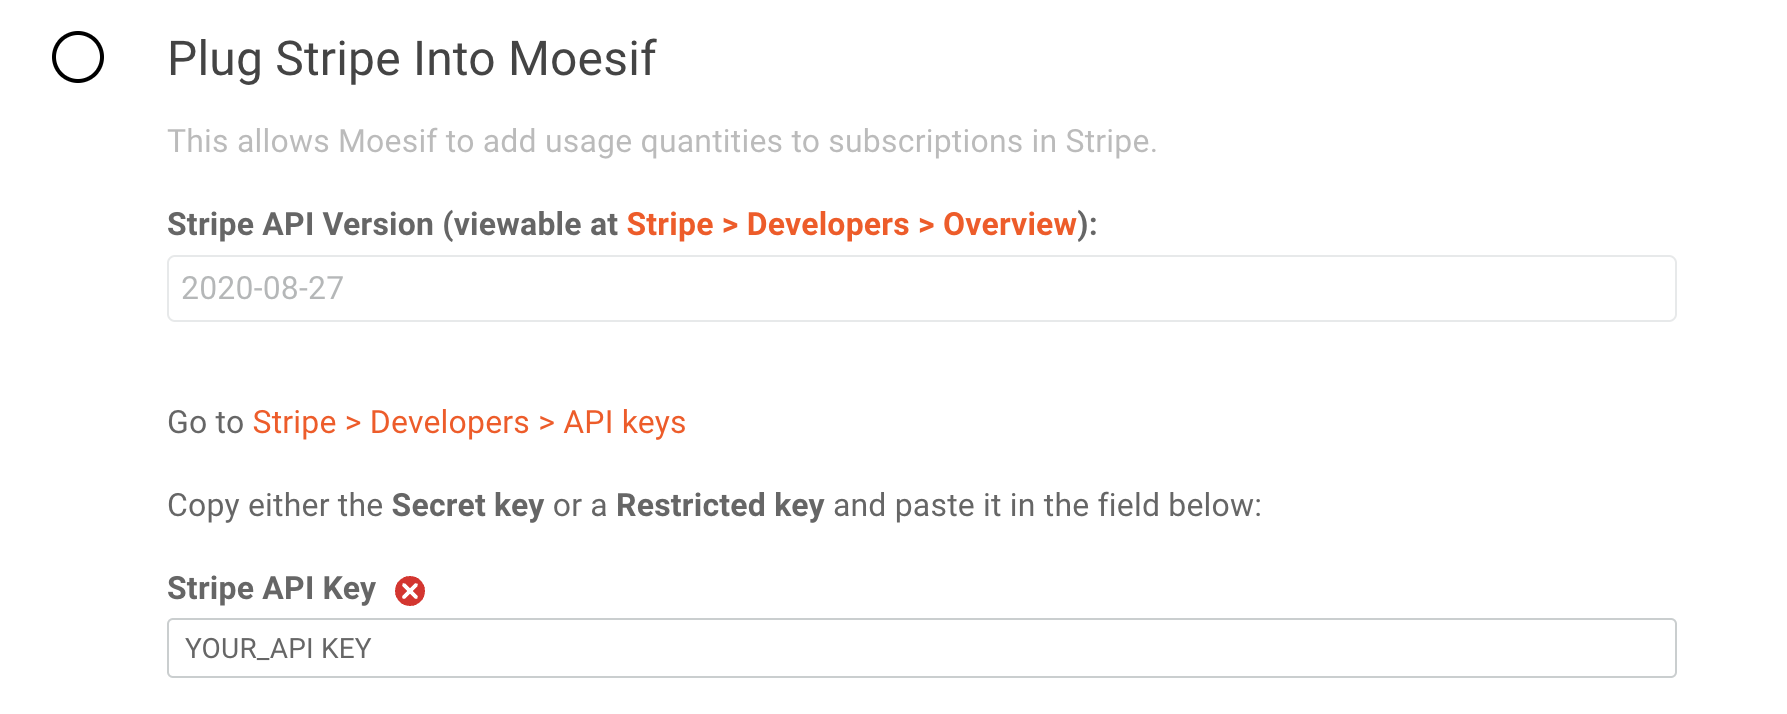
Currently, Moesif only supports version 2020-08-27 of the Stripe API so that field defaults for the Stripe API Version field.
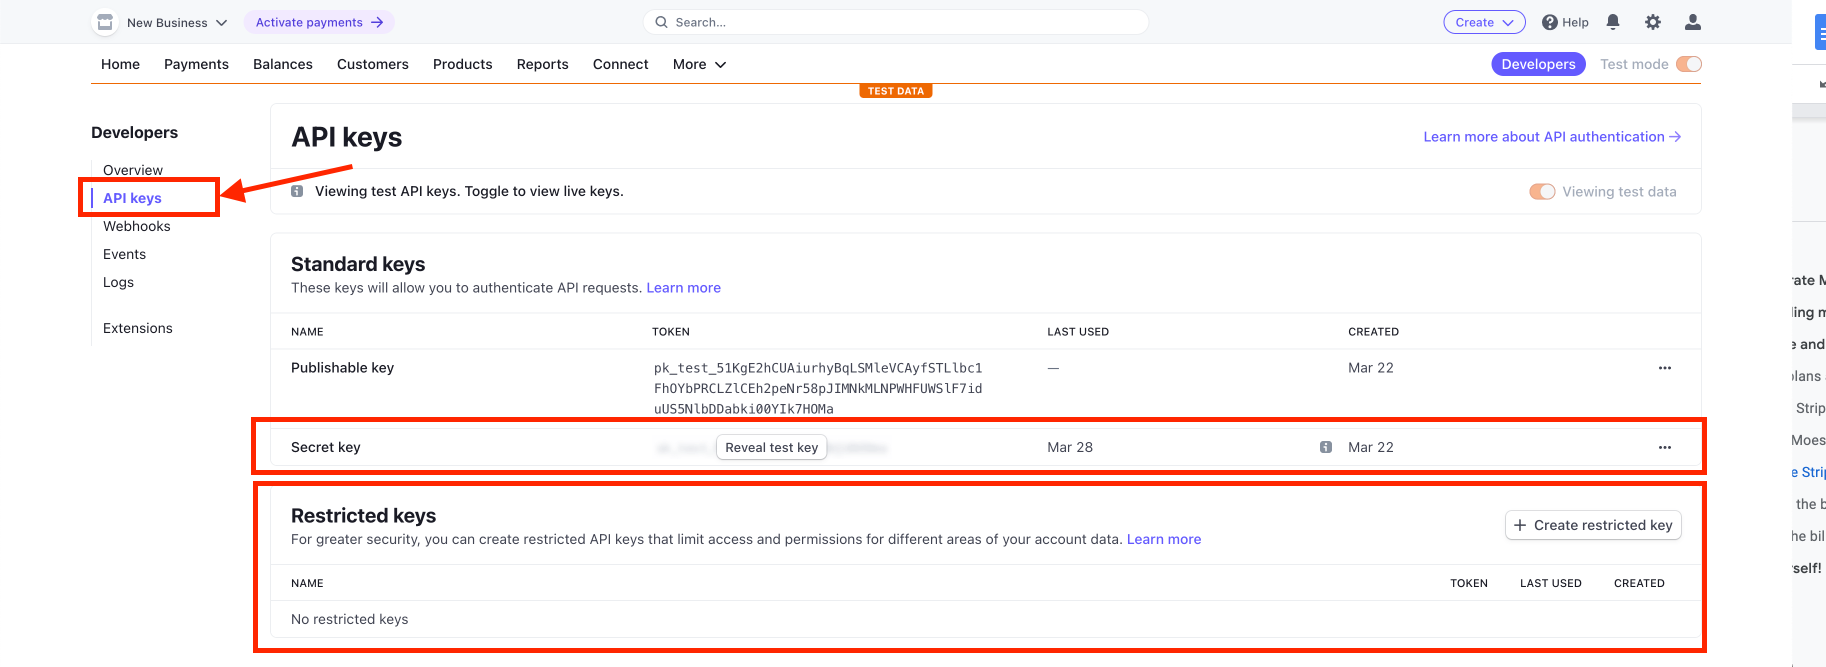
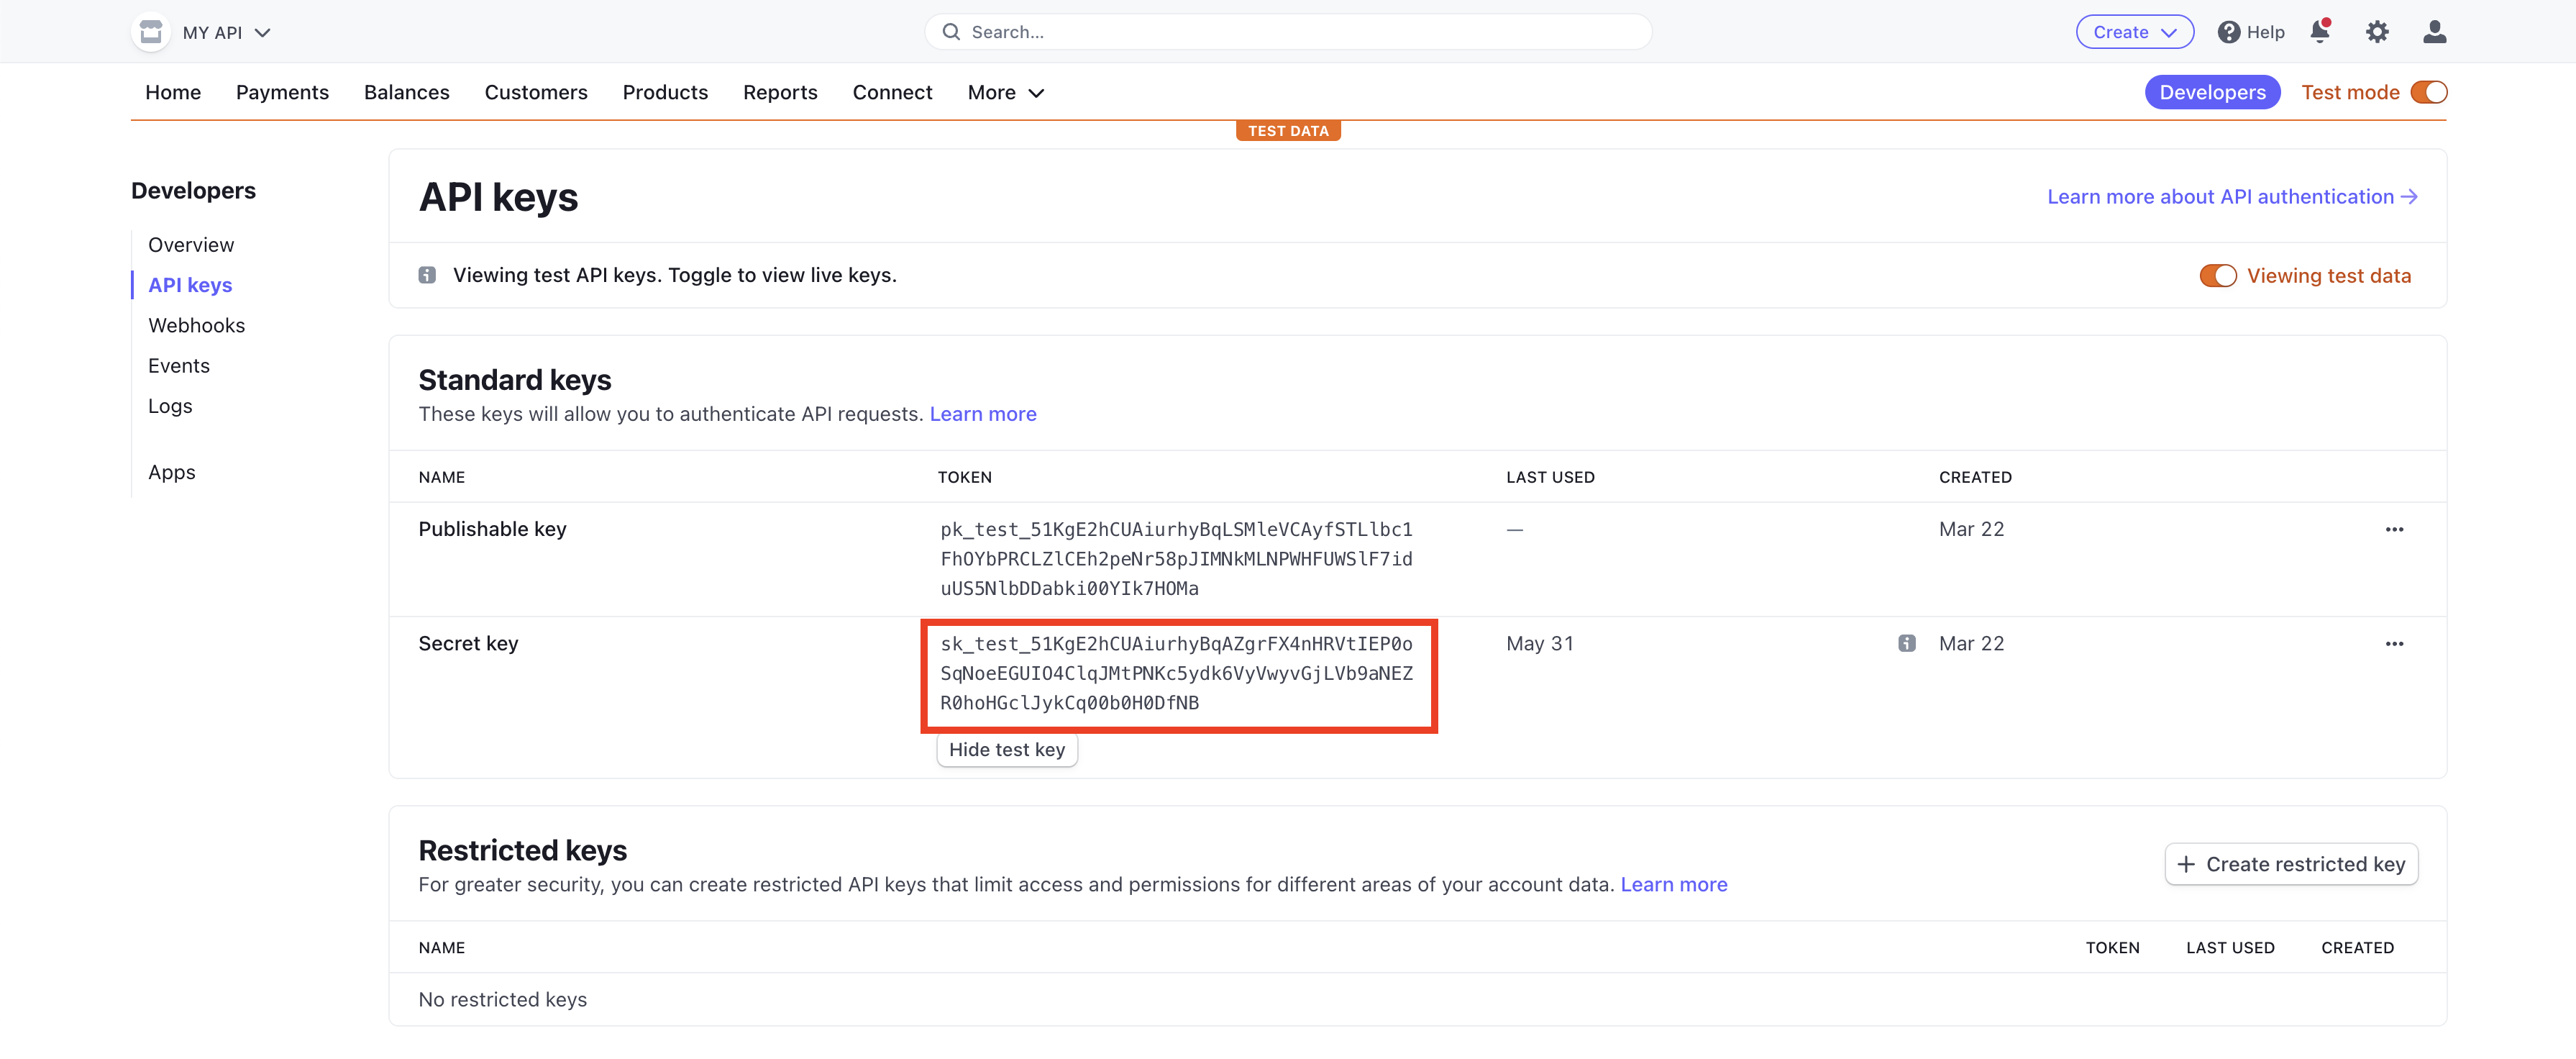
For the Stripe API Key field, you’ll need to retrieve the API key from Stripe to plug it in. From the Developers screen, the same one we used in the previous step, you’ll click on API Keys. You’ll then be able to see the private key for your API in either the Secret key or a generated Restricted keys field on the screen. Either key can be used.
After copying the key from Stripe, you’ll paste this key into the Stripe API Key field back in Moesif. After doing this, back in Moesif you can scroll down to the bottom of the screen and click Save to save the configuration.
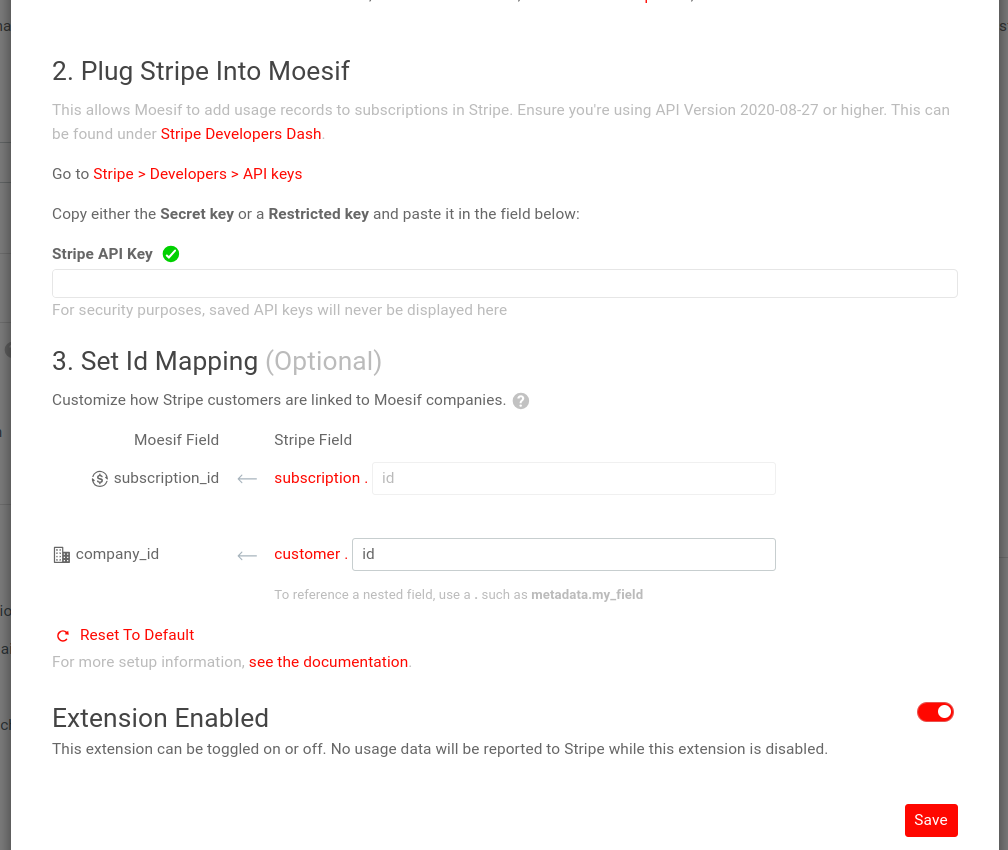
Optionally, you have the ability to customize the company_id in Moesif as well. The default should work fine for most purposes. However, you can fully customize it to specify how to map Stripe Subscription and Customer objects to Subscription ID and Company ID in Moesif respectively:
- A Stripe Customer maps to Moesif Company.
- A Stripe Subscription maps to a Moesif Subscription.
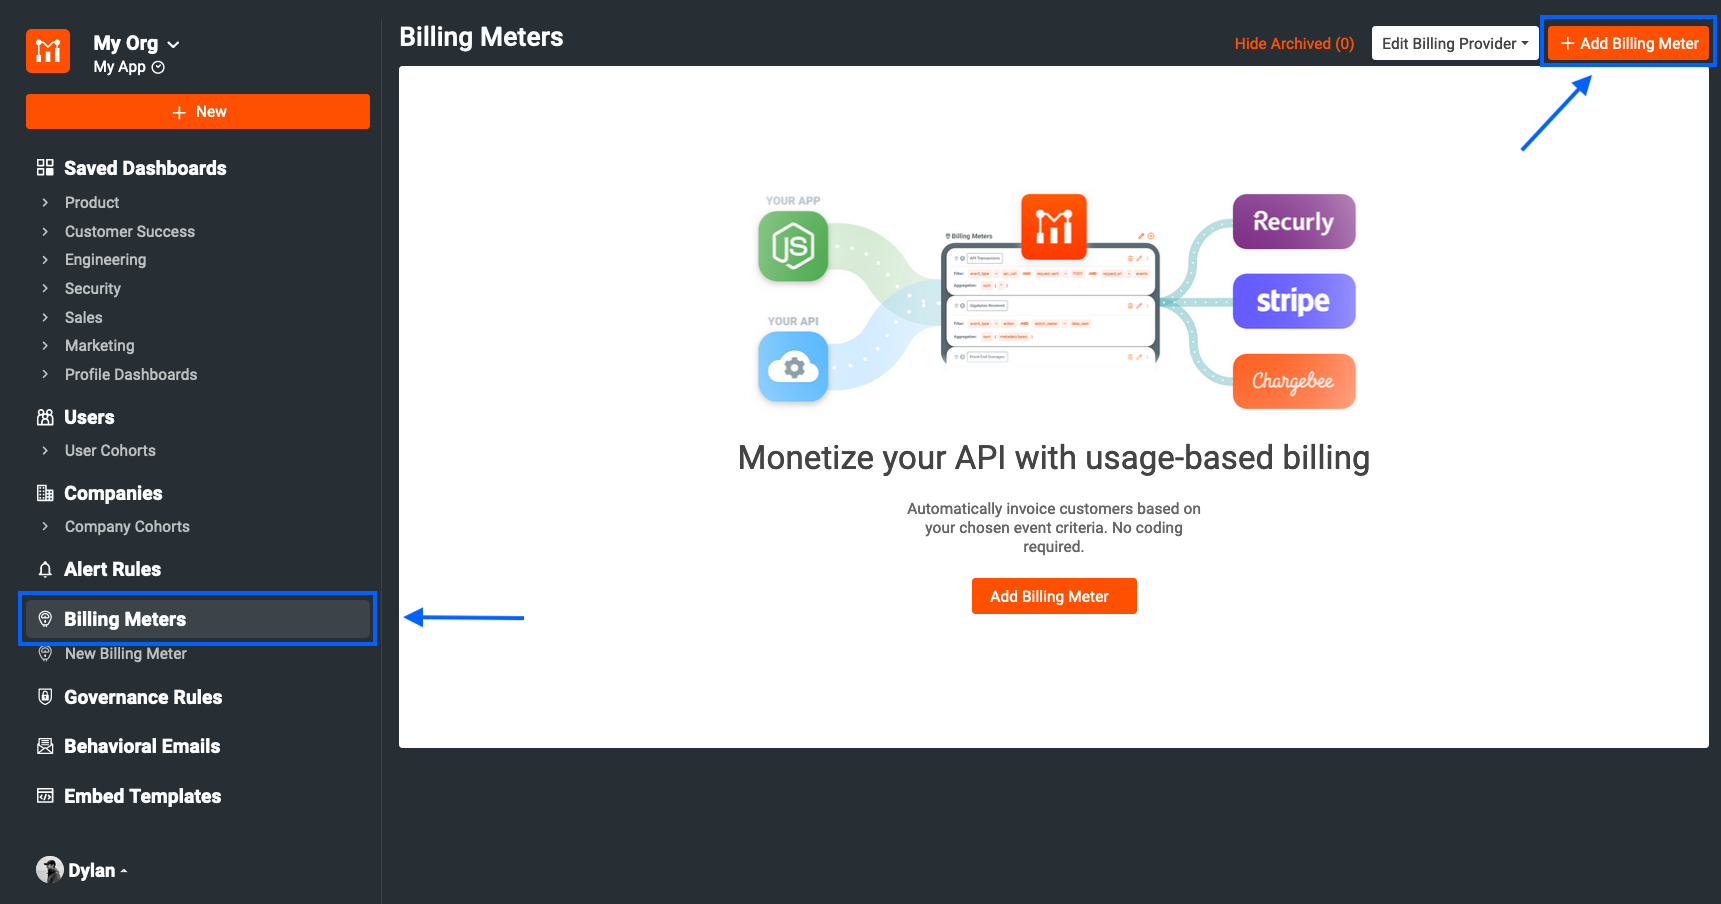
3 - Create a Billing Meter
Once you have the Stripe integration active in Moesif, you can begin to set up your billing meter. Billing meters created in Moesif do two things: track usage based on specific criteria and report that usage to the billing provider. Moesif allows you to set up very simple and very complex billing meters with relative ease.
To create the Billing Meter, in Moesif you will navigate to the Billing Meter screen. You can do this from the left-side menu. On the Billing Meter’s screen, you’ll then click + Add Billing Meter in the top-right corner of the screen.
The next screen is where you can actually input the criteria for your Billing Meter.
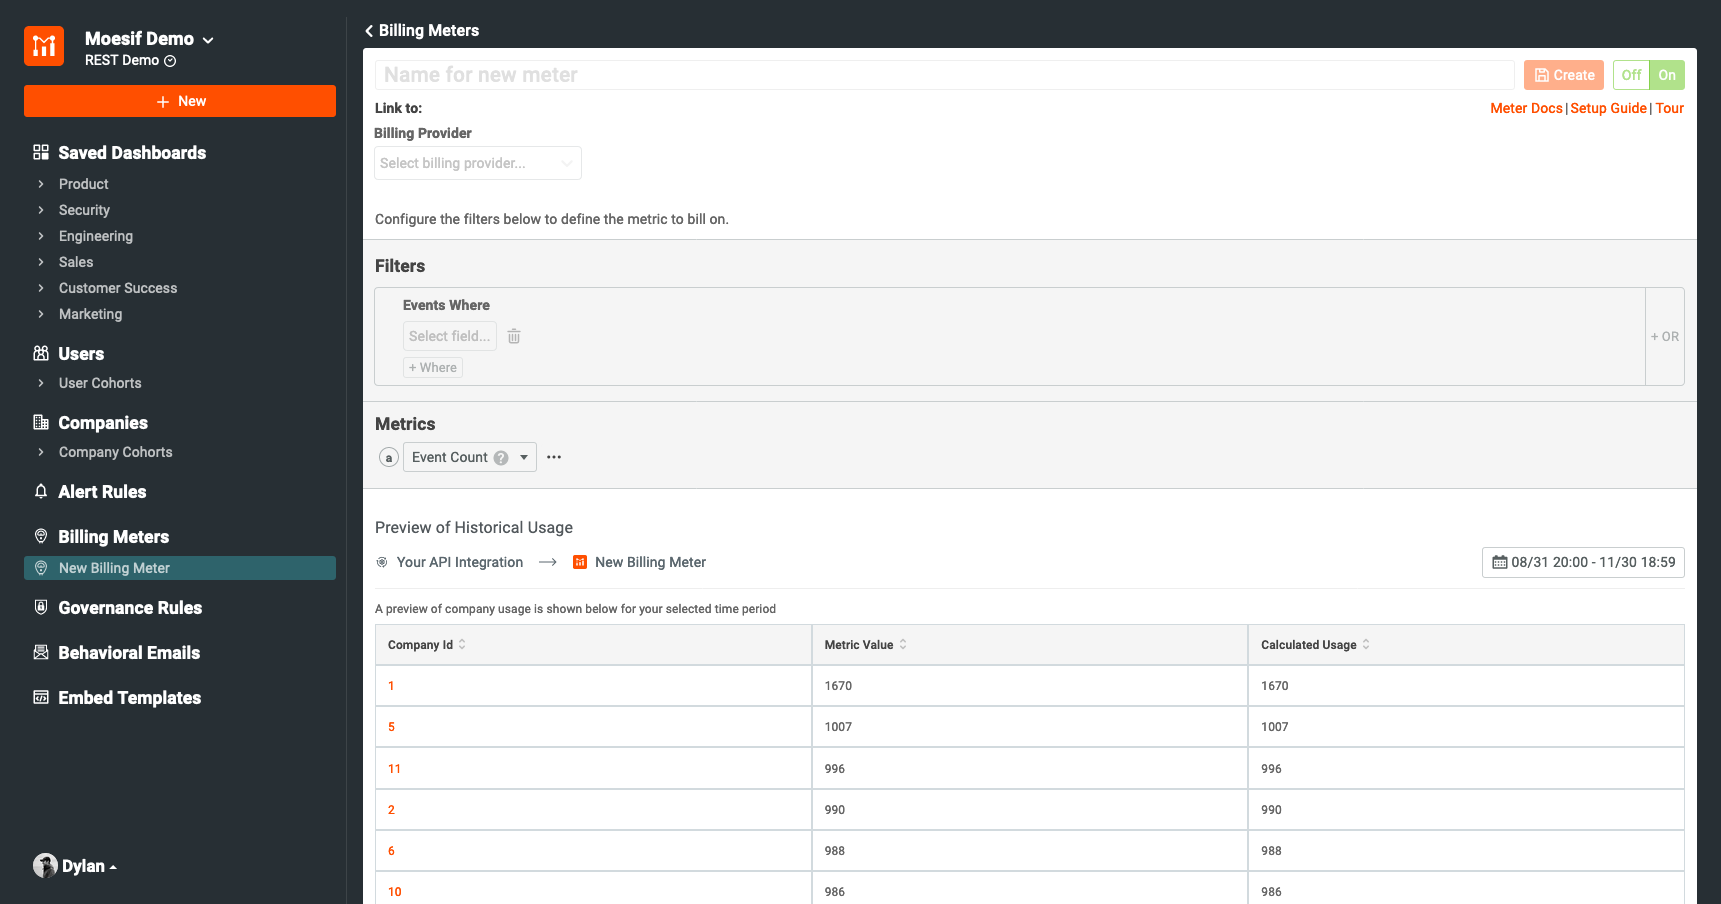
Fields on this screen include:
-
Billing Meter Name
- This is the Moesif internal name of your new Billing Meter
-
Billing Provider
- In this dropdown you can choose the billing provider you want to send your usage metrics to.
-
Product (Stripe only)
- Here you can choose which Product that you’ve set up in Stripe you want your usage metrics to be tied to.
-
Price (Stripe only)
- The last field in the Billing Provider settings for the Billing Meter, here you will choose which Price you want to tie your usage metrics to.
-
Filters
- Under the Filters configuration, you will configure your billing criteria to only include requests that fit a certain criteria.
-
Metrics
- Here you can choose which metric you would like to bill on. Available options include:
-
Event Count
- This will increment usage for every event that fits the criteria outlined in the Filter criteria.
-
Unique Users
- This will increment usage whenever a unique user sends a request that fits the Filter criteria. For every unique user, the count will be incremented by 1 regardless of the event count for that user.
-
Unique Companies
- This will increment usage whenever a unique company sends a request that fits the Filter criteria. For every unique company, the count will be incremented by 1 regardless of the event count for that company.
-
Unique Sessions/API Keys
- This will increment usage whenever a unique session or API key is used to send a request that fits the Filter criteria. For every unique session or API key, the count will be incremented by 1 regardless of the event count for that particular session or API key.
There are other options under Metrics as well but the above 4 tend to be the most applicable to usage-based billing.
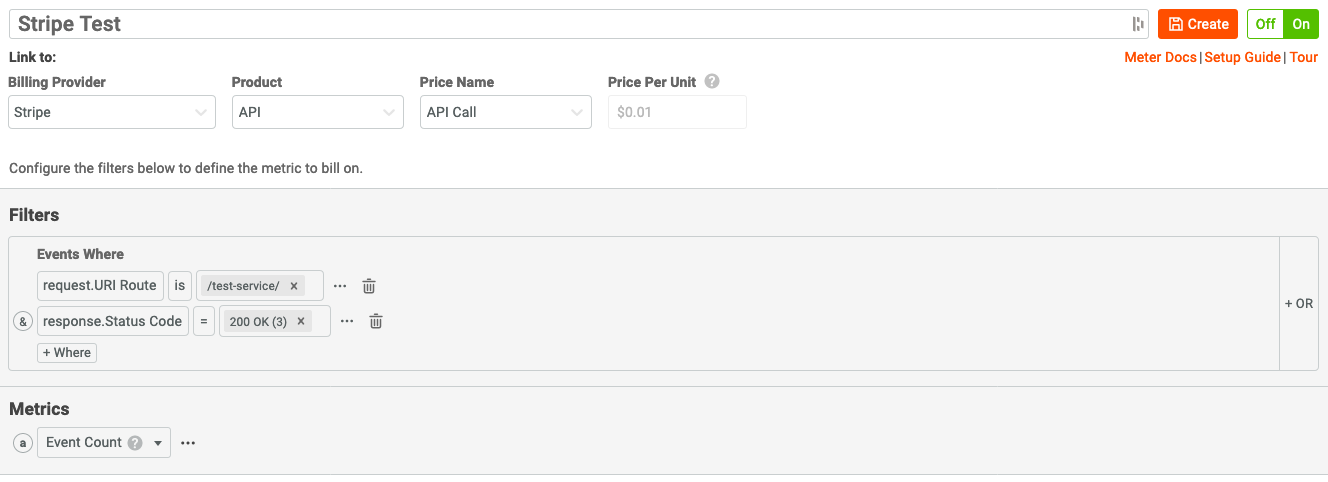
As an example, for this guide we will create a Billing Meter that will filter traffic for a single endpoint, named /test-service, and where requests received a successful HTTP 200 response. We will use the Event Count metric to make sure that every request is added to the tally and sent to the billing provider.
In Moesif, the billing meter will be configured as shown below.
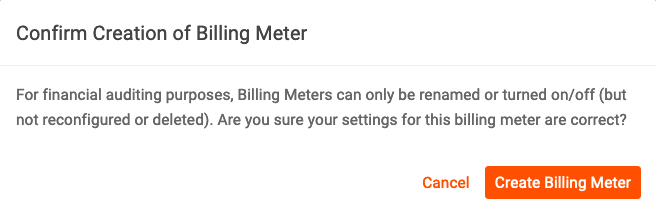
We will then click Create. This will create and activate the Billing Meter. A modal will appear notifying you that the billing meter has been created and presents a walk-through to ensure the meter is correctly configured.
First, we will set up a flow to get users registered, subscribed, and create a JWT so they can use our monetized API. Once that is complete we will come back and proceed with the walk-through.
4 - Create the /register endpoint
Instead of using a pre-built onboarding flow, such as through a Developer Portal within an API gateway, we will build our own. We will create an endpoint called /register which we can then use to onboard our users who want to use the API. The result will be that the user receives an API key that they can use that will track their usage.
Since we are using Moesif, Stripe, and AWS API Gateway as part of our overall solution, we need to make sure each of the components is working together properly.
Here’s what the endpoint will do:
- Use the AWS API Gateway JS Client to create an API key and add it to a usage plan
- Create a user in Stripe
- Subscribe the new user to the API subscription in Stripe
- Create the CompanyID in Moesif (which will be the API Key ID)
- Create the UserID in Moesif (which will be the Stripe Customer ID)
- Create an API key
If you already have User and Company identifiers in Moesif and other systems that you want to use, instead of using Stripe’s customer and subscription as your IDs, you can do that in Moesif under the Stripe configuration settings.
In this example, I will create a simple NodeJS API with Express to do the above.
Create the npm project
First, we will create a folder called moesif-monetization where we will add our API code. We will then run npm init to turn moesif-monetization so we can use npm in our project. For that, you’ll run the following command in the moesif-monetization directory.
$ npm init
You can fill out the details or use the defaults as needed when creating the npm project.
You should then see a package.json file in your moesif-monetization folder.
Now, open this directory in your favorite IDE or text editor. I will be using VS Code for the remainder of this tutorial for all the coding.
Add in the project dependencies
We will now edit our package.json file with our correct dependencies. In the package.json we will add the following entries under the dependencies object.
 "dependencies": {
   "@aws-sdk/client-api-gateway": "^3.131.0",
   "@stripe/stripe-js": "^1.29.0",
   "body-parser": "^1.20.0",
   "dotenv": "^16.0.0",
   "express": "^4.17.1",
   "http": "0.0.1-security",
   "moesif-nodejs": "^3.5.8",
   "node-fetch": "^2.6.5",
   "path": "^0.12.7",
   "stripe": "^8.219.0"
 }
Save the file, then navigate to the terminal and run:
$ npm install
Now, your dependencies will be brought into the project and added to the node_modules folder. These dependencies will help us to make calls to REST endpoints, connect to Stripe and Moesif, and various other capabilities we will build into our app.
Create the .env file
Instead of hardcoding the Stripe keys and other static values into our app, we will abstract them into a .env file. We can do this using the dependency we added in our package.json called dotenv.
In the root directory, create a file named .env. Within this file, we will add a few entries that will contain the keys and values used in our code.
STRIPE_KEY="sk_test_XXX"
STRIPE_PRICE_KEY="price_XXX"
MOESIF_APPLICATION_ID="YOUR_MOESIF_APP__ID"
AWS_INVOKE_URL="https://your-aws-api-gateway.execute-api.region.amazonaws.com"
AWS_REGION="aws-region"
AWS_ACCESS_KEY_ID="awsaccesskeyid"
AWS_SECRET_ACCESS_KEY="awssecretaccesskey"
AWS_USAGE_PLAN_KEY_TYPE="API_KEY"
AWS_USAGE_PLAN_ID=”usageplan"
The values that are here can be found in the following places:
Obtaining Your Stripe API and Price Key
Your Stripe API Key can be found in the same place we grabbed the key for our Stripe and Moesif integration we did earlier for the Billing Meter. You can actually use the same key for both or create a restricted key with just the scope needed for each function.
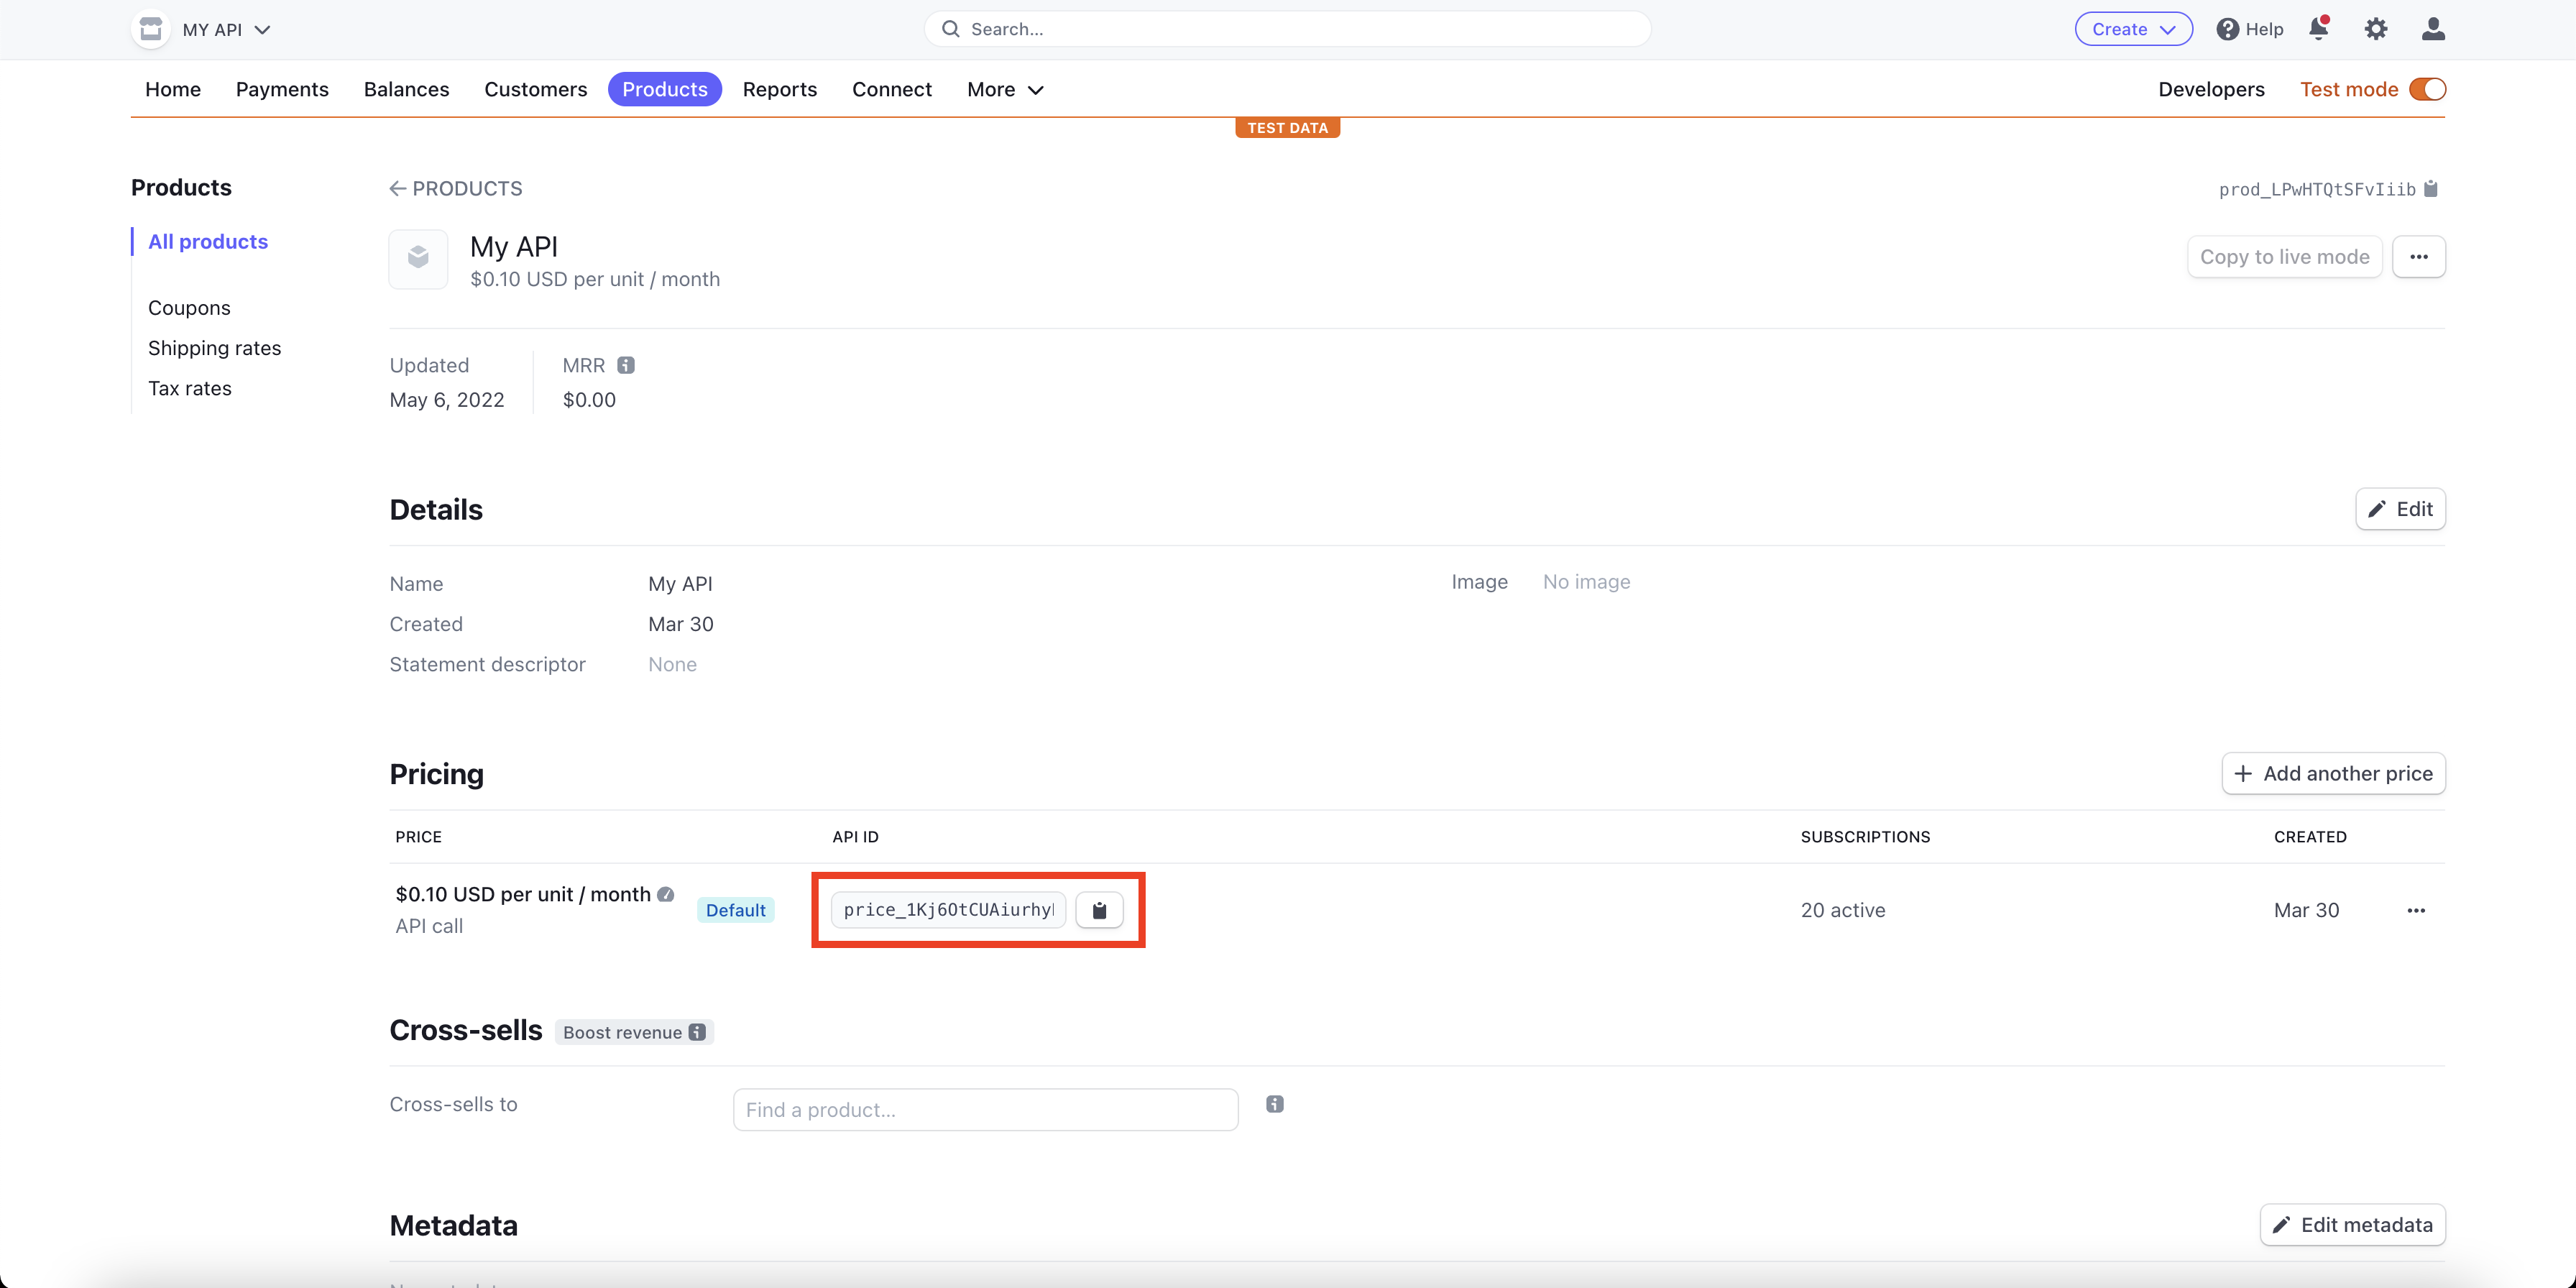
While we’re at it, lets grab our Stripe product’s price key. We will need it in the next section. Your Stripe price key is an identifier for the price you created earlier in Stripe. This can be found by going to the product in Stripe and grabbing the value from the API ID column.
Obtaining Your Moesif Application ID
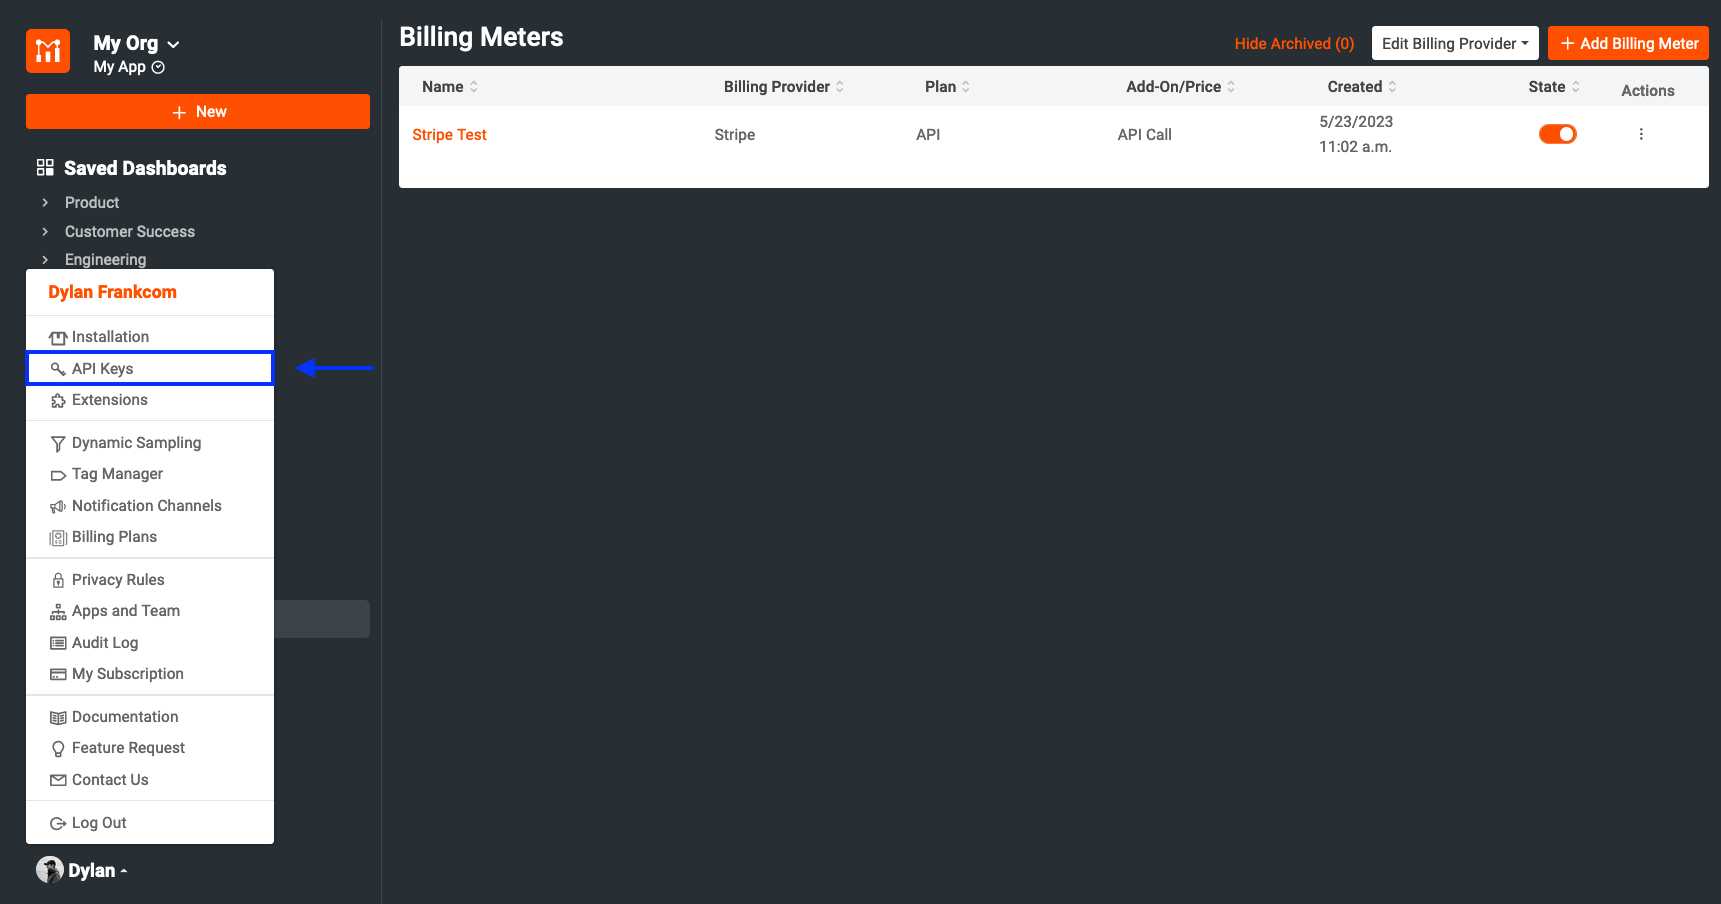
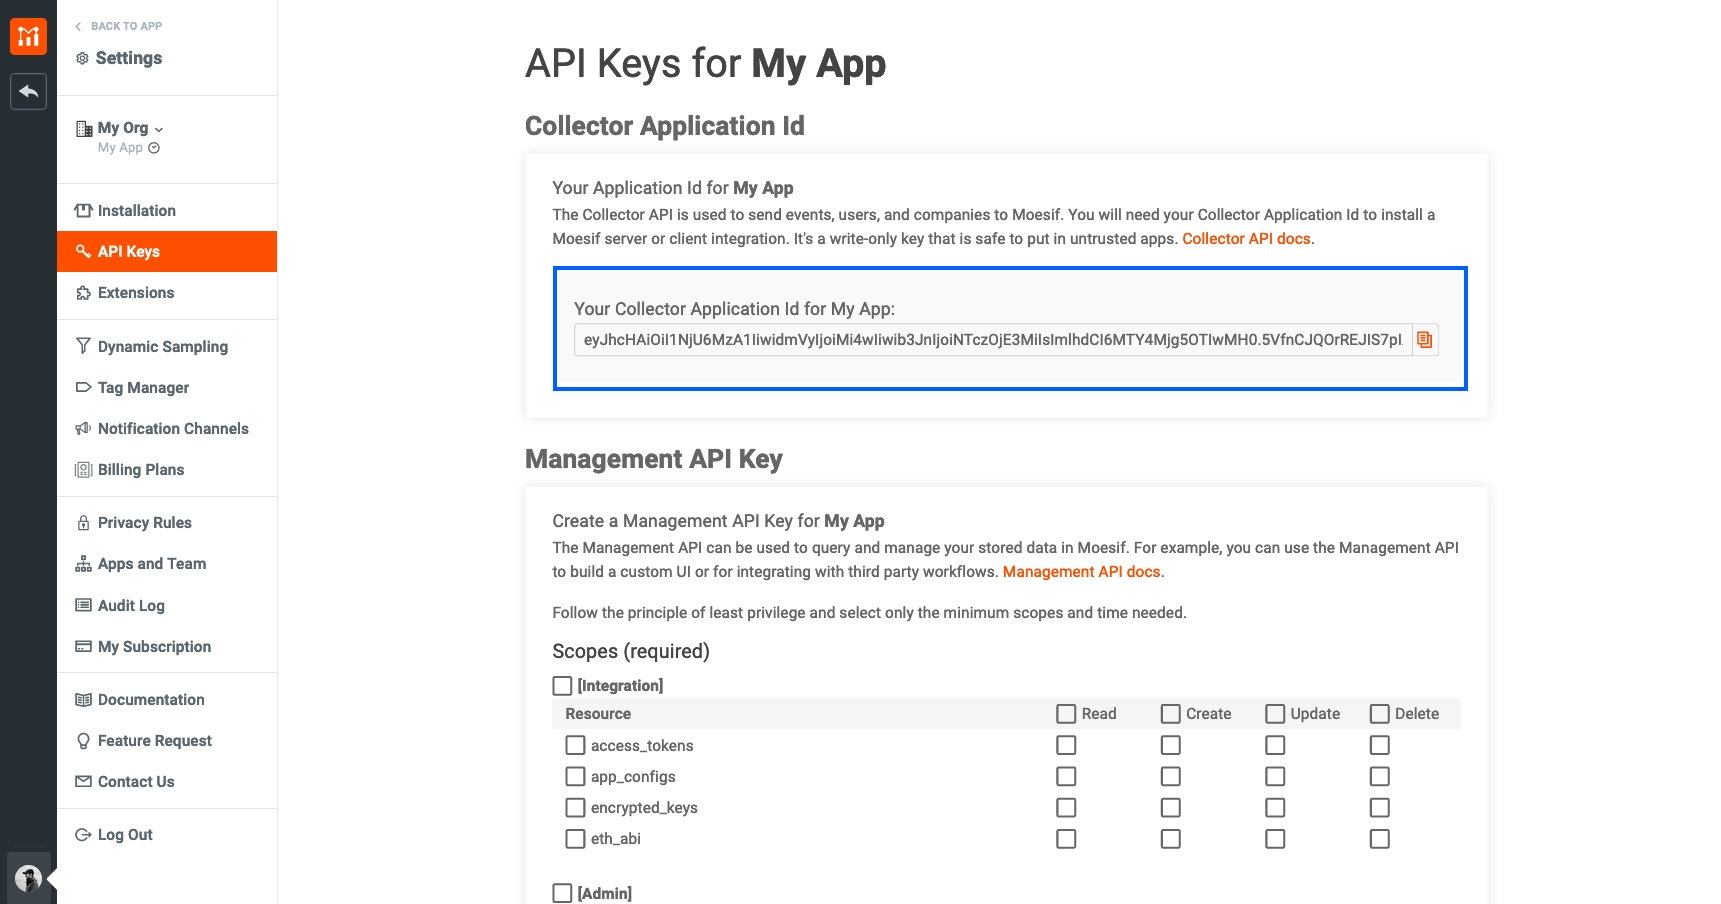
Your Moesif application ID is found in Moesif by going to the menu link in the bottom-left of the screen (which will show your name) and selecting API Keys.
The key will then be on the page that appears under Collector Application Id.
Your AWS_INVOKE_URL
This will be the URL of your AWS API Gateway. This can be found by navigating to your API in the AWS API Gateway Console, navigating to Stages, selecting your stage, and copying the Invoke URL on the screen.
Your AWS_REGION
This value will be based on the AWS region where you have your AWS API Gateway running. An example value would be “us-east-2”.
Obtaining Your AWS_ACCESS_KEY_ID
Info on this and the Secret Access Key mentioned below can be found here.{:target=”_blank” rel=”noopener”}
Obtaining Your AWS_SECRET_ACCESS_KEY
This will be your AWS Secret Access Key. You will likely need to generate a new one and can check out the instructions from the AWS team here on how to do it.{:target=”_blank” rel=”noopener”}
Your AWS_USAGE_PLAN_KEY_TYPE
AWS allows for multiple usage plan key types but for our purposes we will use API_KEY as the value here.
Obtaining Your AWS_USAGE_PLAN_ID
This value can be accessed by going to your Usage Plan in the AWS API Gateway console. You can navigate here by going to your API in the AWS console, clicking Usage Plans, selecting your plan, and copying the ID.
Once you’ve populated the file with the nine key-value pairs, save the file. We won’t need to touch this file again for the remainder of the tutorial.
Create the app.js file
In the root directory of our app, we will create an app.js file (if not already created). In this file we will add the following code that adds our dependencies and creates a base REST endpoint.
const express = require('express')
const path = require("path");
require('dotenv').config()
var bodyParser = require('body-parser')
const moesif = require('moesif-nodejs');
const Stripe = require('stripe');
// npm i --save node-fetch@2.6.5
const fetch = require('node-fetch');
// npm install @aws-sdk/client-api-gateway
const { APIGatewayClient, CreateApiKeyCommand, CreateUsagePlanKeyCommand } = require("@aws-sdk/client-api-gateway");

const app = express();
app.use(express.static(path.join(__dirname)));

const port = 5000;
const stripe = Stripe(process.env.STRIPE_KEY);

var jsonParser = bodyParser.json();

config = {
 invokeUrl: process.env.AWS_INVOKE_URL,
 region: process.env.AWS_REGION,
 credentials: {
   accessKeyId: process.env.AWS_ACCESS_KEY_ID,
   secretAccessKey: process.env.AWS_SECRET_ACCESS_KEY
 }
}

const client = new APIGatewayClient(config);

const moesifMiddleware = moesif({
 applicationId: process.env.MOESIF_APPLICATION_ID
});

app.use(moesifMiddleware);

app.post('/register', jsonParser,
 async (req, res) => {
 }
)
app.listen(port, () => {
 console.log(`Example app listening at http://localhost:${port}`);
})
In the above code we are:
- Importing a few dependencies
- Configuring the Stripe dependency
- Configure our AWS API Gateway Client
- Configuring the Moesif middleware
- Create the /register endpoint
- Set our app to run on port 5000 and start our Node app
You will notice that we have process.env.STRIPE_KEY, process.env.MOESIF_APPLICATION_ID, and other environment variables in the code. These values will come from the .env file that we created in the last step.
Implement the /register endpoint
Our next step is to implement the /register endpoint. This endpoint will essentially create our binding between AWS API Gateway, Stripe, and Moesif. The outcome will be a generated API Key from AWS API Gateway which will associate usage with a user in Moesif, which will then be reported to Stripe.
The first bit of code we will add to our__/register__ endpoint will be to create the API key and associate that API key with a Usage Plan. To do this we will use the AWS API Gateway Client SDK and it’s CreateApiKeyCommand and CreateUsagePlanKeyCommand.
   const params = {
     name: req.body.email,
     enabled: true,
   };
   const command = new CreateApiKeyCommand(params);
   const response = await client.send(command);
   const awsApiKeyId = response.id;
   const awsApiKey = response.value;

   const usageKeyCommand = new CreateUsagePlanKeyCommand({
keyId: response.id,
keyType: process.env.AWS_USAGE_PLAN_KEY_TYPE,
usagePlanId: process.env.AWS_USAGE_PLAN_ID
   });
   const usageKeyResponse = await client.send(usageKeyCommand);
The next step in the flow is to create the customer in Stripe. We will use our Stripe JS dependency to do just that. We will use the parameters from the request body (email, first name, last name) to create the customer in Stripe using the stripe.customers.create function. We will also store the AWS API Gateway generated API Key ID in the Stripe metadata object. We will then store the created customer in a custom variable so we can access the customer ID generated in Stripe, if needed.
   const customer = await stripe.customers.create({
     email: req.body.email,
     name: `${req.body.firstname} ${req.body.lastname}`,
     description: 'Customer created through /register endpoint',
     metadata: {
       'awsAPIKeyId': awsApiKeyId,
     }
   });
Next, we will subscribe this new user to our API subscription we created in Stripe earlier. We will use the stripe.subscriptions.create function and use the generated customer ID from the previous function call to subscribe them. This will return back a subscription object containing an ID we will use later.
   const subscription = await stripe.subscriptions.create({
     customer: customer.id,
     items: [
       { price: process.env.STRIPE_PRICE_KEY },
     ],
   });
Once the user and subscription are created in Stripe, we will now use the Moesif middleware to create the user and add their relevant details into Moesif. First we will call the Moesif middleware’s updateCompany function to map the Stripe customer.id to the companyId in Moesif.
  var company = { companyId: customer.id };
  moesifMiddleware.updateCompany(company);
We will then do a similar step with the updateUser function and use it to map the Stripe customer.id to the userId and companyId and some other metadata we collected on the user into Moesif. This will link the user to the company as well.
  var user = {
     userId: customer.id,
     companyId: customer.id,
     metadata: {
       email: req.body.email,
       firstName: req.body.firstname,
       lastName: req.body.lastname,
     }
   };
   moesifMiddleware.updateUser(user);
Lastly, we will return a 200 OK response back to the caller with the API key in the response body.
   res.status(200)
   res.send({ apikey: awsApiKey });
The completed function, end-to-end, will look like this:
app.post('/register', jsonParser,
 async (req, res) => {
    console.log(req.body);

    // Generate API key
    const params = {
      name: req.body.email,
      enabled: true,
    };
    const command = new CreateApiKeyCommand(params);
    const response = await client.send(command);
    const awsApiKeyId = response.id;
    const awsApiKey = response.value;
    console.log(response);

    // Associate the API key with a usage plan
    const usageKeyCommand = new CreateUsagePlanKeyCommand({
  keyId: response.id,
  keyType: process.env.AWS_USAGE_PLAN_KEY_TYPE,
  usagePlanId: process.env.AWS_USAGE_PLAN_ID
    });
    const usageKeyResponse = await client.send(usageKeyCommand);
    console.log(usageKeyResponse);

    // create Stripe customer
    console.log('create stripe customer');
    const customer = await stripe.customers.create({
      email: req.body.email,
      name: `${req.body.firstname} ${req.body.lastname}`,
      description: 'Customer created through /register endpoint',
      metadata: {
        'awsAPIKeyId': awsApiKeyId,
      }
    });
    console.log('stripe customer created');

    // create Stripe subscription
    console.log('create stripe subscription');
    const subscription = await stripe.subscriptions.create({
      customer: customer.id,
      items: [
        { price: process.env.STRIPE_PRICE_KEY },
      ],
    });
    console.log('stripe subscription created: ' + subscription.id);

    // create user, company, and subscription in Moesif
    var company = { companyId: customer.id };
    moesifMiddleware.updateCompany(company);

    var user = {
      userId: customer.id,
      companyId: customer.id,
      metadata: {
        email: req.body.email,
        firstName: req.body.firstname,
        lastName: req.body.lastname,
      }
    };
    moesifMiddleware.updateUser(user);

    res.status(200)
    res.send({ apikey: awsApiKey });
 }
)
With that, we can now actually try out our endpoint to make sure that each piece is working as expected. The outcome should be a registered user with an API key which will record and report usage data to Stripe. Let’s move on to testing it.
5 - Send a test request to the /register endpoint
Once your /register endpoint has been coded and deployed, it’s time to test it. For right now we will simply use Postman to send a request. Our request will contain a JSON request body that will contain a:
- First name
- Last name
Of course, this is the minimal amount of information we would want to configure our system and profiles in AWS API Gateway, Stripe, and Moesif correctly. You can easily add more fields as needed for your specific use case.
In Postman, we will create our request with the following information:
- Request Type: POST
- Endpoint URL: http://localhost:5000/register
-
Request Body:
{
  "firstname": "Userfirstname",
  "lastname": "Userlastname",
  "email": "test@test.com"
}
Once everything is plugged into Postman, it should look like the following:
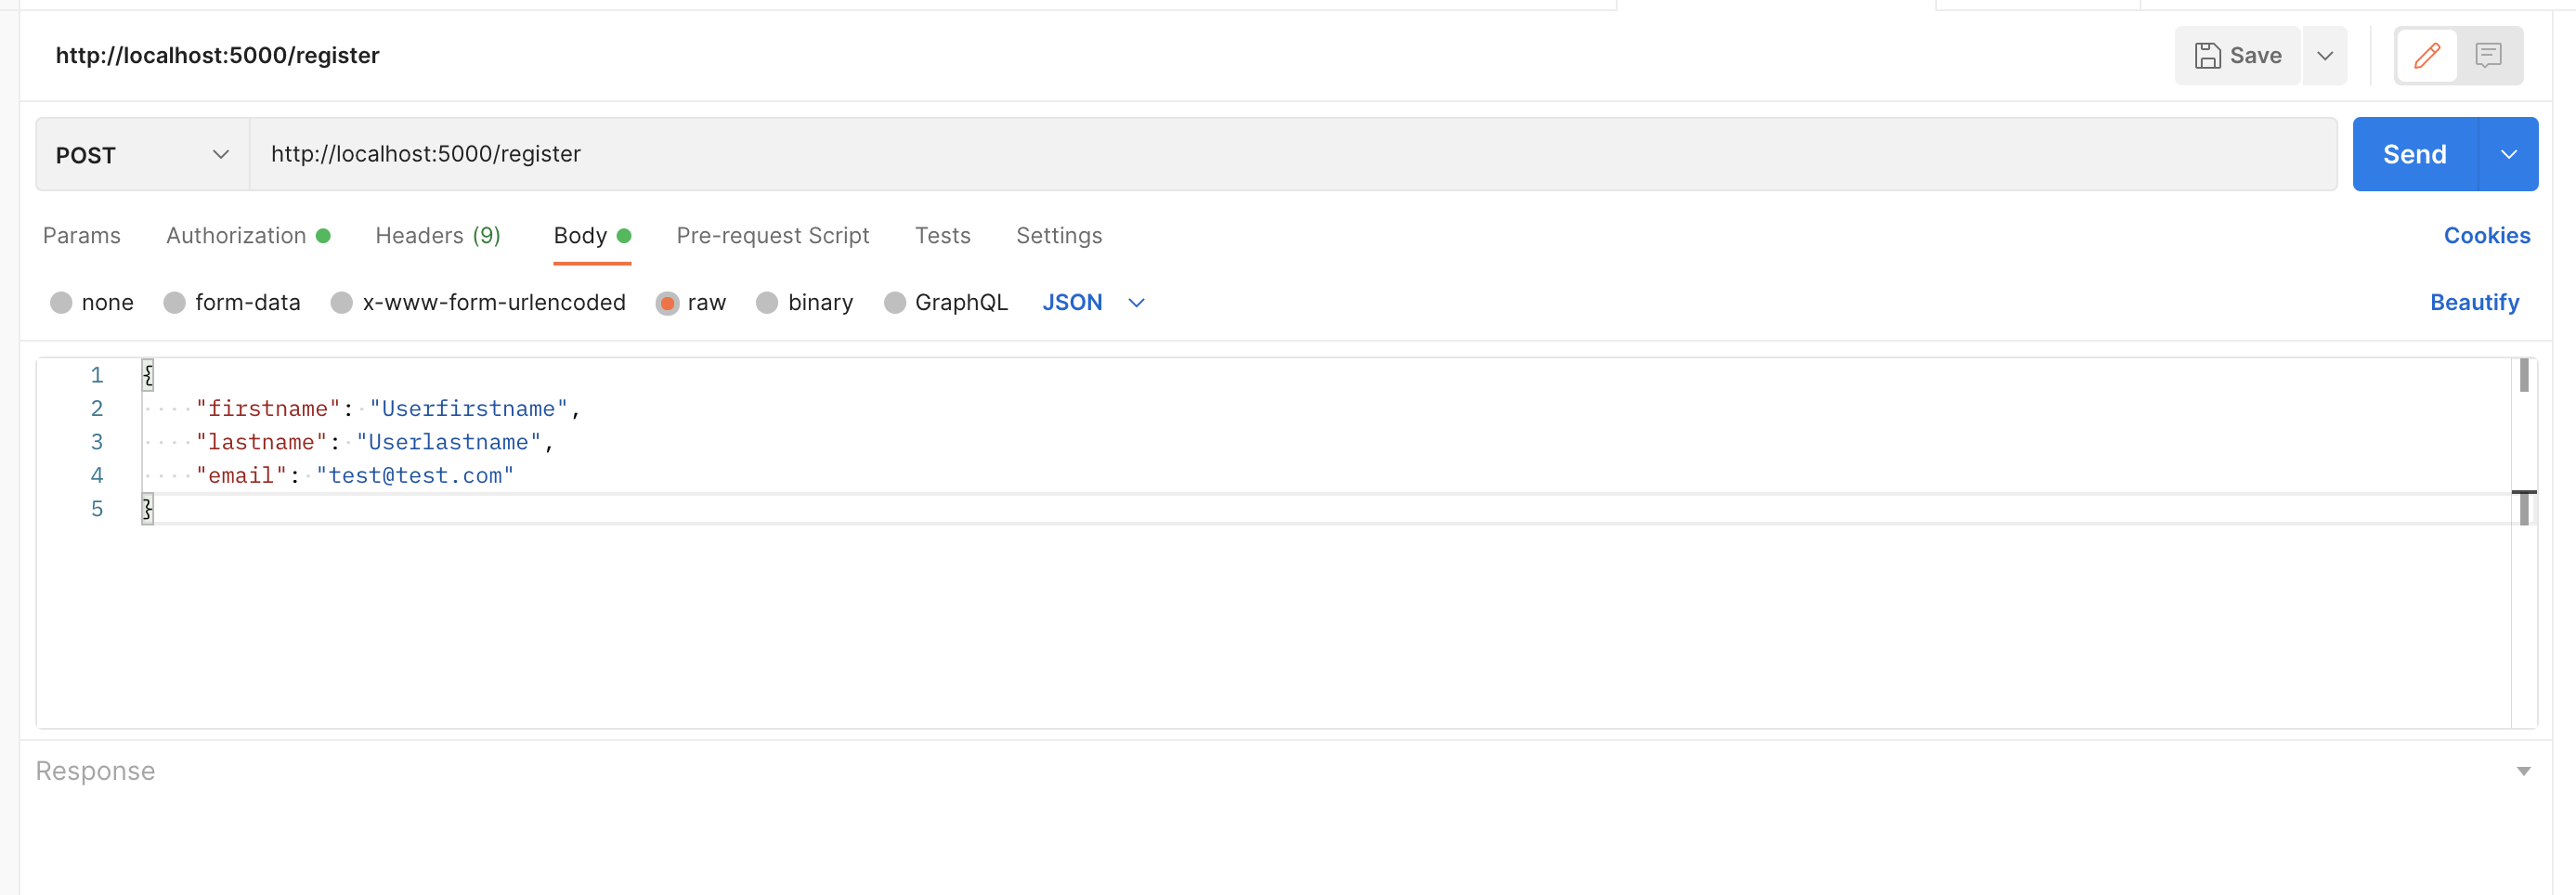
Once the request is sent, the response should contain an API key that the newly registered user can use.
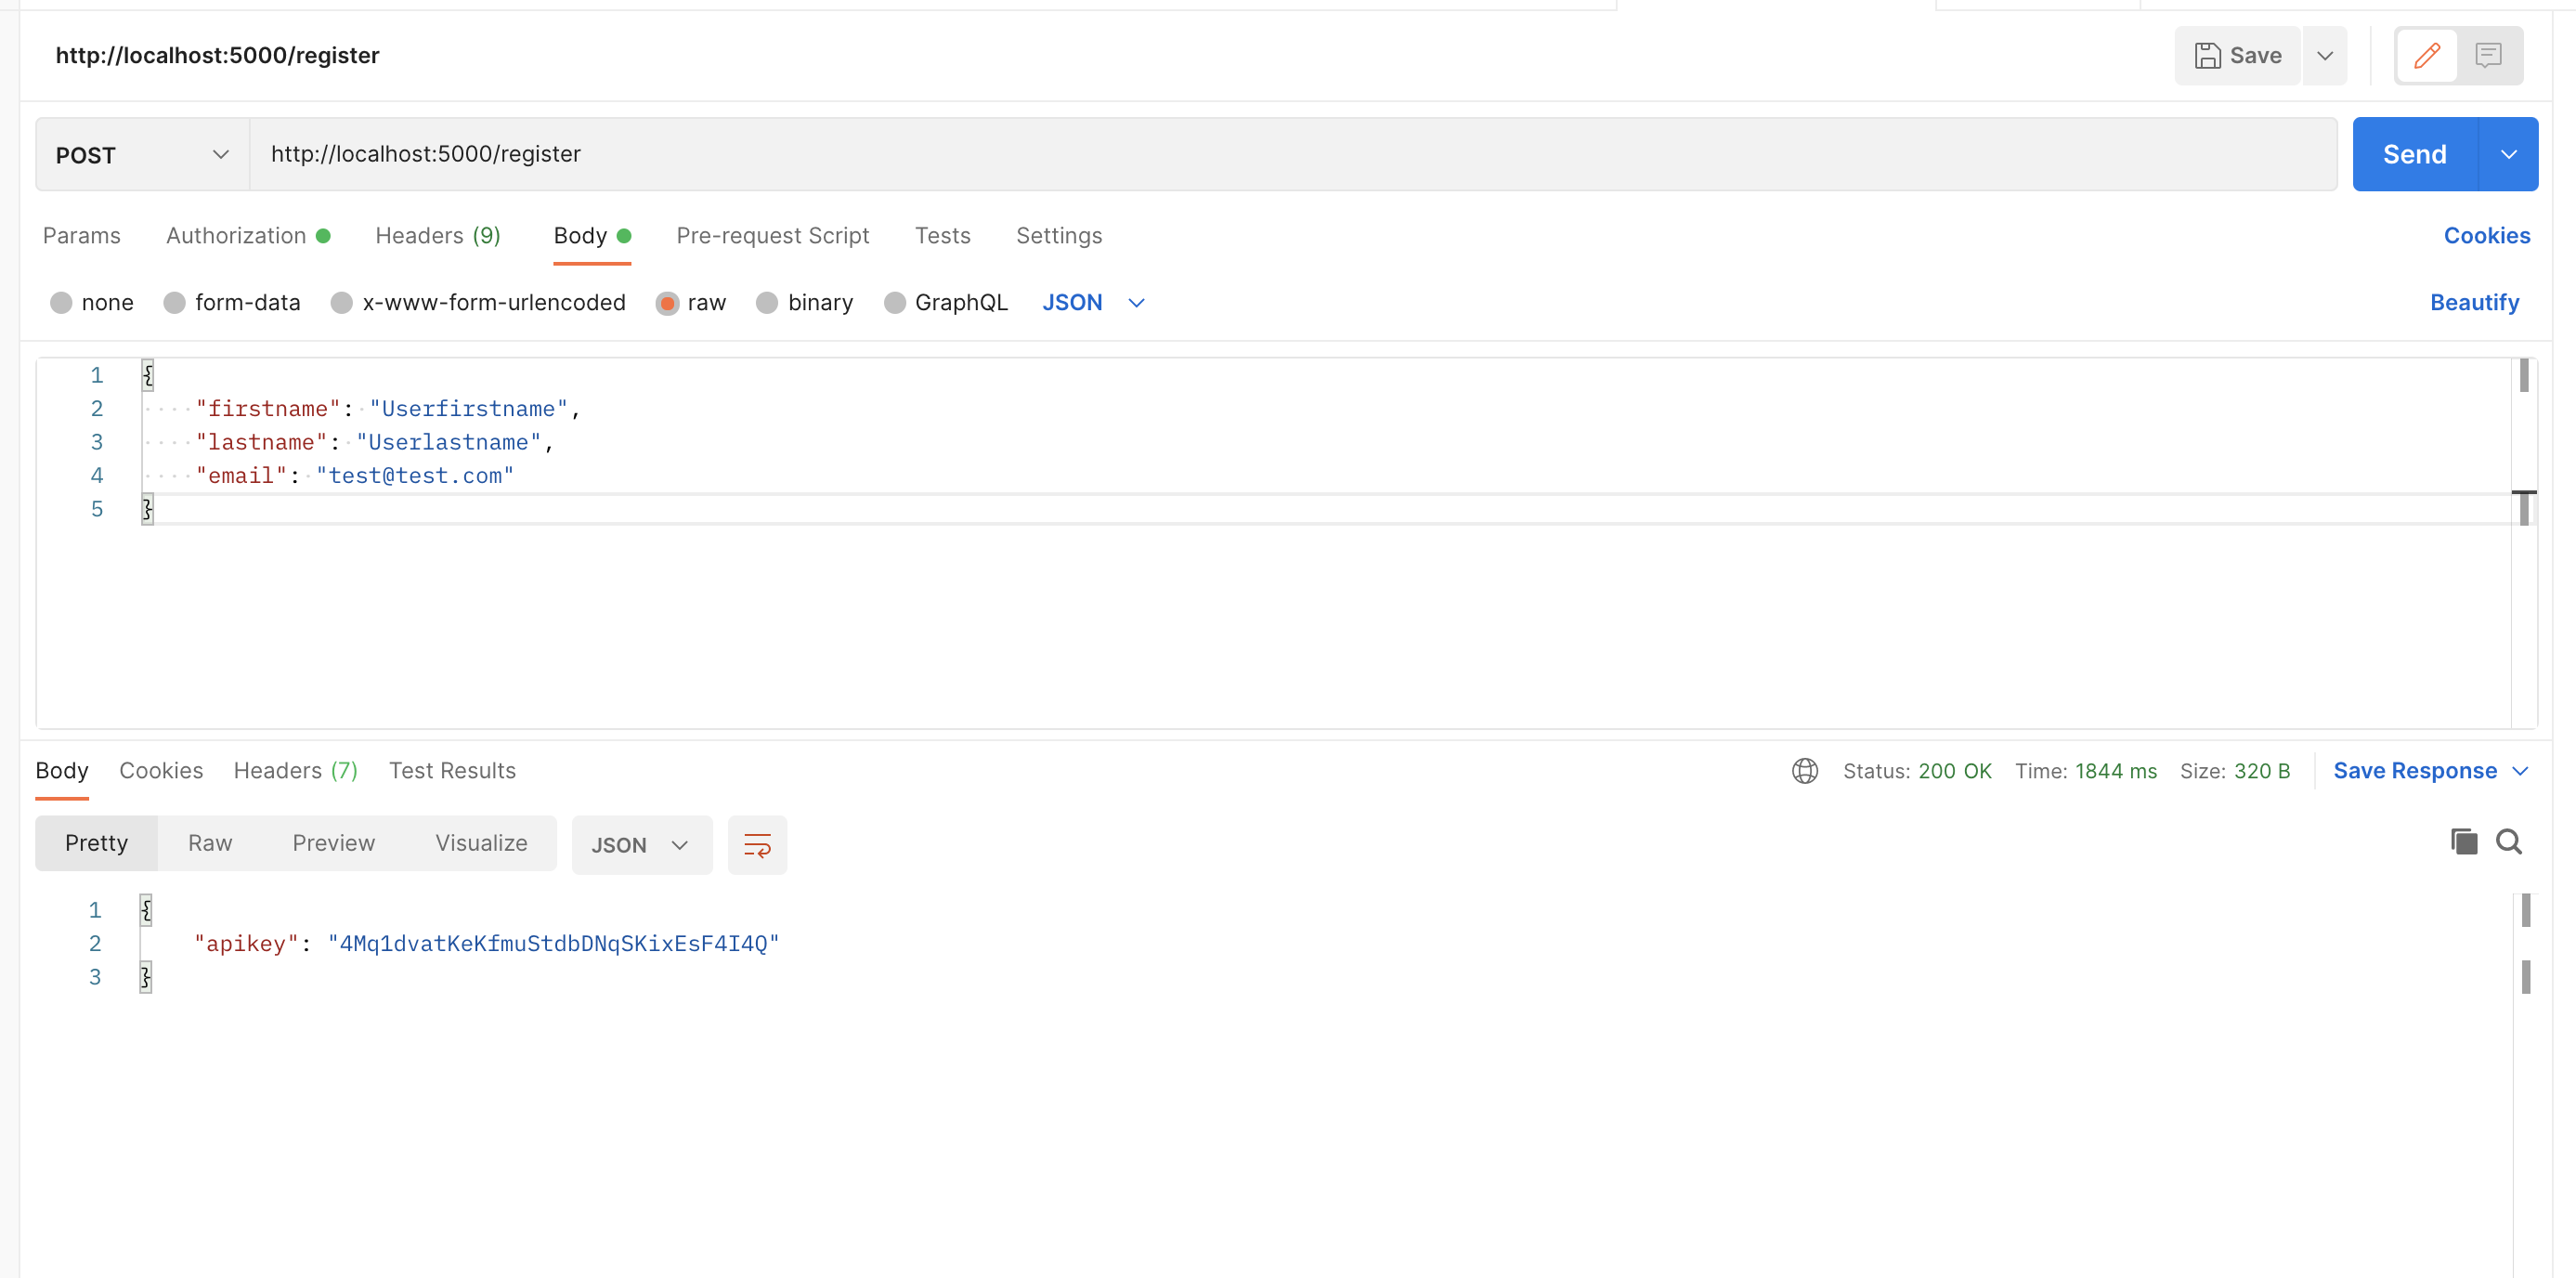
We will now check Stripe to ensure that the information we registered with is correctly entered into the systems.
Logging back into Stripe, you’ll navigate to Customers screen. You should see your newly created user in the list.
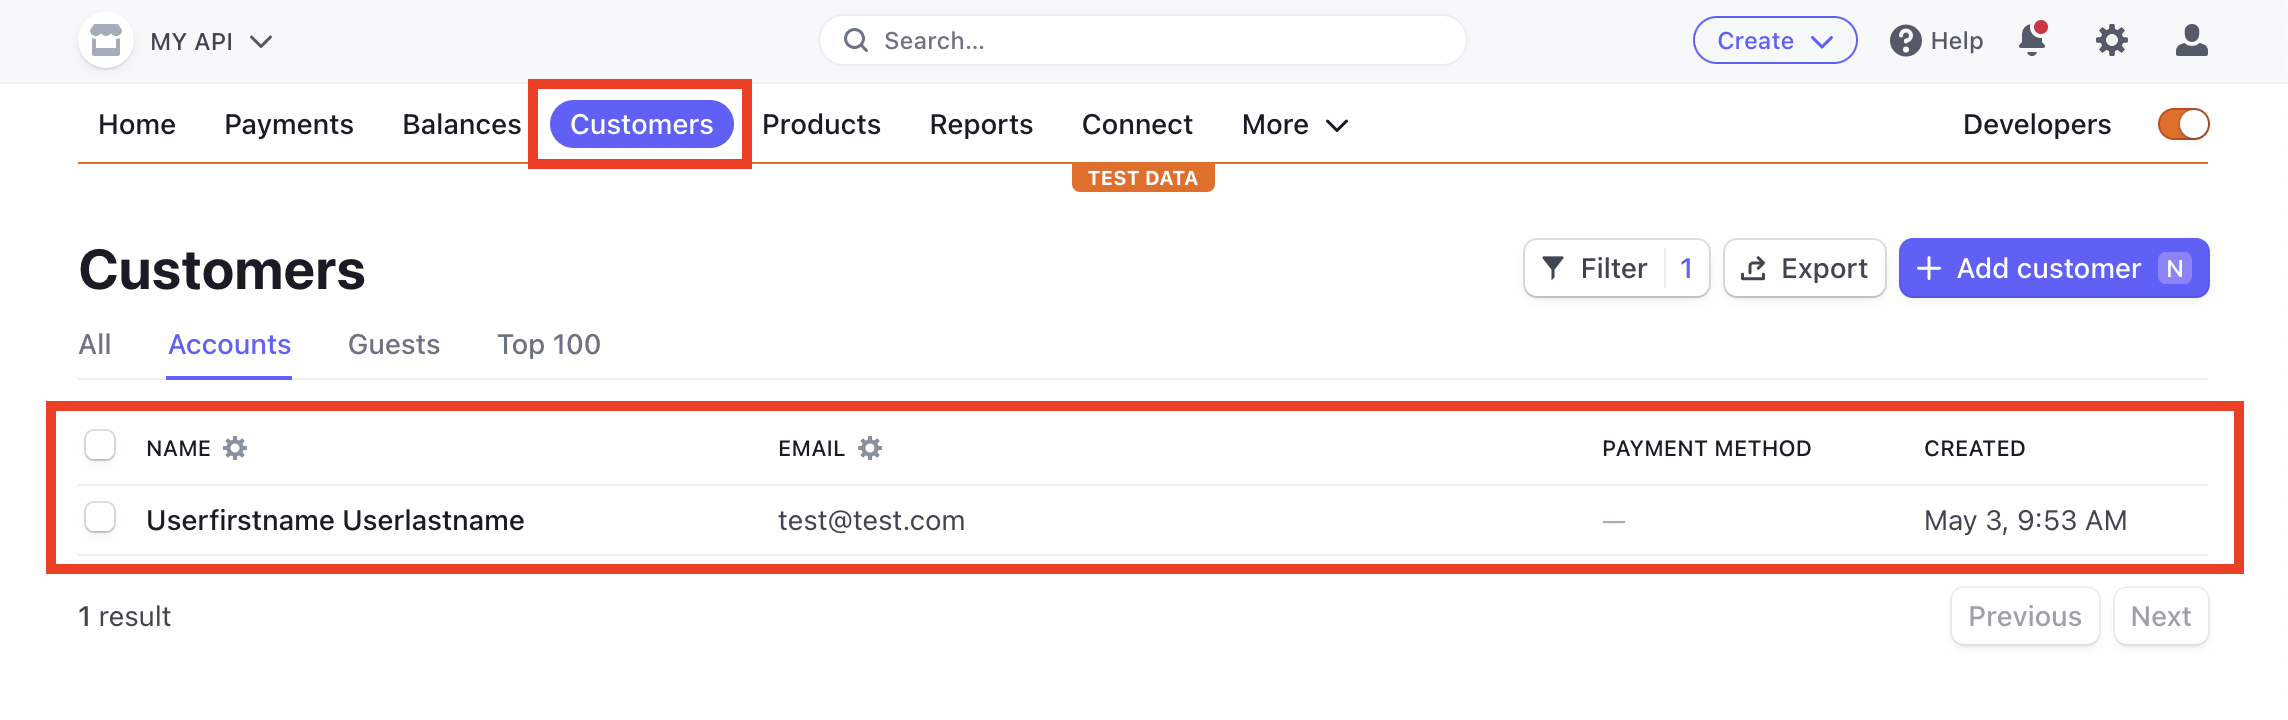
Click on the newly added customer in the list. On the next screen, you should see that the customer is also subscribed to your APIs subscription. You should also see under Metadata that the awsAPIKeyID is also present.
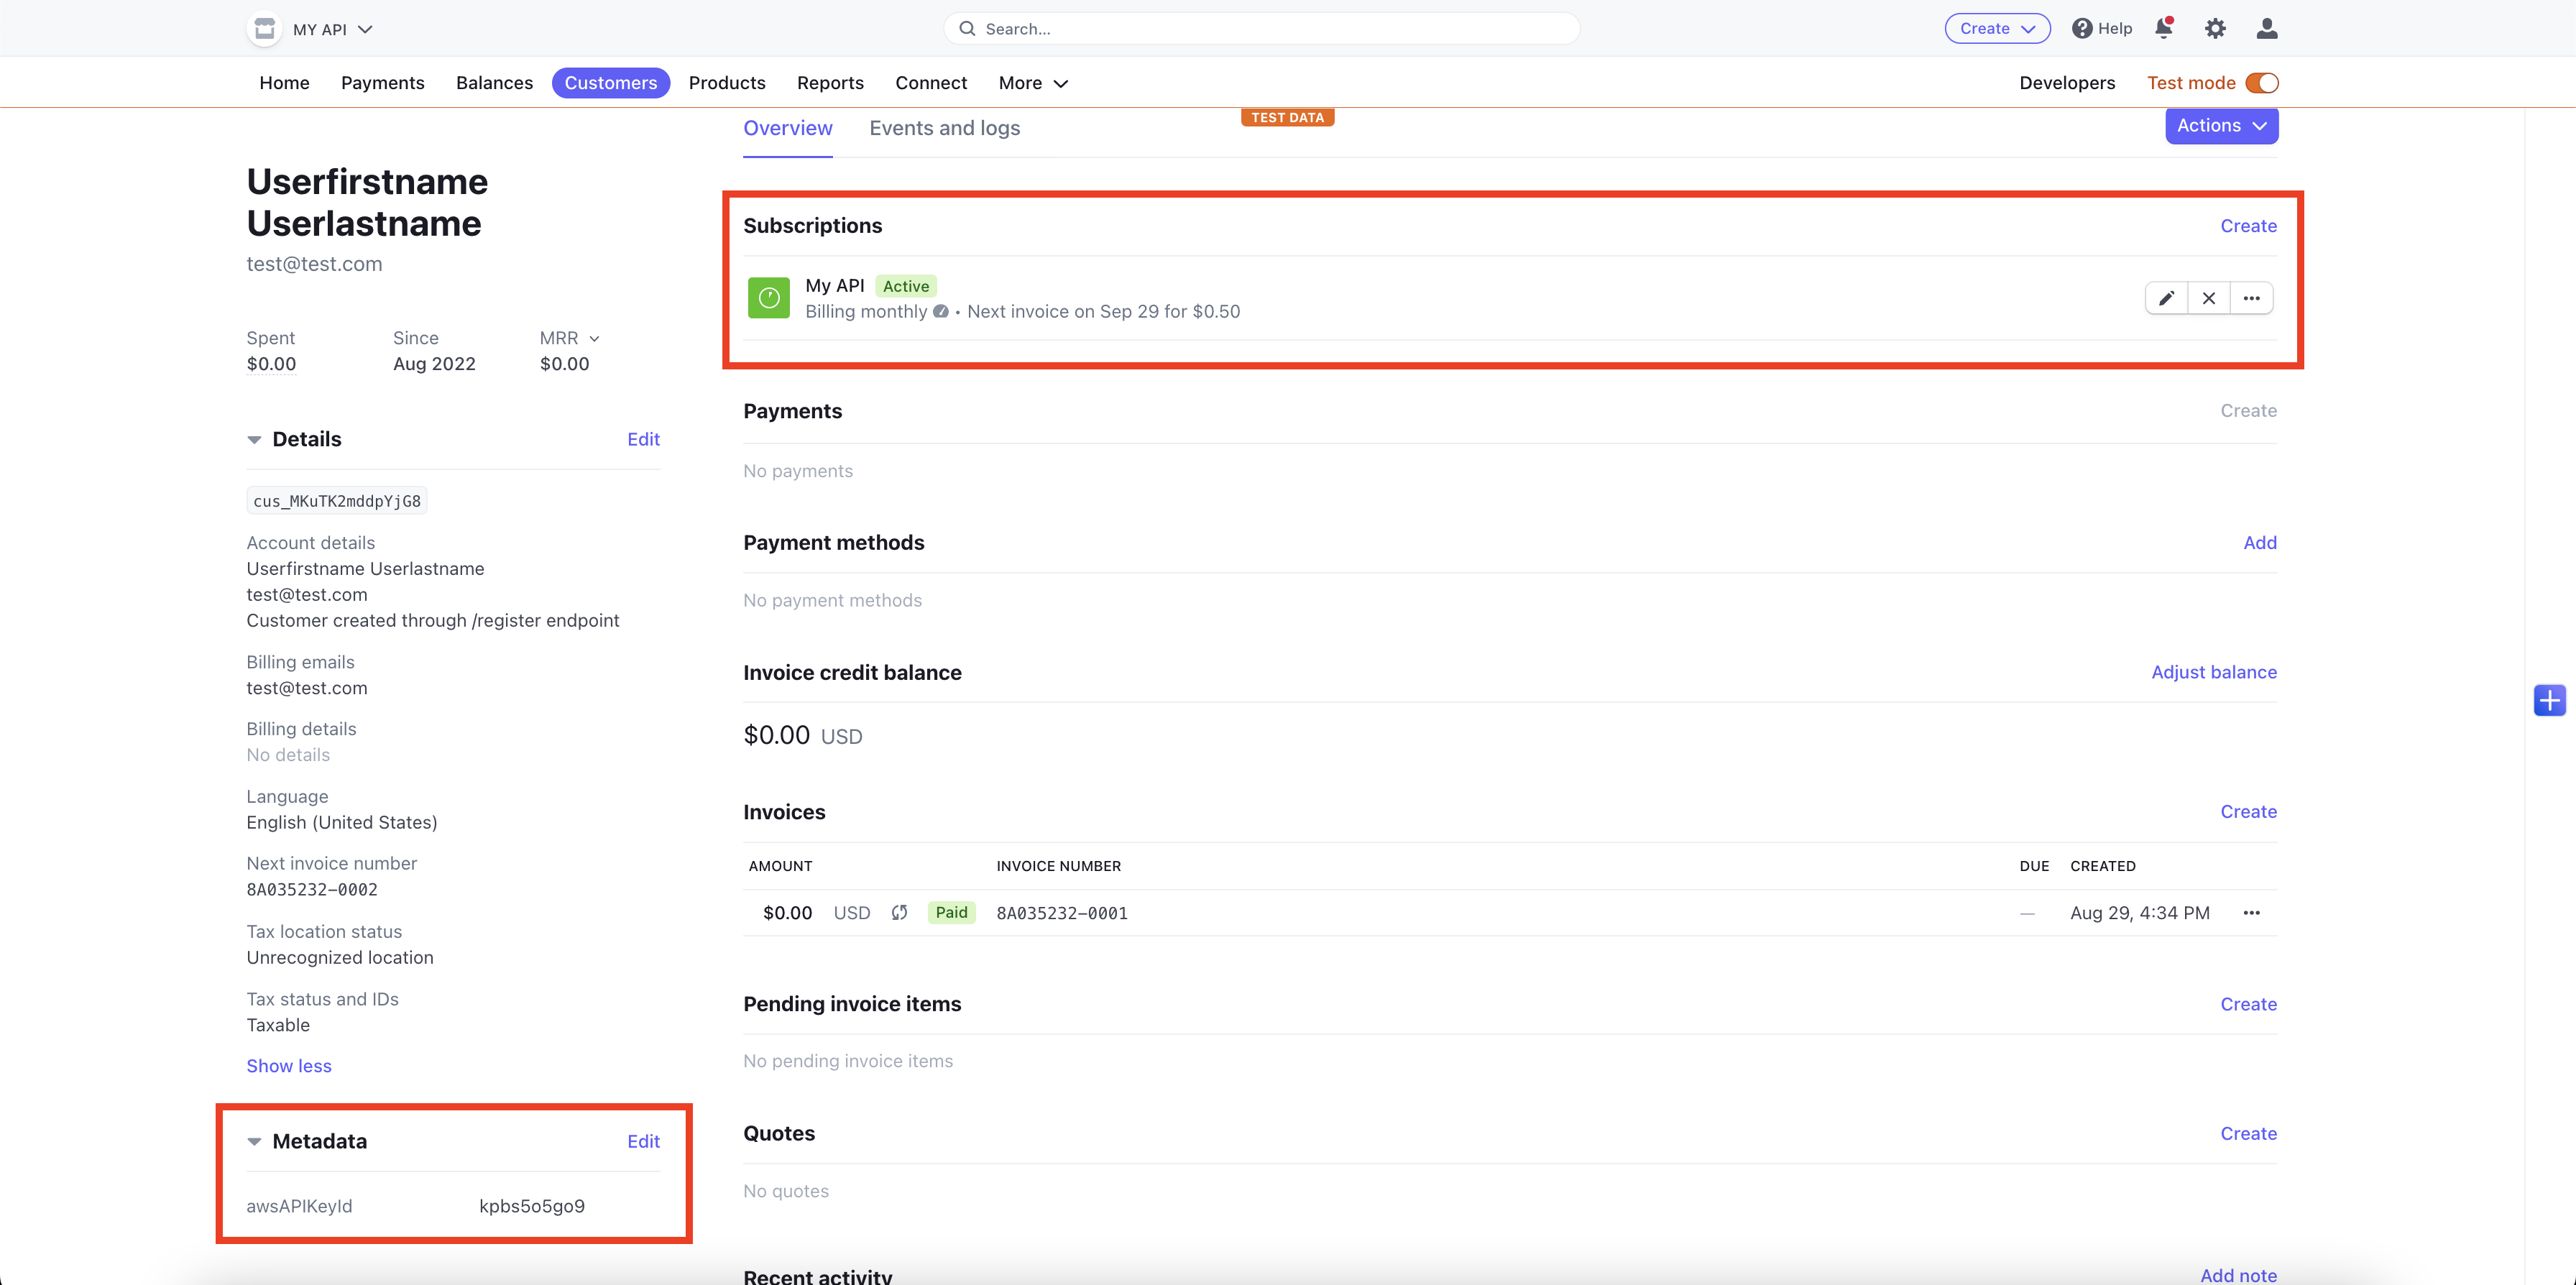
Having the awsAPIKeyID present is important since that is part of the mechanism we use to map usage data over to Stripe from Moesif. If this is not present, make sure the code above has been correctly configured to add it to the Stripe customer metadata.
With these checks completed, we can safely assume that our /register endpoint is correctly setting up our users accounts and subscriptions in Stripe.
6 - Call your API using the generated API key
Our next step is to actually use our generated API key. We will then confirm that all the correct information is added into Moesif. The data we are confirming includes:
- The Stripe Customer ID is mapped to the Moesif Company ID
- The Stripe Subscription ID is mapped to the Moesif Subscription ID
- Moesif contains the Stripe metadata in the company profile
Use Postman to send the request
Next, let’s use Postman, or another platform, to send a request to the endpoint on AWS API Gateway. This is the endpoint that we set up the billing meter for in Step 3, above.
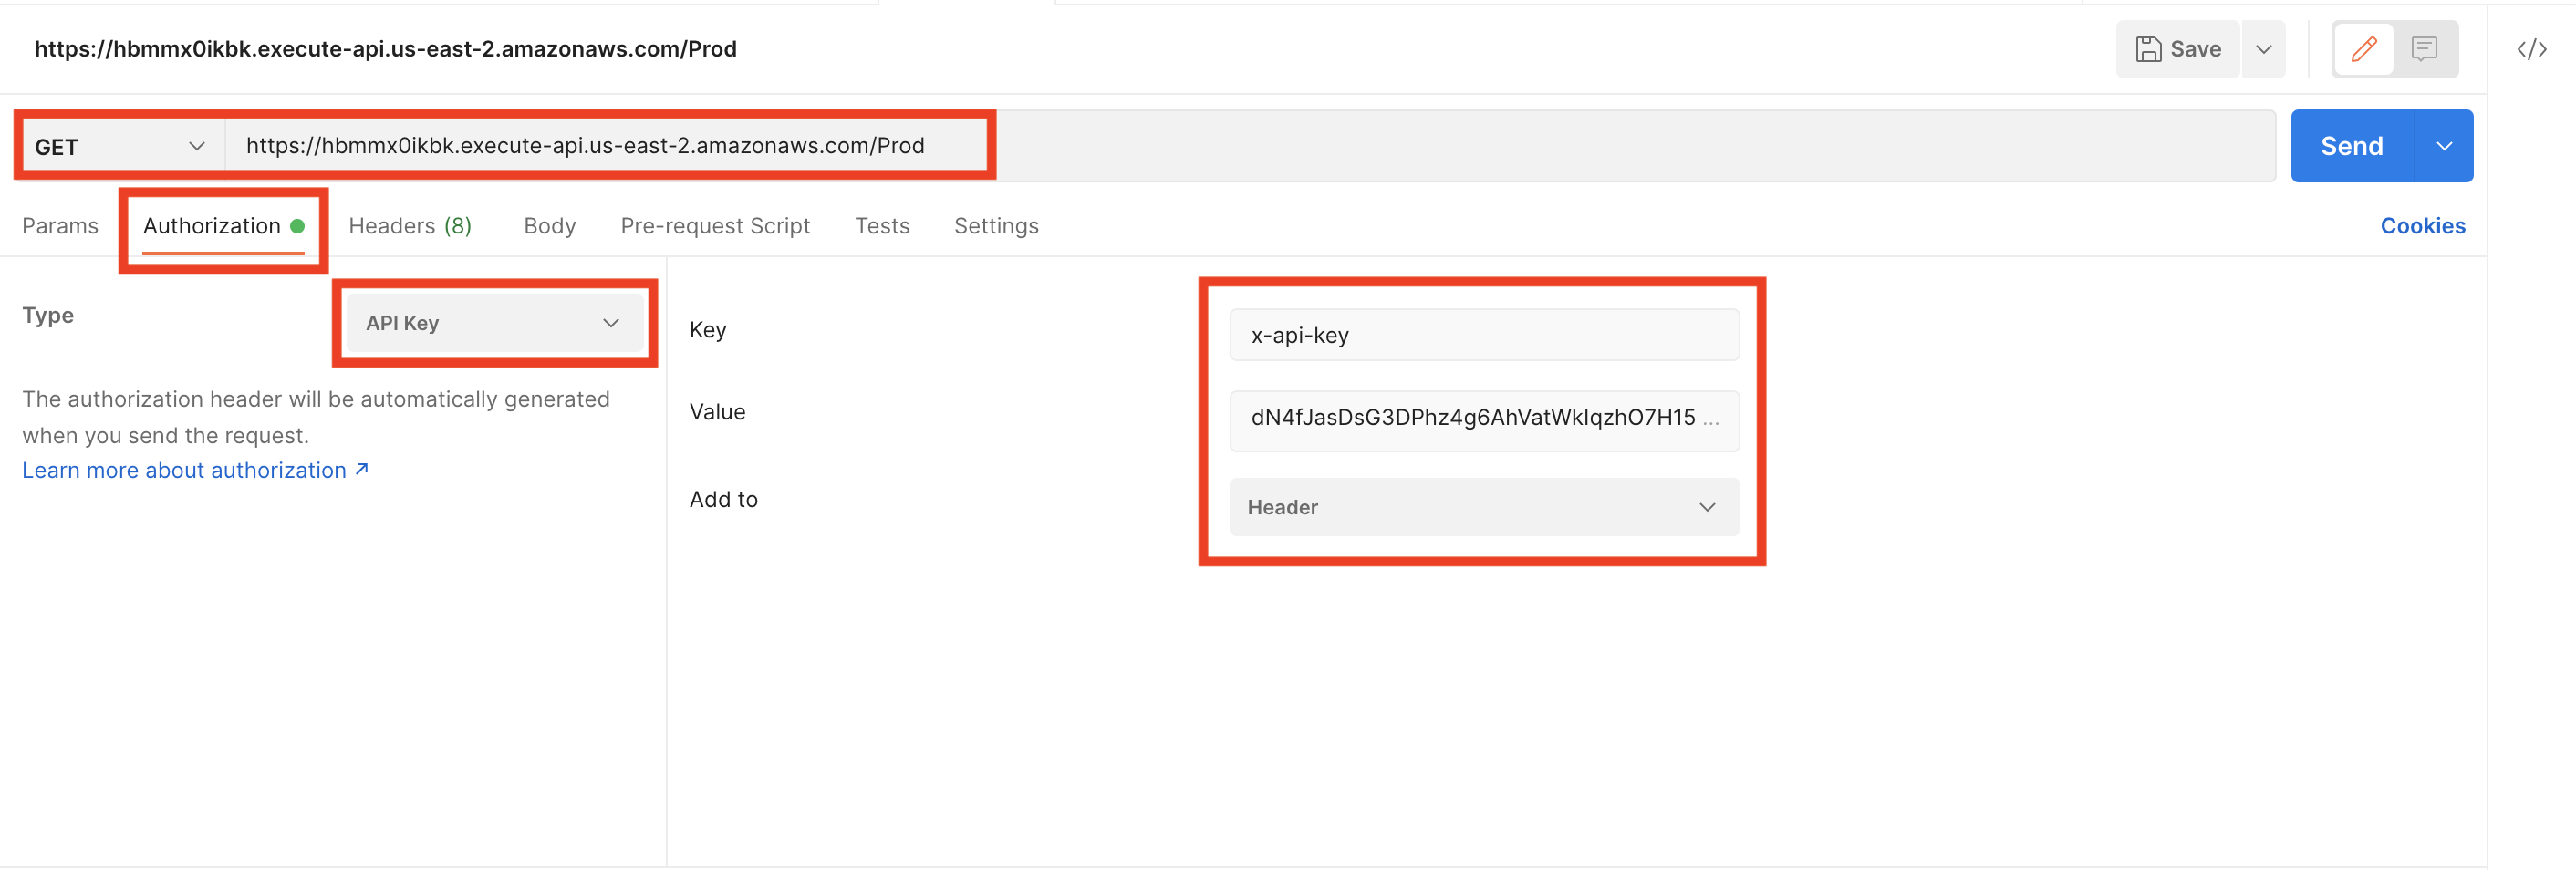
In Postman, we will:
- Put the invoke URL for your AWS API Gateway API endpoint as the request URL
- Select the Authorization tab
- Select the Type as API Key
- Populate the API key details
- Set the Key as “x-api-key”
- Set the Value as the generated API key
- Set the Add to field value to “Header”
Below is an example of the populated request configuration in Postman.
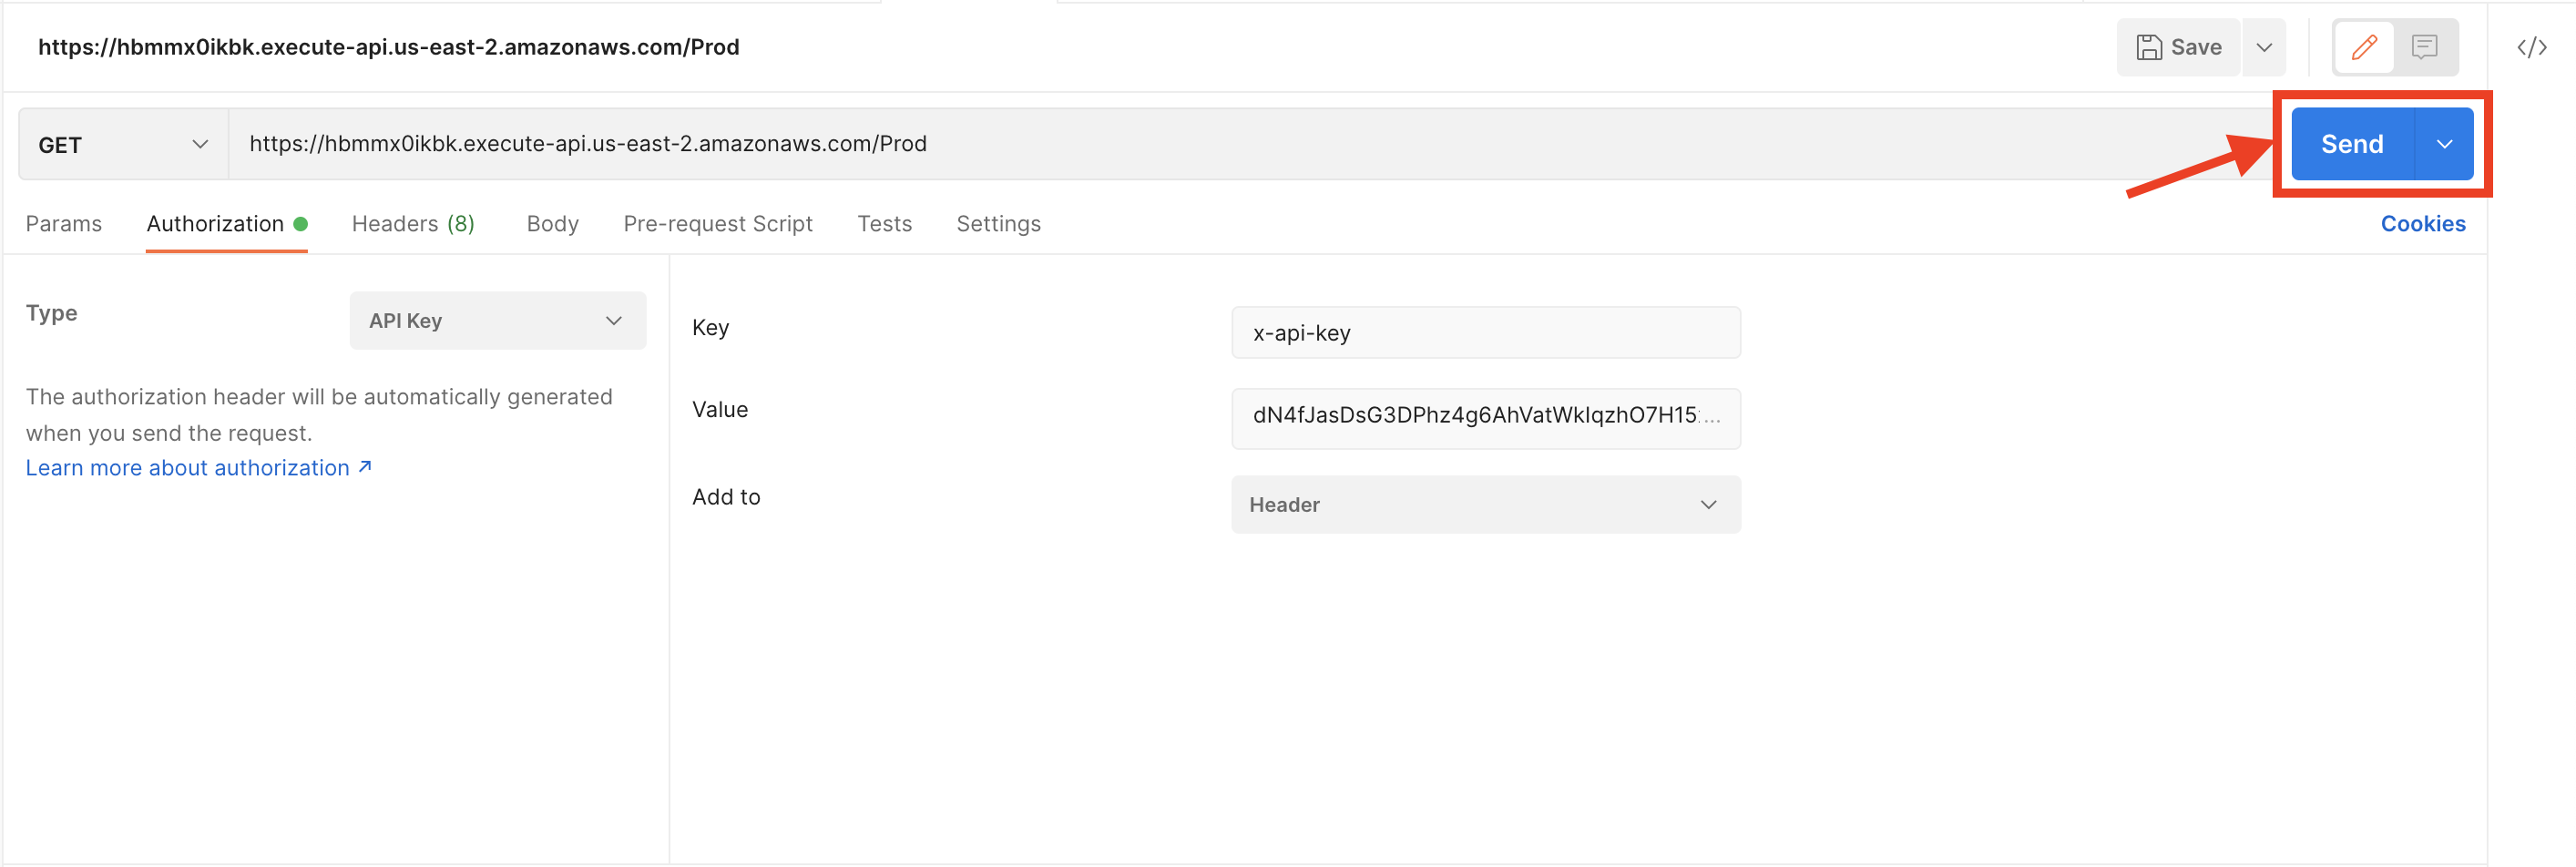
To send the request to our endpoint, click Send.
Once sent, your request should be proxied through AWS Api Gateway and the API call analytics should land in Moesif.
Confirm that Moesif received the request info
Back in Moesif, you’ll navigate to the Live Event Log screen where you should see the request you just sent. You should see the entry has both a User ID and Company ID populated with the Stripe user and subscription ID’s. The entries should look like this:
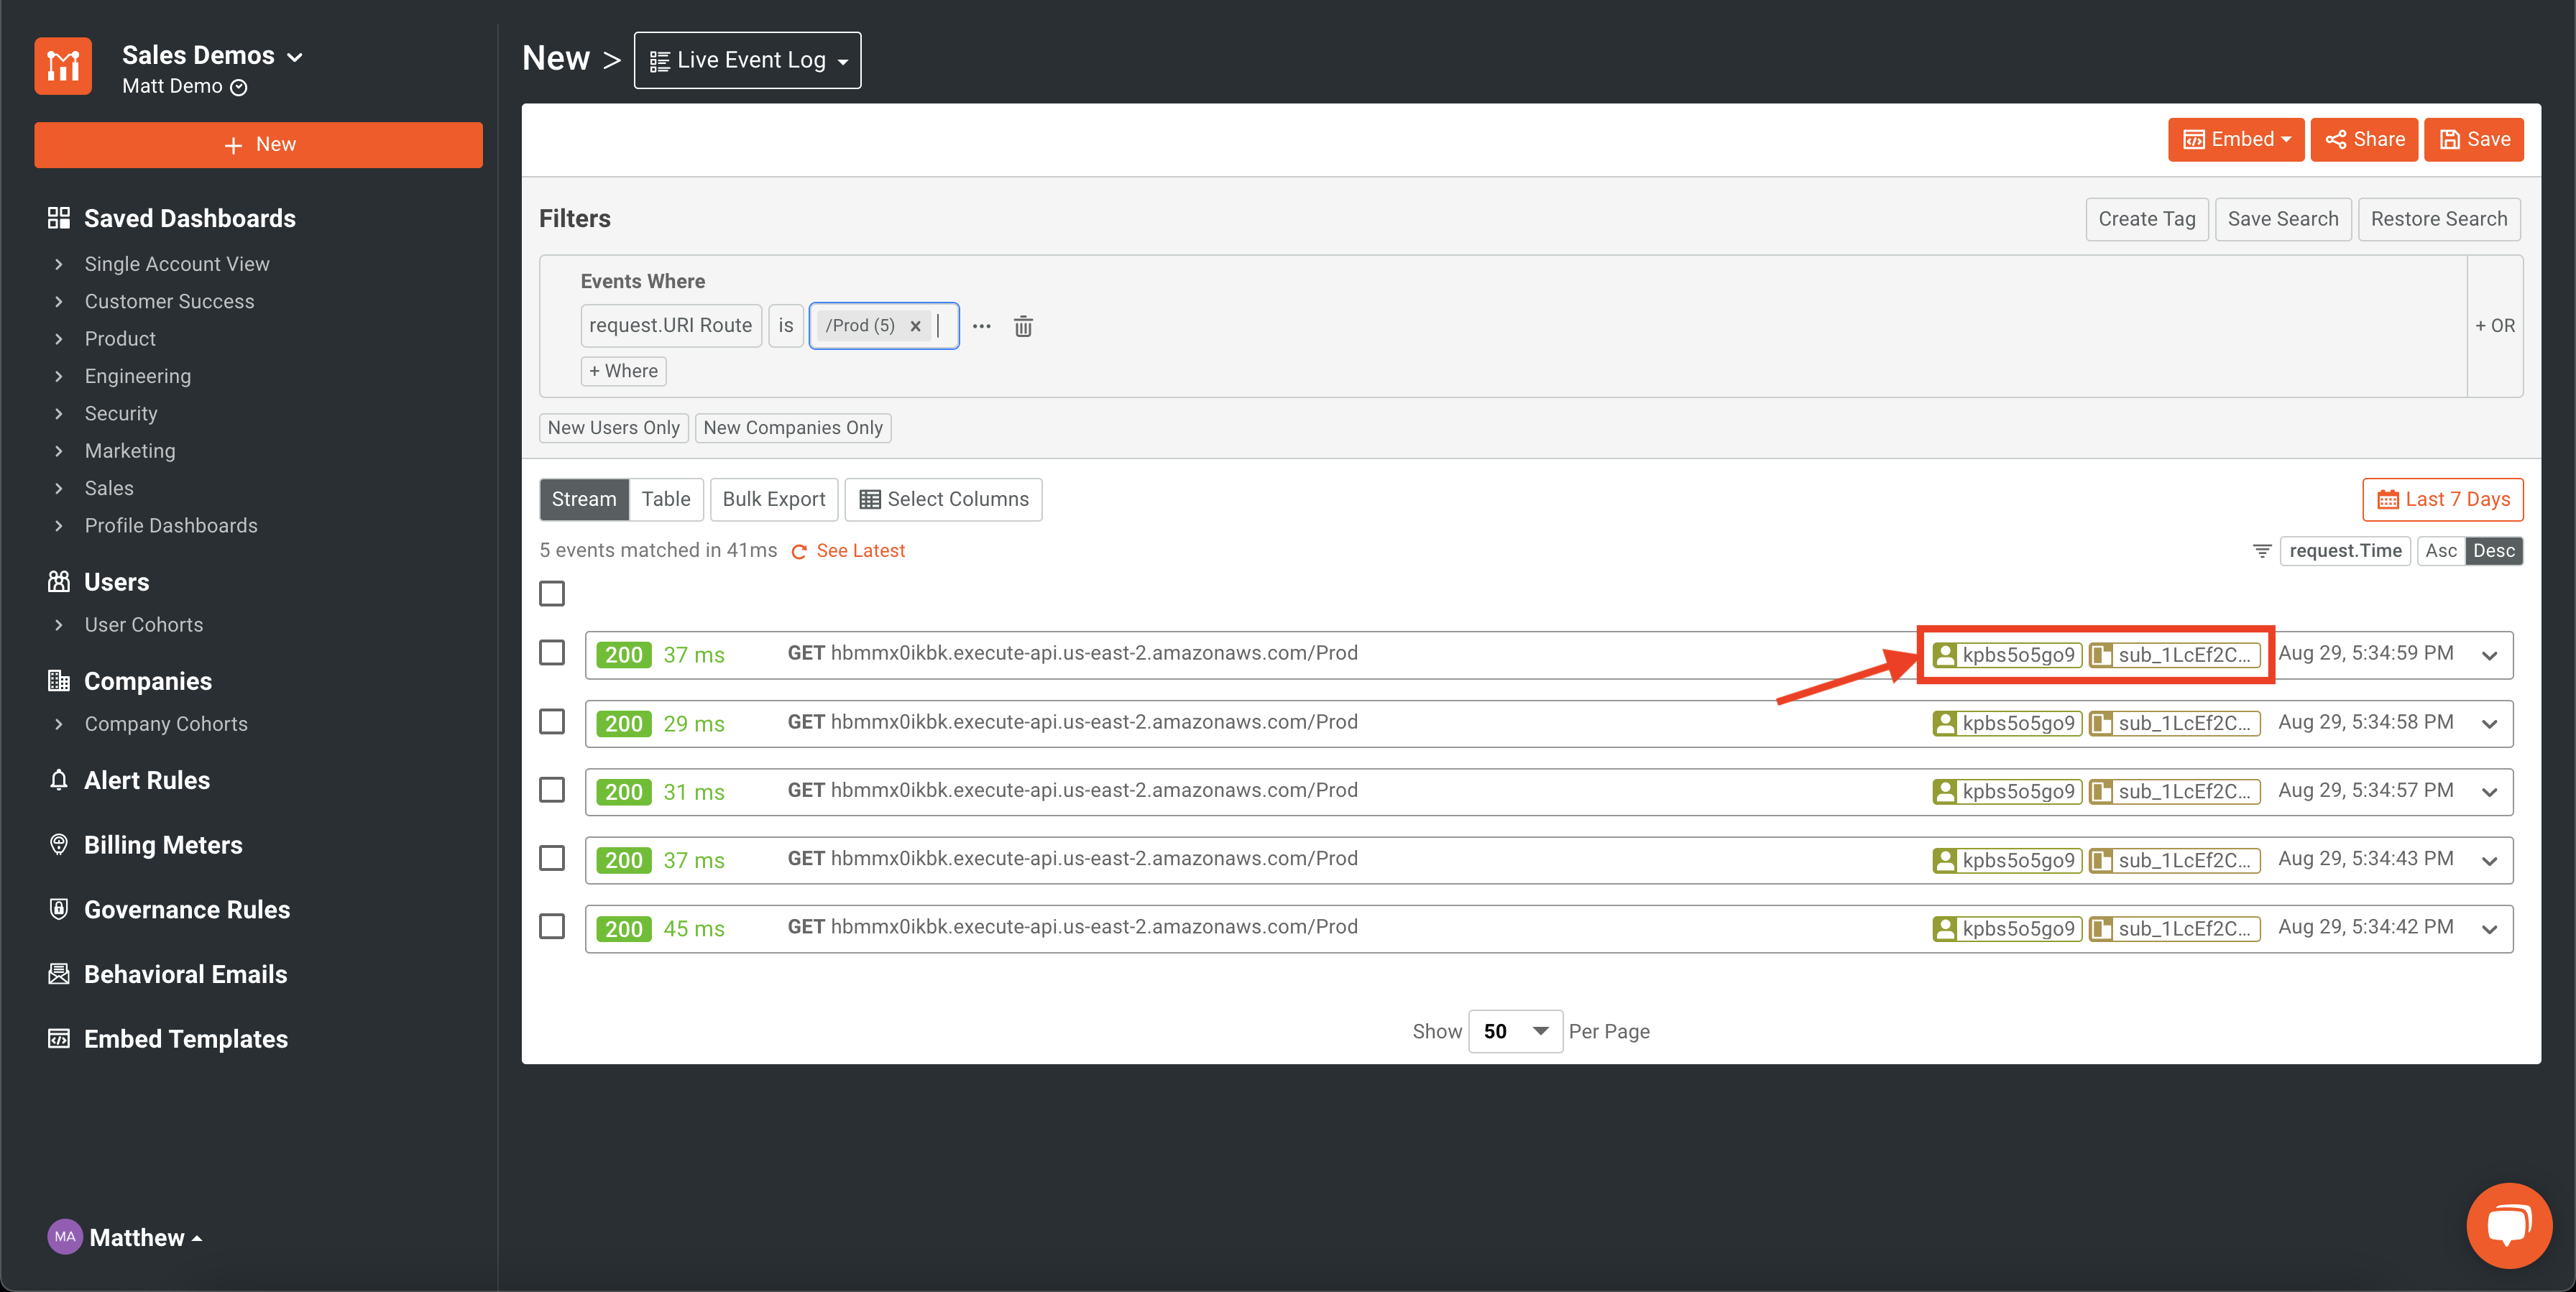
The customer ID should match your AWS API Gateway API Key ID and the subscription ID will look like “sub_XXXX”.
If you click on the User ID shown in the entries on the Live Event Log screen, you will come to the users profile page. On this page, we will confirm that the Stripe metadata is present. We will need to add a new column to our profile to display the Stripe data. To do this, from the profile page, click on the … More Actions button and click Customize Profiles’ Layout.
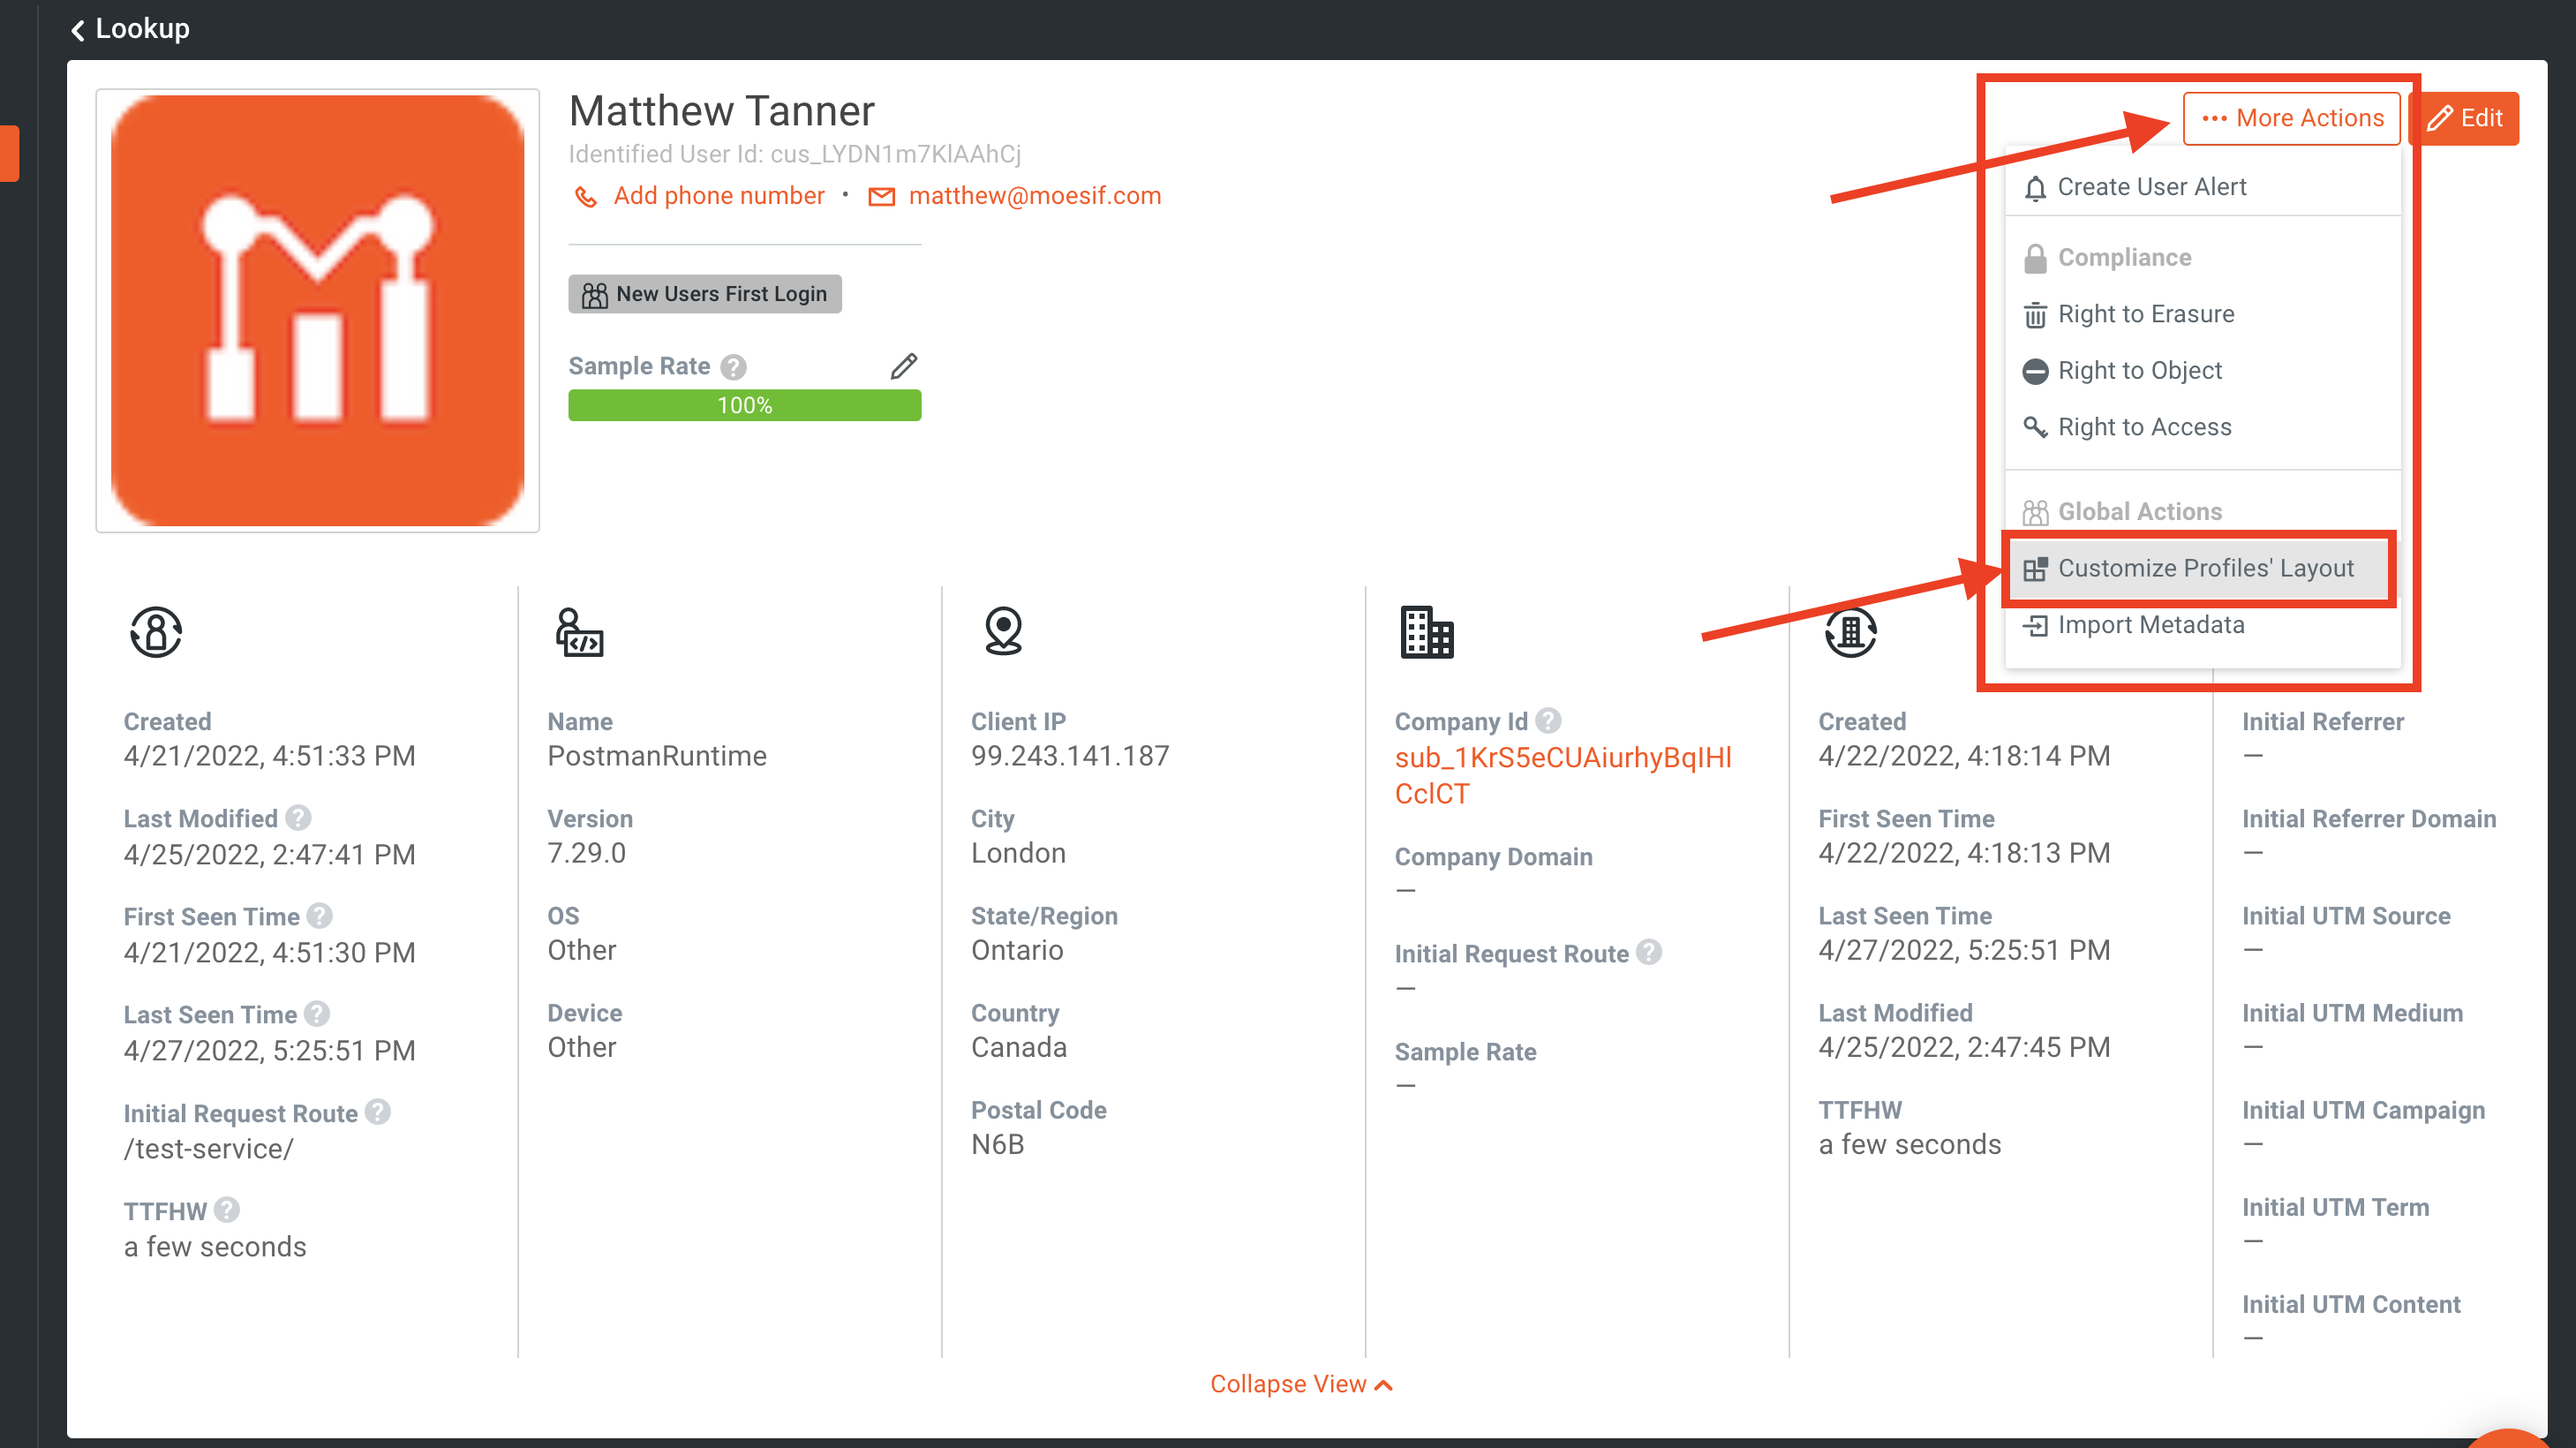
We will then add a new column for the Stripe metadata. You will click the + button on the far right of the screen to create a new column where we will add the Stripe metadata.
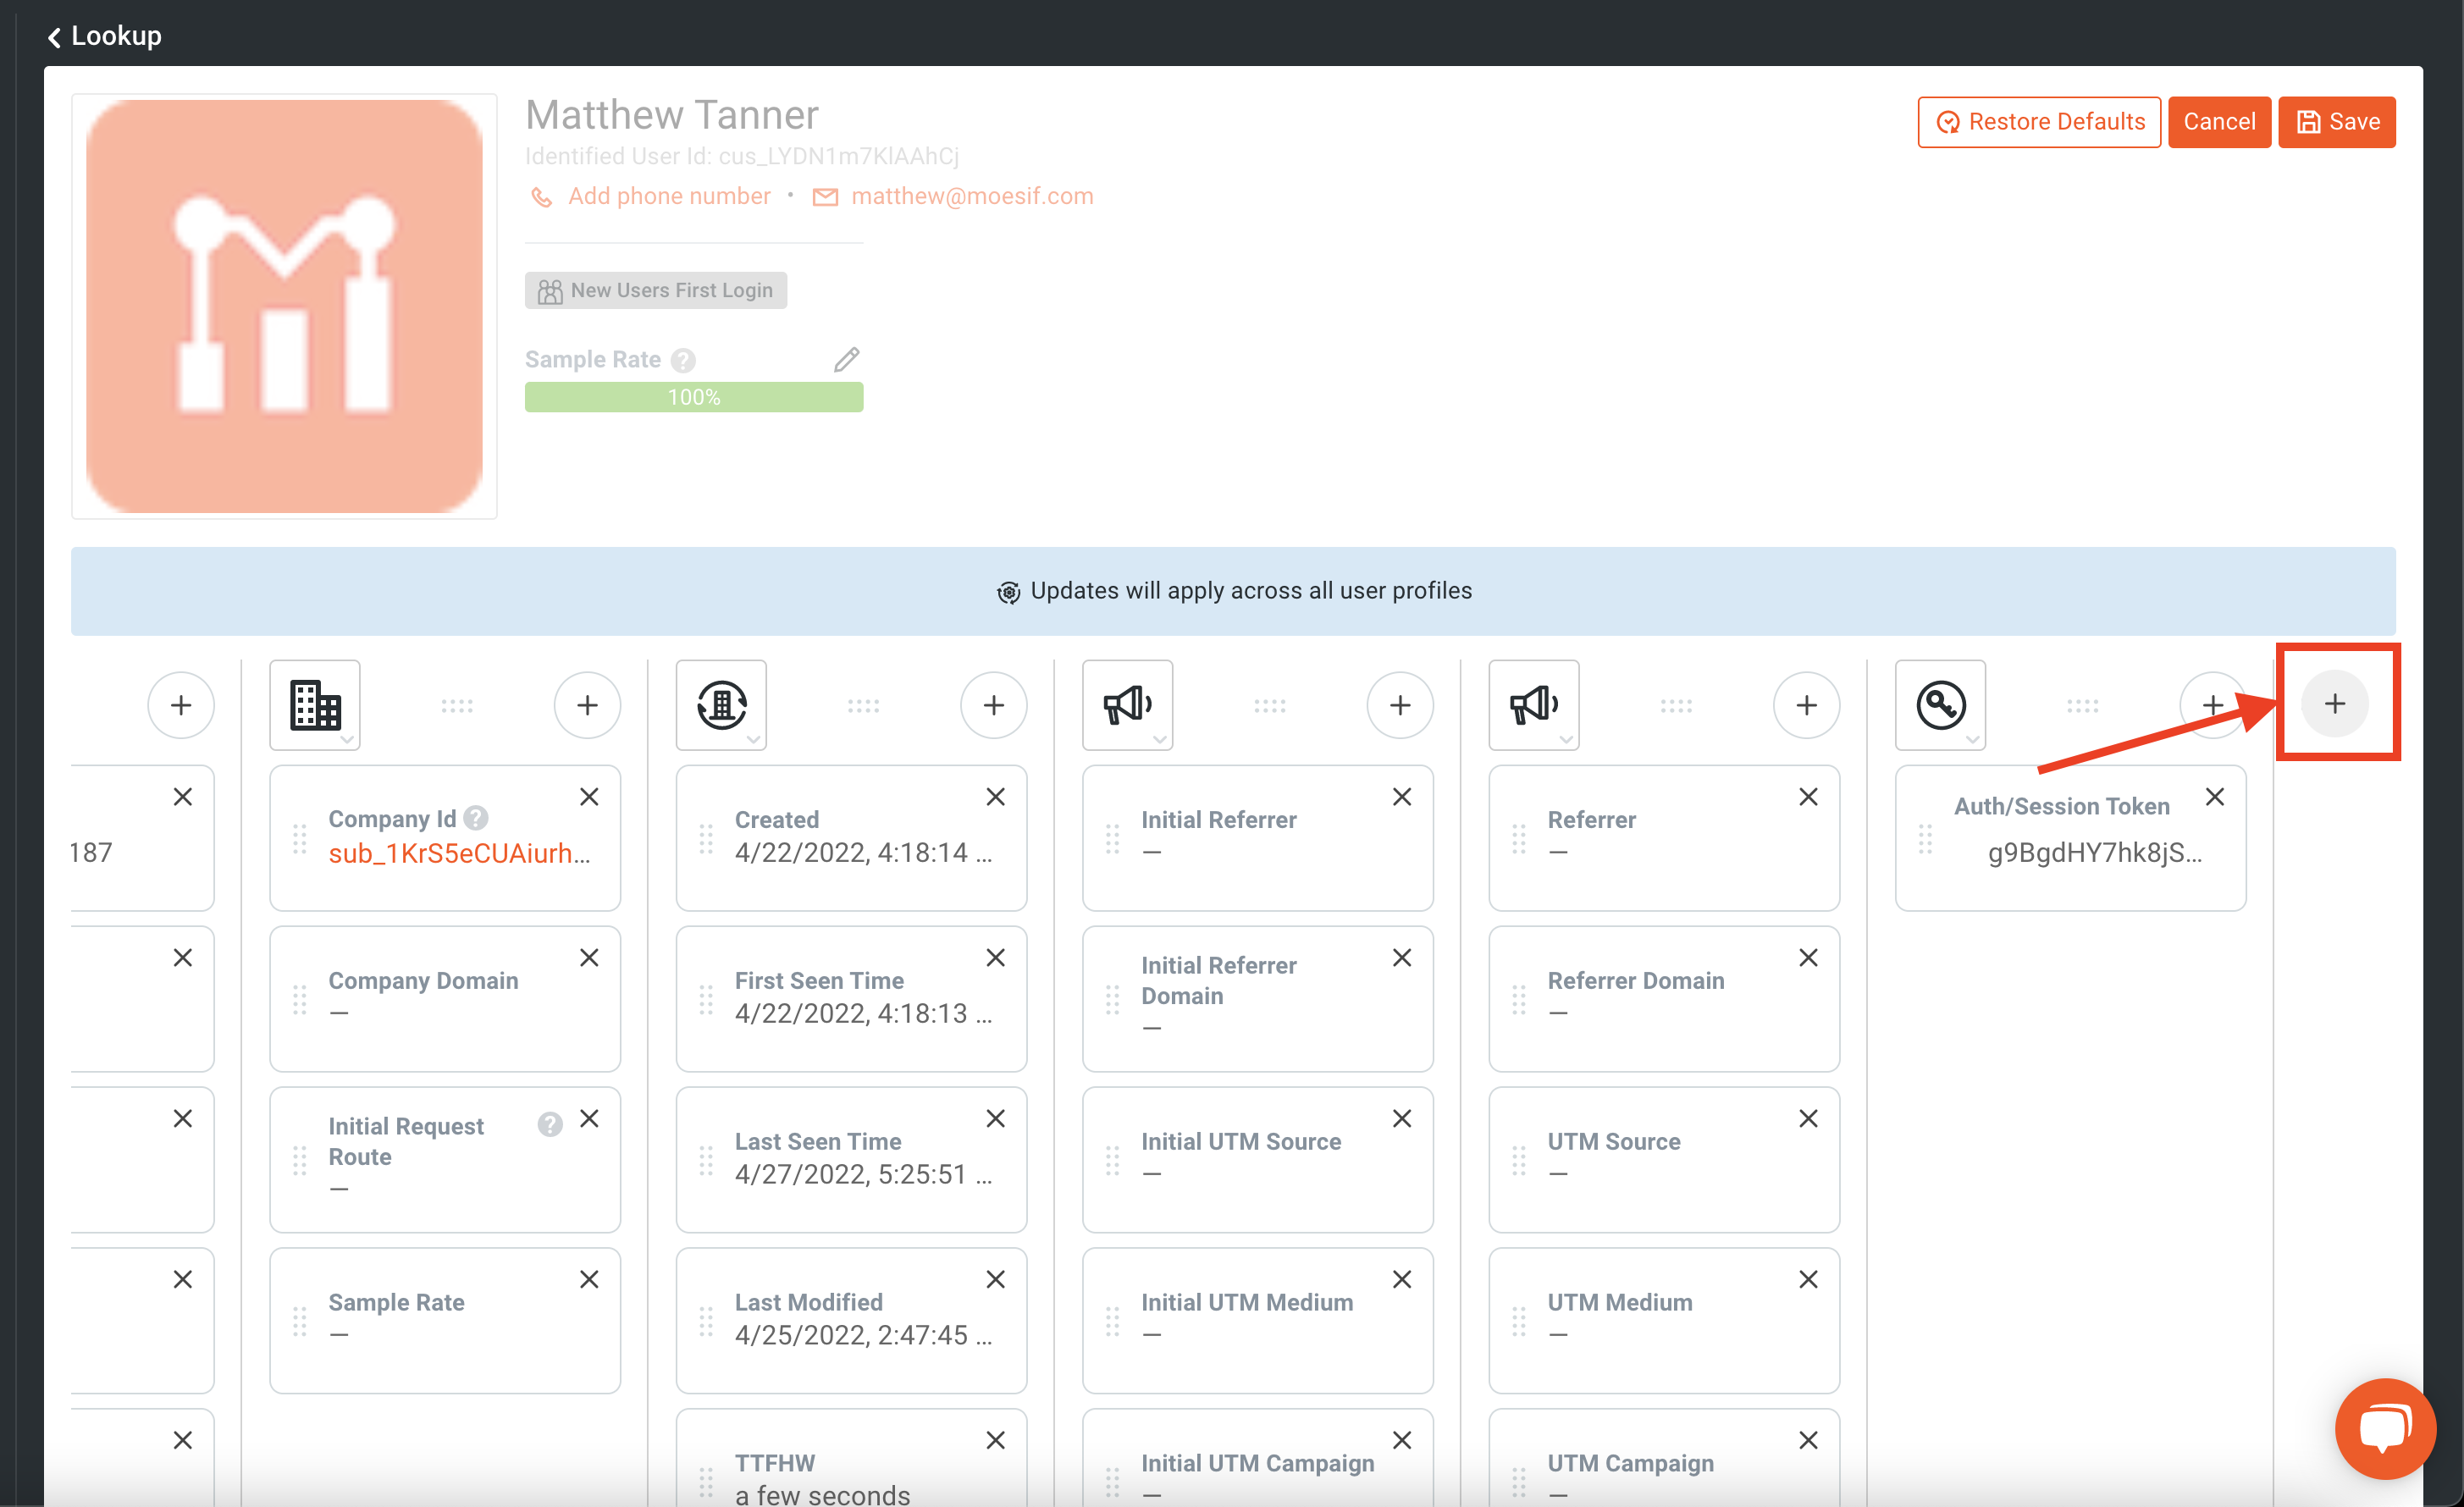
You may need to scroll to the right to see it depending on your resolution and screen size to see the + button.
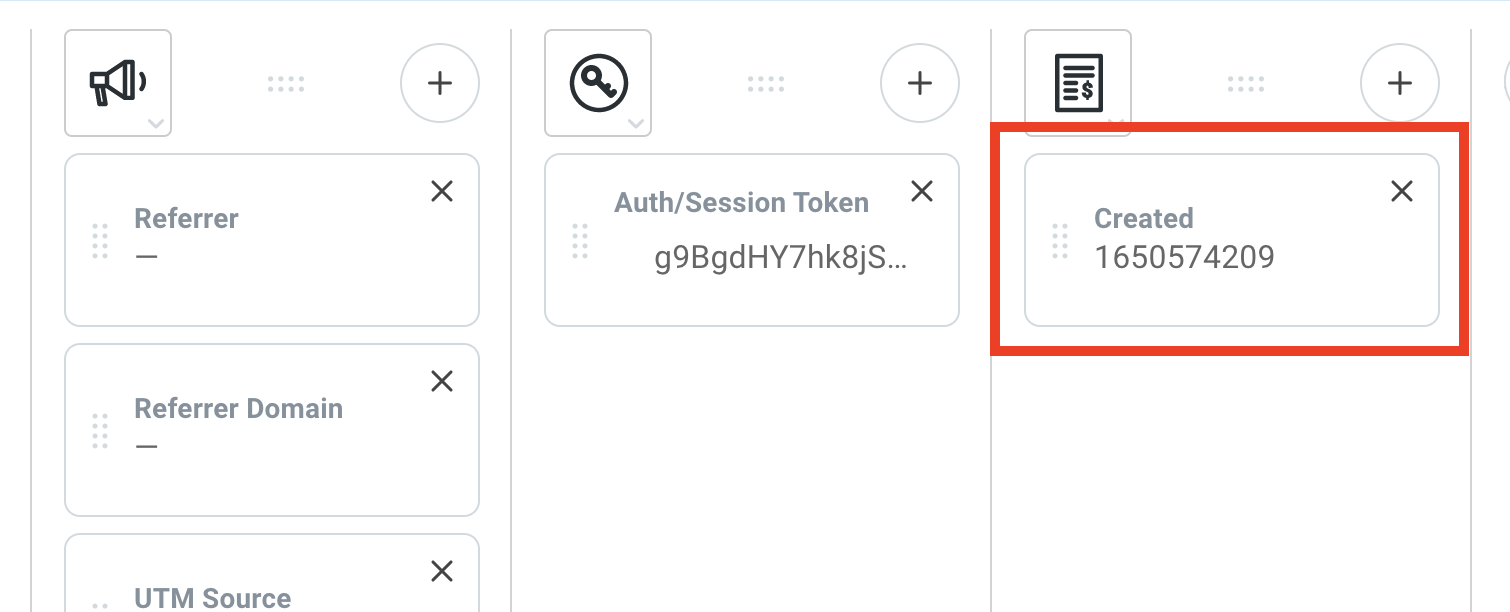
You will then drill down to Metadata > stripe > customer > created and use this field in the new row. I’ve also changed the column image to one more fitting. You can customize this by clicking on the image and selecting whichever one fits best.
You can also add other fields, but for right now just this single field is enough to tell us that Moesif is correctly receiving data from Stripe.
If you don’t see the Stripe metadata entry as an available field, wait a few minutes. If after a few minutes the Stripe metadata isnt present, ensure that your Stripe configuration is correct in Moesif. After confirming or editing it, try creating a new user and sending a request again to confirm that the integration is working.
At this point, we now have confirmed that our API call, proxied through AWS API Gateway, is working and stamped with the correct user (API Key ID) and company (Stripe Subscription ID) details in Moesif. We also confirmed that Stripe is sending data back to Moesif which is correctly being mapped to the corresponding user profile, confirmed through the Stripe metadata in Moesif.
7 - Create the frontend
Next, we want to add a simple little frontend so we don’t need to call for our API key through Postman. We will make a quick little registration form that will then return an API key for our newly registered user to use.
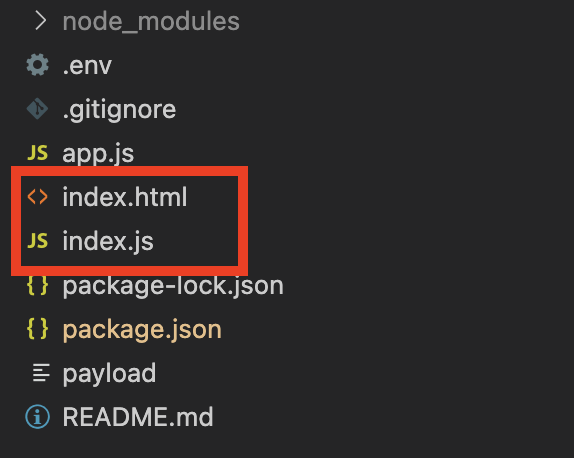
Add your frontend files to the app
In the root directory of the application, we will add two files. We will add both an index.html and an index.js.
Add in your route to serve the static html files
In the app.js file, we will add in a route to serve the static HTML files. Underneath our code for the /register endpoint, we will add another endpoint. Add the following code:
pp.get("/", function (_req, res) {
 res.sendFile(path.join(__dirname, "index.html"));
 res.sendFile(path.join(__dirname, "index.js"));
});
This code will now load the website (once we have the code plugged in) when you navigate to http://localhost:5000/ .
Code the frontend form and logic
Finally, let’s add the code for our frontend HTML and JavaScript functionality. In the index.html file, we will add markup that looks like this:
<!DOCTYPE html>
<html lang="en">
 <head>
   <meta charset="utf-8" />
   <meta name="viewport" content="width=device-width, initial-scale=1" />
   <meta name="theme-color" content="#000000" />
   <meta
     name="description"
     content="Moesif Embedded Dashboard example"
   />
   <title>None React App Example</title>
 </head>
 <body>
   <noscript>You need to enable JavaScript to run this app.</noscript>
   <h1>
     Moesif Monetization Example
   </h1>
   <div id="form-input">
     email: <input id="email-input" placeholder="email" />
     first name: <input id="firstname-input" placeholder="first name" />
     last name: <input id="lastname-input" placeholder="last name" />
     <button onClick="submitRegistration()">Register</button>
   </div>
   <div id="apikey-output"></div>
   <p id="error-message"></p>
   <script src="index.js"></script>
 </body>
</html>
his markup will display a form which allows users to input an email, first name, and last name. It also has a Register button that will call the JavaScript function for submitRegistration(). That function will be in our index.js JavaScript file.
The index.js file will look like this:
async function submitRegistration() {
  const email = document.getElementById("email-input").value;
  const firstname = document.getElementById("firstname-input").value;
  const lastname = document.getElementById("lastname-input").value;
  const errorElement = document.getElementById("error-message");
  const apikey = document.getElementById("apikey-output");

  var body = { email, firstname, lastname };
  console.log(body);
  var response = await fetch('http://localhost:5000/register', {
    method: 'post',
    body: JSON.stringify(body),
    headers: {'Content-Type': 'application/json'}
  });
  var data = await response.json();
  console.log(data);
  apikey.innerHTML = data.apikey;
}
This function will take the input from the form, post it to our /register endpoint, and display the returned API key on the screen.
8 - Test the frontend
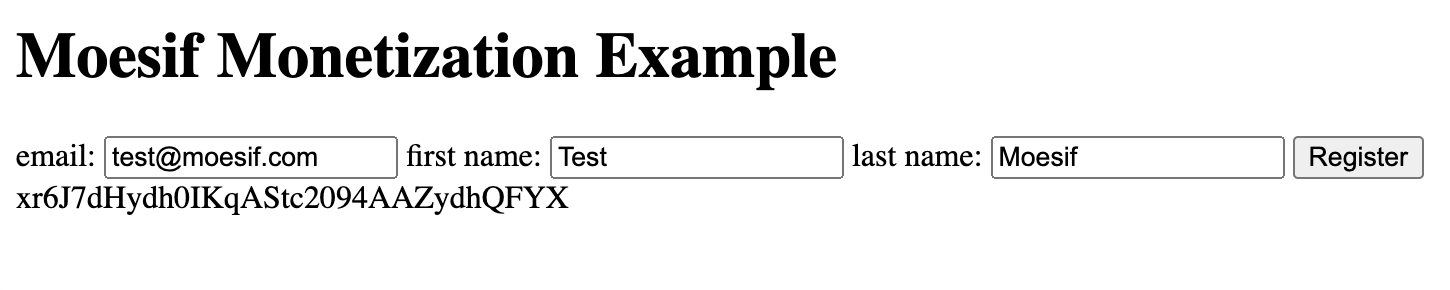
To test the frontend, save your code changes and restart the server. Then, in a browser, navigate to http://localhost:5000/. You will then see the form show up.

Fill out the form fields and submit
Now that the form is loaded, fill in the fields and click the Register button. This will take the info, post it to our /register endpoint, and give us the generated API key.
It is suggested that you use a different email than you used earlier when you created an API key directly through the /register endpoint.
Confirm the API key is returned
Once the submit button is clicked, after a few seconds, the API key should be returned back to the UI.
9 - Send a request to your monetized API
We will once again want to make sure that everything is working with our UI, through to our backend systems. For this, simply repeat the steps from Step 6 to confirm that the user and company IDs are populated correctly and that the Stripe metadata is returned for this user and the new API key.
10 - Confirm all the pieces are working correctly
Although this is optional, this step may help with troubleshooting any issues that may have came from our previous steps. Here are a few things to check to make sure that all is working as it should. After creating a new user through the UI and using the generated API key to place a call to your API, confirm the following:
- In Stripe
- Confirm that a customer has been created in Stripe with the details you entered into the UI
- Confirm that the customer has been subscribed to the correct product and price
- Confirm that the generated AWS API Key ID is listed in the Customer Metadata
- In AWS API Gateway
- The API Key has been created and attached to a Usage Plan
- In Moesif
- Your API call was recorded in Moesif in the Live Event Log
- Your API call has the AWS API Gateway API Key ID and Stripe Subscription ID in the User and Company fields in Moesif, respectively.
- Confirm that the Stripe metadata is populated in Moesif
11 - Check Stripe for usage
Lastly, After a few hours, it’s best to go into Stripe to confirm that usage is being added to a users subscription. Be sure that you’ve sent a few requests through in order to make sure you have some data that should be sent to Stripe.
it may take a few hours for usage to make its way from Moesif to Stripe. If data still isn’t in Moesif after a few hours, ensure you’ve followed all the steps outlined within this guide. This includes making sure that your user and company ID’s from Moesif are correctly mapped to the corresponding keys in Stripe.
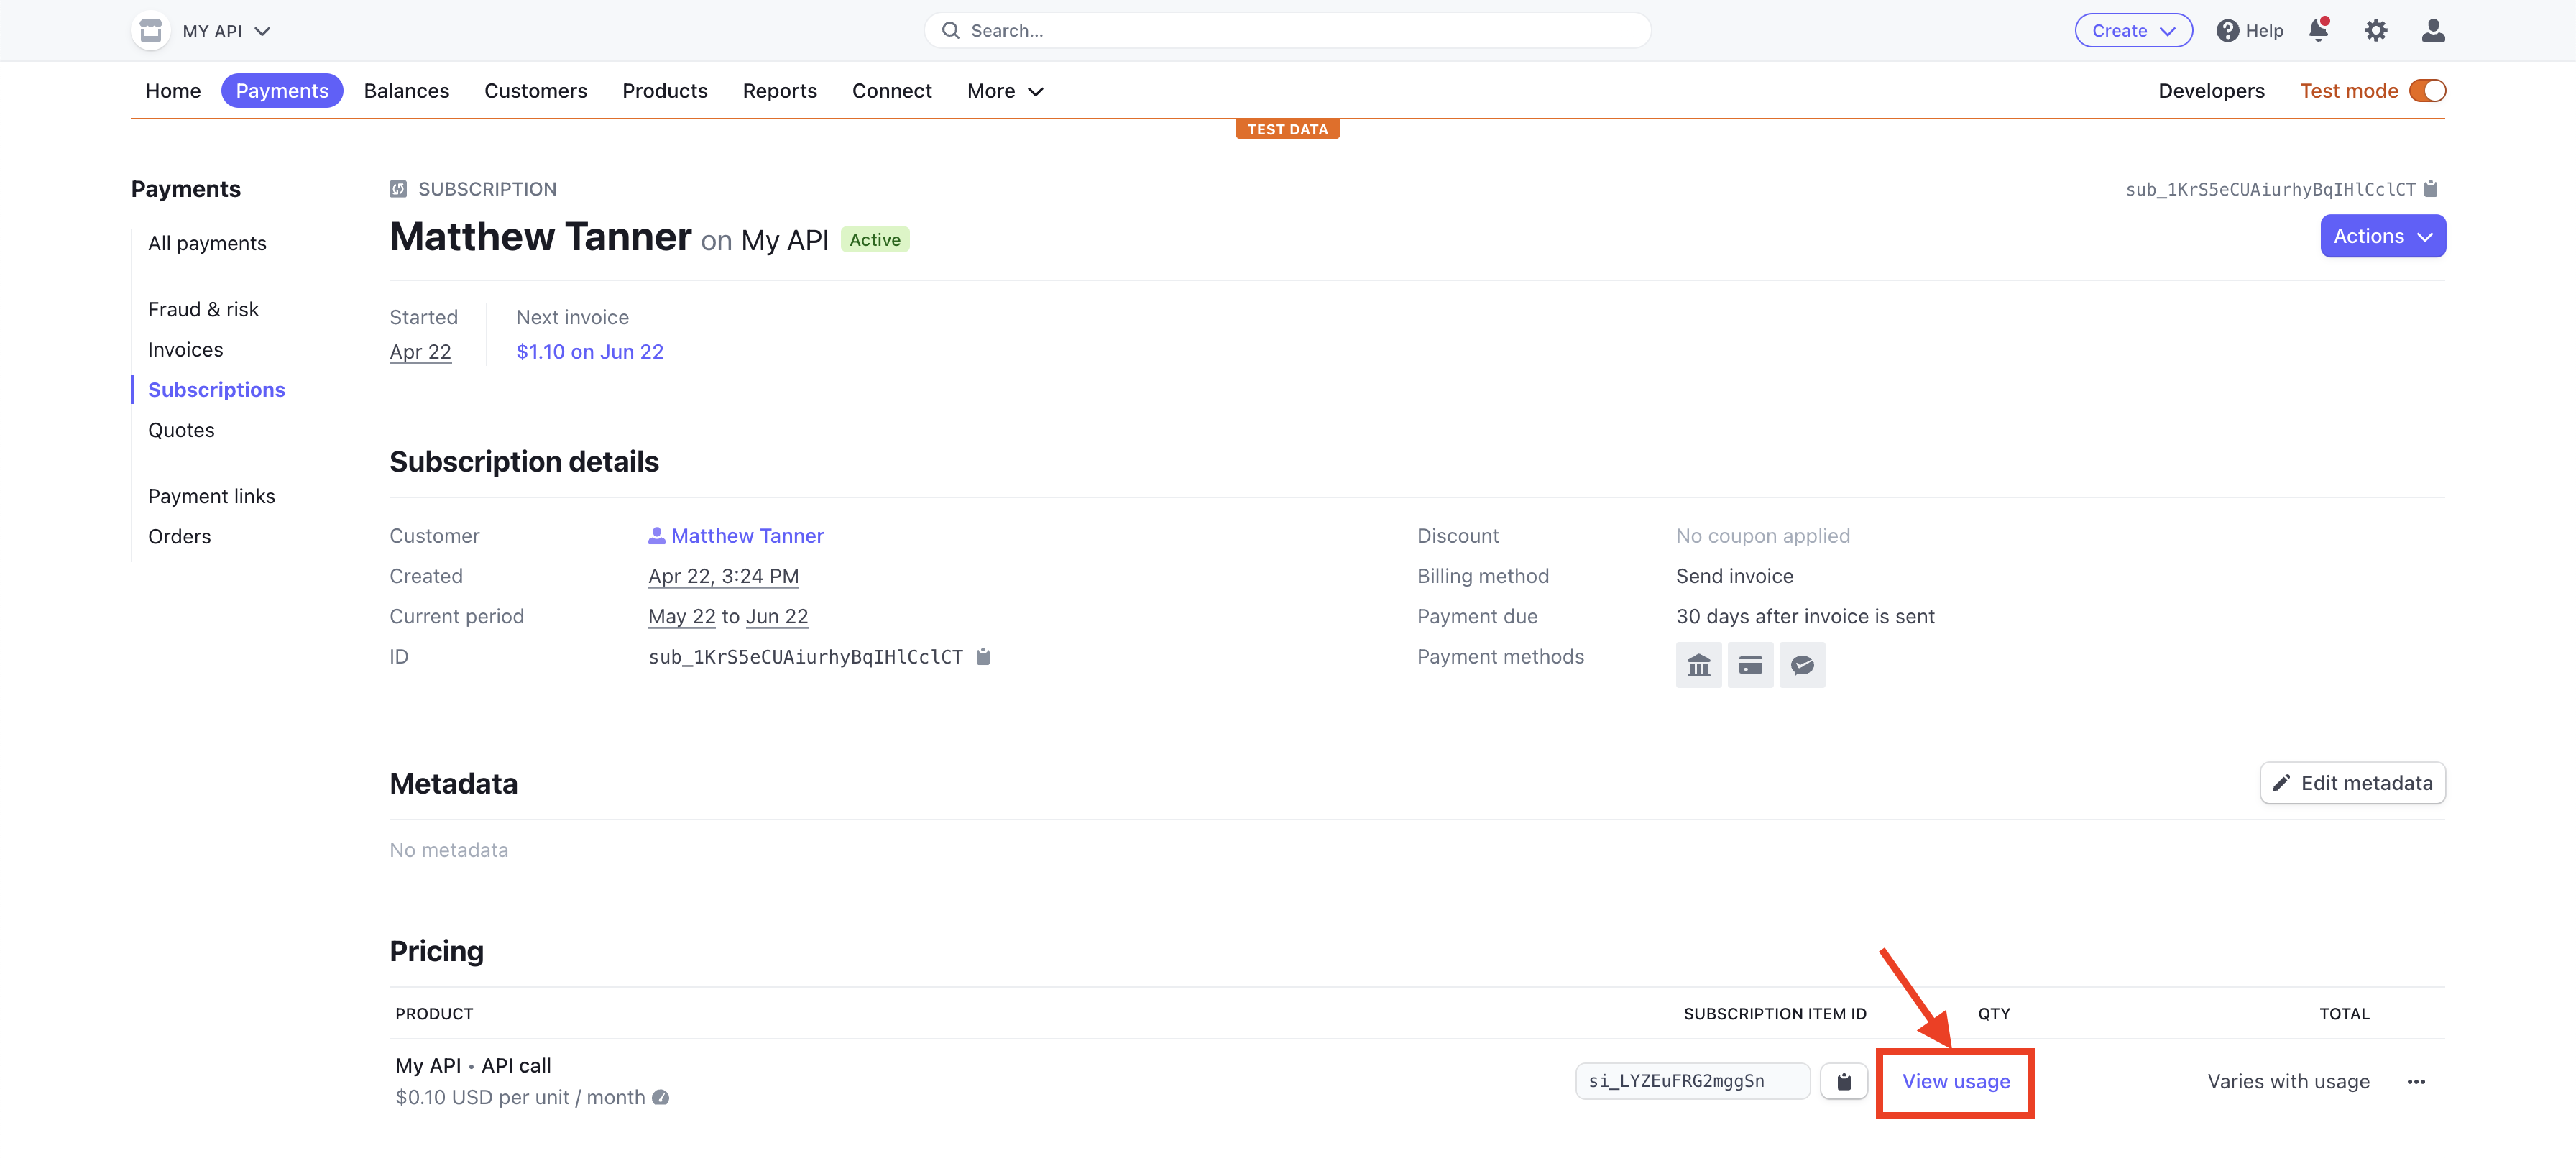
To check the usage, in Stripe you’ll want to navigate to the Customers screen and select the customer that you made the API call with. Once selected, you should see some active subscriptions for the users that you’ve registered through the /register endpoint. The one we created earlier is called My API. Click on the subscription entry.
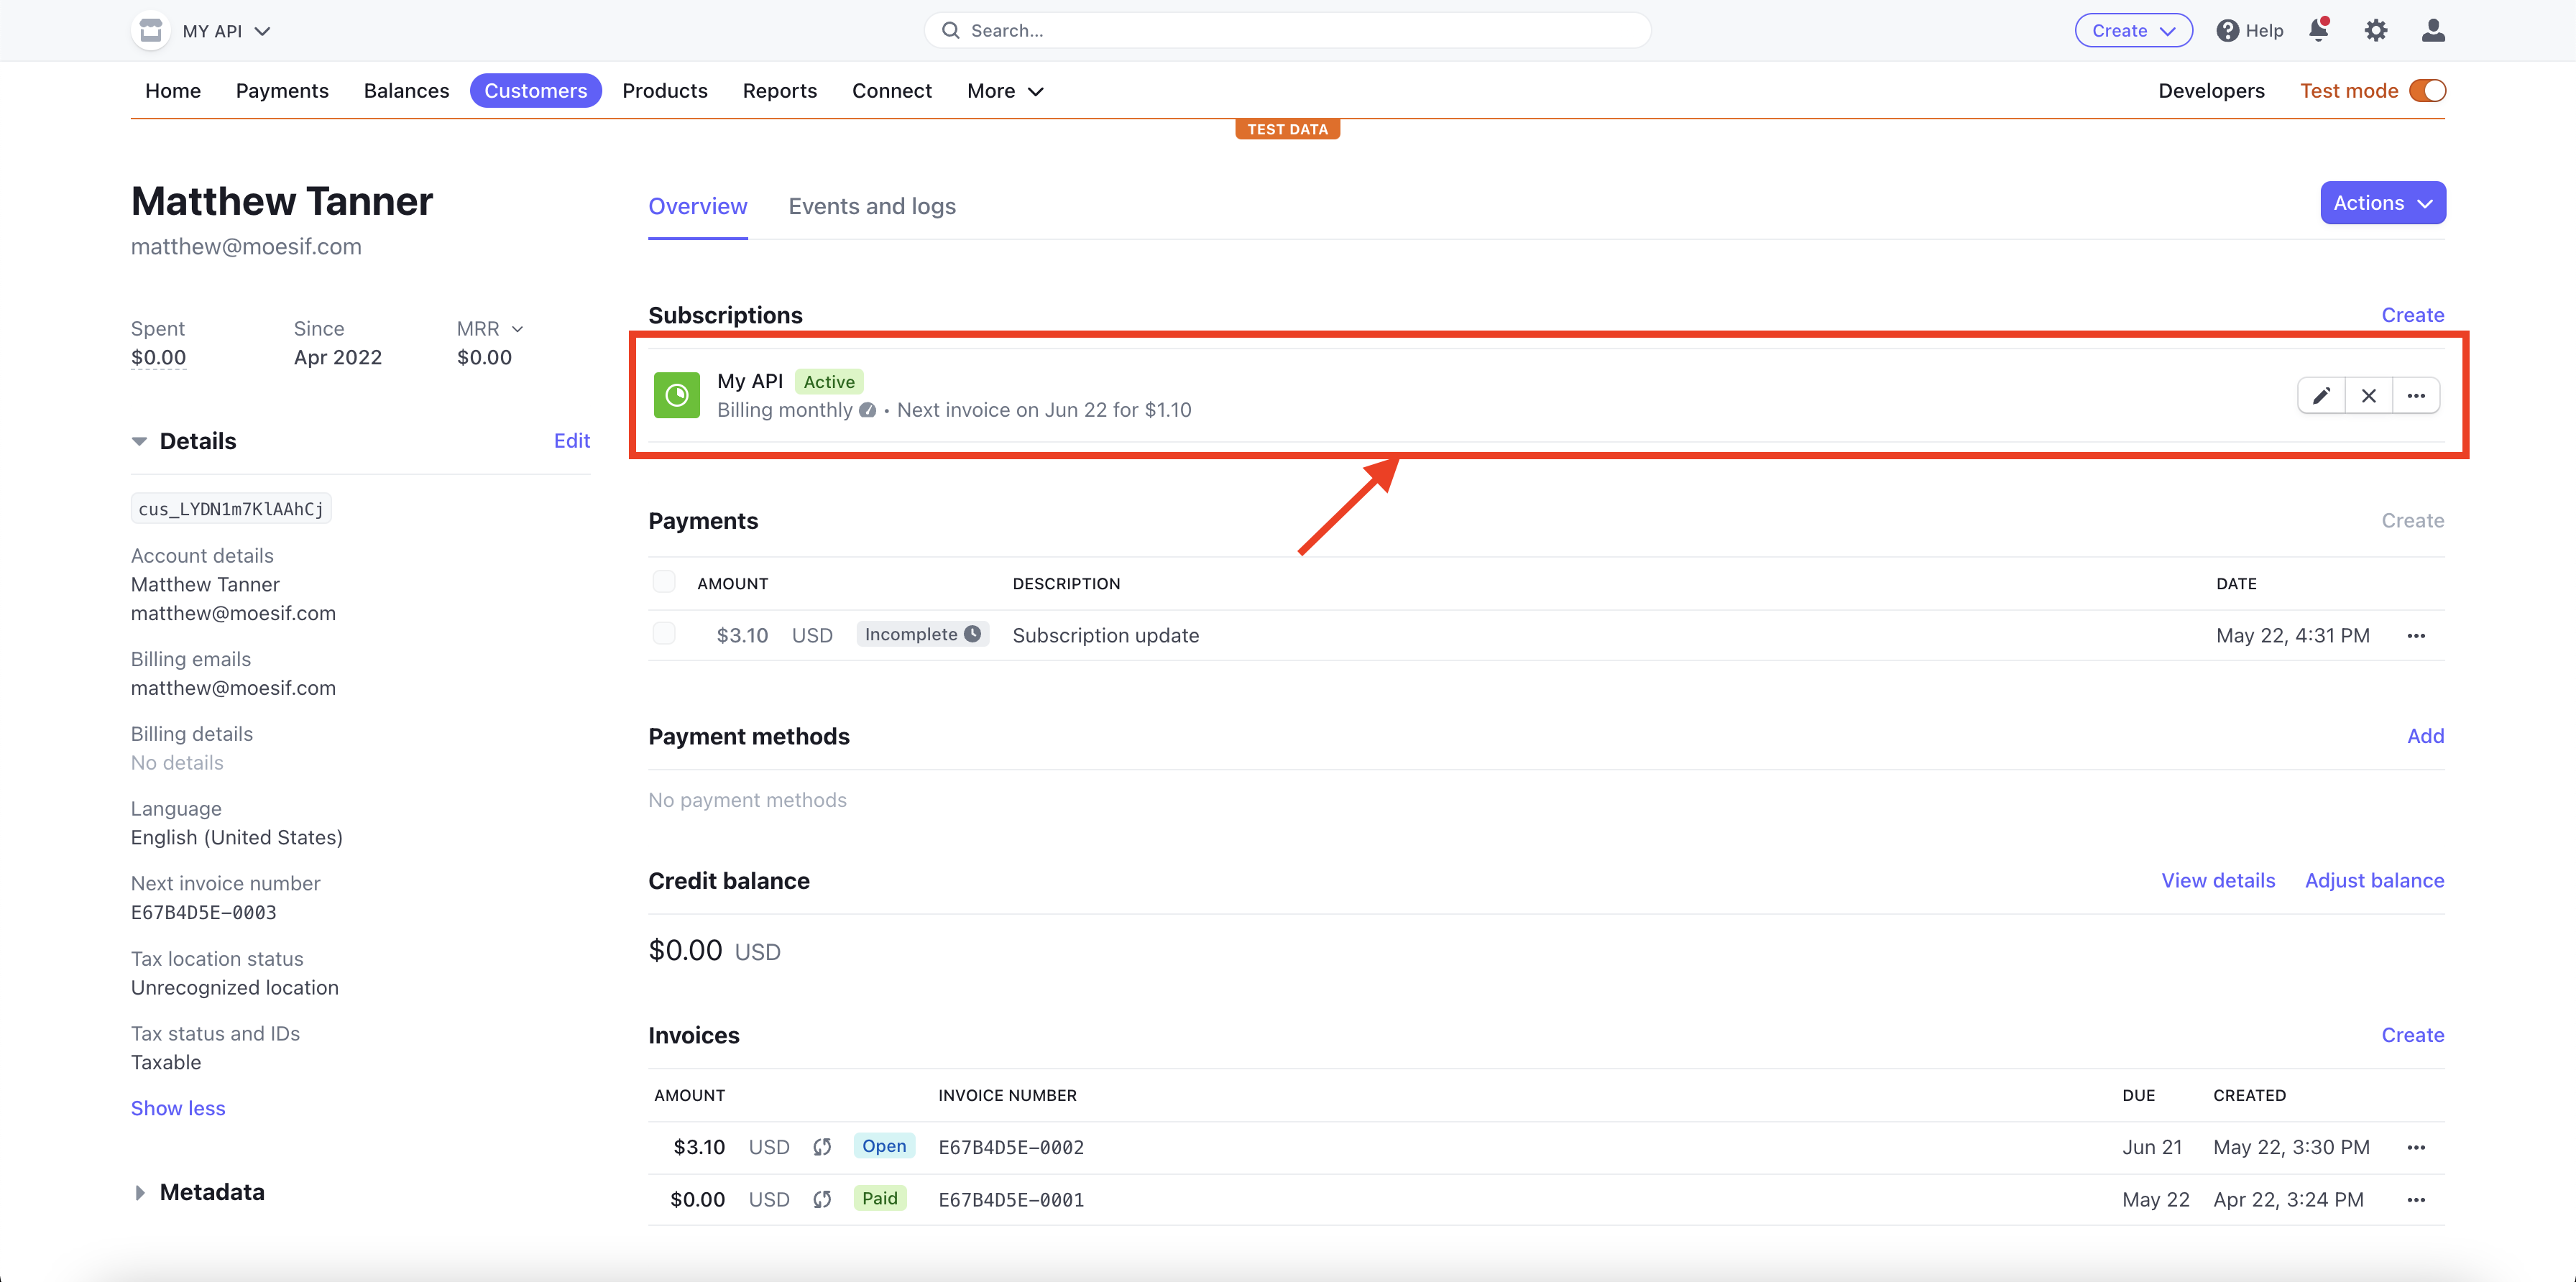
On the next screen, click on View Usage beside the price entry.
A modal should now pop up showing you the usage for the API that has been reported to Stripe from Moesif.
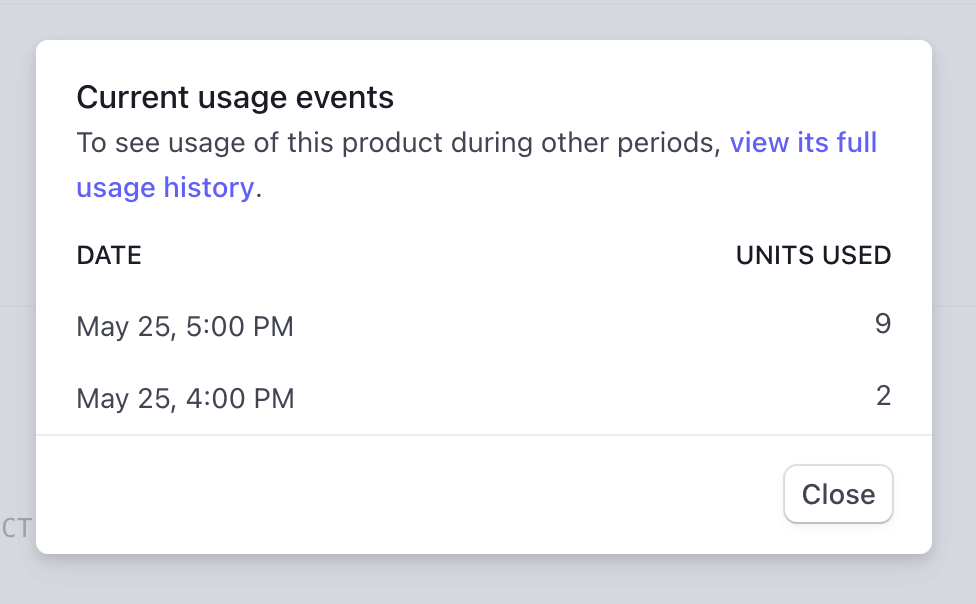
Remember, it may take up to an hour before usage is reported to Stripe. If you data isn’t there yet, check back a bit later for the updates.
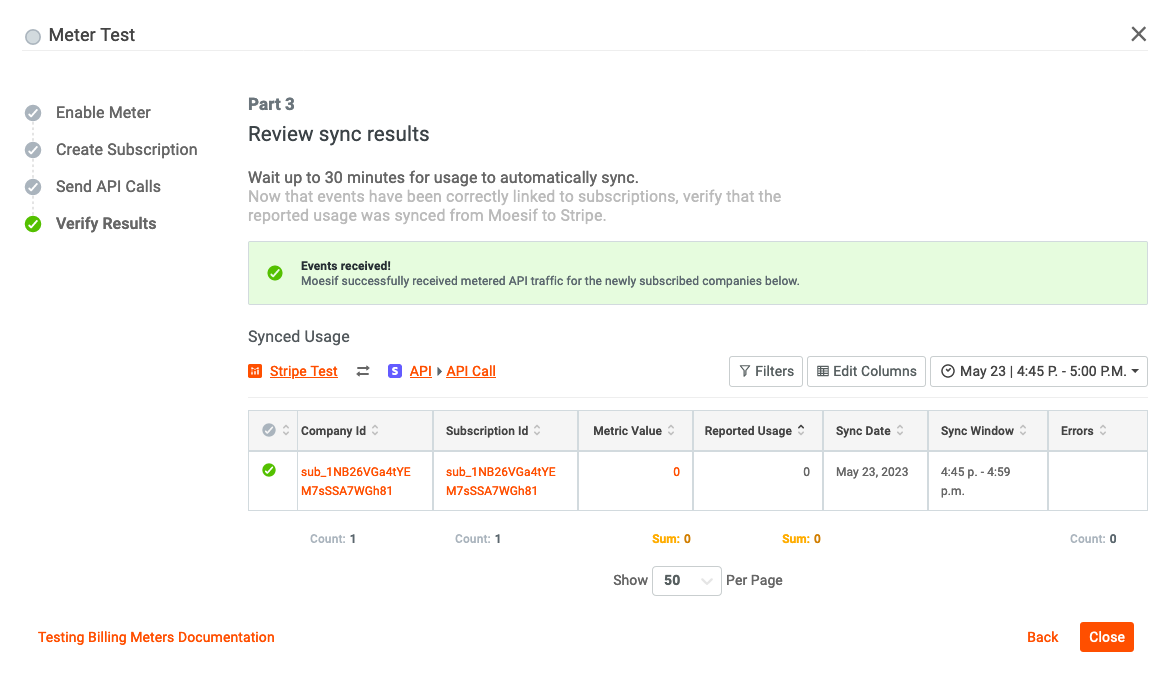
12 - Determining If the Billing Meter is Working Correctly
Testing the created Billing Meter is easy with out Test Meter function. Navigate to your created Billing Meter from the left side navigation pane and selecting your Stripe Test billing meter. Select Test Meter on the top right.
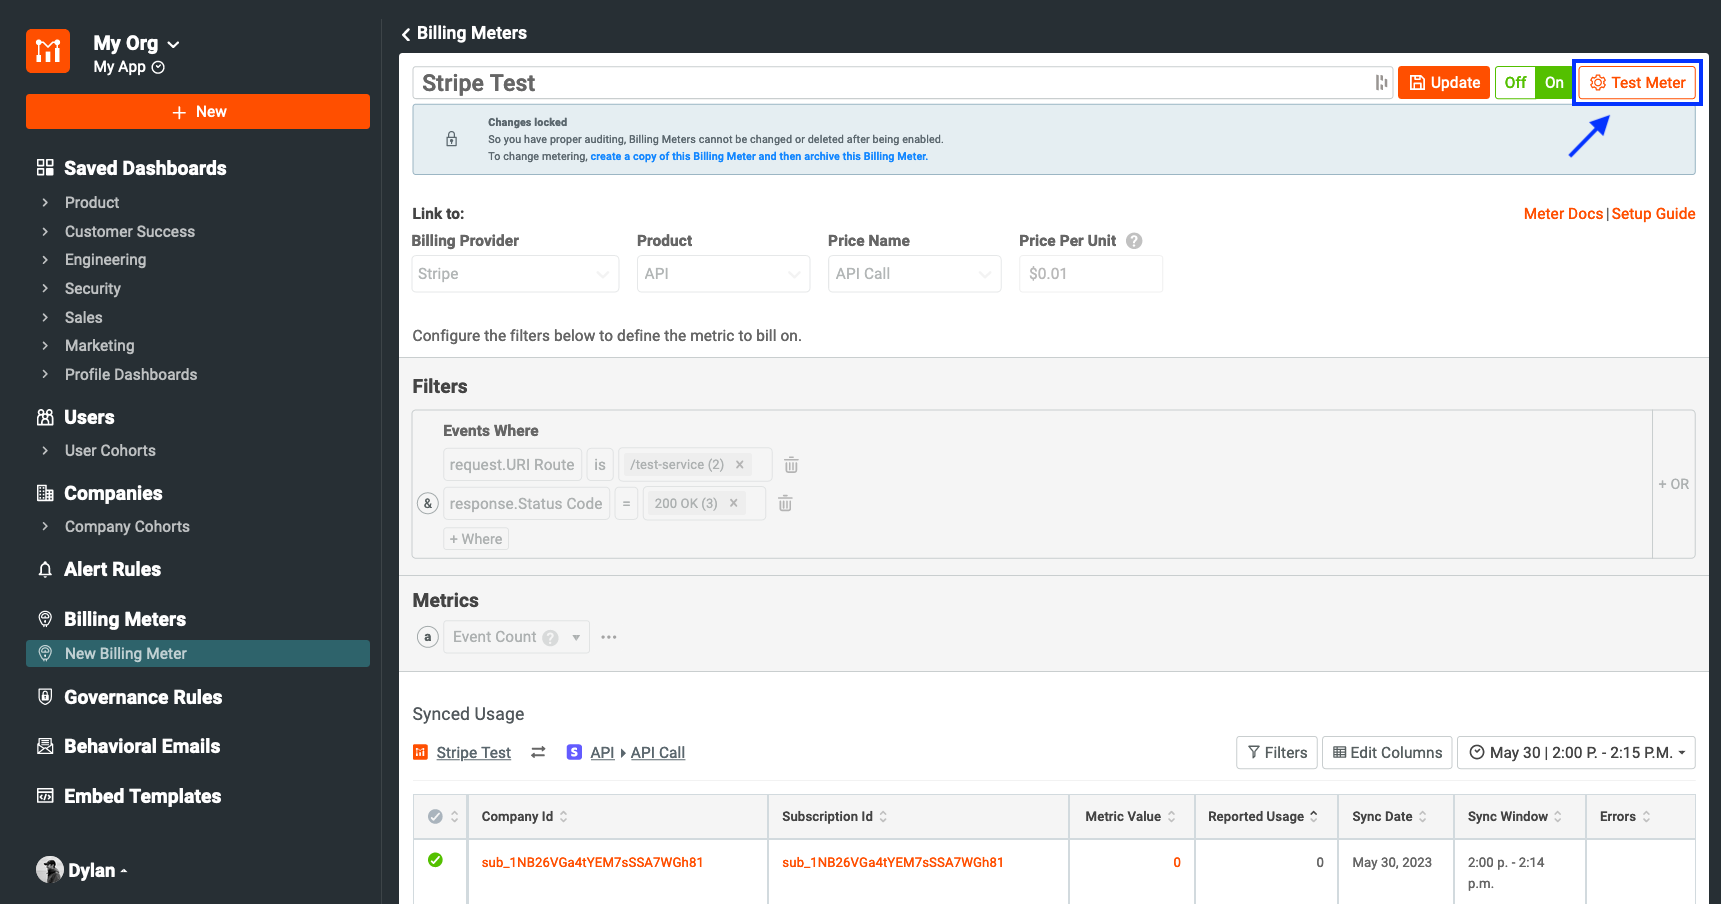
We will first confirm the meter that you are attempting to test. Click the Next button at the bottom of the modal.

Moesif will wait for Subscriptions to created within Stripe and those subscriptions to be associated within Moesif itself. This page will update automatically, no need to refresh.

Moesif will then wait for an API call to our any endpoint associated with our billing meter using our the JWT that has been created for us.
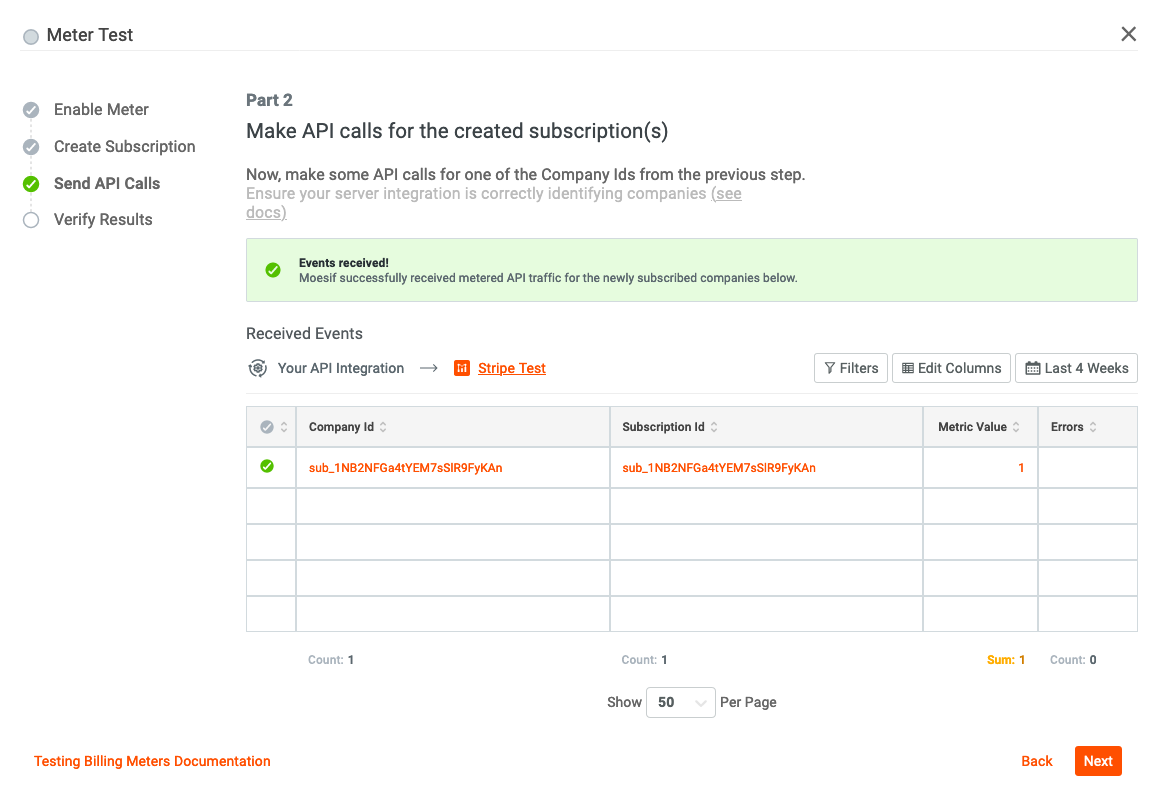
Finally, Moesif will sync all usage data to Stripe every 15 minutes. This step may take a few minutes depending on when the API call was initiated but will update on the given interval.
Wrapping up
Monetization has always been a tough hurdle to get past. Many custom solutions offered flexibility but at a very high engineering and support cost. With Moesif, API monetization is possible in an extremely minimal amount of time. As demonstrated in this article, With a little bit of configuration and minimal amount of code we can create a production-ready, post-paid monetization scheme in minimal time.


Related Articles

API Strategy
Leveraging AI For a Better API Strategy
Learn how to leverage AI to build and fortify your API strategy. Improve design, governance, documentation, and align APIs with business outcomes.
API Strategy
The 5 Best Mixpanel Alternatives of 2025
Learn about the best Mixpanel alternatives to determine the right analytics solution for your use case.

API Development
How to Leverage Moesif Effectively for API Observability
Effectively leverage Moesif for API observability through best practices for integration, event enrichment, custom actions, and engineering workflow integrat...
API Strategy
How to Build an Internal Chargeback Model for Your API and AI Usage Using Moesif
Use Moesif to implement internal chargebacks and enable precise API and AI cost attribution for better transparency and resource optimization.
