Creating and Using Embedded Templates
If you’re looking to add a chart to a public-facing app or website or make a chart available to users who don’t have access to Moesif, embedded templates are the way to do this. Embedded templates allow users to view dynamic charts that are easily embedded into an application’s UI.
In this walk-through, we will create a very simple embedded template example which uses a user ID to display a dynamic chart.
Generally, we would have it so when a user logs in, their user ID would be supplied to retrieve their specific metrics. For this demonstration, we will put an input where they can supply any user ID they want to retrieve metrics for.
We will create a simple UI with HTML and JavaScript and a server which fetches our embedded data. Essentially, our UI will pass a User ID to our server endpoint. The server endpoint will then fetch our embedded template data and return it to our UI. Once the data is returned, our UI will display the data in an HTML iframe.
This simple guide should give you an idea of how to integrate an embedded template into your application.
Step 1: Creating Your Template
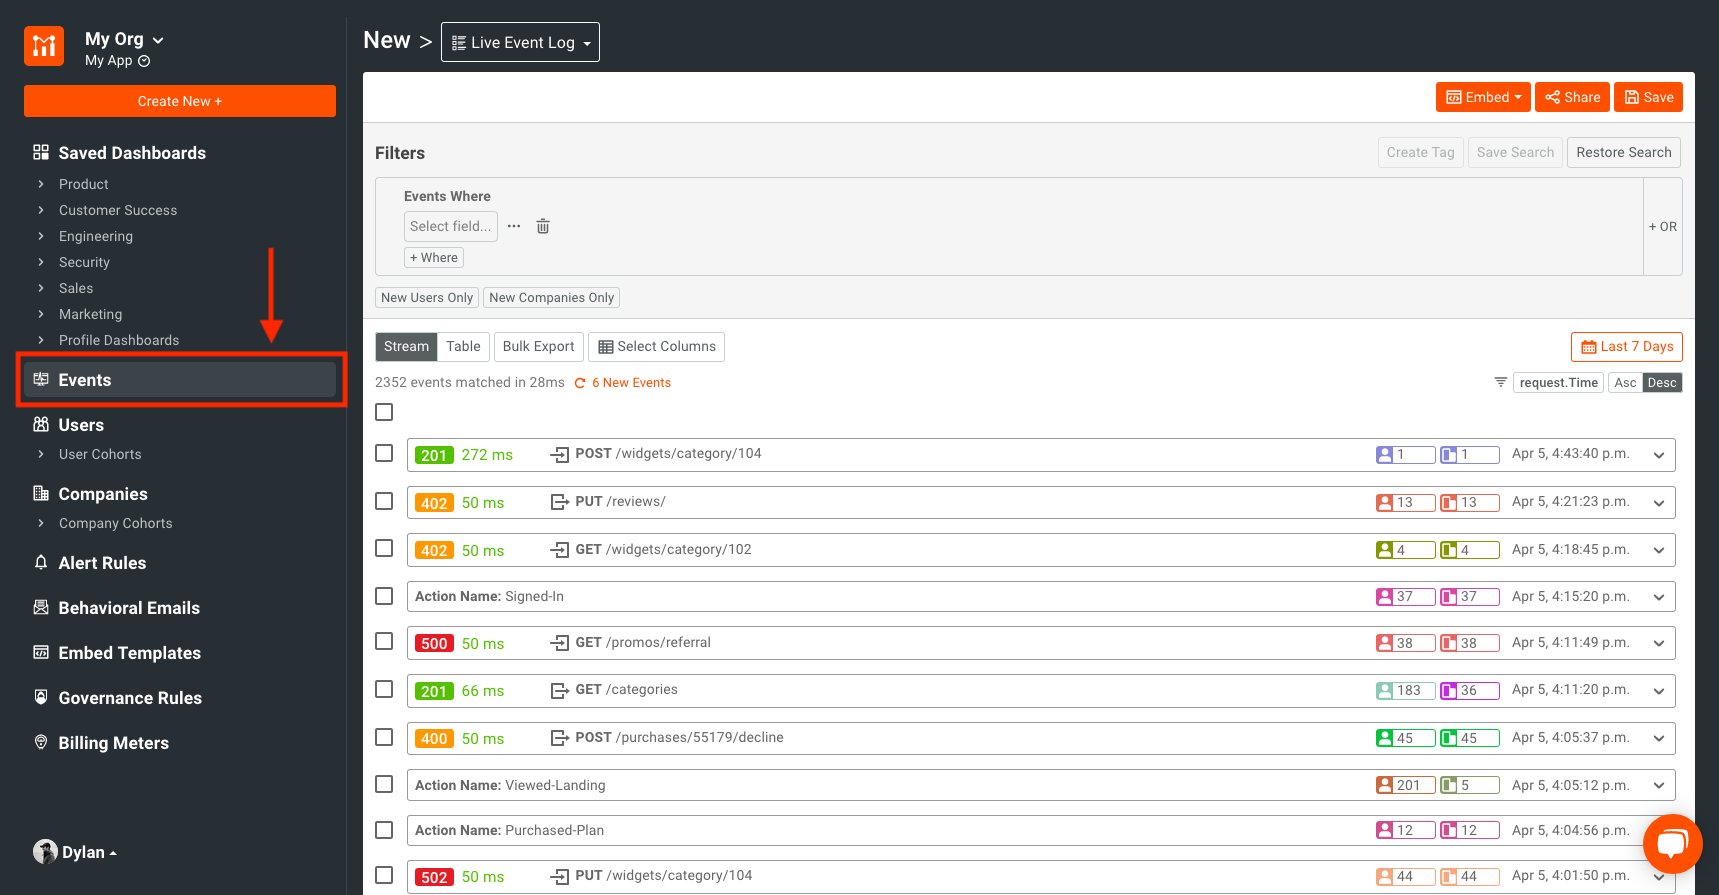
The first thing we will do is create our chart that we want to display in our embedded template. For this, navigate to the Events screen in Moesif.
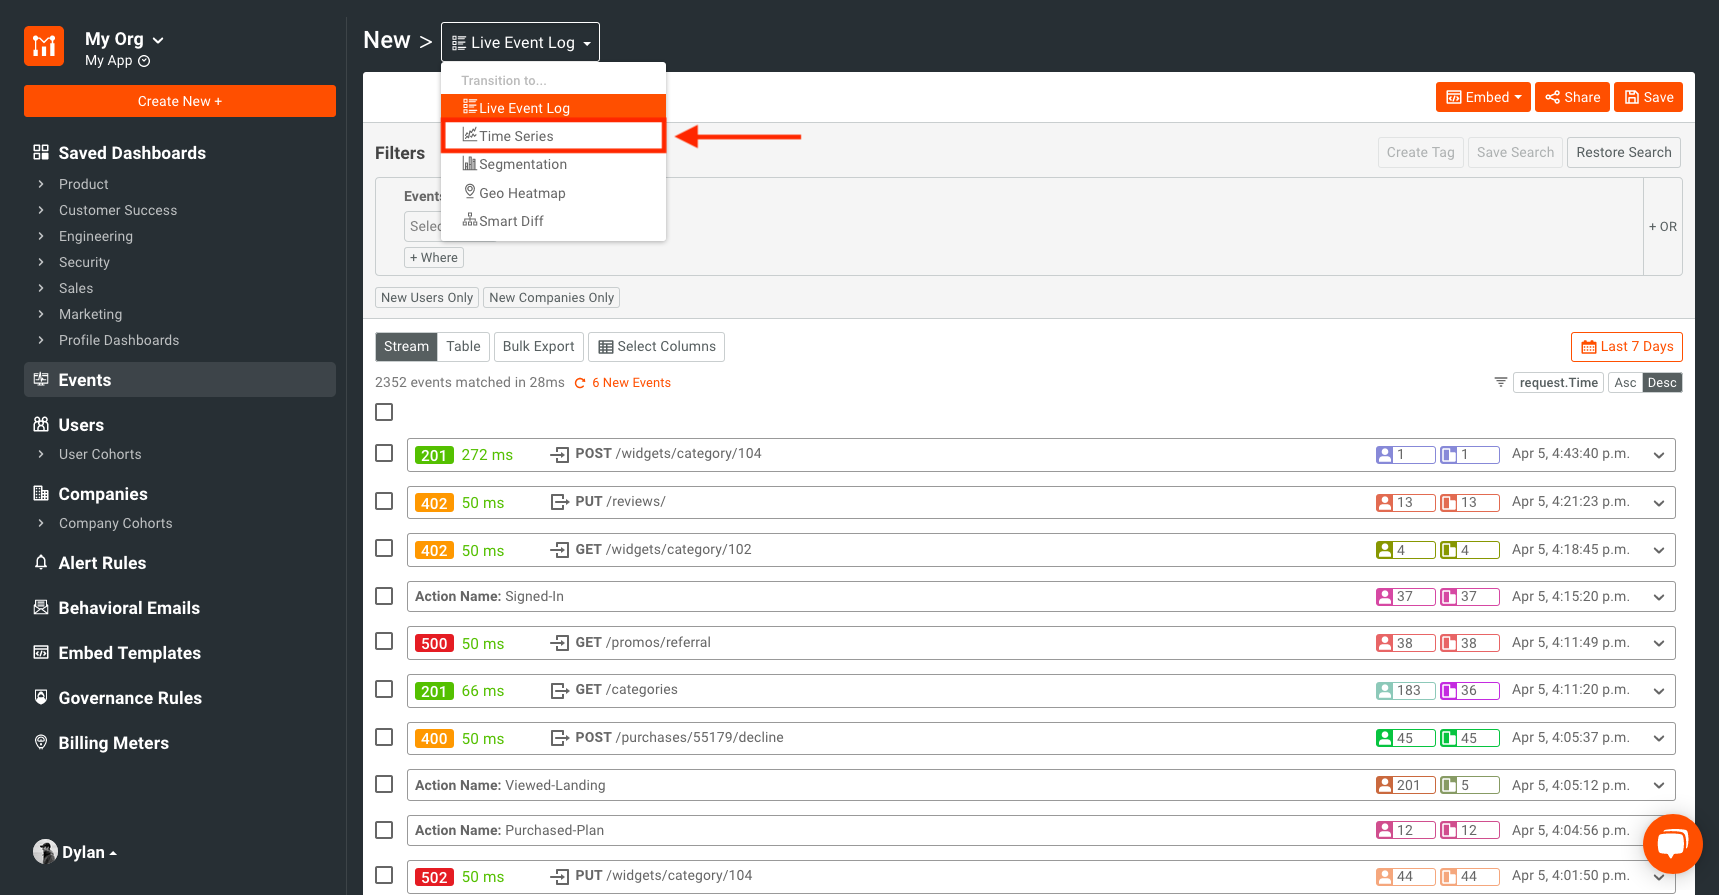
To create our chart, navigate to the New dropdown menu and select Time Series.
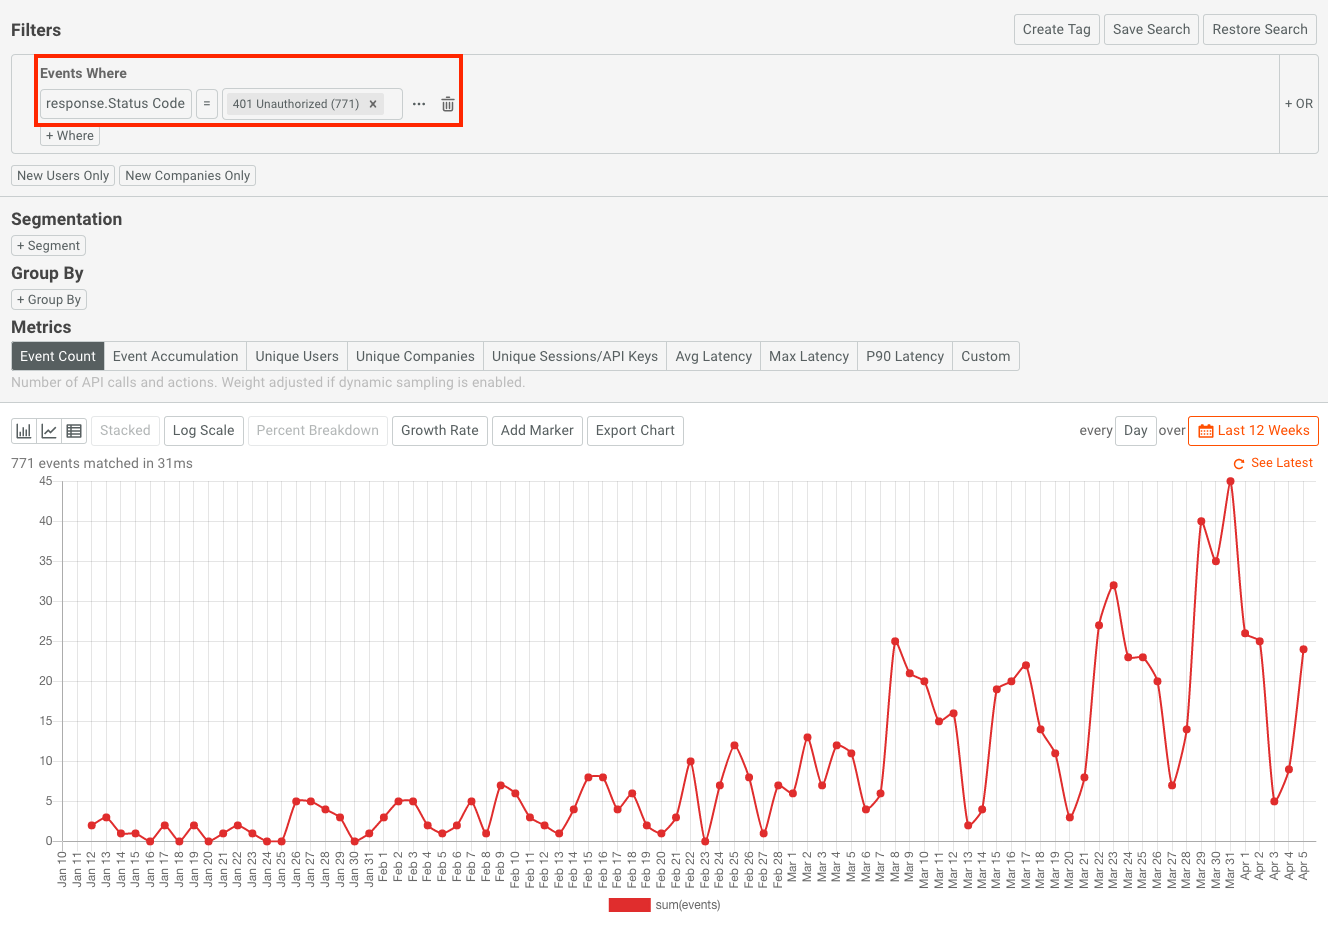
From here, we will display the occurrences of HTTP 401 Unauthorized responses in the last 12 weeks. We could show whatever metric makes sense for your situation. For our purposes, we will use this.
Our filter will look like this:
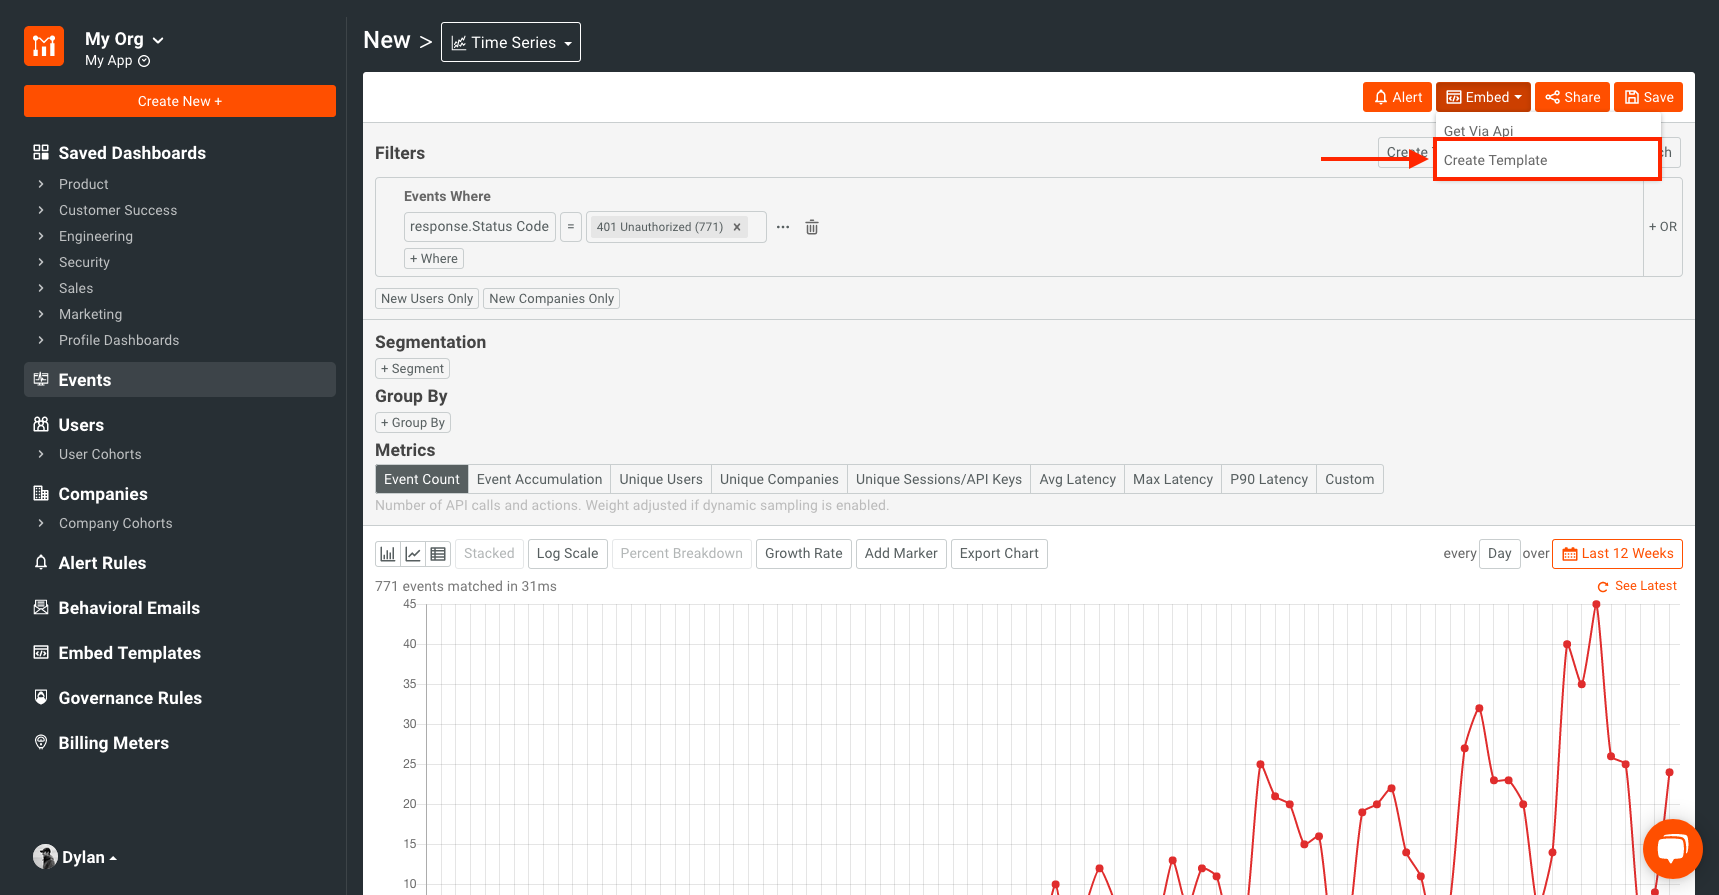
From here, we will create our embedded template. For this we will click on the Embed menu and select Create Template.
Now we will see a few options for displaying our chart. This modal will include a few options for sharing and embedding your template. These include:
- Private
- Add the chart to a dashboard that only you are able to see
- Team
- Add the chart to a dashboard that you and members of your organization are able to see
- Public Link
- Create a public link to securely share metrics with external parties or statically embed charts in an iFrame
- Embed Template
- Create a template to embed dynamic charts in customer-facing apps. Dynamic fields can be created to limit data access such as by the authenticated user
We will choose Embed Template.

Once we have chosen Embed Template, we have to choose at least 1 value that will be dynamic. This value will need to be supplied in our request to retrieve our embedded template data. Since I will be using a user ID to retrieve the data, I will click the button for + Dynamic User Id so that I can supply a user ID and retrieve a chart.
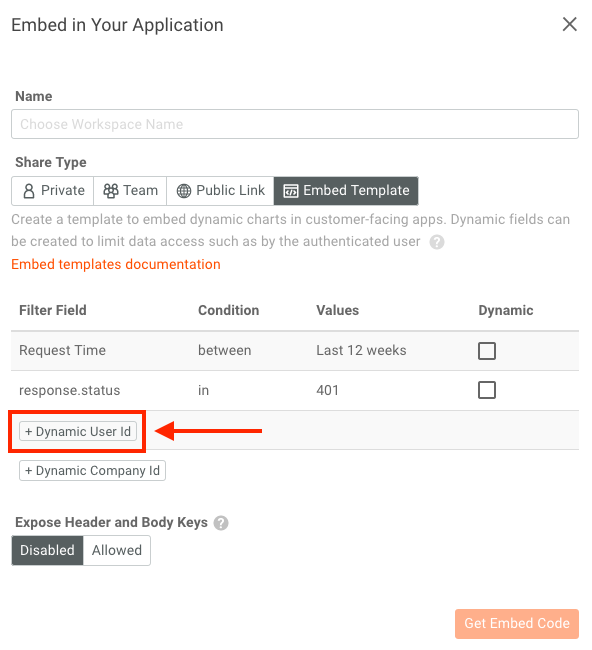
Once you click + Dynamic User Id, you’ll now see that a user_id filter field has been added to the list.
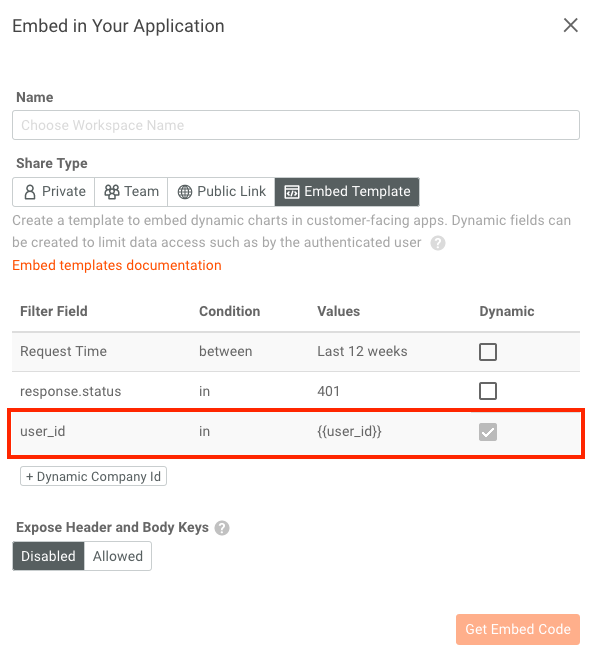
Now, when we retrieve our chart data we will have to also supply a user_id as a parameter. By doing this, we will only retrieve metrics for the user whose user ID has been supplied to the template.
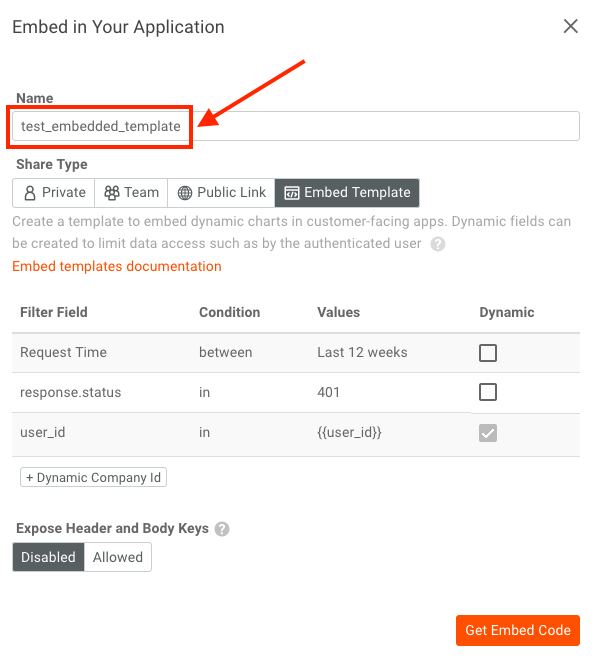
Before we actually generate the code to embed our template, we will need to name our workspace/template at the top of the modal window. I will name this one “test_embedded_template”.
The final step is to click Get Embed Code.
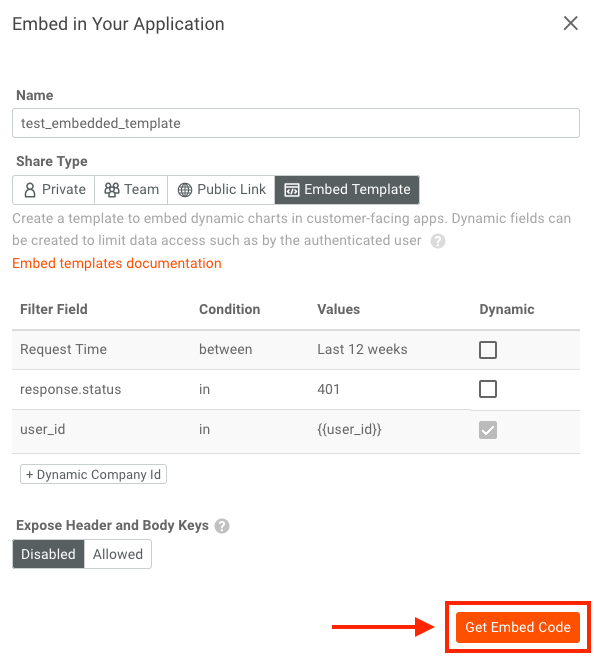
Once we click Get Embed Code, Moesif will generate a Workspace ID and an Access Token.
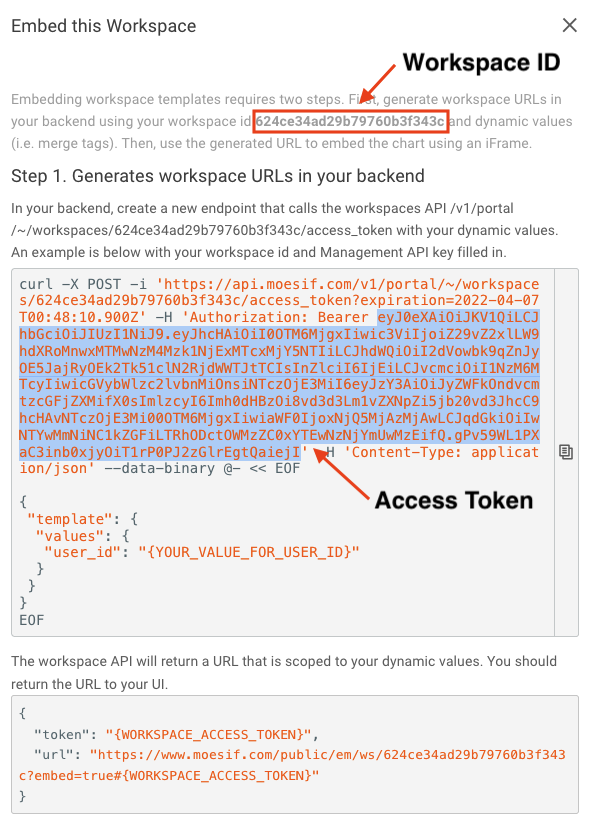
We will then need to create an endpoint on our own platform that we can call which will retrieve that info for the chart we want to display.
Step 2: Creating the Server
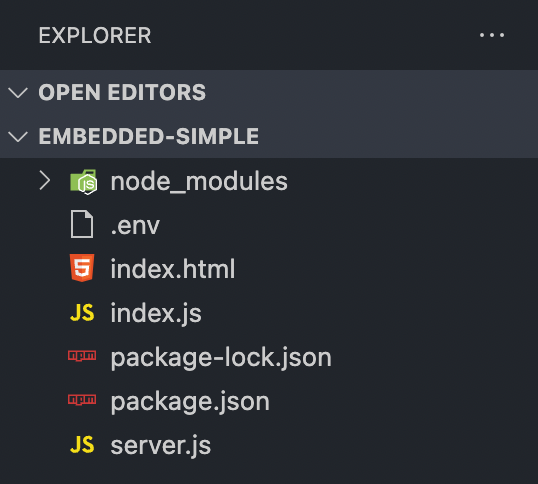
First I will create a folder named “Embedded-Simple” and open that folder in VS Code. In VS Code, or externally, you’ll want to run npm init in the root of your project folder. This will initialize the project and create a package.json file.
Next we’ll install our dependencies by using the following command:
npm install dotenv express node-fetch@2
Once the command is done running, you should see a node_modules folder in your root directory and our package.json file should look like this:
{
  "name": "embedded-simple",
  "version": "1.0.0",
  "description": "",
  "main": "server.js",
  "author": "",
  "license": "ISC",
  "dependencies": {
    "dotenv": "^16.0.0",
    "express": "^4.17.3",
    "node-fetch": "^2.6.7"
  },
  "scripts": {
    "test": "echo \"Error: no test specified\" && exit 1"
  }
}
Now we are ready to actually create our server code and endpoint.
Step 3: Creating an Endpoint
For demonstration purposes, we will create a very simple endpoint. The endpoint URL will look like: /embed-dash(/:userId). This endpoint will receive a query parameter with the user ID we will pass to the embedded template.
In the root of the project, I have created a file called server.js. This file is where we will put all of our server code.
Our server code will look like this:
const dotenv = require("dotenv");
dotenv.config();
const express = require("express");
const path = require("path");
const fetch = require("node-fetch");
const { Console } = require("console");
const app = express();
app.use(express.static(path.join(__dirname)));

const moesifManagementToken = process.env.MOESIF_MANAGEMENT_TOKEN;
const templateWorkspaceId = process.env.MOESIF_TEMPLATE_WORKSPACE_ID;
const moesifApiEndPoint = "https://api.moesif.com";

if (!moesifManagementToken) {
 console.error(
   "No MOESIF_MANAGEMENT_TOKEN found. Please create an .env file with MOESIF_MANAGEMENT_TOKEN & MOESIF_TEMPLATE_WORKSPACE_ID."
 );
}

if (!templateWorkspaceId) {
 console.error(
   "No MOESIF_TEMPLATE_WORKSPACE_ID found. Please create an .env file with MOESIF_MANAGEMENT_TOKEN & MOESIF_TEMPLATE_WORKSPACE_ID."
 );
}

app.get("/embed-dash(/:userId)", function (req, res) {
 const userId = req.params.userId;

 const templateData = {
   template: {
     values: {
       user_id: userId,
     },
   },
 };

 // Set your desired expiration for the generated workspace token.
 // Moesif's recommendation is to match or be larger than your user's session time while keeping time period less than 30 days.
 const tomorrow = new Date();
 tomorrow.setDate(tomorrow.getDate() + 1);
 const expiration = tomorrow.toISOString();

 fetch(
   moesifApiEndPoint +
     "/v1/portal/~/workspaces/" +
     templateWorkspaceId +
     "/access_token" +
     "?expiration=" + expiration,
   {
     method: "POST",
     headers: {
       "Content-Type": "application/json",
       Authorization: "Bearer " + moesifManagementToken,
     },
     body: JSON.stringify(templateData),
   }
 )
   .then((response) => {
     if (response.ok) {
       return response;
     } else {
       console.log("Api call to moesif not successful. server response is:");
       console.error(response.statusText);
       throw Error(response.statusText);
     }
   })
   .then((response) => {
     return response.json();
   })
   .then((info) => {
     res.json(info);
   })
   .catch((err) => {
     res.status(500).send({
       error: "something went wrong",
     });
   });
});


app.get("/", function (req, res) {
 res.sendFile(path.join(__dirname, "index.html"));
 res.sendFile(path.join(__dirname, "index.js"));
});

console.log("server started!");

app.listen(3050);
Let’s break down a few components.
At the very top you will see that we are retrieving our management token and workspace ID from a .env config file. You also see that we have our Moesif API endpoint added here as well.
We will add the .env file in Step 4 of this guide.
const moesifManagementToken = process.env.MOESIF_MANAGEMENT_TOKEN;
const templateWorkspaceId = process.env.MOESIF_TEMPLATE_WORKSPACE_ID;
const moesifApiEndPoint = "https://api.moesif.com";
Next, we do a few checks to make sure that the config is being correctly pulled into the server upon startup. If the values are not loaded, we will display an error for easy debugging.
if (!moesifManagementToken) {
 console.error(
   "No MOESIF_MANAGEMENT_TOKEN found. Please create an .env file with MOESIF_MANAGEMENT_TOKEN & MOESIF_TEMPLATE_WORKSPACE_ID."
 );
}

if (!templateWorkspaceId) {
 console.error(
   "No MOESIF_TEMPLATE_WORKSPACE_ID found. Please create an .env file with MOESIF_MANAGEMENT_TOKEN & MOESIF_TEMPLATE_WORKSPACE_ID."
 );
}
Next, we create our endpoint that will retrieve our embedded template information and data to display.
app.get("/embed-dash(/:userId)", function (req, res) {
We first create a JSON template with our User ID to be passed in the request body.
 const userId = req.params.userId;

 const templateData = {
   template: {
     values: {
       user_id: userId,
     },
   },
 };
We then create an expiration for our generated workspace token.
 const tomorrow = new Date();
 tomorrow.setDate(tomorrow.getDate() + 1);
 const expiration = tomorrow.toISOString();
Lastly, we make the request to the Moesif Workspaces API endpoint with all of our data populated.
fetch(
   moesifApiEndPoint +
     "/v1/portal/~/workspaces/" +
     templateWorkspaceId +
     "/access_token" +
     "?expiration=" + expiration,
   {
     method: "POST",
     headers: {
       "Content-Type": "application/json",
       Authorization: "Bearer " + moesifManagementToken,
     },
     body: JSON.stringify(templateData),
   }
 )
Once returned, we return the response to the caller and log a few things to our server console. If an error occurs, we also handle that here.
.then((response) => {
     if (response.ok) {
       return response;
     } else {
       console.log("Api call to moesif not successful. server response is:");
       console.error(response.statusText);
       throw Error(response.statusText);
     }
   })
   .then((response) => {
     return response.json();
   })
   .then((info) => {
     res.json(info);
   })
   .catch((err) => {
     res.status(500).send({
       error: "something went wrong",
     });
   });
The last bit of server code will simply serve our index.html and index.js files that will be our static site. For simplicity, I am using this NodeJS server to also serve our static site files instead of creating a separate server to do that. Then, I’m serving everything on localhost:3050.
app.get("/", function (req, res) {
 res.sendFile(path.join(__dirname, "index.html"));
 res.sendFile(path.join(__dirname, "index.js"));
});

console.log("server started!");

app.listen(3050);
Now we will need to create our .env file to store our values for accessing our template.
Step 4: Creating the .env File
In the root of our project (where our server.js file is), we will create another file called .env.
In this file, we will create two static values. One value will be for MOESIF_MANAGEMENT_TOKEN and the other for MOESIF_TEMPLATE_WORKSPACE_ID. Our file will look like this:
MOESIF_MANAGEMENT_TOKEN={ACCESS TOKEN}
MOESIF_TEMPLATE_WORKSPACE_ID={WORKSPACE ID}
These are the values that we generated previously from when we clicked Get Embed Code in Moesif.
The file will look something like this:

If you exited out of the previous modal and need to get these values for your configuration, simply click the Embed Templates item on the left navigation pane then click Show Embed Instructions to access the values again.

Our next step is to create our UI so that we can enter a user ID and retrieve the corresponding chart.
Step 5: Creating the UI
For our UI we will create 2 files: index.html and index.js. We will add these files to the root of our project as well.
Make sure that you have named them correctly so that our server will serve them as we have configured it in step 2.
Our index.html file will look like this:
<!DOCTYPE html>
<html lang="en">
<head>
<meta charset="utf-8" />
<meta name="viewport" content="width=device-width, initial-scale=1" />
<meta name="theme-color" content="#000000" />
<meta
name="description"
content="Moesif Embedded Dashboard example"
/>
<title>None React App Example</title>
<style>
.iframeWrapper {
position: relative;
padding-bottom: 56.25%; /* 16:9 */
padding-top: 25px;
height: 0;
}
.iframeWrapper iframe {
position: absolute;
top: 0;
left: 0;
width: 100%;
height: 100%;
}
</style>
</head>
<body>
<noscript>You need to enable JavaScript to run this app.</noscript>
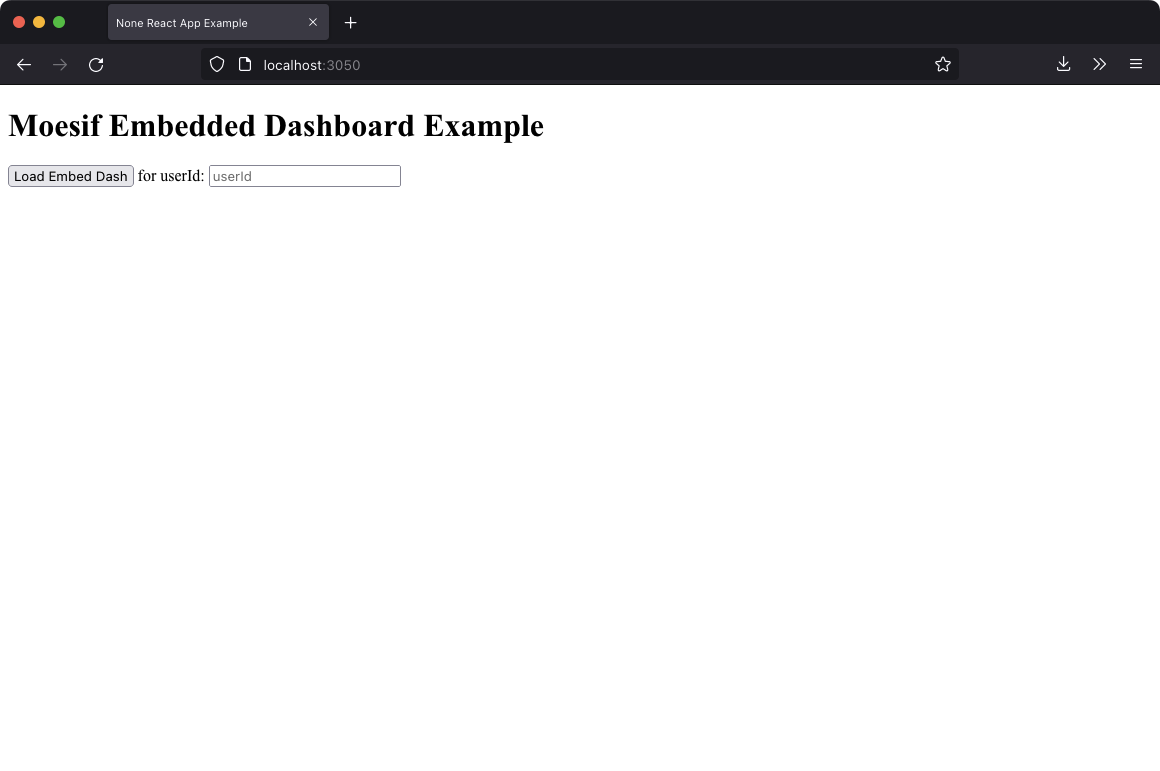
<h1>
Moesif Embedded Dashboard Example
</h1>
<button onClick="fetchEmbedInfo()">Load Embed Dash</button>
for userId: <input id="userId-input" placeholder="userId" />
<p id="error-message"></p>
<div class="iframeWrapper">
<iframe
id="preview-frame"
src=""
name="Moesif embedded dash example"
frameborder="0"
noresize="noresize"
allowfullscreen
>
</iframe>
</div>
<script src="index.js"></script>
</body>
</html>
You can see that we have a text input, a button to load the chart, and an iframe that will display the chart.
Next, we will add our index.js code. This code is called by our Load Embed Dash button in the above markup. It contains a single function called fetchEmbedInfo. This function calls our /embed-dash endpoint and attaches our user ID value from the markup to the request as a query parameter.
When the response is returned we either output an error message to the screen or take the returned JSON values and plug them into the iframe element in the markup to render the chart.
function fetchEmbedInfo() {
   const iframeElement = document.getElementById("preview-frame");
   const errorElement = document.getElementById("error-message");
   const userIdElement = document.getElementById("userId-input");
   // make api call to the server
   // to get generated dashboard information
   fetch("/embed-dash/" + encodeURIComponent(userIdElement.value))
     .then(function (response) {
       if (response.ok) {
         console.log(response);
         return response;
       } else {
         console.log(response.statusText);
         throw Error(response.statusText);
       }
     })
     .then(function (response) {
       return response.json();
     })
     .then(function (body) {
       iframeElement.src = body ? body.url : "";
       //errorElement.innerText = JSON.stringify(body);
     })
     .catch(function (err) {
       errorElement.innerText =
         "Could not load. Please check if you created .env with MOESIF_MANAGEMENT_TOKEN && MOESIF_TEMPLATE_WORKSPACE_ID and run `node server.js`.";
       iframeElement.src = "https://www.google.com";
     });
 }
Now our code is complete. Our folder structure should look like this now that we have all of our files created.
With our code complete, it’s now time to run our project and see our embedded template rendered on the screen!
Step 6: Viewing the Embedded Dashboard
In the root of your project, make sure you have a terminal running. Next, run the following command and you should then see that the server has started:
node server.js
Next, navigate to http://localhost:3050. Here you should see your index.html rendered:
Now, type in a known user ID and click Load Embed Dash. This will call our endpoint in the server, pass it the userID, and return back some data so we can render the chart in the iframe element. The result should look similar to this:
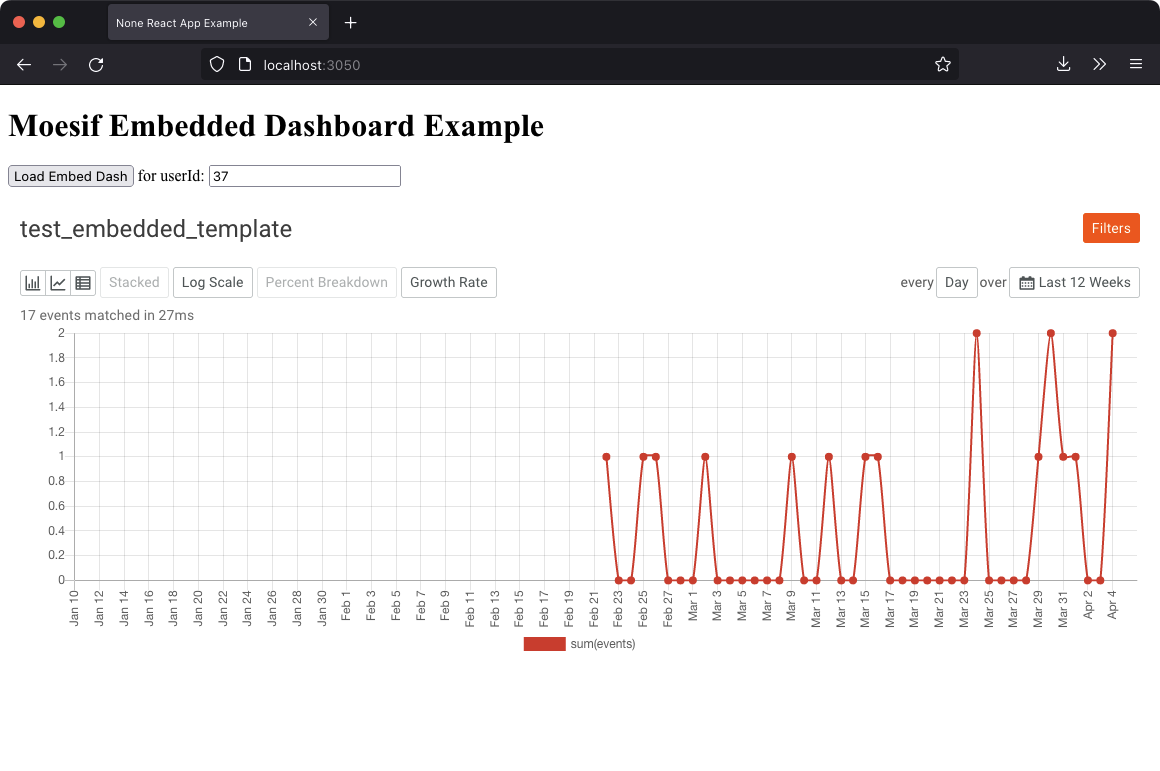
And with that, we’ve successfully created and used an embedded template in our UI using Moesif.