Moesif Middleware for Ruby on Rails and Rack
by Moesif, the API analytics and API monetization platform.
![]()


![]()

Moesif Rack Middleware automatically logs incoming and outgoing API calls and sends them to Moesif for API analytics and monitoring. This middleware allows you to integrate Moesif’s API analytics and API monetization features into your Ruby applications with minimal configuration. The middleware supports Ruby on Rails, Grape, and other Ruby frameworks built on Rack.
If you’re new to Moesif, see our Getting Started resources to quickly get up and running.
Prerequisites
Before using this middleware, make sure you have the following:
Get Your Moesif Application ID
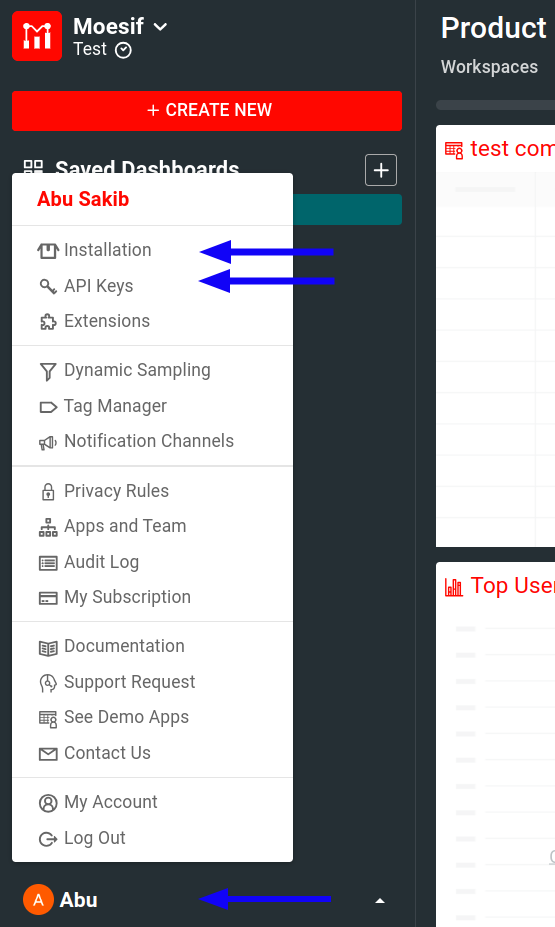
After you log into Moesif Portal, you can get your Moesif Application ID during the onboarding steps. You can always access the Application ID any time by following these steps from Moesif Portal after logging in:
- Select the account icon to bring up the settings menu.
- Select Installation or API Keys.
- Copy your Moesif Application ID from the Collector Application ID field.
Install the Middleware
Install the Moesif gem:
gem install moesif_rack
If you’re using Bundler, add the gem to your Gemfile:
gem 'moesif_rack'
Then run bundle install.
Configure the Middleware
See the available configuration options to learn how to configure the middleware for your use case.
How to use
1. Enter Moesif Application ID
Create a hash containing application_id and specify your Moesif Application ID as its value. This hash also contains other options you may want to specify.
moesif_options = {
  'application_id' => 'YOUR_MOESIF_APPLICATION_ID'
}
2. Add the Middleware
For Rails 5.0 or Newer
Using strings or symbols for middleware class names is deprecated for newer frameworks like Ruby 5.0. So we recommend that you pass the class directly:
  class Application < Rails::Application
    moesif_options = {
      'application_id' => 'YOUR_MOESIF_APPLICATION_ID'
    }

    config.middleware.use MoesifRack::MoesifMiddleware, moesif_options
  end
For Rails 4.0 and Other Frameworks
For most Rack-based frameworks including Rails 4.x or older, add the middleware MoesifRack::MoesifMiddleware within config/application.rb:
  class Application < Rails::Application
    moesif_options = {
      'application_id' => 'Your Moesif Application Id'
    }

    config.middleware.use "MoesifRack::MoesifMiddleware", moesif_options
  end
For Grape API
For Grape APIs, you can add the middleware after any custom parsers or formatters.
module Acme
  class Ping < Grape::API
    format :json

    moesif_options = {
      'application_id' => 'Your Moesif Application Id'
    }

    insert_after Grape::Middleware::Formatter, MoesifRack::MoesifMiddleware, moesif_options

    get '/ping' do
      { ping: 'pong' }
    end
  end
end
Order of Middleware
Since Moesif Rack is a logging middleware, the ordering of middleware matters.
The best place for MoesifRack::MoesifMidleware is near the top so it captures the data closest to the wire.
But remember to put it after any body parsers or authentication middleware.
Typically, right above the default logger of Rails app Rails::Rack::Logger is a good spot.
If you want to be as close as wire as possible, put it before ActionDispatch::Static.
To insert the Moesif middleware before Rails::Rack::Logger, you can use the insert_before method instead of
use:
  class Application < Rails::Application
    # snip

    config.middleware.insert_before Rails::Rack::Logger, MoesifRack::MoesifMiddleware, moesif_options

    # snip
  end
If you are using Rack::Deflater or other compression middleware, make sure to put the Moesif middleware after
it so it can capture the uncompressed data.
To see your current list of middleware, execute this command:
bin/rails middleware
Optional: Capturing Outgoing API Calls
In addition to your own APIs, you can also start capturing calls out to third party services through by setting the capture_outgoing_requests option.
For configuration options specific to capturing outgoing API calls, see Options For Outgoing API Calls.
Troubleshoot
For a general troubleshooting guide that can help you solve common problems, see Server Troubleshooting Guide.
Other troubleshooting supports:
Repository Structure
.
├── BUILDING.md
├── Gemfile
├── images/
├── lib/
├── LICENSE
├── moesif_capture_outgoing/
├── moesif_rack.gemspec
├── Rakefile
├── README.md
└── test/
Configuration Options
The following sections describe the available configuration options for this middleware. You have to set these options in a Ruby hash as key-value pairs. See the examples for better understanding.
application_id (Required)
| Data type |
|---|
| String |
A string that identifies your application in Moesif.
api_version
| Data type |
|---|
| String |
Optional.
Use to tag requests with the version of your API.
identify_user
| Data type | Return type |
|---|---|
Proc
|
String |
Optional, but highly recommended.
A Proc that takes env, headers, and body as arguments.
Returns a string that represents the user ID used by your system.
Moesif identifies users automatically. However, due to the differences arising from different frameworks and implementations, set this option to ensure user identification properly.
moesif_options['identify_user'] = Proc.new { |env, headers, body|

  # Add your custom code that returns a string for user id
  '12345'
}
identify_company
| Data type | Return type |
|---|---|
Proc
|
String |
Optional.
A Proc that takes env, headers, and body as arguments.
Returns a string that represents the company ID for this event. This helps Moesif attribute requests to unique company.
moesif_options['identify_company'] = Proc.new { |env, headers, body|

  # Add your custom code that returns a string for company id
  '67890'
}
identify_session
| Data type | Return type |
|---|---|
Proc
|
String |
Optional.
A Proc that takes env, headers, and body as arguments.
Returns a string that represents the session token for this event.
Similar to users and companies, Moesif tries to retrieve session tokens automatically. But if it doesn’t work for your service, use this option to help identify sessions.
moesif_options['identify_session'] = Proc.new { |env, headers, body|
    # Add your custom code that returns a string for session/API token
    'XXXXXXXXX'
}
get_metadata
| Data type | Return type |
|---|---|
Proc
|
Hash
|
Optional.
A Proc that takes env, headers, and body as arguments.
Returns a Hash that represents a JSON object. This allows you to attach any
metadata to this event.
moesif_options['get_metadata'] = Proc.new { |env, headers, body|
  # Add your custom code that returns a dictionary
  value = {
      'datacenter'  => 'westus',
      'deployment_version'  => 'v1.2.3'
  }
  value
}
mask_data
| Data type | Return type |
|---|---|
Proc
|
EventModel
|
Optional.
A Proc that takes an EventModel as an argument and returns an EventModel.
This option allows you to modify headers or body of an event before sending the event to Moesif.
moesif_options['mask_data'] = Proc.new { |event_model|
  # Add your custom code that returns a event_model after modifying any fields
  event_model.response.body.password = nil
  event_model
}
For more information and the spec of Moesif’s event model, see the source code of Moesif API library for Ruby.
skip
| Data type | Return type |
|---|---|
Proc
|
Boolean |
Optional.
A Proc that takes env, headers, and body as arguments.
Returns a boolean. Return true if you want to skip a particular event.
moesif_options['skip'] = Proc.new { |env, headers, body|
  # Add your custom code that returns true to skip logging the API call
  if env.key?("REQUEST_URI")
      # Skip probes to health page
      env["REQUEST_URI"].include? "/health"
  else
      false
  end
}
debug
| Data type | Default |
|---|---|
| Boolean |
false
|
Optional.
If true, the middleware prints out debug messages. In debug mode, the processing is not done in backend thread.
log_body
| Data type | Default |
|---|---|
| Boolean |
true
|
Optional.
If false, doesn’t log request and response body to Moesif.
batch_size
| Data type | Default |
|---|---|
int
|
200
|
Optional.
The maximum batch size when sending to Moesif.
batch_max_time
| Data type | Default |
|---|---|
int
|
2
|
Optional.
The maximum time in seconds to wait (approximately) before triggering flushing of the queue and sending to Moesif.
event_queue_size
| Data type | Default |
|---|---|
int
|
1000000
|
Optional.
The maximum number of events to hold in queue before sending to Moesif.
In case of network issues, the middleware may fail to connect or send event to Moesif. In those cases, the middleware skips adding new to event to queue to prevent memory overflow.
Options For Outgoing API Calls
The following options apply to outgoing API calls. These are calls you initiate using Net::HTTP package to third parties like Stripe or to your own services.
Several options use request and response as input arguments. The request and response objects passed in are HTTPRequest request and HTTPResponse response objects.
capture_outgoing_requests
| Data type | Default |
|---|---|
| Boolean |
false
|
Set to true to capture all outgoing API calls from your app.
identify_user_outgoing
| Data type | Return type |
|---|---|
Proc
|
String |
Optional, but highly recommended.
A Proc that takes env, headers, and body as arguments.
Returns a string that represents the user ID used by your system.
Moesif identifies users automatically. However, due to the differences arising from different frameworks and implementations, set this option to ensure user identification properly.
moesif_options['identify_user_outgoing'] = Proc.new { |request, response|

  # Add your custom code that returns a string for user id
  '12345'
}
identify_company_outgoing
| Data type | Return type |
|---|---|
Proc
|
String |
Optional.
A Proc that takes env, headers, and body as arguments.
Returns a string that represents the company ID for this event. This helps Moesif attribute requests to unique company.
moesif_options['identify_company_outgoing'] = Proc.new { |request, response|

  # Add your custom code that returns a string for company id
  '67890'
}
get_metadata_outgoing
| Data type | Return type |
|---|---|
Proc
|
Hash
|
Optional.
A Proc that takes env, headers, and body as arguments.
Returns a Hash that represents a JSON object. This allows you to attach any
metadata to this event.
moesif_options['get_metadata_outgoing'] = Proc.new { |request, response|

  # Add your custom code that returns a dictionary
  value = {
      'datacenter'  => 'westus',
      'deployment_version'  => 'v1.2.3'
  }
  value
}
identify_session_outgoing
| Data type | Return type |
|---|---|
Proc
|
String |
Optional.
A Proc that takes env, headers, and body as arguments.
Returns a string that represents the session token for this event.
Similar to users and companies, Moesif tries to retrieve session tokens automatically. But if it doesn’t work for your service, use this option to help identify sessions.
moesif_options['identify_session_outgoing'] = Proc.new { |request, response|

    # Add your custom code that returns a string for session/API token
    'XXXXXXXXX'
}
skip_outgoing
| Data type | Return type |
|---|---|
Proc
|
Boolean |
Optional.
A Proc that takes env, headers, and body as arguments.
Returns a boolean. Return true if you want to skip a particular event.
moesif_options['skip_outgoing'] = Proc.new{ |request, response|

  # Add your custom code that returns true to skip logging the API call
  false
}
mask_data_outgoing
| Data type | Return type |
|---|---|
Proc
|
EventModel
|
Optional.
A Proc that takes an EventModel as an argument and returns an EventModel.
This option allows you to modify headers or body of an event before sending the event to Moesif.
moesif_options['mask_data_outgoing'] = Proc.new { |event_model|

  # Add your custom code that returns a event_model after modifying any fields
  event_model.response.body.password = nil
  event_model
}
log_body_outgoing
| Data type | Default |
|---|---|
| Boolean |
true
|
Optional.
If false, doesn’t log request and response body to Moesif.
Examples
- Moesif Rails 5 Example: an example of Moesif with a Ruby on Rails 5 application
- Moesif Rails 4 Example: an example of Moesif with a Ruby on Rails 4 application
- Moesif Rack Example: an example of Moesif in a Rack application
The following examples demonstrate how to add and update customer information.
Update a Single User
To create or update a user profile in Moesif, use the update_user() method.
metadata = {
  :email => 'john@acmeinc.com',
  :first_name => 'John',
  :last_name => 'Doe',
  :title => 'Software Engineer',
  :salesInfo => {
      :stage => 'Customer',
      :lifetime_value => 24000,
      :accountOwner => 'mary@contoso.com',
  }
}

# Campaign object is optional, but useful if you want to track ROI of acquisition channels
# See https://www.moesif.com/docs/api#users for campaign schema
campaign = MoesifApi::CampaignModel.new()
campaign.utm_source = "google"
campaign.utm_medium = "cpc"
campaign.utm_campaign = "adwords"
campaign.utm_term = "api+tooling"
campaign.utm_content = "landing"

# Only user_id is required.
# metadata can be any custom object
user = MoesifApi::UserModel.new()
user.user_id = "12345"
user.company_id = "67890" # If set, associate user with a company object
user.campaign = campaign
user.metadata = metadata

update_user = MoesifRack::MoesifMiddleware.new(@app, @options).update_user(user_model)
The metadata field can contain any customer demographic or other info you want to store. Moesif only requires the user_id field.
For more information, see the function documentation in Moesif Ruby API reference.
Update Users in Batch
To update a list of users in one batch, use the update_users_batch() method.
users = []

metadata = {
  :email => 'john@acmeinc.com',
  :first_name => 'John',
  :last_name => 'Doe',
  :title => 'Software Engineer',
  :salesInfo => {
      :stage => 'Customer',
      :lifetime_value => 24000,
      :accountOwner => 'mary@contoso.com',
  }
}

# Campaign object is optional, but useful if you want to track ROI of acquisition channels
# See https://www.moesif.com/docs/api#users for campaign schema
campaign = MoesifApi::CampaignModel.new()
campaign.utm_source = "google"
campaign.utm_medium = "cpc"
campaign.utm_campaign = "adwords"
campaign.utm_term = "api+tooling"
campaign.utm_content = "landing"

# Only user_id is required.
# metadata can be any custom object
user = MoesifApi::UserModel.new()
user.user_id = "12345"
user.company_id = "67890" # If set, associate user with a company object
user.campaign = campaign
user.metadata = metadata

users << user

response = MoesifRack::MoesifMiddleware.new(@app, @options).update_users_batch(users)
The metadata field can contain any customer demographic or other info you want to store. Moesif only requires the user_id field. This method is a convenient helper that calls the Moesif API lib.
For more information, see the function documentation in Moesif Ruby API reference.
Update a Single Company
To update a single company, use the update_company() method.
metadata = {
  :org_name => 'Acme, Inc',
  :plan_name => 'Free',
  :deal_stage => 'Lead',
  :mrr => 24000,
  :demographics => {
      :alexa_ranking => 500000,
      :employee_count => 47
  }
}

# Campaign object is optional, but useful if you want to track ROI of acquisition channels
# See https://www.moesif.com/docs/api#update-a-company for campaign schema
campaign = MoesifApi::CampaignModel.new()
campaign.utm_source = "google"
campaign.utm_medium = "cpc"
campaign.utm_campaign = "adwords"
campaign.utm_term = "api+tooling"
campaign.utm_content = "landing"

# Only company_id is required.
# metadata can be any custom object
company = MoesifApi::CompanyModel.new()
company.company_id = "67890"
company.company_domain = "acmeinc.com" # If domain is set, Moesif will enrich your profiles with publicly available info
company.campaign = campaign
company.metadata = metadata

update_company = MoesifRack::MoesifMiddleware.new(@app, @options).update_company(company_model)
The metadata field can contain any customer demographic or other info you want to store. Moesif only requires the company_id field. This method is a convenient helper that calls the Moesif API lib.
For more information, see the function documentation in Moesif Ruby API reference.
Update Companies in Batch
To update a list of companies in one batch, use the update_companies_batch() method.
companies = []

metadata = {
  :org_name => 'Acme, Inc',
  :plan_name => 'Free',
  :deal_stage => 'Lead',
  :mrr => 24000,
  :demographics => {
      :alexa_ranking => 500000,
      :employee_count => 47
  }
}

# Campaign object is optional, but useful if you want to track ROI of acquisition channels
# See https://www.moesif.com/docs/api#update-a-company for campaign schema
campaign = MoesifApi::CampaignModel.new()
campaign.utm_source = "google"
campaign.utm_medium = "cpc"
campaign.utm_campaign = "adwords"
campaign.utm_term = "api+tooling"
campaign.utm_content = "landing"

# Only company_id is required.
# metadata can be any custom object
company = MoesifApi::CompanyModel.new()
company.company_id = "67890"
company.company_domain = "acmeinc.com" # If domain is set, Moesif will enrich your profiles with publicly available info
company.campaign = campaign
company.metadata = metadata

companies << company
response = MoesifRack::MoesifMiddleware.new(@app, @options).update_companies_batch(companies)
The metadata field can contain any customer demographic or other info you want to store. Moesif only requires the company_id field. This method is a convenient helper that calls the Moesif API lib.
For more information, see the function documentation in Moesif Ruby API reference.
How to Test
- Manually clone this repository.
- From your terminal, navigate to the root directory of the middleware.
- Run
gem install moesif_rack. - Add your Moesif Application ID to
test/moesif_rack_test.rb. - Run
ruby test/moesif_rack_test.rb. - Then run
ruby -I test test/moesif_rack_test.rb -n test_capture_outgoingto test capturing outgoing API calls from your app to third parties like Stripe, Github or to your own dependencies.
Explore Other Integrations
Explore other integration options from Moesif: