Using Moesif, Kong, and Stripe to Monetize Your AI APIs - Part 3: Managing Customer Credit

This is the third part of a three-part series about AI API monetization. You can check out the first part of the series here and the second part here.
Things can get tricky when managing pre-paid, pay-as-you-go billing for monetized APIs. Three mechanisms must be in place for this type of billing to work: first, you need to be able to add credits to an account. Second, you need to be able to burn down those credits. Third, you need to be able to block users from accessing the API once they have run out of credits.
The first part is relatively easy since most billing providers allow you to create payments that can be added to a user’s account as a pre-paid credit. The second part is covered by mechanisms such as a Moesif Billing Meter, which we discussed in the last post. The third part is where things get increasingly more complex. This is because Billing Providers, where the customer’s balance and usage are calculated, usually have a rate limit for reporting usage. This means that real-time balances are much harder to achieve since it would require usage to be fed to the billing provider in real-time; the balance burned down and then reported back to the system that controls API access to decide whether the user should have continued access to the API.
Up until recently, this was not possible. Luckily, we at Moesif have created a way to achieve near real-time pre-paid API access using our latest Pre-Paid Credits and Balance features. This set of features allows Moesif to be the book of record for the user’s balance, so no round-trip to the billing provider is needed, and rate limits put on usage APIs are no longer a concern. The result: as usage is metered in Moesif, it can then be burned down against the user’s credits to achieve a real-time balance. The governance rule we created in Part 2 of this blog series will work in near real-time, blocking users when they run out of credits.

For more info on pre-paid credit features within Moesif, check out Moesif’s Credit Tracking and Consumption docs.
In the next part of this tutorial series, we will examine how to charge for API credits in Stripe and then add those credits to Moesif. We will begin by looking at adding a payment to Stripe.
Create a Payment In Stripe
Since we are implementing pre-paid API access, we must first charge the customer for a certain amount of credits. We will do this by manually creating a payment in Stripe. Of course, you can also make a top-up mechanism in your code or UI. Everything we will do here is also available through the Stripe APIs. For this guide, we will focus on manually adding the balance top-up.
This part of the guide assumes you already have a customer in Stripe and Moesif. If you do not, you can revisit this section once a customer is added to both platforms. Adding customers will be covered in the following guide, Part 4.
As a first part of our flow to add credits, we will need to add some money into our Stripe account to be consumed when API calls are made. This can be done by:
- Logging into Stripe and going to the Customers screen.
- Select the customer you’d like to add the top-up to.
- Click Create Payment in the top left of the screen.
- On the Create a new payment modal, select USD as your currency (or whatever currency you’d like to use), add the amount, and choose the Payment method.
- Click Create Payment.
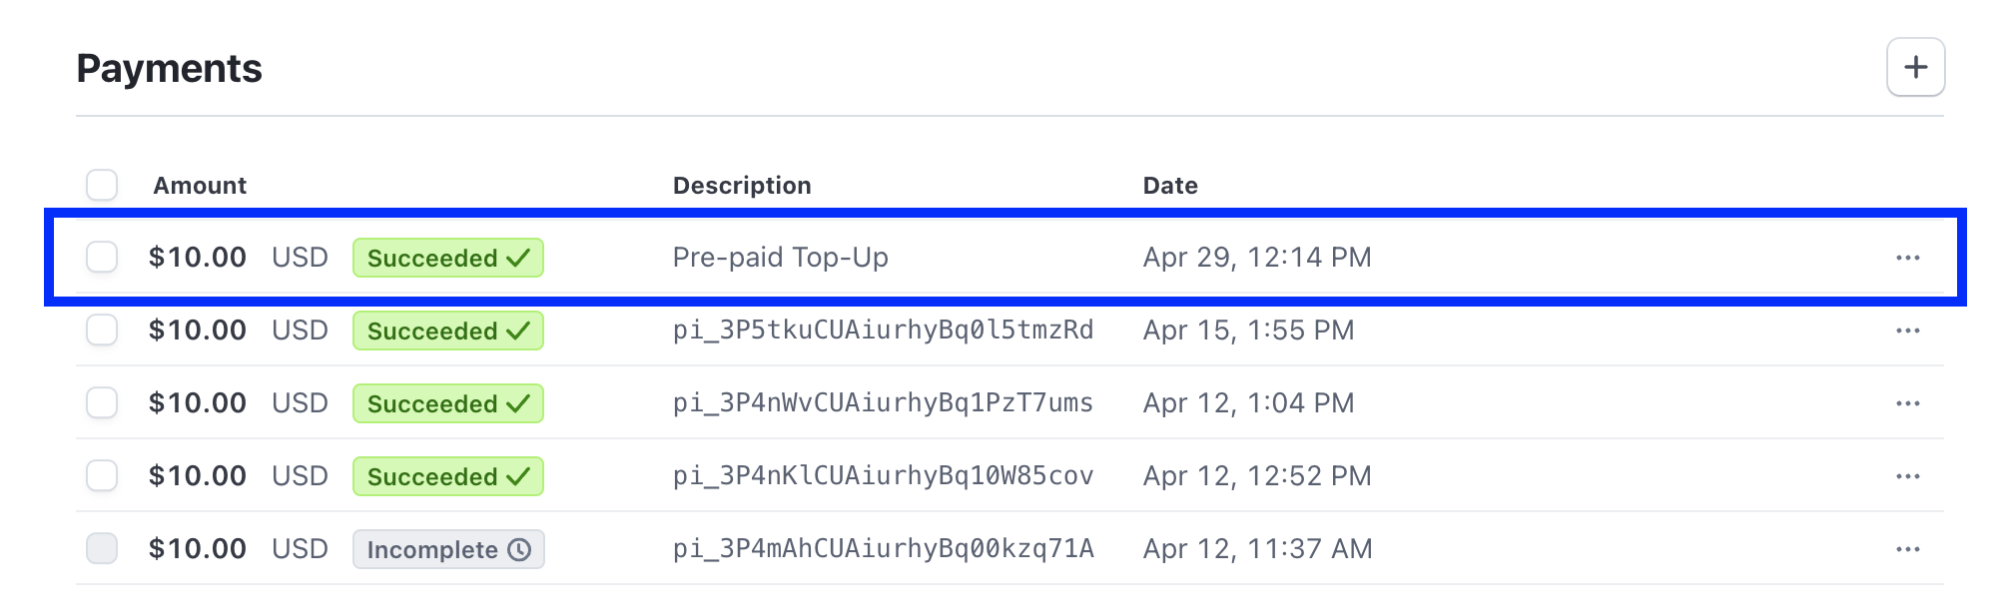
Once complete, the payment will be processed, and the amount will be added to the customer’s Stripe account. You should see the entry under Payments on the customer’s profile if the payment has successfully been completed.
Add a Credit to Moesif
Once the amount is added to Stripe, we can create the corresponding entry in the Moesif ledger so that Moesif can control access to the API in real time.
To add the amount to Moesif, you must go to the customer’s Company profile. This can be done by going to the Companies page in Moesif and finding the company in the Lookup screen. Once found, click on the customer’s Company ID.
To add the credits to the company in Moesif, do the following:
- On the Company Profile screen, click the pencil icon beside Current Balance.
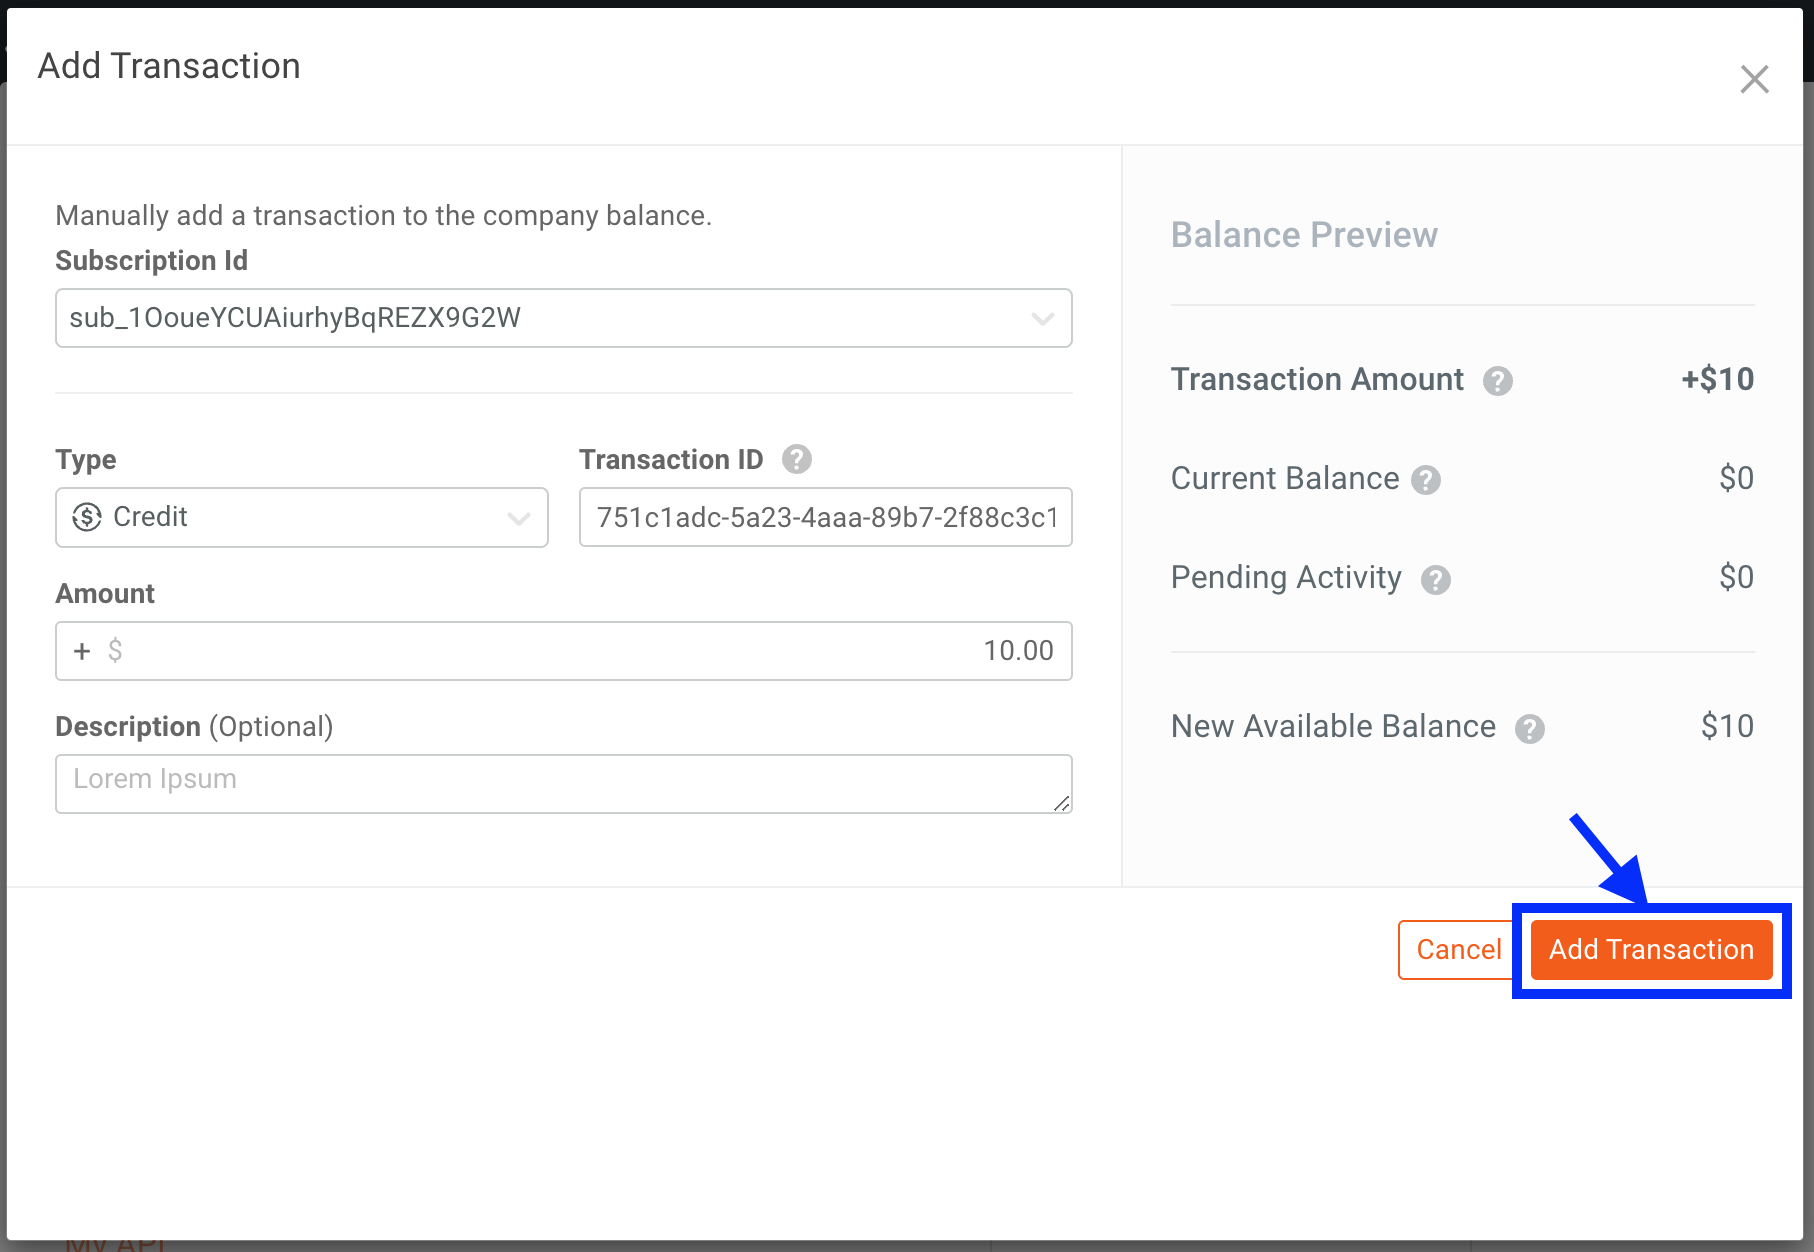
- In the modal that appears, ensure the Type is set to Credit and add “$10.00” to the Amount field.
- If you have multiple subscriptions for the customer, ensure that the Subscription Id field value matches the subscription to which you want to apply the credits.
- Once the form is completed, click Add Transaction.
Based on the steps above, the Add Transaction screen will look like this before clicking the Add Transaction button.
You should see the balance added to the company’s account within a few minutes. The result from our above transaction will now appear in the company’s profile, showing that the company has $10.00 in its Current and Available Balance.
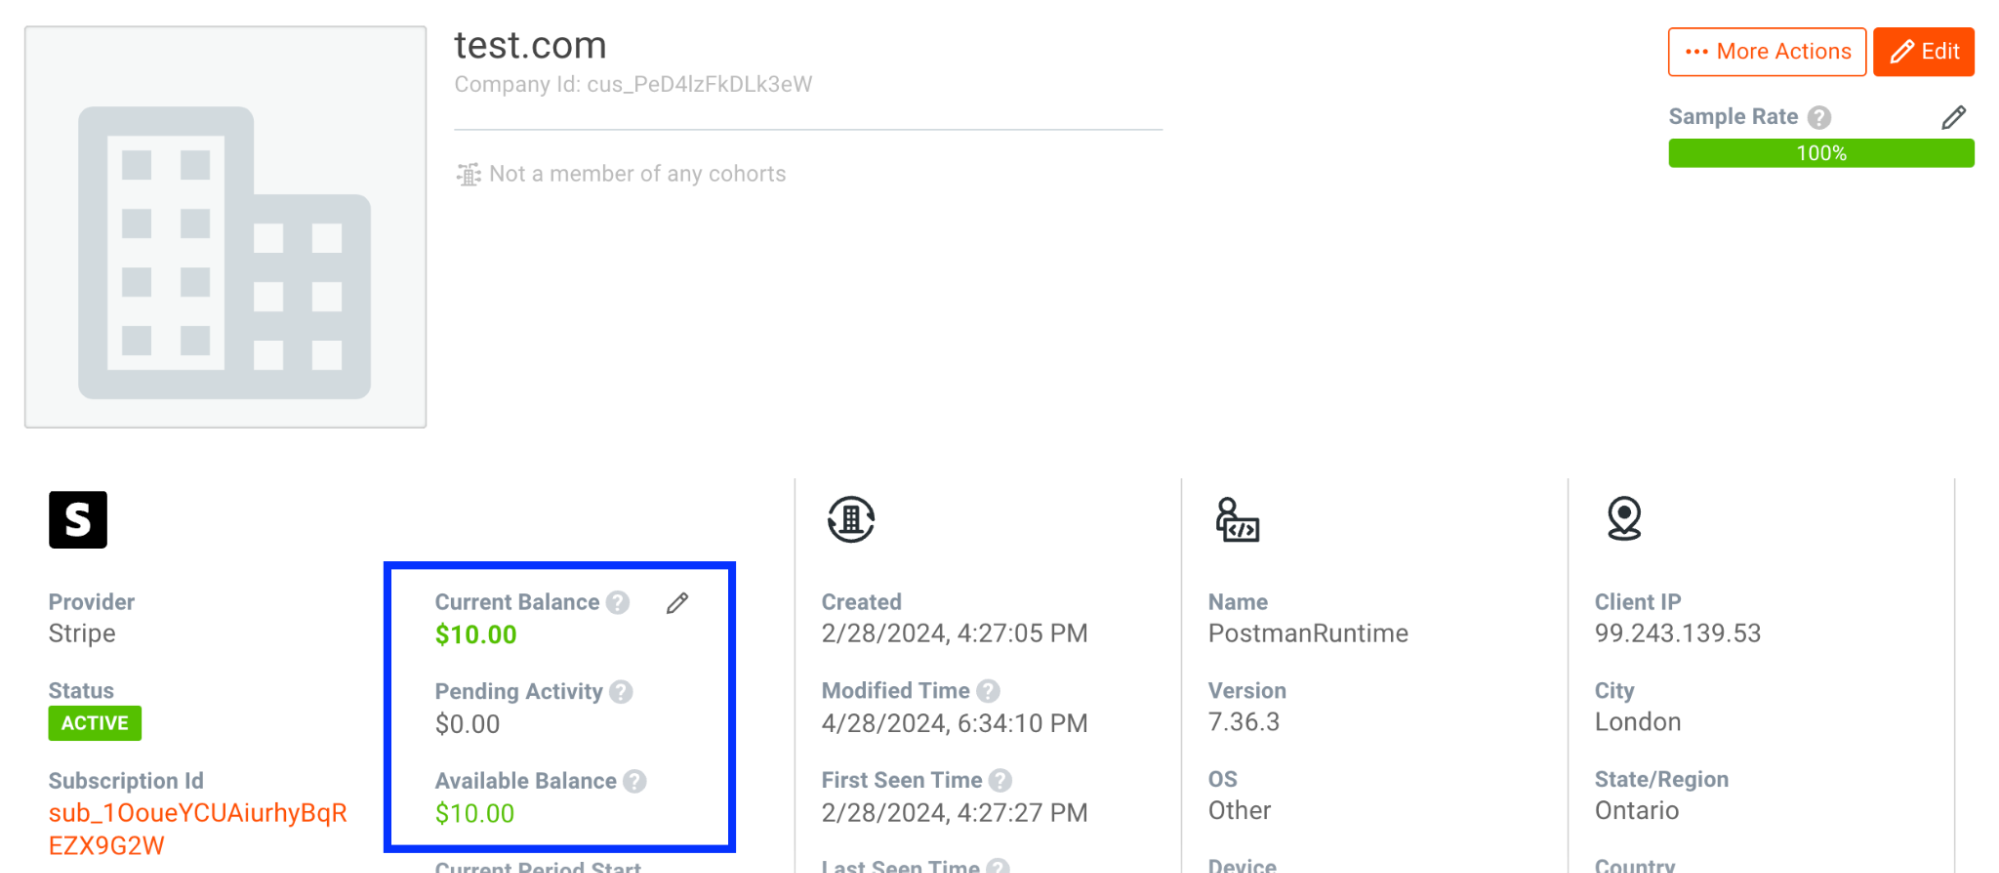
Each value represents a few aspects of the company/user’s balance. Let’s examine each a little closer.
Current Balance
This value is the current balance without factoring in any pending activity/transactions that have not been processed yet.
Pending Activity
This is the activity/transactions (credits or debits) that have not yet been posted. This value is mutable and can change until the transaction is posted. Once posted, this will be reflected in the updated Current Balance field and removed from the amount under Pending Activity.
For example, if API usage or credits have been added to an account, you will see the corresponding amount here until it has been posted.
Available Balance
From a usage perspective, this amount is the most important as it dictates what credits a user has left to spend in a pre-paid scenario. This value is the amount of credits/$ left for the user to consume. This amount equals (Current Balance + (plus) Pending Activity).
For example, if my current balance is $1000 and I have a $250 debit transaction pending, my available balance will be $750.
Now, manually adding the balance in Moesif is one way to do things; however, wouldn’t it be nice to have a top-up in Stripe automatically applied to the balance in Moesif? Let’s take a look at how this (optional) step can be done using Stripe’s APIs and Webhook.
Optional: Automating Account Top-up In Moesif
Pre-paid credits can be added to Moesif via Moesif’s Credit Consumption API. Because of this, there are three potential ways that users can intercept a payment event in Stripe and apply it to the Moesif balance. We’ve created a Github repo that contains all the code you will need to run any of these variants. These include a webhook, API, and combined approach. Let’s look at each approach a bit closer:
Webhook-only App
With this approach, whenever a user’s balance changes in Stripe, a corresponding debit or credit will be added to the Moesif balance. Using the Stripe webhook, when a change is sent, the record will be created and sent to Moesif via the Moesif Credit Consumption API.
This approach works well for applications that already have an existing top-up flow built and allows for minimal changes. This automated approach enables both balances to stay in sync between the two systems.
The webhook application in this Github example (webhook-app.js) will receive a message from Stripe when a user has added funds to their Stripe account. To start this example, clone the Github repo, populate the .env file, and run:
node webhook-app.js
For this application to work, you must deploy the webhook somewhere (for example, for testing, you could use ngrok or deploy on your existing API infrastructure). It needs to be publicly accessible. Once deployed, add the webhook to Stripe with the following steps:
- In Stripe, go to the Developers menu.
- Then go to Webhooks > Add endpoints.
- On the next screen, you’ll add your webhook endpoint URL in the Endpoint URL field.
- Then, you’ll also need to click the Select events button, selecting the following events for the webhook:
payment_intent.succeeded- Optionally add the events you want to subscribe to without using Payment Intents.
- Once configured, click Add endpoint.
Once the endpoint has been added to Stripe, test it by going through your top-up logic and ensure that the webhook fires and successfully creates the credit/debit entry in Moesif (you will be able to see the debugger output in the console/logs where your webhook is running as well).
API-only App
If you are building or have an existing top-up flow that leverages an API, instead of having the webhook execute the logic to do the top-up in Moesif, you can make a direct API call to Moesif’s Credit Consumption endpoint as the payment intent is created. In this example, there is an API app that allows users to call a /top-up endpoint with their Stripe customer ID and the amount they would like to credit to their account.
In this approach, the endpoint creates a Stripe PaymentIntent that adds the amount to the user’s Stripe account. At the same time, this endpoint creates a corresponding transaction on the Moesif side, adding the amount to the available balance in Moesif.
The endpoint can be deployed independently or on your existing API infrastructure; however, this endpoint requires users to have a credit card on file and will create a Stripe Payment Intent for the amount they have requested to be charged against that card. To run the API, clone the Github repo, populate the .env file, and run the following command:
node webhook-api-app.js
Webhook + API App
For users who want to use the best of both solutions, this example allows users to create an endpoint to initiate the top-up transaction and then use the webhook to apply that credit on the Moesif side once the PaymentIntent has succeeded on the Stripe side.
The webhook and API will require the same configuration as the initial webhook and API examples above. Currently, in this solution, the /top-up REST API endpoint and the webhook run in the same node project. However, both can be split apart as needed.
The node app will need to be hosted publicly, but to test functionality locally, clone the Github repo, populate the .env file, and run the following command:
node webhook-api-app.js
Using any of these three approaches, you can have it so that top-up payments processed through Stripe are automatically applied to the balance in Moesif. This is much more scalable and automated than manually adding these transactions by hand in the Moesif UI.
Conclusion
With that, we’ve successfully added a balance to customers in both Stripe and Moesif. This will help to enable real-time PAYG billing and leverage the infrastructure we created in Part 2 of this series, giving us a complete pre-paid system that will allow usage to be metered, burned down, and access to the API’s controlled based on them having an available balance of credits to use.
Next, and lastly, we will focus on onboarding customers. We will cover how to register customers in Moesif, Stripe, and Kong so that they can use the APIs, giving us a complete end-to-end API monetization setup to start driving revenue from our AI APIs (or any API, for that matter!).


Related Articles

API Strategy
Leveraging AI For a Better API Strategy
Learn how to leverage AI to build and fortify your API strategy. Improve design, governance, documentation, and align APIs with business outcomes.
API Strategy
The 5 Best Mixpanel Alternatives of 2025
Learn about the best Mixpanel alternatives to determine the right analytics solution for your use case.

API Development
How to Leverage Moesif Effectively for API Observability
Effectively leverage Moesif for API observability through best practices for integration, event enrichment, custom actions, and engineering workflow integrat...
API Strategy
How to Build an Internal Chargeback Model for Your API and AI Usage Using Moesif
Use Moesif to implement internal chargebacks and enable precise API and AI cost attribution for better transparency and resource optimization.