Integrating with .NET Core APIs
ASP.NET is an extremely popular way to quickly and securely build RESTful APIs with C# and .NET Core. Moesif is a great addition to your ASP.NET API stack to cover everything from analytics to helping you set up metered billing.
Building your API is just the first step. Once built, you need to keep customers and services using the API happy. Moesif is the tool to help you do exactly that.
Integrating Moesif with your ASP.NET Minimal API can be done in a few simple steps. In this guide I’ll show you how to:
- Create a Moesif Account
- Integrate Moesif into your API code
- Verify the integration
- Be ready to jump into docs and get started!
Prerequisites
- A functioning ASP.NET project using .Net 6+. Follow our guide if you are starting from scratch
- .NET 6+ SDK installed
- Postman to test our functionality
Step 1: Creating Your Moesif Account
If you don’t already have a Moesif account, You’ll want to sign up. Once you’re registered you’ll need to add in a few details.
<img class="lazyload blur-up" data-src="/docs/images/guides/1900/org-details-screen.png" width="75%" alt="Moesif create account first screen">
These include:
- Organization Name the name of your organization or company
- App Name the name of the app you are integrating with Moesif
- What best matches your role? Here you can describe what your current role is at your organization. This helps us to assist you with relevant hints and tips in the future.
- What are you hoping to achieve? Here you can let us know how you'll use Moesif to help your organization or project.
Once you’ve filled out these details, click Next. After this, you’ll be presented with a brief overview of Moesif.
<img class="lazyload blur-up" data-src="/docs/images/guides/1900/moesif-overview-screen.png" alt="Moesif create account overview screen">
Click Next once again.
After the Overview screen, you’ll be presented with the Quick Install screen. Here you can pick from any different server integrations and plugins. For .NET, we want to make sure .NET is selected in the left pane and that the .NET Core walk-through is displayed on the right.
The Quick Install screen makes the assumption you are using .NET 5+. Starting with .NET 6,
Startup.csandProgram.cshave been unified. We will be taking this more modern approach with this guide. Additionally, take note of your application ID, we’ll be using it later.
Step 2: Adding Project Dependencies
Again, we’ll be using the Minimal API we built in this blog post. It is a modern and straight-forward approach to building ASP.NET API’s. Feel free to use it as a starting point.
We will install the Moesif Middleware using the NuGet package manager. Enter the following in your terminal while in the correct directory:
dotnet add package Moesif.Middleware
Our CreditScoreAPI.csproj will be updated to reflect the newly added NuGet package.
<Project Sdk="Microsoft.NET.Sdk.Web">

  <PropertyGroup>
    <TargetFramework>net7.0</TargetFramework>
    <Nullable>enable</Nullable>
    <ImplicitUsings>enable</ImplicitUsings>
  </PropertyGroup>

  <ItemGroup>
    <PackageReference Include="Moesif.Middleware" Version="1.3.20" />
  </ItemGroup>

</Project>
Run the following command to ensure your project builds correctly.
dotnet build
Your dependencies will be brought into the project and compiled if necessary. The Moesif.Middleware dependency is what allows us to connect to Moesif.
Step 3: Adding the Moesif Integration Code
First, we’ll add some configuration details into our appsettings.json file. It’s here we can define various options like our application ID, whether or not to log the body of a request, or enable local debugging. Enter the following, editing as you see fit:
{
  "MoesifOptions": {
    "ApplicationId": "YOUR_MOESIF_APPLICATION_ID",
    "LocalDebug": false,
    "LogBody": true,
    "LogBodyOutgoing": true,
    "ApiVersion": "1.1.0",
    "EnableBatching": true,
    "BatchSize": 25
  },
  ...
}
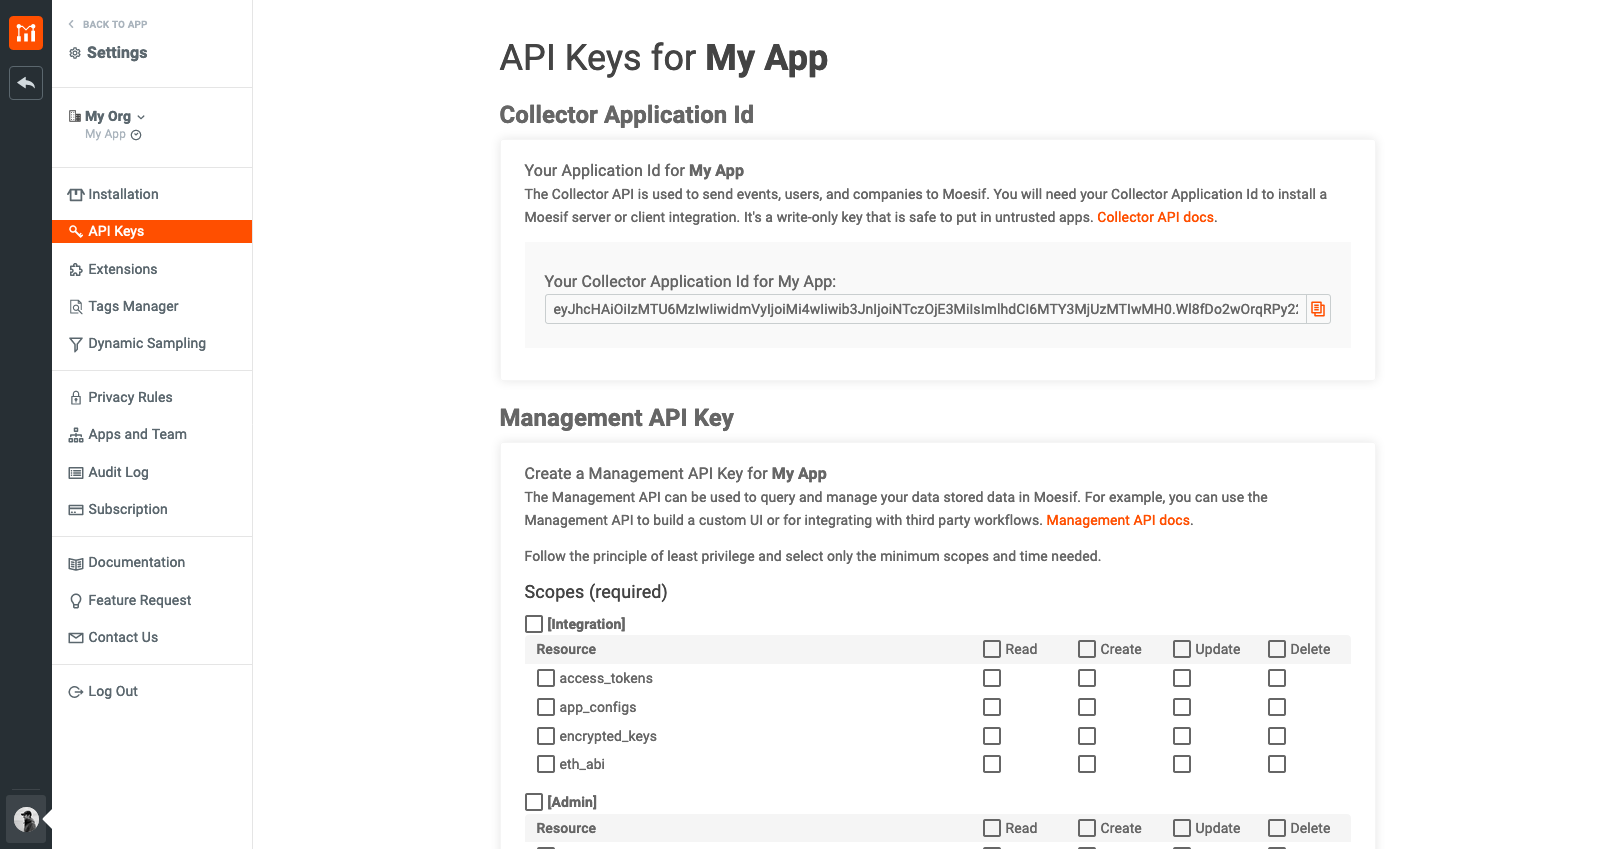
Obtaining your Moesif Application ID
Your Moesif Application ID is provided to you in the code example on the setup screen. If you navigated away from the screen or have need for your application ID in the future, there are alternative ways to access it. Your Moesif application ID is found in Moesif by going to the menu link in the bottom-left of the screen (which will show your name) and selecting API Keys.
The key will then be on the page that appears under Collector Application Id.
Next, we’ll create a file to host all of our Moesif middleware implementations. We’ll create a folder called Settings and create a file within it called MoesifOptions.cs.
Don’t be intimidated by the wall of code. This file includes a fair amount of boilerplate. We don’t need to edit this at all right now, but it will be useful to have in the future if you wish to enable more features in Moesif.
// MoesifOptions.cs

namespace CreditScoreAPI.Settings
{
    public class MoesifOptions
    {
        private readonly IConfiguration _config;

        public MoesifOptions(IConfiguration config)
        {
            _config = config;
        }
        public static Func<HttpRequest, HttpResponse, string> IdentifyUser = (HttpRequest req, HttpResponse res) => {
            // Implement your custom logic to return user id
            return req.HttpContext?.User?.Identity?.Name;
        };

        public static Func<HttpRequest, HttpResponse, string> IdentifyCompany = (HttpRequest req, HttpResponse res) => {
            return req.Headers["X-Organization-Id"];
        };

        public static Func<HttpRequest, HttpResponse, string> GetSessionToken = (HttpRequest req, HttpResponse res) => {
            return req.Headers["Authorization"];
        };

        public static Func<HttpRequest, HttpResponse, Dictionary<string, object>> GetMetadata = (HttpRequest req, HttpResponse res) => {
            Dictionary<string, object> metadata = new Dictionary<string, object>
            {
                {"string_field", "value_1"},
                {"number_field", 0},
                {"object_field", new Dictionary<string, string> {
                    {"field_a", "value_a"},
                    {"field_b", "value_b"}
                    }
                }
            };
            return metadata;
        };

        public static Func<HttpRequestMessage, HttpResponseMessage, Dictionary<string, object>> GetMetadataOutgoing = (HttpRequestMessage req, HttpResponseMessage res) => {
            Dictionary<string, object> metadata = new Dictionary<string, object>
            {
                {"string_field", "value_1"},
                {"number_field", 0},
                {"object_field", new Dictionary<string, string> {
                    {"field_a", "value_a"},
                    {"field_b", "value_b"}
                    }
                }
            };
            return metadata;
        };

        public Dictionary<string, object> getMoesifOptions()
        {
            Dictionary<string, object> moesifOptions = new Dictionary<string, object>
            {
                {MoesifOptionsParamNames.ApplicationId, getConfigString(MoesifOptionsParamNames.ApplicationId)},
                {MoesifOptionsParamNames.LocalDebug, getConfigBool(MoesifOptionsParamNames.LocalDebug)},
                {MoesifOptionsParamNames.LogBody, getConfigBool(MoesifOptionsParamNames.LogBody)},
                {MoesifOptionsParamNames.LogBodyOutgoing, getConfigBool(MoesifOptionsParamNames.LogBodyOutgoing)},
                {MoesifOptionsParamNames.ApiVersion, getConfigString(MoesifOptionsParamNames.ApiVersion)},
                {MoesifOptionsParamNames.EnableBatching, getConfigBool(MoesifOptionsParamNames.EnableBatching)},
                {MoesifOptionsParamNames.BatchSize, getConfigInt(MoesifOptionsParamNames.BatchSize)},
                {MoesifOptionsParamNames.IdentifyUser, IdentifyUser},
                {MoesifOptionsParamNames.IdentifyCompany, IdentifyCompany},
                {MoesifOptionsParamNames.GetSessionToken, GetSessionToken},
                {MoesifOptionsParamNames.GetMetadata, GetMetadata},
                {MoesifOptionsParamNames.GetMetadataOutgoing, GetMetadataOutgoing}
            };
            return moesifOptions;
        }

        public string getConfigString(string paramName)
        {
            return _config.GetValue<string>(MoesifOptionsParamNames.asKey(paramName));
        }

        public bool getConfigBool(string paramName)
        {
            return _config.GetValue<bool>(MoesifOptionsParamNames.asKey(paramName));
        }
        public int getConfigInt(string paramName)
        {
            return _config.GetValue<int>(MoesifOptionsParamNames.asKey(paramName));
        }

        public bool isConfiguredMoesifApplicationId()
        {
            string appId = null;
            try
            {
                appId = (string)getMoesifOptions().GetValueOrDefault(MoesifOptionsParamNames.ApplicationId);
            }
            catch (Exception ex)
            {
                Console.WriteLine("Error Reading Moesif Application Id in appsettings(.env).json: " + ex.Message);
            }
            return !string.IsNullOrWhiteSpace(appId) && !appId.StartsWith("<");
        }
    }

    public class MoesifOptionsParamNames
    {
        // Read from appsettings.json
        public static string Key = "MoesifOptions";
        // Read from appsettings.json
        public static string ApplicationId = "ApplicationId";
        // Read from appsettings.json
        public static string LocalDebug = "LocalDebug";
        // Read from appsettings.json
        public static string LogBody = "LogBody";
        // Read from appsettings.json
        public static string LogBodyOutgoing = "LogBodyOutgoing";
        // Read from appsettings.json
        public static string ApiVersion = "ApiVersion";
        // Read from appsettings.json
        public static string EnableBatching = "EnableBatching";
        // Read from appsettings.json
        public static string BatchSize = "BatchSize";

        public static string IdentifyUser = "IdentifyUser";
        public static string IdentifyCompany = "IdentifyCompany";
        public static string GetSessionToken = "GetSessionToken";
        public static string GetMetadata = "GetMetadata";
        public static string GetMetadataOutgoing = "GetMetadataOutgoing";

        public static string asKey(string suffix)
        {
            return Key + ":" + suffix;
        }
    }
}
In this file we define our configuration of the Moesif middleware. We can also define details that can enable user and company tracking, add custom metadata that will be associated with an event, and add the ability to skip certain events entirely.
If you would like to enable User Tracking, check out our documentation.
We’ll jump over to our Program.cs file to enable the Moesif middleware. We’ll add the using Moesif.Middleware statement to import the namespace. After our builder declaration, we will configure ASP.NET’s Kestrel server to allow synchronous operations:
// Program.cs

using Moesif.Middleware;

var builder = WebApplication.CreateBuilder(args);

builder.WebHost.ConfigureKestrel(serverOptions =>
{
   serverOptions.AllowSynchronousIO = true;
});
Finally, after building our WebApplication, we’ll initialize the Moesif Middleware with our pre-defined configuration:
// Program.cs

var app = builder.Build();

var moesifOptions = new CreditScoreAPI.Settings.MoesifOptions(app.Configuration);

app.UseMiddleware<MoesifMiddleware>(moesifOptions.getMoesifOptions());
We parse through the app’s configuration extracting the details we entered in appsettings.json. We then use that object to configure the initialization of our Middleware.
Our final Program.cs looks like this:
using Moesif.Middleware;

var builder = WebApplication.CreateBuilder(args);
builder.WebHost.ConfigureKestrel(serverOptions =>
{
   serverOptions.AllowSynchronousIO = true;
});

var app = builder.Build();

var moesifOptions = new CreditScoreAPI.Settings.MoesifOptions(app.Configuration);

app.UseMiddleware<MoesifMiddleware>(moesifOptions.getMoesifOptions());

var userAddedCreditScores = new List<CreditScore>();

app.MapGet("/creditscore", () =>
{
    var score = new CreditScore
    (
        Random.Shared.Next(300, 850)
    );
    return score;
});

app.MapPost("/creditscore", (CreditScore score) => {
    userAddedCreditScores.Add(score);
    return score;
});

app.MapGet("/userAddedCreditScores", () => userAddedCreditScores);

app.Run();

record CreditScore(int Score)
{
    public string? CreditRating
    {
        get => Score switch
        {
            >= 800 => "Excellent",
            >= 700 => "Good",
            >= 600 => "Fair",
            >= 500 => "Poor",
            _ => "Bad"
        };
    }
}
Step 4: Making Your First Request
Start your server with the following command:
dotnet run
If you are having issues, running the command:
dotnet clean && dotnet build && dotnet runcan help sort out some build time issues.
Once your API code is back up and running, it’s time to issue a request to your endpoint. My preference for this is to use Postman to send the GET request.
Regardless of how the request is sent, the Moesif integration into your application isn’t complete until the first request is sent and detected by Moesif. In the Moesif setup screen, before you send off the request, you should see a dialog at the bottom of the screen showing “No events received”.
<img class="lazyload blur-up" data-src="/docs/images/guides/2300/no-data-received-screen.png" alt="Moesif no data received onboarding screen">
To continue, send off the request to your endpoint.
<img class="lazyload blur-up" data-src="/docs/images/guides/2300/postman.png" alt="Postman showing a successful request to our endpoint">
Step 5: Confirming Your Integration
After the request is sent, Moesif should receive the event and data. This may take a few moments for the first request to reflect in the system. Once received, Moesif will confirm that you are ready to move forward.
Scroll to the bottom of the screen and click View Events.
<img class="lazyload blur-up" data-src="/docs/images/guides/2300/next-button.png" alt="Moesif next button">
Explore Moesif
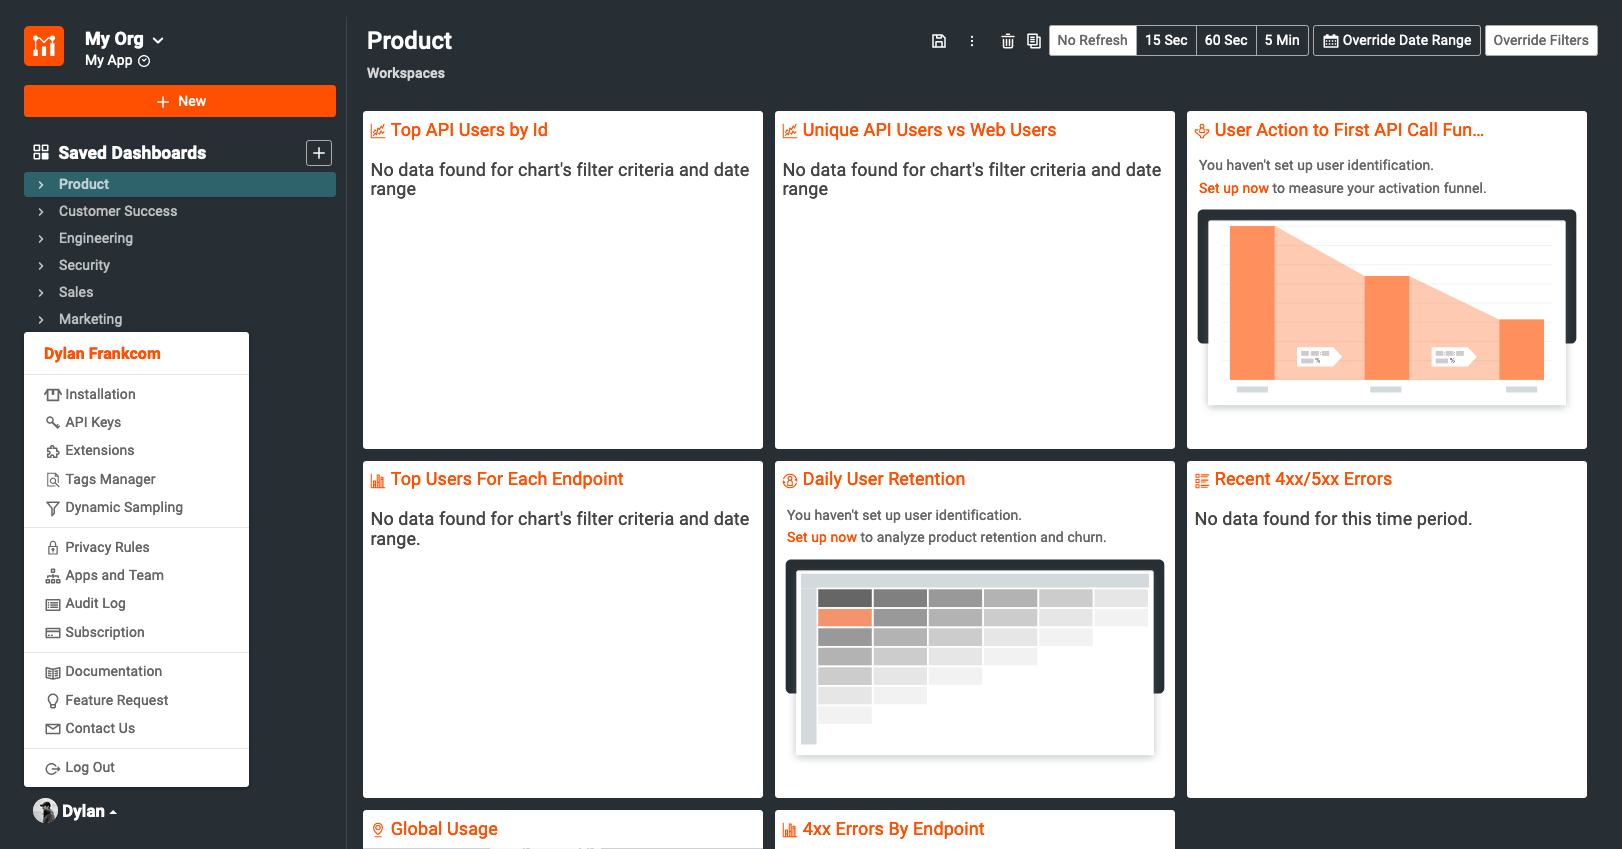
You’ve now successfully integrated your API application with Moesif. You should now see the Moesif dashboard in the browser, ready to explore.
<img class="lazyload blur-up" data-src="/docs/images/guides/2300/query-received-dashboard.png" alt="Moesif dashboard with event received">
Now that your API is integrated and moving data into Moesif you can start to explore. Check out our docs to find everything from API analytics, monitoring and alerts, and more!