Integrating with KrakenD Enterprise
Moesif KrakenD plugin is available only on KrakenD Enterprise.
When it comes to deploying KrakenD and integrating it with Moesif, developers will be happy to know that it’s quite simple. In a few steps, you can get started with a performant gateway that is API analytics and monetization-ready.
In this tutorial, we will go over how to deploy KrakenD Enterprise via docker and then enable Moesif. Once enabled, we will quickly check the integration by sending through some API calls to our KrakenD instance and check to make sure that they came through to Moesif.
As we start, this tutorial assumes the following:
- You have an Active Moesif account. Don’t have one? Sign up here.
- You have docker installed.
Let’s get started by looking at deploying KrakenD enterprise.
Deploy KrakenD Enterprise on Docker
Before we get started with the step below, you’ll want to make sure that you have a KrakenD Enterprise license. If you don’t have one, you can chat with the KrakenD team to get one. Once you have a license key, you can proceed to do the following:
- Create a folder/directory called
KrakenDsomewhere on your local machine. - Open up a terminal pointing to the new
KrakenDdirectory. - Lastly, add your
LICENSE.txtto yourKrakenDfolder. Don’t have a LICENSE.txt file? Contact the KrakenD team for an Enterprise license.
Next, we will set up the basic configuration for our KrakenD Enterprise instance. In the terminal, pointing to the root of the KrakenD folder, we will run a few commands to set up the instance configuration as well as launch the docker container.
First, create a krakend.json file in the KrakenD directory as well. To do this in the terminal, you can run the following:
echo '{ "version": 3 }' > krakend.json
Next, we will create and run the KrakenD instance in docker. To do so, you can run the following command:
docker run --rm -it -p "8080:8080" -v "$PWD:/etc/krakend" \
  krakend/krakend-ee:2 \
  run -c krakend.json
For those less familiar with docker, here is what we are doing within this command:
-
docker runstarts a new container from a Docker image. -
The
--rmflag automatically removes the container when it exits. Without this flag, stopped containers remain on the system and can be restarted or inspected later. -
The
-itflag combines two flags,-iand-t. The-ior--interactiveflag keeps the container’s standard input (STDIN) open, even if it is not attached. The-tor--ttyflag provides a terminal or console inside the container. This is useful when you want to interact with the container and enter commands. -
The
-p "8080:8080"command maps port 8080 of the container to port 8080 on your host machine. This allows you to access services running on that port inside the container using the host’s IP address and port 8080. -
The
-v "$PWD:/etc/krakend"mounts the supplied directory from your host system into the container.$PWDis a shell variable that represents the current working directory on the host./etc/krakendis the path in the container where this directory will be mounted. This is used for sharing files between the host and the container. In this case, ourkrakend.jsonand theLICENSE.txtfile. -
The
krakend/krakend-ee:2command specifies the Docker image to use. In this case,krakend/krakend-eeis the name of the image, and2is the tag that represents the version of the image. -
Lastly, the
run -c krakend.jsoncommand gets executed inside the container once it starts. In this case, it’s running the Krakend service with a specific configuration filekrakend.json.
Feel free to modify
docker runthe command as needed for your specific use case.
Add an Endpoint
Next, we will add a test endpoint to our KrakenD Enterprise instance that is running in docker. To do this, we will need to add a few things to the krakend.json configuration file we created earlier. Open up the krakend.json file and add the following:
{
    "version": 3,
    "endpoints": [
        {
          "endpoint": "/v1/test",
          "method": "GET",
          "backend": [
            {
              "url_pattern": "/get",
              "method": "GET",
              "host": [
                "https://www.httpbin.org"
              ]
            }
          ]
        }
      ]

}
Let’s break down what we’ve added in the krakend.json file.
"version": 3
When we first created the file, we added this element. This specifies the version of the Krakend configuration file format we are using. It’s important to use the correct version to ensure compatibility with your Krakend installation.
"endpoints"
Next, we see the endpoints element. This is an array that defines the API endpoints Krakend will expose. Each item in the array is an endpoint configuration. In our case, we have a single endpoint that we are adding inside the array. Let’s take a look at each element that comprises the endpoint that we’ve added.
"endpoint": "/v1/test"
Inside the endpoints array, we’ve added a single entry. With what we’ve added here when you call /v1/test on your Krakend server, it will process this request according to the configuration we’ve defined.
"method": "GET"
This specifies the HTTP method for this endpoint. In this case, it’s a GET request. This means the endpoint /v1/test will respond to HTTP GET requests.
"backend"
This is an array defining the backend service(s) Krakend will connect to when this endpoint is called. Each item in this array represents a different backend service. In your configuration, there’s one backend service defined. Inside the backend array, we’ve defined a few things that we will cover next.
"url_pattern": "/get"
This specifies the path Krakend will append to the backend host when forwarding the request. If a request comes to Krakend at /v1/test, it will be forwarded to https://www.httpbin.org/get.
"method": "GET"
This defines the HTTP method Krakend uses when making the request to the backend. In the case of the configuration we’ve added, it will use a GET request.
"host": ["https://www.httpbin.org"]
This is an array of hosts for the backend service. Krakend will use these URLs to forward incoming requests. Here, it’s set to https://www.httpbin.org. If we were to add more than one host, KrakenD would load balance the traffic between the hosts added into the array.
Now that we have our config in place, we will restart KrakenD (or if you want to enable a hot reload of the config, you can check out the docs here). For this, stop the docker container and restart it using the command we used before to start the service. This will pull in our latest config when the container starts back up.
Test The Endpoint
Next, let’s test the endpoint. To do this, you could use Postman and send a GET request to http://localhost:8080/v1/test. Alternatively, use the following curl request below and run it in a terminal.
curl http://localhost:8080/v1/test
You should get back a successful response from the endpoint. Next, we will add Moesif to the configuration so we can start to explore API analytics and monetization for the traffic flowing through our KrakenD instance.
Configure Moesif Within KrakenD
To add the Moesif configuration to our KrakenD instance, go back into the krakend.json configuration file and add the following:
"extra_config": {
        "telemetry/moesif": {
          "@comment": "Push user activity to Moesif based on the information contained in JWT, every second, in batches of 1000 events",
          "application_id": "MOESIF_APPLICATION_ID",
          "debug": false,
          "log_body": false,
          "event_queue_size": 1000000,
          "batch_size": 1000,
          "timer_wake_up_seconds": 1
        }
      }
You’ll see the application_id element currently reads MOESIF_APPLICATION_ID. There are two ways to retrieve this from Moesif:
- If you are in the onboarding flow of Moesif, choose the KrakenD option on the left-hand side. In the pane on the right, you’ll see your Moesif Application ID.
- If you’ve already integrated with Moesif in another way, you can click on the Settings menu in the bottom left side of the Moesif application (displayed as your name). In the menu, click the API Keys menu item. Your Application ID will be on the next screen under Your Collector Application Id for {your_app_name}.
Regardless of how the key is obtained, replace the MOESIF_APPLICATION_ID placeholder, save the file, and restart the KrakenD instance.
Your krakend.json configuration file, once completely populated with the Moesif elements, will look like so:
{
    "version": 3,
    "endpoints": [
        {
          "endpoint": "/v1/test",
          "method": "GET",
          "backend": [
            {
              "url_pattern": "/get",
              "method": "GET",
              "host": [
                "https://httpbin.org/"
              ]
            }
          ]
        }
      ],
    "extra_config": {
        "telemetry/moesif": {
          "@comment": "Push user activity to Moesif based on the information contained in JWT, every second, in batches of 1000 events",
          "application_id": "MOESIF_APPLICATION_ID",
          "debug": false,
          "log_body": false,
          "event_queue_size": 1000000,
          "batch_size": 1000,
          "timer_wake_up_seconds": 1
        }
      }
}
Test The Integration
With Moesif enabled, it’s time to test that our integration is working. Using the command we sent before let’s send a few more requests.
curl http://localhost:8080/v1/test
Then, in Moesif we will check to make sure the requests came through. If you are on the onboarding screen, you’ll see the screen show that events have been received. If this is the case, once received, continue through the next few screens until you get into the main app.
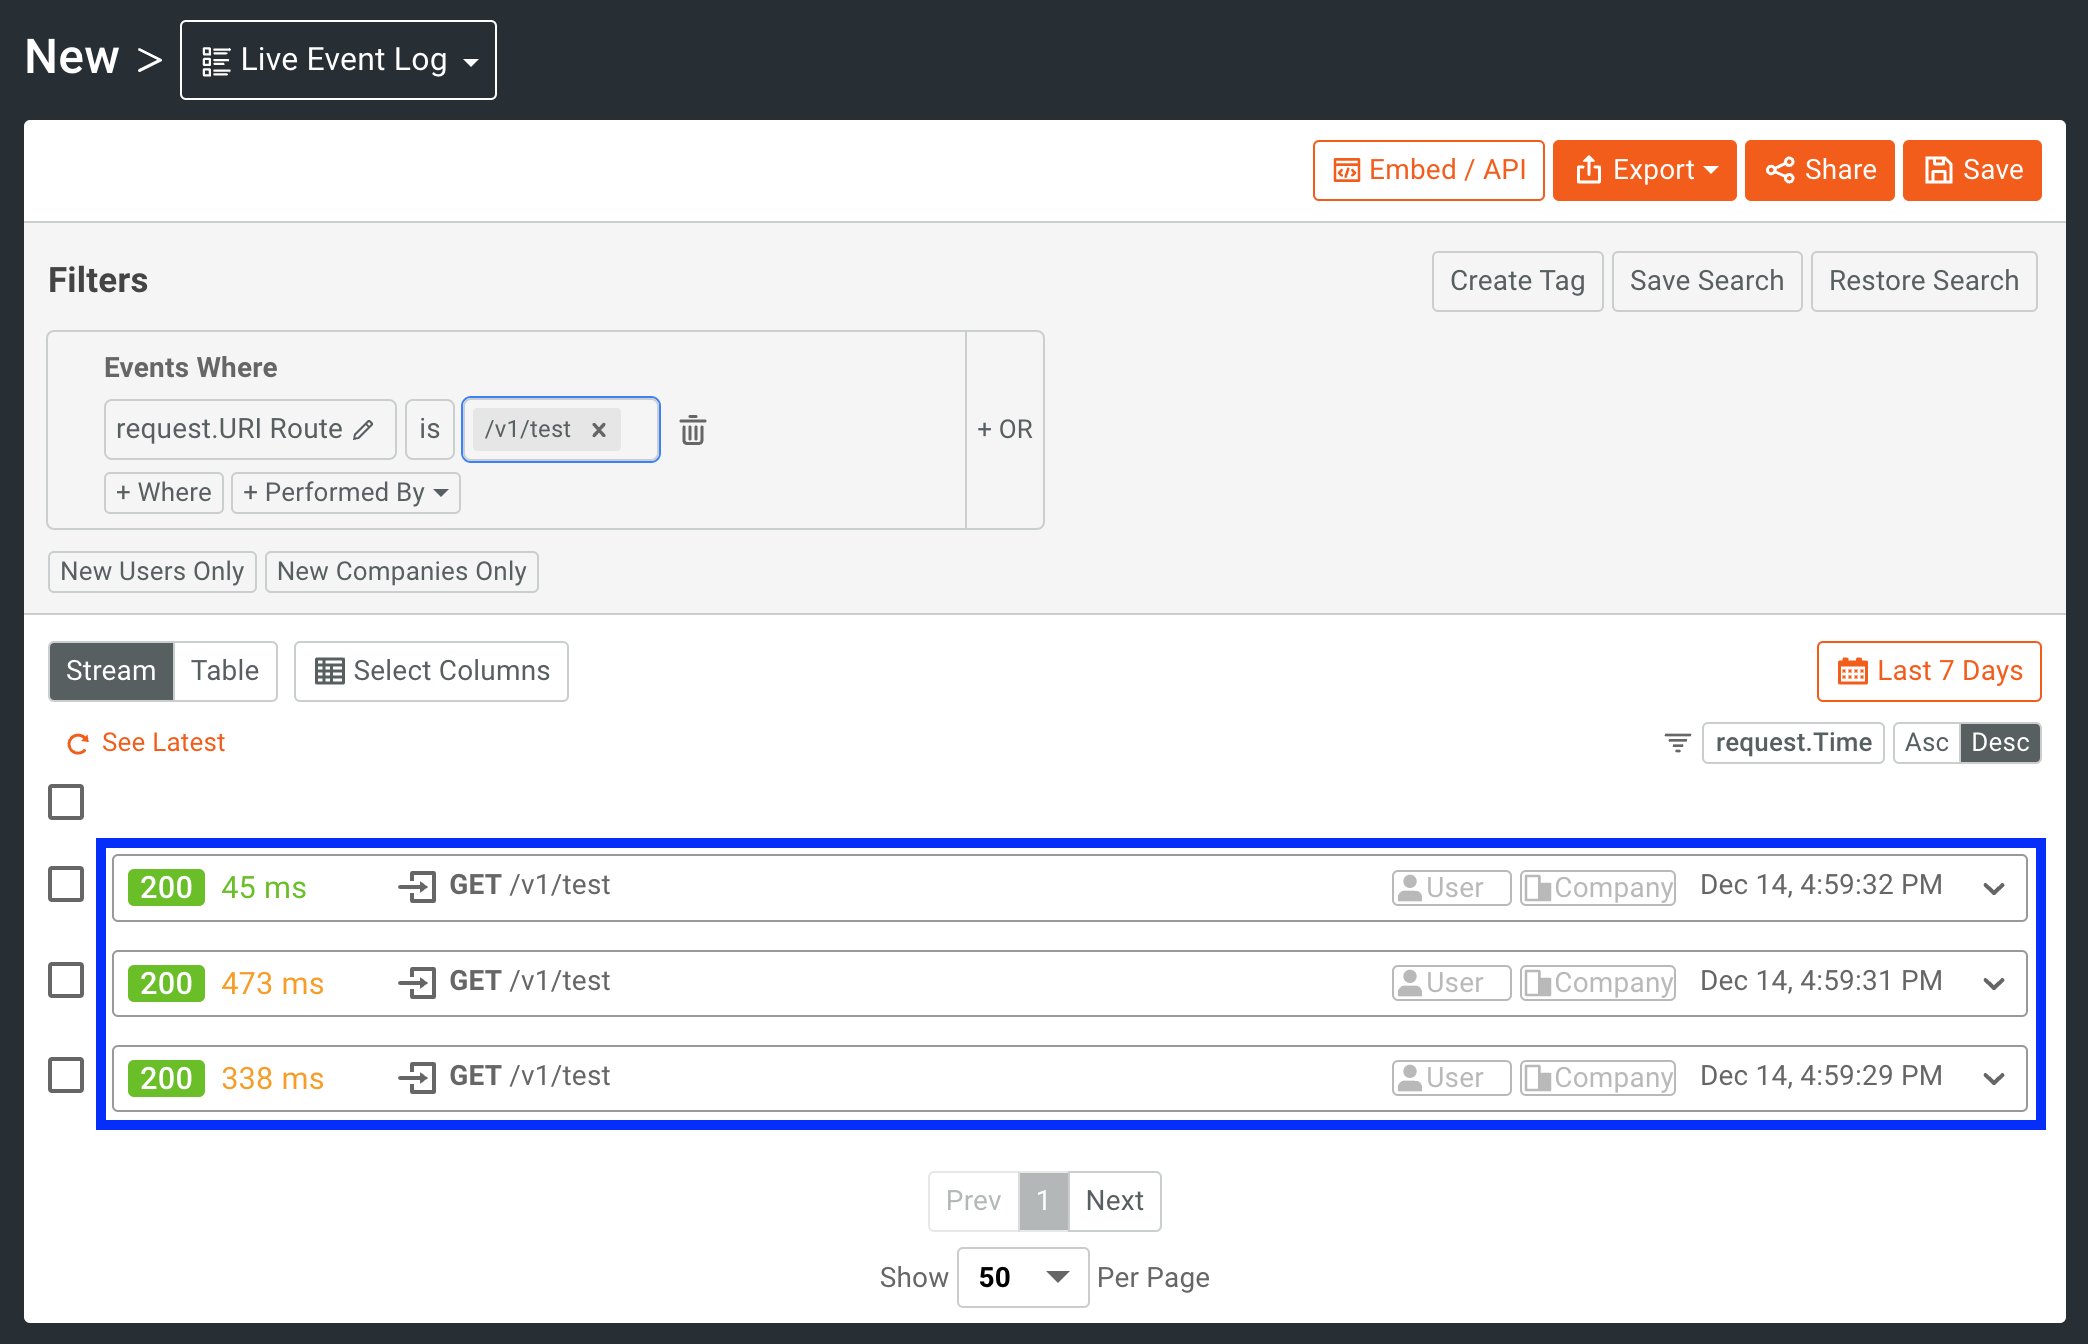
Once in the main Moesif application, click on the New button in the top-left of the screen and in the modal, select Live Event Log.

In the Live Event Log, we should be able to see the requests that were processed by the KrakenD instance show up here.
Next Steps
Now that you’ve got the base integration running and a working instance of KrakenD, you’ll want to implement User and Company tracking to experience the full functionality of both platforms. For more details on how that works, see the docs here.