Moesif AWS API Gateway Integration
Integrate Moesif API Monetization and Analytics with your AWS API Gateway without any code changes or redeploy. This integration installs automatically via a CloudFormation template.
How it works
The integration works by Logging API calls to an Amazon Data Firehose which sends API access logs in batches to Moesif. Besides tracking typical API parameters like URI route and status code, the integration also tracks the user identity which makes them perfect for user behavior analytics tools like Moesif.
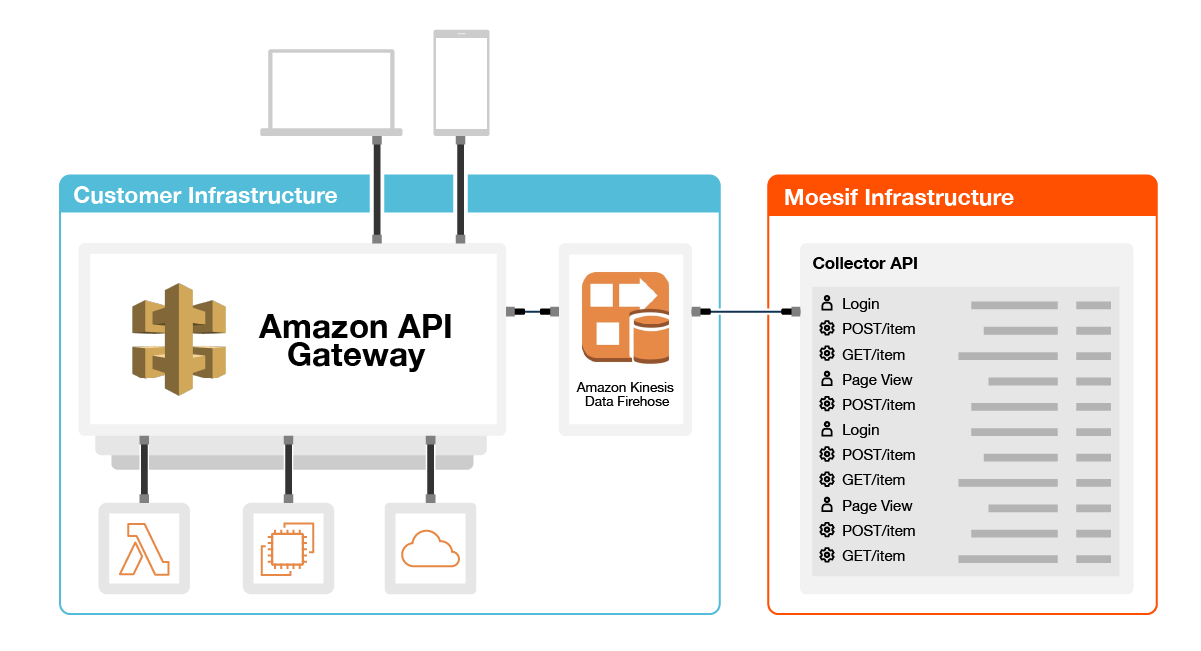
Because you are monitoring at the API gateway itself, you also gain visibility into rejected requests that never reach your underlying service such as those running in AWS Lambda or EC2.
This integration only supports AWS Gateway of type REST API and REST API Private. If your gateway is not a REST API Type, you must use one of the SDKs.
How to Install
1. Create an Amazon Data Firehose
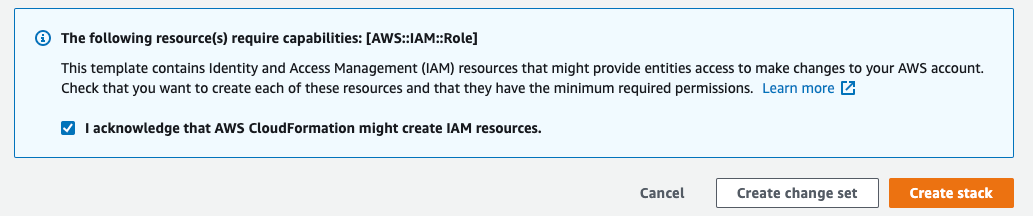
- Click the below Launch Stack button to open CloudFormation which will automatically create a new Data Firehose configured with Moesif collection API as the destination.
- In the
MoesifApplicationIdfield of the Parameters section, enter your Moesif Application ID. To get your Application ID, follow these steps:- Log into Moesif Portal.
- Select the account icon to bring up the settings menu.
- Select Installation or API Keys.
- Copy your Moesif Application ID from the Collector Application ID field.
- Ensure you checkbox I acknowledge that AWS CloudFormation might create IAM resources. Then click Create Stack.

If you experience errors or want to create the Firehose manually, follow these instructions
After the stack is created, search for “Firehose” in the AWS Console search bar and select Amazon Data Firehose. You’ll need the newly created Firehose ARN for the next step.
2. Enable API Gateway access logging
With the Firehose created, you need to configure API Gateway to send access logs to it.
- Go to your AWS API Gateway instance within the AWS Console.
- Select Stages on the left menu and then select Edit under the “Logs and tracing” section.
- Within the Edit logs and tracing panel, toggle on Custom access logging.
- Add your Data Firehose ARN created from Step 1 under Access Log Destination ARN.
- For Log format, add the below JSON snippet. Ensure the JSON is minified into a single line like below.
{"apiId":"$context.apiId","requestId":"$context.requestId","requestTime":"$context.requestTime","protocol":"$context.protocol","httpMethod":"$context.httpMethod","resourcePath":"$context.path","requestHostHeader":"$context.domainName","requestUserAgentHeader":"$context.identity.userAgent","ip":"$context.identity.sourceIp","status":"$context.status","responseLength":"$context.responseLength","durationMs":"$context.responseLatency","caller":"$context.identity.caller","user":"$context.identity.user","principalId":"$context.authorizer.principalId","cognitoIdentityId":"$context.identity.cognitoIdentityId","userArn":"$context.identity.userArn","apiKeyId":"$context.identity.apiKeyId","metadata":{"apiKey":"$context.identity.apiKey","stage":"$context.stage"}}
The above Log format works by mapping AWS $context variables to Moesif variables. For more info surrounding available $context variables, check out the AWS docs
It’s not possible to log the request and response body with this integration. If you require analytics on body fields, choose a different integration such as a SDK-based integration.
Click Save Changes and that’s it! API logs should start showing up after a few minutes.
You may need to redeploy your stage if logs are not showing up in Moesif.
Overview of User Tracking
With the above Log format, the integration also logs the various identity variables so that Moesif can properly identify the user. For most integrations, no change is needed and the default Log format already includes covers all built in API Gateway access control methods and authorizers used.
| Priority | Moesif Variable | AWS Context Variable | Description |
|---|---|---|---|
| 1. | user |
$context.identity.user |
The principal identifier of the user. Supported for IAM authorization. |
| 2. | apiKeyId |
$context.identity.apiKeyId |
The API key ID associated with an API request that requires an API key. |
| 3. | principalId |
$context.authorizer.principalId |
The principal user id associated returned from an API Gateway Lambda authorizer such as a custom one that extracts the subject from a JWT (Json Web Token). |
| 4. | cognitoIdentityId |
$context.identity.cognitoIdentityId |
The Amazon Cognito identity ID of the caller making the request. |
| 5. | caller |
$context.identity.caller |
The principal identifier of the caller that signed the request. Supported for IAM authorization. |
| 6. | userArn |
$context.identity.userArn |
The Amazon Resource Name (ARN) of the effective user identified after authentication. |
Priority of Identity Variables
If multiple identities are available (uncommon), the above table defines the priority to select an identity.
For example, if you are using a custom lambda authorizer which extracts the subject from a JWT (Json Web Token), then your lambda function would normally return the principalId which is automatically populated in $context.authorizer.principalId by AWS. Moesif will then use this (assuming $context.identity.user and $context.identity.apiKeyId are not defined as these are higher priority).
Customize User Identification
While automatic extraction should be sufficient for most applications, you can override Moesif’s default behavior.
To do so, update your Log format to map an AWS $context variable to the Moesif field user. Any AWS context variable can be used as long as it’s a “string” type.
For example, if you want to use the source IP address as the user id, modify user in your JSON log format to look like below:
{
  "user": "$context.identity.sourceIp"
}
If the field is not already available as an $context variable, you can add it to the authorizer context in your lambda authorizer. This works only if using a custom lambda authorizer.
Enabling Company Tracking
The Moesif AWS API Gateway integration can also enable company tracking as well. This value can be added into Moesif in two distinct ways:
- The first option uses the
companyIdvariable within the gateways log format (similar to user tracking). To do so, modify the Moesif fieldcompanyIdin your JSON log format to refer to the appropriate AWS context variable. For example, you may use$context.identity.apiKeyIdor another unique identifier within the available context variables.
{
  "companyId": "$context.identity.apiKeyId"
}
- Secondly, for more flexibility, users can also use the Moesif API to link users to companies via the update users API. Specifics can be found in the docs, here.
Event Metadata
Besides the above default template variables, you can include additional AWS context variables not already mapped by modifying your Log format. They must be added as part of the queryString, the request.headers, or the metadata field.
- For
queryString, Moesif will parse this as a query string. Must be in format likea=1&b=2 - For
request.headers, Moesif wil parse and display these as HTTP headers within Moesif UI. - For
metadata, Moesif will parse as the custom event metadata. Use this for any data not part ofqueryStringorrequest.headerscustom to your application.
| Field | Format |
queryString |
The full query string starting with ?. It should be already url encoded such as a=1&b=2 |
request.headers |
Map of key/values of headers like Content-Type and X-Forwarded-For. Values must be primitive types that conform to HTTP header values. |
metadata |
JSON object of data that’s not already part of query string or headers |
Below is an example Log format which maps an additional AWS variable $context.error.message to a new metadata field my_error_message.
The rest of Log format fields are omitted for brevity.
{
  "metadata": { "my_error_message": "$context.error.message" }
}
Any AWS $context variables can be included as part of the metadata.
Including event fields not in $context
AWS Log format only supports the $context variables. This works well like in the above example which is already in the $context. However, many event fields like request headers are not part of the $context variables.
You can still indirectly include these event fields by returning their key-value pairs as part of the authorizer context from a custom Lambda authorizer function. By doing so, you can then reference the key-values via $context.authorizer.keyName where keyName is your key name.
For example, let’s say we want to save the operationName and a request header X-Forwarded-For which are not part of the $context variables.
You can read them in a custom lambda authorizer such as in the example Python lambda below. Notice how we set two fields as part of the returned context.
import json

def lambda_handler(event, context):
    print(json.dumps(event))
    query_string = urlencode(event.get('queryStringParameters', {}))

    # Construct the policy document
    auth_response = {
        "principalId": "user1234",
        "policyDocument": {
            "Version": "2012-10-17",
            "Statement": [
                {
                    "Action": "execute-api:Invoke",
                    "Effect": "Allow",
                    "Resource": event['methodArn']
                }
            ]
        },
        "context": {
            # The query string
            "queryString": query_string,

            # A request header
            "x_forwarded_for": event['headers'].get('X-Forwarded-For', None),
            "content_type": event['headers'].get('Content-Type', None),

            # An arbitrary  metadata field
            "operation_name": event['requestContext'].get('operationName', '')

        }
    }

    # Return the policy document
    return auth_response
Once done, you can now reference the variables like so in your Log format:
{
    "queryString": "$context.authorizer.queryString",
    "headers": {
        "X-Forwarded-For": "$context.authorizer.x_forwarded_for",
        "Content-Type": "$context.authorizer.content_type"
    },
    "metadata": {
        "operation_name": "$context.authorizer.operation_name"
    }
}
With this solution, you can include any fields available in the event context.
AWS Restrictions:
- AWS Does not support nesting for the authorizer
context.authorizer.* - AWS Does not support dashes for field names for
context.authorizer.*
Supporting Quotas & Governance Rules
With the default integration, API traffic will be logged to Moesif via firehose, but Moesif governance rules will not be enforced. If you require governance rules such as to enforce quotas or block cancelled subscriptions, you can integrate with the Moesif governance rules APIs within your custom lambda authorizer for AWS API Gateway.
Moesif has an example lambda authorizer available on GitHub.
By enforcing governance rules at the API Gateway layer, you have a central spot to reject requests and you have better protection of your underlying services as the requests will never hit them.
Alternatively, if you can’t add a lambda authorizer or prefer a more out-of-the-box integration, you can also install a Moesif server integration for your API/web framework. In your SDK configuration, make sure you skip all logging so you don’t duplicate events that are already logged via the firehose. Because you can mix-and-match multiple Moesif integrations, you can enforce governance through the Moesif server integrations like moesif-nodejs, while still maintaining logging through this API Gateway integration.
Troubleshooting
Manual Firehose Creation
If you cannot use the CloudFormation template or having issues, you can manually create and configure a Kinesis Data Firehose using the HTTP destination.
Go to Amazon Kinesis within the AWS Console and select Create Delivery Stream.
The name of your delivery stream must start with amazon-apigateway-
- For the source, select Direct PUT or other sources.
- For the destination, select HTTP Endpoint and enter the following:
- For
HTTP endpoint URL, enterhttps://api.moesif.net/v1/partners/aws/kinesis - For
Access key, enter your Moesif Application Id. - For
Buffer interval, enter 60 seconds. - Enable GZIP compression.
Finish the creation wizard and make a note of the Firehose ARN. Complete the rest of the guide using your Firehose ARN. This should be in the same region where you created the Firehose.
Limitations
There are certain limitations to be aware of below. You can use an alternative Moesif server integration as a workaround for any of these limitations.
- This integration supports REST API and REST API Private. It does not support a Websockets or HTTP Gateway.
- Request and Response Body fields are not logged.
- Governance rules will not be enforced until you integrate the governance rules API.