Moesif Servlet Integration Documentation
by Moesif, the API analytics and API monetization platform.
![]()

![]()

moesif-servlet is a Java servlet filter that logs incoming API calls and sends to Moesif for API analytics and monitoring.
Overview
We’ve implemented the SDK as a Javax servlet filter without importing framework specific dependencies. Any framework built on Java Servlet API such as Spring, Struts, and Jersey can use this SDK with minimal configuration.
An identical implementation moesif-servlet-jakarta uses the newer Jakarta Servlet API. This implementation works with Java 17+ Tomcat 10 and Spring Boot 3.0. You can find its source code in the moesif-servlet-jakarta folder.
Prerequisites
Before using this SDK, make sure you have the following:
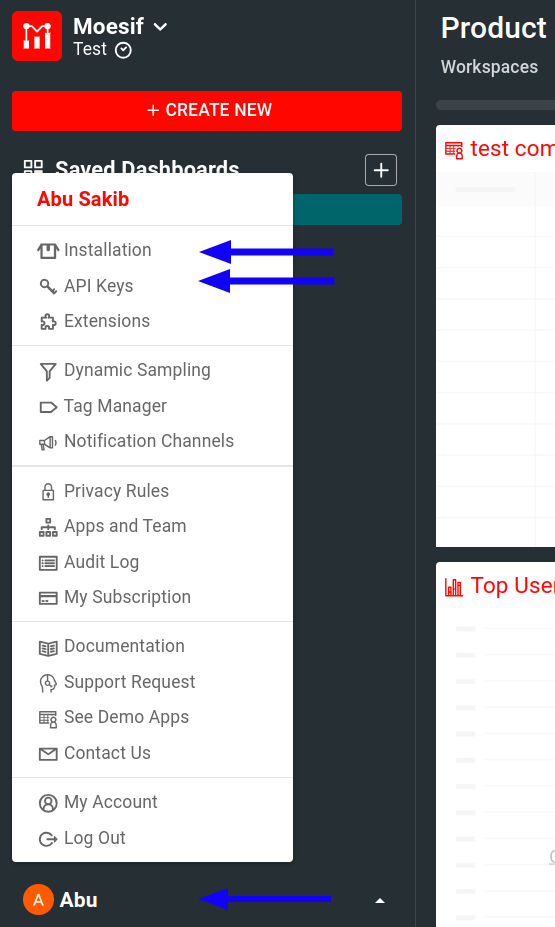
Get Your Moesif Application ID
After you log into Moesif Portal, you can get your Moesif Application ID during the onboarding steps. You can always access the Application ID any time by following these steps from Moesif Portal after logging in:
- Select the account icon to bring up the settings menu.
- Select Installation or API Keys.
- Copy your Moesif Application ID from the Collector Application ID field.
Install the SDK
Maven Users
Add the Moesif dependency to your project’s pom.xml file:
<dependency>
    <groupId>com.moesif.servlet</groupId>
    <artifactId>moesif-servlet</artifactId>
    <version>1.8.3</version>
</dependency>

<!-- OR for newer Jakarta-->
<dependency>
    <groupId>com.moesif.servlet</groupId>
    <artifactId>moesif-servlet-jakarta</artifactId>
    <version>2.2.3</version>
</dependency>
Gradle Users
Add the Moesif dependency to your project’s build.gradle file:
dependencies {
    compile 'com.moesif.servlet:moesif-servlet:1.8.3'
}

// OR for newer Jakarta
dependencies {
    compile 'com.moesif.servlet:moesif-servlet-jakarta:2.2.3'
}
How to Use
Different Java web frameworks have different way of configuring servlet filters. The following sections describe the instructions for different frameworks:
- Spring Boot
- Spring MVC
- Jersey Servlet
- Spark Servlet
- Generic Java Servlet
- Spring Boot 3.x using Jakarta
Spring Boot
In your Spring configuration file, install the MoesifFilter object.
import com.moesif.servlet.MoesifFilter;

import javax.servlet.Filter;
import org.springframework.web.servlet.config.annotation.*;
import org.springframework.context.annotation.*;
import org.springframework.http.converter.*;

@Configuration
public class MyConfig implements WebMvcConfigurer {

  @Bean
  public Filter moesifFilter() {
    return new MoesifFilter("Your Moesif Application Id");
  }
}
To customize the filter, pass in a object that implements MoesifConfiguration such
as MoesifConfigurationAdapter.
@Configuration
public class MyConfig implements WebMvcConfigurer {

  MoesifConfiguration config = new MoesifConfigurationAdapter() {
    @Override
    public String getSessionToken(HttpServletRequest request, HttpServletResponse response) {
      return request.getHeader("Authorization");
    }
  };

  @Bean
  public Filter moesifFilter() {
    return new MoesifFilter("Your Moesif Application Id", config);
  }
}
For for more information about MoesifConfiguration, see the configuration options.
Running the Spring Boot Starter Example
To run spring-boot-starter-example, make sure you have the following installed:
- Java 8+
- Maven version 3.0.x or above.
You can check Maven version with the following command:
mvn -v
Then follow these steps:
-
Clone the repository
git clone https://github.com/Moesif/moesif-servlet cd moesif-servlet -
In the
spring-boot-starter-example/src/main/java/com/moesif/servlet/spring/MyConfig.javafile, specify your Moesif Application ID in theapplicationIdvariable. -
Compile:
cd spring-boot-starter-example mvn clean install -
Run:
java -jar target/spring-boot-starter-example*.jarAlternatively:
mvn spring-boot:run -
Using Postman or cURL, make a few API calls to
http://localhost:8080/apior the port that Spring Boot is running on. -
Verify that the API calls log to your Moesif account web portal.
Spring MVC (Java Config)
import com.moesif.servlet.MoesifFilter;

import javax.servlet.Filter;
import org.springframework.web.servlet.support.AbstractAnnotationConfigDispatcherServletInitializer;


public class MyWebInitializer extends
		AbstractAnnotationConfigDispatcherServletInitializer {

	@Override
	protected Filter[] getServletFilters() {
		return new Filter[]{new MoesifFilter("Your Moesif Application Id")};
	}
}
Spring MVC (XML Config)
In Spring MVC + XML configuration, you can register the filters using web.xml file:
  <filter>
    <filter-name>MoesifFilter</filter-name>
    <filter-class>com.moesif.servlet.MoesifFilter</filter-class>
    <init-param>
      <param-name>application-id</param-name>
      <param-value>Your Moesif Application Id</param-value>
    </init-param>
    <init-param>
      <param-name>debug</param-name>
      <param-value>false</param-value>
    </init-param>
    <init-param>
      <param-name>logBody</param-name>
      <param-value>true</param-value>
    </init-param>
  </filter>
  <filter-mapping>
    <filter-name>MoesifFilter</filter-name>
    <url-pattern>/*</url-pattern>
  </filter-mapping>
You may have to override onStartup() to pass in the MoesifConfiguration object.
Jersey Servlet
You can run Jersey in multiple ways, as a Java servlet or embedded with a Java NIO framework like Grizzly. This subsection focuses on running Jersey as a servlet.
Edit the web.xml file and add your Moesif Application ID.
  <filter>
    <filter-name>MoesifFilter</filter-name>
    <filter-class>com.moesif.servlet.MoesifFilter</filter-class>
    <init-param>
      <param-name>application-id</param-name>
      <param-value>Your Application Id</param-value>
    </init-param>
    <init-param>
      <param-name>debug</param-name>
      <param-value>false</param-value>
    </init-param>
    <init-param>
      <param-name>logBody</param-name>
      <param-value>true</param-value>
    </init-param>
  </filter>
  <filter-mapping>
    <filter-name>MoesifFilter</filter-name>
    <url-pattern>/*</url-pattern>
  </filter-mapping>
Running the Jersey Servlet Example
To run jersey-servlet-example, make sure you have the following installed:
- Java 8+
- Maven version 3.0.x or above.
You can check Maven version with the following command:
mvn -v
Then follow these steps:
-
Clone the repository:
git clone https://github.com/Moesif/moesif-servlet cd moesif-servlet/ -
Edit the
jersey-servlet-example/src/main/webapp/WEB-INF/web.xmlfile and add your Moesif Application ID. -
Compile and run:
cd jersey-servlet-example mvn clean install java -jar target/dependency/webapp-runner.jar target/*.war -
Go to
http://localhost:8080/api/demoor the port that Tomcat is running on.
In your Moesif account web portal, you should see events logged and monitored.
You can shut down the server manually by pressing Ctrl + C.
Spark Servlet
You can run Spark in multiple ways, as a Java servlet or embedded with a server like Jetty. This subsection focuses on running Spark as a servlet.
Edit the web.xml file and add your Moesif Application ID.
  <filter>
    <filter-name>MoesifFilter</filter-name>
    <filter-class>com.moesif.servlet.MoesifFilter</filter-class>
    <init-param>
      <param-name>application-id</param-name>
      <param-value>Your Moesif Application Id</param-value>
    </init-param>
    <init-param>
      <param-name>debug</param-name>
      <param-value>false</param-value>
    </init-param>
    <init-param>
      <param-name>logBody</param-name>
      <param-value>true</param-value>
    </init-param>
  </filter>
  <filter-mapping>
    <filter-name>MoesifFilter</filter-name>
    <url-pattern>/*</url-pattern>
  </filter-mapping>
Running the Spark Servlet Example
To run spark-servlet-example, make sure you have the following installed:
- Java 8+
- Maven version 3.0.x or above.
You can check Maven version with the following command:
mvn -v
Then follow these steps:
-
Clone the repository:
git clone https://github.com/Moesif/moesif-servlet cd moesif-servlet -
Edit the
spark-servlet-example/src/main/webapp/WEB-INF/web.xmlfile and add your Moesif Application ID there. In thespark-servlet-example/src/main/java/com/moesif/servlet/spark/example/SparkDemo.javafile, add your Moesif Application ID as an argument toMoesifAPIClientobject. -
Compile and run:
cd spark-servlet-example mvn clean install java -jar target/dependency/webapp-runner.jar target/*.war -
Go to
http://localhost:8080/api/demoor the port that Tomcat is running on.
In your Moesif account web portal, you should see event logged and monitored.
You can shut down the server manually by pressing Ctrl + C.
Generic Java Servlet
Edit the web.xml file and add your Moesif Application ID.
  <filter>
    <filter-name>MoesifFilter</filter-name>
    <filter-class>com.moesif.servlet.MoesifFilter</filter-class>
    <init-param>
      <param-name>application-id</param-name>
      <param-value>Your Moesif Application Id</param-value>
    </init-param>
    <init-param>
      <param-name>debug</param-name>
      <param-value>false</param-value>
    </init-param>
    <init-param>
      <param-name>logBody</param-name>
      <param-value>true</param-value>
    </init-param>
  </filter>
  <filter-mapping>
    <filter-name>MoesifFilter</filter-name>
    <url-pattern>/*</url-pattern>
  </filter-mapping>
Running the Generic Servlet Example
servlet-example implements the Servlet Filter directly in a generic servlet app rather than using a higher level framework like Spring MVC or Spring Boot.
To run this example, make sure you have the following installed:
- Java 8+
- Maven version 3.0.x or above.
You can check Maven version with the following command:
mvn -v
Then follow these steps:
-
Clone the repository:
git clone https://github.com/Moesif/moesif-servlet cd moesif-servlet -
Edit the
servlet-example/src/main/webapp/WEB-INF/web.xmlfile and add your Moesif Application ID there. -
Compile and run:
cd servlet-example mvn clean install java -jar target/dependency/webapp-runner.jar target/*.war -
Go to
http://localhost:8080/api/demoor the port that Tomcat is running on.
In your Moesif account web portal, you should see event logged and monitored.
You can shut down the server manually by pressing Ctrl + C.
Troubleshoot
For a general troubleshooting guide that can help you solve common problems, see Server Troubleshooting Guide. To print debug logs to help troubleshooting, follow the instructions in How to Print Debug Logs.
Other troubleshooting supports:
How to Print Debug Logs
If you need to print debugs logs, you can set the debug switch when initializing the MoesifFilter object.
MoesifFilter filter = new MoesifFilter("Your Moesif Application Id", debug)
If you are using XML configuration, you can set the debug switch like below:
    <filter-name>MoesifFilter</filter-name>
    <filter-class>com.moesif.servlet.MoesifFilter</filter-class>
    <init-param>
      <param-name>application-id</param-name>
      <param-value>Your Moesif Application Id</param-value>
    </init-param>
    <init-param>
      <param-name>debug</param-name>
      <param-value>true</param-value>
    </init-param>
  </filter>
How to Test
- Manually clone this repository.
- Enter
moesif-servletand runmvn clean install -U -Dgpg.skipif you haven’t done so. - Add your own application id to
src/test/java/com/moesif/servlet/MoesifServletTests.java. You can find your Moesif Application Id from Moesif Dashboard -> Top Right Menu -> Installation - From terminal/cmd navigate to the root directory of the moesif-servlet.
- Invoke
mvn -Dtest=MoesifServletTests testto run the tests.
Configuration Options
To configure the filter, extend the MoesifConfigurationAdapter class to override a few configuration parameters
or implement the entire MoesifConfiguration interface. Both will achieve similar results.
Parameters
Override the following parameters, if needed.
batchSize
| Required | Type | Default Value | Description |
|---|---|---|---|
| No | Number | 100 | The batch size of API events that triggers flushing of queue and sending the data to Moesif. |
batchMaxTime
| Required | Type | Default Value | Description |
|---|---|---|---|
| No | Number (seconds) | 2 | The maximum wait time (approximately) before the SDK triggers flushing of the queue and sends data to Moesif. |
queueSize
| Required | Type | Default Value | Description | | – | – | – | – | | No | Number | 1000000 | Maximum queue capacity to hold events in memory. |
retry
| Required | Type | Default Value | Description | | – | – | – | – | | No | Number | 0 | Number of time to retry if the SDK fails to send data to Moesif. Set the value between 0 to 3. |
updateConfigTime
| Required | Type | Default Value | Description | | – | – | – | – | | No | Number (seconds) | 300 (seconds) | The maximum wait time (approximately) to pull the latest app configuration and update the cache. |
logBody
| Required | Type | Default Value | Description | | – | – | – | – | | No | boolean | true | Whether to log request and response body to Moesif. |
requestMaxBodySize
| Required | Type | Default Value | Description | | – | – |—————|———————————————————————————————-| | No | Number | 1,048,576 | The maximum request body size in bytes to log when sending the data to Moesif. Default 1 MiB |
responseMaxBodySize
| Required | Type | Default Value | Description | | – | – |—————|———————————————————————————| | No | Number | 1,048,576 | The maximum response body size in bytes to log when sending the data to Moesif. Default 1 MiB |
Interface Methods
The MoesifConfiguration class provides several methods that you can override to customize its behavior or extract information from your requests/responses with custom logic.
Overridable Methods
boolean skip (HttpServletRequest request, HttpServletResponse response)String getApiVersion (HttpServletRequest request, HttpServletResponse response)Object getMetadata (HttpServletRequest request, HttpServletResponse response)String identifyUser (HttpServletRequest request, HttpServletResponse response)String identifyCompany (HttpServletRequest request, HttpServletResponse response)String getSessionToken (HttpServletRequest request, HttpServletResponse response)EventModel maskContent (EventModel eventModel)
Calling Behavior
The above methods are called at different times during the processing of each HTTP request and response.
On Request Only
skip, this is called first before the Moesif filter processes the request any further. If true, the MoesifFilter immediately continues the request through the filter chain without logging or any further processing by Moesif.getApiVersion, called on request only
On Request and On Response
Each of the following interface methods is called twice per HTTP request/response cycle to expose information from the request, the response, or both, depending on your needs.
getMetadataidentifyUseridentifyCompanygetSessionToken
- On Request: The method is called before the request is fully processed and there is no response yet, so the response
HttpServletResponseparameter is alwaysnullfor the first call. - On Response: The method is called a second time after the response is generated by your application. Both
HttpServletRequestandHttpServletResponseare passed as parameters and non-null.
Note: If you need to use these callbacks for governance features, such as transforming or blocking requests, the necessary information must be available in the request phase. This is because request governance operates before the response is generated.
After Request/Response Processing
maskContent, is called twice but at each point, after all of the above methods are called, and this method gets the partial then the final Moesif Event model that would eventually be sent. This method allows you to remove sensitive data from the HTTP headers or body or inspect/change any Event property in general before sending to Moesif
public boolean skip(HttpServletRequest request, HttpServletResponse response)
Return true if you want to skip logging a
request to Moesif. For example, you may skip requests like health probes.
  @Override
  public boolean skip(HttpServletRequest request, HttpServletResponse response) {
    // Skip logging health probes
    return request.getRequestURI().contains("health/probe");
  }
2. public Object getMetadata(HttpServletRequest request, HttpServletResponse response)
Return a Java Object that allows you to add custom metadata to the event like instanceId or traceId. The metadata must be a simple Java object that can be converted to JSON.
public Object getMetadata(HttpRequest request, ClientHttpResponse response) {
  Map<String, Object> customMetadata = new HashMap<String, Object>();
  customMetadata.put("service_name", System.getProperty("app_name"));
  return customMetadata;
}
3. public String identifyUser(HttpServletRequest request, HttpServletResponse response)
Highly recommended.
Returns a user ID as a String. This enables Moesif to attribute API requests to individual users so you can understand who is calling your API.
You can use this function simultaneously with identifyCompany() to track both individual customers and the companies that they are a part of.
  @Override
  public String identifyUser(HttpServletRequest request, HttpServletResponse response) {
    if (request.getUserPrincipal() == null) {
        return null;
    }
    return request.getUserPrincipal().getName();
  }
4. public String identifyCompany(HttpServletRequest request, HttpServletResponse response)
Returns a company ID as a String.
If you have a B2B business, this enables Moesif to attribute API requests to specific companies or organizations so you can understand which accounts are calling your API. You can use this function simultaneously with identifyUser() to track both individual customers and the companies they are a part of.
  @Override
  public String identifyCompany(HttpServletRequest request, HttpServletResponse response) {
    return "12345";
  }
5. public String getSessionToken(HttpServletRequest request, HttpServletResponse response)
Moesif automatically detects the end user’s session token or API key, but you can manually define the token for finer control.
  @Override
  public String getSessionToken(HttpServletRequest request, HttpServletResponse response) {
    return request.getHeader("Authorization");
  }
The following example uses the session ID:
  @Override
  public String getSessionToken(HttpServletRequest request, HttpServletResponse response) {
    return request.getRequestedSessionId();
  }
6. public String getApiVersion(HttpServletRequest request, HttpServletResponse response)
Returns a string to tag requests with a specific version of your API.
  @Override
  public String getApiVersion(HttpServletRequest request, HttpServletResponse response) {
    return request.getHeader("X-Api-Version");
  }
7. public EventModel maskContent(EventModel eventModel)
If you want to remove any sensitive data in the HTTP headers or body before sending to Moesif, use maskContent.
Usage Examples
For the methods which are called once on request and again on response, here are the patterns we recommend for each use case of reading a value from the request only, reading a value from the response only, and logging values that require both request and response.
1. Reading a Value from the Request Only
If you need to extract information that is available in the request, you can implement the method using only the request parameter.
@Override
public String identifyUser(HttpServletRequest request, HttpServletResponse response) {
    // Extract user ID from request header
    return request.getHeader("X-User-Id");
}
In this example, the user ID is obtained from a custom request header. Since this information is available in the request, it can be accessed during both the request and response phases.
2. Reading a Value from the Response Only
If the information you need is only available in the response, you can implement the method to check if the response is not null.
@Override
public String identifyCompany(HttpServletRequest request, HttpServletResponse response) {
    if (response != null) {
        // Extract company ID from response header
        return response.getHeader("X-Company-Id");
    }
    // Response not yet available, return null to set no value on request phase
    return null;
}
In this example, the company ID is obtained from a response header. Since the response is null during the request phase, we return null in that case.
3. Reading a Value Using Both Request and Response
If you need to use information from both the request and the response, you can implement the method accordingly.
@Override
public Object getMetadata(HttpServletRequest request, HttpServletResponse response) {
    Map<String, Object> metadata = new HashMap<>();
    // Add request information to metadata up front in the event of an error response
    metadata.put("value_id", request.getHeader("X-Value-Id"));

    if (response != null) {
        // if you only need a request value when response is also available
        int start = request.getIntHeader("X-Start-Value");

        int end = response.getIntHeader("X-End-Value");
        metadata.put("value_delta", end - start);
    }
    // The on request value is set first, then overwritten by the on response return value
    // if a value is set on request, but null is returned on response, the on request value is retained and logged
    return metadata;
}
In this example, we build a metadata object that includes information from both the request and the response. During the request phase, response is null, so only request information is read. During the response phase, both request and response information are read for the complete .
Building moesif-servlet Locally
If you are contributing to moesif-servlet, you can build it locally and install in local Maven Repo:
cd moesif-servlet
mvn clean install
Examples
The following examples demonstrate how to add and update customer information.
The methods these examples use are accessible through the Moesif Java API library that this SDK already imports as a dependency.
Update a Single User
To create or update a user profile in Moesif, use the updateUser() function.
MoesifFilter filter = new MoesifFilter("Your Moesif Application Id", new MoesifConfiguration());

// Campaign object is optional, but useful if you want to track ROI of acquisition channels
// See https://www.moesif.com/docs/api#users for campaign schema
CampaignModel campaign = new CampaignBuilder()
        .utmSource("google")
        .utmCampaign("cpc")
        .utmMedium("adwords")
        .utmTerm("api+tooling")
        .utmContent("landing")
        .build();

// Only userId is required
// metadata can be any custom object
UserModel user = new UserBuilder()
    .userId("12345")
    .companyId("67890") // If set, associate user with a company object
    .campaign(campaign)
    .metadata(APIHelper.deserialize("{" +
        "\"email\": \"johndoe@acmeinc.com\"," +
        "\"first_name\": \"John\"," +
        "\"last_name\": \"Doe\"," +
        "\"title\": \"Software Engineer\"," +
        "\"sales_info\": {" +
            "\"stage\": \"Customer\"," +
            "\"lifetime_value\": 24000," +
            "\"account_owner\": \"mary@contoso.com\"" +
          "}" +
        "}"))
    .build();

filter.updateUser(user);
The metadata field can contain any customer demographic or other info you want to store. Moesif only requires the userId field.
This method is a convenient helper that calls the Moesif API library. For more information, see the function documentation in Moesif Java API reference.
Update Users in Batch
To update a list of users in one batch, use the updateUsersBatch() function. You can update users synchronously or asynchronously on a background thread. Unless you require synchronous behavior, we recommend the async versions.
MoesifFilter filter = new MoesifFilter("Your Moesif Application Id", new MoesifConfiguration());

List<UserModel> users = new ArrayList<UserModel>();

UserModel userA = new UserBuilder()
        .userId("12345")
        .companyId("67890")
        .campaign(campaign)
        .metadata(APIHelper.deserialize("{" +
            "\"email\": \"johndoe@acmeinc.com\"," +
            "\"first_name\": \"John\"," +
            "\"last_name\": \"Doe\"," +
            "\"title\": \"Software Engineer\"," +
            "\"sales_info\": {" +
                "\"stage\": \"Customer\"," +
                "\"lifetime_value\": 24000," +
                "\"account_owner\": \"mary@contoso.com\"" +
              "}" +
            "}"))
        .build();
users.add(userA);

UserModel userB = new UserBuilder()
        .userId("54321")
        .companyId("67890")
        .campaign(campaign)
        .metadata(APIHelper.deserialize("{" +
            "\"email\": \"johndoe@acmeinc.com\"," +
            "\"first_name\": \"John\"," +
            "\"last_name\": \"Doe\"," +
            "\"title\": \"Software Engineer\"," +
            "\"sales_info\": {" +
                "\"stage\": \"Customer\"," +
                "\"lifetime_value\": 24000," +
                "\"account_owner\": \"mary@contoso.com\"" +
              "}" +
            "}"))
        .build();
users.add(userB);

filter.updateUsersBatch(users, callBack);
The metadata field can contain any customer demographic or other info you want to store. MOesif only requires the userId field.
This method is a convenient helper that calls the Moesif API library. For more information, see the function documentation in Moesif Java API reference.
Update a Single Company
To update a single company, use the updateCompany() function.
MoesifFilter filter = new MoesifFilter("Your Moesif Application Id", new MoesifConfiguration());

// Campaign object is optional, but useful if you want to track ROI of acquisition channels
// See https://www.moesif.com/docs/api#update-a-company for campaign schema
CampaignModel campaign = new CampaignBuilder()
        .utmSource("google")
        .utmCampaign("cpc")
        .utmMedium("adwords")
        .utmTerm("api+tooling")
        .utmContent("landing")
        .build();

// Only companyId is required
// metadata can be any custom object
CompanyModel company = new CompanyBuilder()
    .companyId("67890")
    .companyDomain("acmeinc.com") // If set, Moesif will enrich your profiles with publicly available info
    .campaign(campaign)
    .metadata(APIHelper.deserialize("{" +
        "\"org_name\": \"Acme, Inc\"," +
        "\"plan_name\": \"Free\"," +
        "\"deal_stage\": \"Lead\"," +
        "\"mrr\": 24000," +
        "\"demographics\": {" +
            "\"alexa_ranking\": 500000," +
            "\"employee_count\": 47" +
          "}" +
        "}"))
    .build();

filter.updateCompany(company);
The metadata field can contain any company demographic or other information you want to store. Moesif only requires the companyId field.
This method is a convenient helper that calls the Moesif API library. For more information, see the function documentation in Moesif Java API reference.
Update Companies in Batch
To update a list of companies in one batch, use the updateCompaniesBatch() function. You can update companies synchronously or asynchronously on a background thread. Unless you require synchronous behavior, we recommend the async versions.
MoesifFilter filter = new MoesifFilter("Your Moesif Application Id", new MoesifConfiguration());

// Campaign object is optional, but useful if you want to track ROI of acquisition channels
// See https://www.moesif.com/docs/api#update-a-company for campaign schema
CampaignModel campaign = new CampaignBuilder()
        .utmSource("google")
        .utmCampaign("cpc")
        .utmMedium("adwords")
        .utmTerm("api+tooling")
        .utmContent("landing")
        .build();

// Only companyId is required
// metadata can be any custom object
CompanyModel company = new CompanyBuilder()
    .companyId("67890")
    .companyDomain("acmeinc.com") // If set, Moesif will enrich your profiles with publicly available info
    .campaign(campaign)
    .metadata(APIHelper.deserialize("{" +
        "\"org_name\": \"Acme, Inc\"," +
        "\"plan_name\": \"Free\"," +
        "\"deal_stage\": \"Lead\"," +
        "\"mrr\": 24000," +
        "\"demographics\": {" +
            "\"alexa_ranking\": 500000," +
            "\"employee_count\": 47" +
          "}" +
        "}"))
    .build();

filter.updateCompaniesBatch(companies);
The metadata field can contain any company demographic or other information you want to store. Moesif only requires the companyId field.
This method is a convenient helper that calls the Moesif API library. For more information, see the function documentation in Moesif Java API reference.
Update a Single Subscription
To create or update a subscription profile in Moesif, use the updateSubscription() function.
MoesifFilter filter = new MoesifFilter("Your Moesif Application Id", new MoesifConfiguration());

// Only subscriptionId, companyId, and status are required
// metadata can be any custom object
SubscriptionModel subscription = new SubscriptionBuilder()
    .subscriptionId("sub_12345")
    .companyId("67890")
    .status("active")
    .metadata(APIHelper.deserialize("{" +
        "\"email\": \"johndoe@acmeinc.com\"," +
        "\"string_field\": \"value_1\"," +
        "\"number_field\": 0," +
        "\"object_field\": {" +
        "\"field_1\": \"value_1\"," +
        "\"field_2\": \"value_2\"" +
        "}" +
        "}"))
    .build();

filter.updateSubscription(subscription);
The metadata field can store any subscription-related information you wish to keep. The subscription_id, company_id, and status fields are all required. This method is a convenient helper that calls the Moesif API library. For more information, see the function documentation in Moesif Java API reference.
Update Subscriptions in Batch
To update a list of subscriptions in one batch, use the updateSubscriptionsBatch() function.
You can update subscriptions synchronously or asynchronously on a background thread. Unless you require synchronous behavior, we recommend the async versions.
MoesifFilter filter = new MoesifFilter("Your Moesif Application Id", new MoesifConfiguration());

List<SubscriptionModel> subscriptions = new ArrayList<>();
subscriptions.add(new SubscriptionBuilder()
    .subscriptionId("sub_12345")
    .companyId("67890")
    .status("active")
    .metadata(APIHelper.deserialize("{" +
        "\"email\": \"johndoe@acmeinc.com\"," +
        "\"string_field\": \"value_1\"," +
        "\"number_field\": 0," +
        "\"object_field\": {" +
        "\"field_1\": \"value_1\"," +
        "\"field_2\": \"value_2\"" +
        "}" +
        "}"))
    .build());

// Add more subscriptions as needed

filter.updateSubscriptionsBatch(subscriptions);
The subscription_id, company_id, and status fields are required for each subscription in the list. This method is a convenient helper that calls the Moesif API library. For more information, see the function documentation in Moesif Java API reference.
How to Get Help
If you face any issues using Moesif Servlet SDK, try the troubheshooting guidelines. For further assistance, reach out to our support team.
Explore Other Integrations
Explore other integration options from Moesif:
Track Outgoing Calls to Third Parties
This SDK captures API calls to your own API. If you want to track outgoing calls to third parties, see Moesif Spring Request SDK.