How to Stand Up Web and API Product Analytics with Nodejs
This guide walks you through how to stand up cross-platform analytics to track customer behavior across both your APIs and web apps. By tracking customer behavior on both APIs and web apps, you’re able to fully understand the customer journey and metrics like Time to First Hello World and Time to Value. More info available in our blog post, Tracking a Developer’s Journey From Sign Up to First API Call
However, gathering the data by itself isn’t enough. After all, if it’s not acted on, it’s not of much use. That’s why we walk you through how to send emails to customers using this data via behavioral email based on customer usage and behavior.
Pro Tip: A user signed up but never integrated or activated? Send them helpful resources on how to integrate with your API.
In a companion article, we wrote about how to configure your the behavioral emails within your Moesif dashboard. In this article, we’ll go through the whole setup process for a Node.js based API.
Prerequisites
This how-to guide requires a Moesif account and Node.js.
Project Setup
First, we need to create a new Node.js project with NPM:
$ mkdir moesif-email
$ cd moesif-email
$ npm init -y && npm i express moesif-nodejs
If everything went alright, the output should include the following lines:
- express@4.17.1
- moesif-nodejs@3.0.0
On the base of Node.js and Express we will build our API and sign-up website. The Moesif SDK for Express will send the API monitoring data to the Moesif service.
Creating a Website with the Moesif Browser SDK
First, we need to create a website. We’ll use the Moesif browser SDK to send client-side events with a specific userID. This will create the new user, with metadata, on the Moesif service and, later on, will allow us to link the user to an API request that we’ll send from the website. The code for moesif-email/index.html looks like this:
<script src="//unpkg.com/moesif-browser-js@^1/moesif.min.js"></script>

<h1>Demo API</h1>
<button id="start">Send client event</button>
<button id="api">Send API request</button>
<pre id="target"></pre>

<script type="text/javascript">
  moesif.init({ applicationId: "<YOUR_MOESIF_APP_ID>" });
  const userId = "demo-user-123";
  moesif.identifyUser(userId, {
    email: "<YOUR_EMAIL>",
    firstName: "Jane",
    lastName: "Doe",
  });
  document.getElementById("start").addEventListener("click", () => {
    moesif.track("clicked_start");
    document.getElementById("target").innerHTML = "clicked_start";
  });
  document.getElementById("api").addEventListener("click", async () => {
    const response = await fetch("/api", {
      headers: { Authorization: userId },
    });
    const json = await response.json();
    document.getElementById("target").innerHTML = JSON.stringify(json, null, 2);
  });
</script>
We included the Moesif browser SDK, created two buttons and linked them with two actions, sending a client event and an API request. The SDK is configured with the userId, so Moesif knows who sent the client event. Don’t forget to replace <YOUR_MOESIF_APP_ID> with your actual Moesif application ID and <YOUR_EMAIL> with your own email.
The client action uses the browser SDK to tell Moesif about something that happened on the website. In this case, clicking the button. This has nothing to do with our API, but it could be interesting later. For example, when a user signed-up via a website, but subsequently didn’t send any requests.
The API request will use the Authorization header to tell the API about the userId. This way, Moesif can link the client events with the API requests later on.

Creating an API with the Moesif Express SDK
The next step is the API server. We’ll use the Express framework to build it. This will also serve the website we created in the last step.
The code for moesif-email/index.js should contain the following:
const fs = require("fs");
const express = require("express");
const moesif = require("moesif-nodejs");
const website = fs.readFileSync(__dirname + "/index.html");

const app = express();
app.use(
  moesif({
    applicationId: "<YOUR_MOESIF_APP_ID>",
    logBody: true,
    identifyUser: ({ headers }) => headers.authorization,
  })
);
app.get("/", (request, response) => response.end(website));
app.get("/api", (request, response) =>
  response.end(JSON.stringify({ timestamp: Date.now() }))
);
app.listen(8888, () => console.log(`Running at http://localhost:8888`));
First we load index.html, then we can create an Express app and configure it to use the Moesif Express SDK as middleware. You need to replace YOUR_MOESIF_APP_ID with your actual Moesif application ID.
Testing the API
To test the Express API, we have to start the server with this command:
$ node .
This should output the following line:
Running at http://localhost:8888
If everything went well, we can navigate to http://localhost:8888 with a browser, see our website and click the buttons. One will send the client event and the other will send an API request.
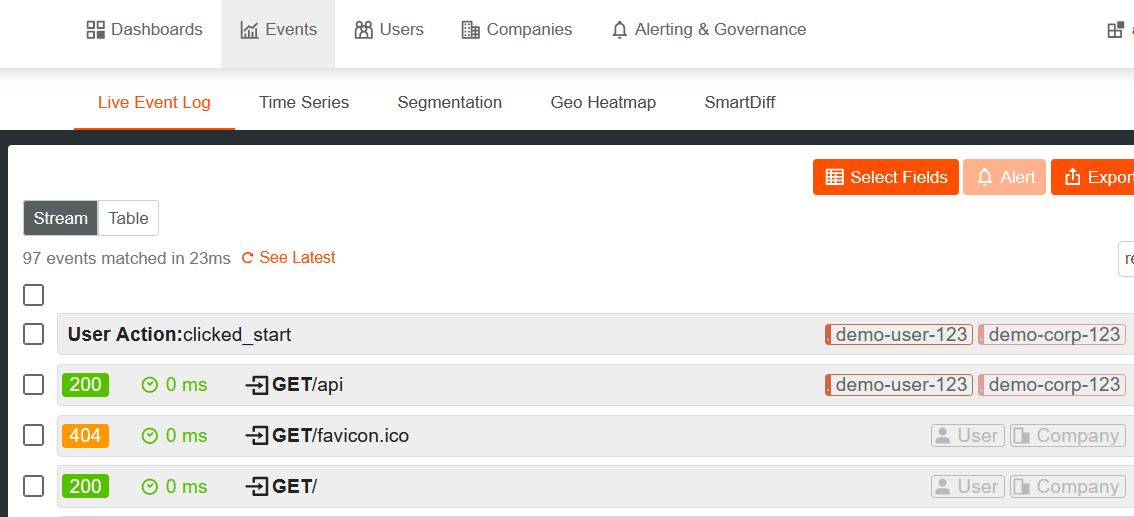
Figure 1: Live event log
If you now navigate to the Moesif dashboard, where you got YOUR_MOESIF_APP_ID from, and click on the “Events” tab at the top, you should see four different events, as in Figure 1 above.
The User Action event is the client event. The GET /api event is the request we sent to the API. They are both annotated with the username and company. The other two events are about the browser requests to load the website and the favicon. They’re included because we deliver the website with the same Express server just like the API, but since the requests are missing the Authorization header, we don’t get a user or company annotation.
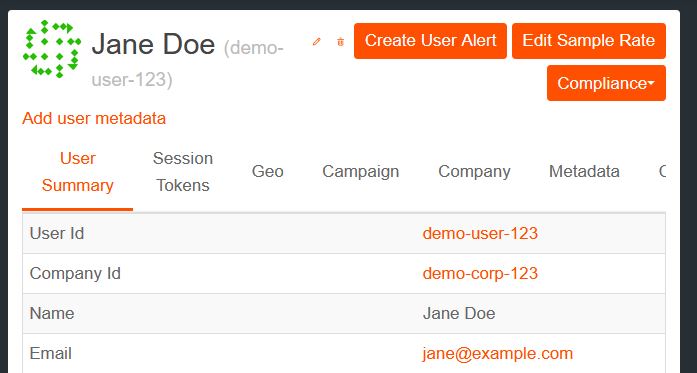
Figure 2: User summary
If you click on the user, you see their “User Summary” which includes the Email address of that user, like in figure 2.
Setting up Behavioral Emails
Now that we created our API and know it gathers data, we can set up the behavioral emails.
Creating Cohorts
The first step to send emails is to create a cohort, that is, a group of users that match specific criteria. These criteria can include demographic information like geolocation, but also performed events.
To do so, we need to go to the user lookup. To get there, click on the “Users” link in the top navigation bar and then on the “User Lookup” link in the second navigation bar below the first.
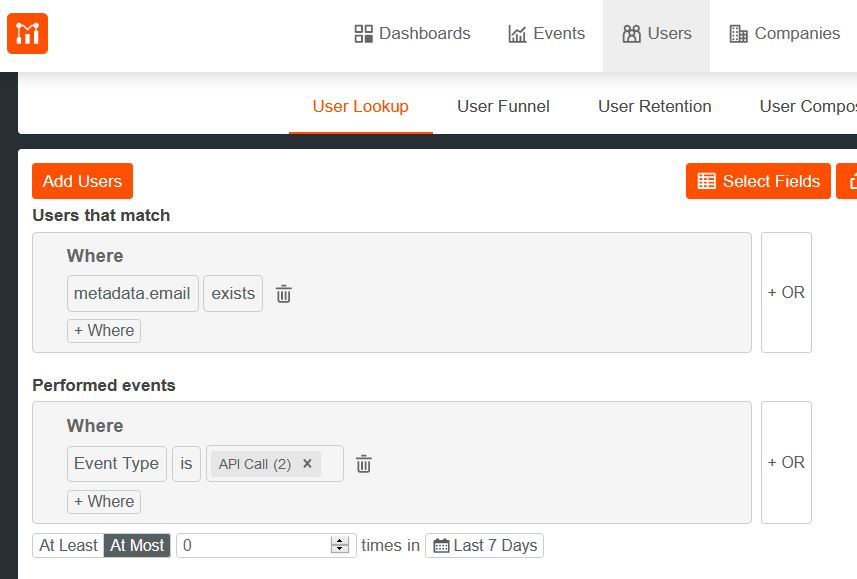
Figure 3: User lookup
The view you now see should be like the screenshot in figure 3.
I already added some criteria for our cohort in the screenshot. Users in that cohort should have an email and they should have zero API calls in the last 7 days. You can replicate that setting, click on “Create Cohort”, and name it “Users without API calls”.
Creating Email Templates
With the cohort definition we told Moesif what criteria the users should satisfy to get an email, or what a user must or mustn’t do to belong to a cohort.
If you navigate to “Alerting & Governance” and then to “Behavioral Emails” you can configure your SMTP server and create email templates that will be used to notify your users.
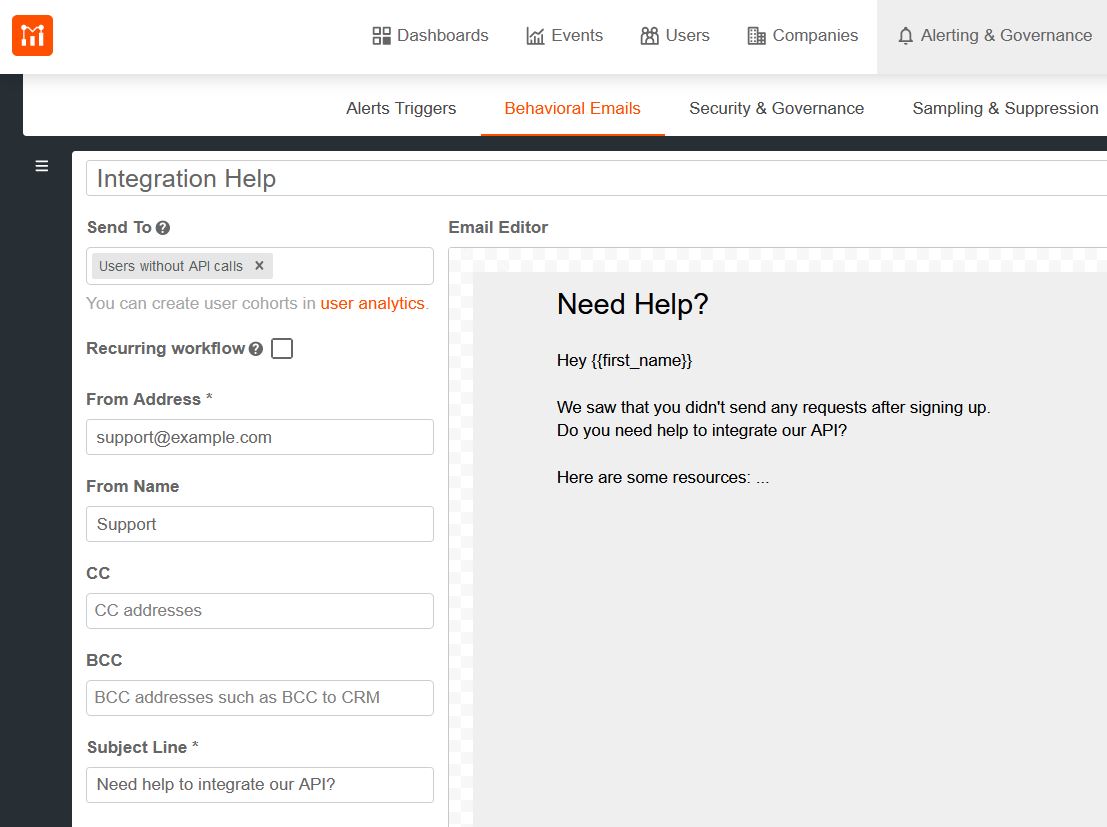
Figure 4: Email template creation
Figure 4 shows a screenshot of the email template creation. Under “Send To” you can choose your cohort. If you check “Recurring workflow”, Moesif won’t just send the email once but check in a specific interval if the user still satisfies the criteria and should get a new email.
Summary
Adding end-to-end analytics to your Express based Node.js API and website takes just a few lines of code with Moesif.
The Moesif browser and Node.js SDKs enable you to track everything from initial sign-up to last API call. This allows you to link the channels your users came from to the actual usage of your API, so whole user journey can be analyzed later on.
With behavioral emails you can use this information to automatically notify your users of anything API usage related. Send helpful emails with Moesif.


Related Articles

API Strategy
Leveraging AI For a Better API Strategy
Learn how to leverage AI to build and fortify your API strategy. Improve design, governance, documentation, and align APIs with business outcomes.
API Strategy
The 5 Best Mixpanel Alternatives of 2025
Learn about the best Mixpanel alternatives to determine the right analytics solution for your use case.

API Development
How to Leverage Moesif Effectively for API Observability
Effectively leverage Moesif for API observability through best practices for integration, event enrichment, custom actions, and engineering workflow integrat...
API Strategy
How to Build an Internal Chargeback Model for Your API and AI Usage Using Moesif
Use Moesif to implement internal chargebacks and enable precise API and AI cost attribution for better transparency and resource optimization.