Embedding Dashboards with React to Surface Metrics to Customers
Embedded dashboards are an easy way to share the insights you got from Moesif across your team and with your customers. You define metrics, build your dashboards, and then share them, filtered by company or user, inside your developer portal.
From a technical point of view, they’re just websites that can be displayed inside an iframe somewhere on your web pages. But, to prevent users from seeing data from other users, you have to get the dashboard URL on your backend after all of your authorization checks have been done.
In a companion blog post we showed you how to create a custom dashboard and tell a story with your data. In this post, we will embed a Moesif dashboard into a React application. We will create a backend that fetches the dashboard URL and a React component, based on React hooks, that talks to our backend.
Prerequisites
To follow this how-to, you need a Moesif account and Node.js.
Initializing the Project
To initialize a new project, you have to run these commands:
$ mkdir moesif-dashboard
$ cd moesif-dashboard
$ npm init -y
Creating a Backend
We will use Express to create a backend and Axios as the HTTP client that will talk to the Moesif dashboard service. The backend will serve the frontend and the URL to our dashboard. First, we need to install the packages:
$ npm i axios express
After that, we can create a server.js file with the following content:
const axios = require("axios");
const express = require("express");
const fs = require("fs");

const clientHtml = fs.readFileSync(__dirname + "/client.html");

const app = express();

app.get("/", (request, response) => response.end(clientHtml));
app.get("/dashboards/:worspaceId", async ({ params, user }, response) => {
  const url = `https://api.moesif.com/v1/portal/~/workspaces/${params.workspaceId}/access_token`;
  const body = { template: { values: { company_id: user.companyId } } };
  const headers = { Authorization: "<MOESIF_AUTH_TOKEN>" };
  const { data } = await axios.post(url, body, { headers });
  response.end(JSON.stringify(data));
});

app.listen(8888);
The GET /dashboards/:workspaceId route will deliver our workspace URL to the client to use it in an iframe.
You have to replace the <MOESIF_AUTH_TOKEN> with your own.
The company_id will be the dynamic value that filters the dashboard for one company.
In Express, authentication is usually done via some middleware, represented as authMiddleware(). It looks at the request, authenticates it somehow, and adds a user object to the request object. The user object has a companyId property to get the dashboard URL from the Moesif API.
The route has a parameter for the workspaceId. This parameter makes the route more flexible. It can now deliver URLs for different dashboards.
The Moesif API returns JSON with an access_token and an url that we simply pass on to our backend client. The URL gives access to a single dashboard filtered by one company; this way, we can prevent users from accessing dashboards they should not access.
Creating the Frontend
The frontend will be a simple React application. Create a client.html with the following code:
<!DOCTYPE html>

<title>Embedded Dashboard</title>

<div id="app"></div>

<script src="https://unpkg.com/react@16.13.1/umd/react.production.min.js"></script>
<script src="https://unpkg.com/react-dom@16.13.1/umd/react-dom.production.min.js"></script>
<script src="https://unpkg.com/@babel/standalone@7.11.6/babel.js"></script>

<script script type="text/babel">
  function App() {
    return (
      <div>
        <h1>Embedded Dashboard</h1>
        <Dashboard workspaceId="<WORKSPACE_ID>" />
      </div>
    );
  }

  function Dashboard({ workspaceId }) {
    const [dashboardUrl, setDashboardUrl] = React.useState("");

    React.useEffect(() => {
      fetch("/dashboards/" + workspaceId)
        .then((r) => r.json())
        .then(({ url }) => setDashboardUrl());
    }, [workspaceId]);

    return (
      <iframe src={dashboardUrl} frameborder="0" noresize="noresize"></iframe>
    );
  }

  ReactDOM.render(<App />, document.getElementById("app"));
</script>
The Dashboard component is essential here. It requires a workspaceId prop to get the dashboard URL from our backend. The useEffect hook will keep track of this prop; every time a new value comes in, it will fetch the dashboard URL from the backend. This way, we can create multiple instances of the component for different dashboards, and we can also change the current dashboard displayed by one instance of the component.

Linking Embedded Dashboards
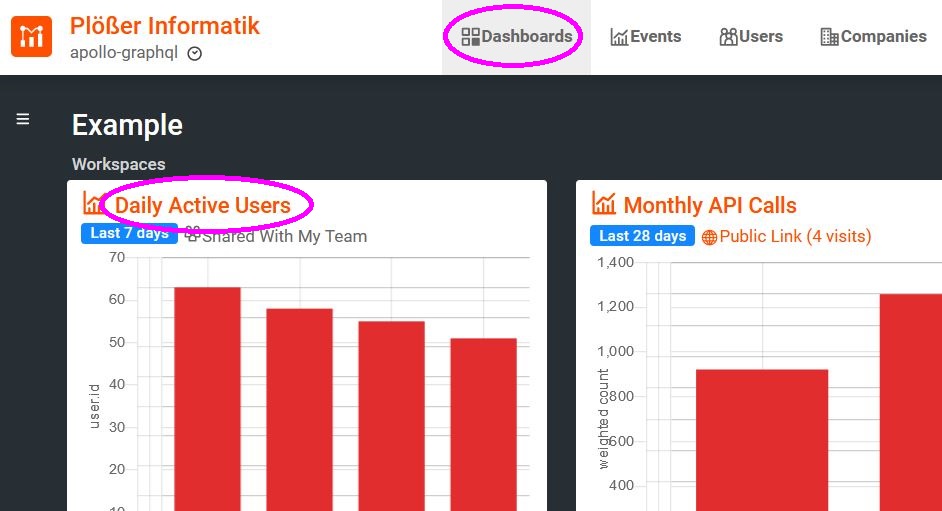
The next step is to gather the worksapce IDs from the dashboards we want to embed. To find these IDs, you have to navigate to the “Dashboards” page of the Moesif console. There you have to choose a dashboad you want to integrate and click on its title.
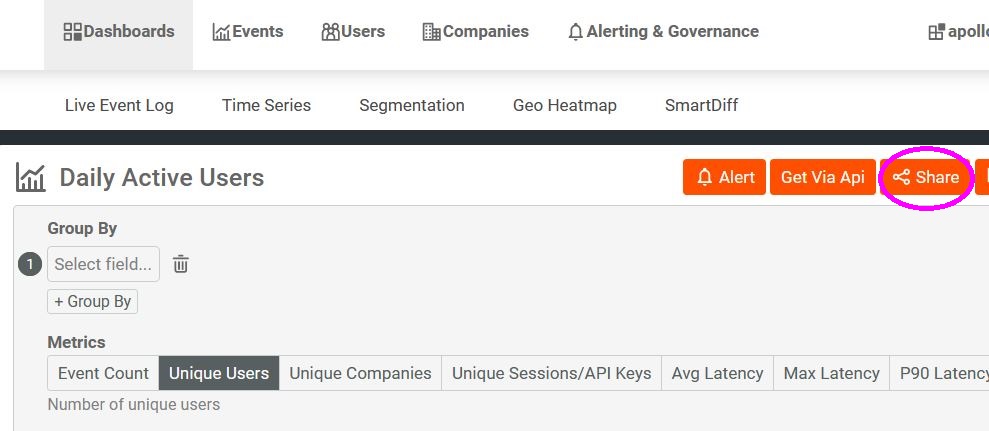
On the details page of the dashboard, you have to click on the orange “Share” button on the top right.
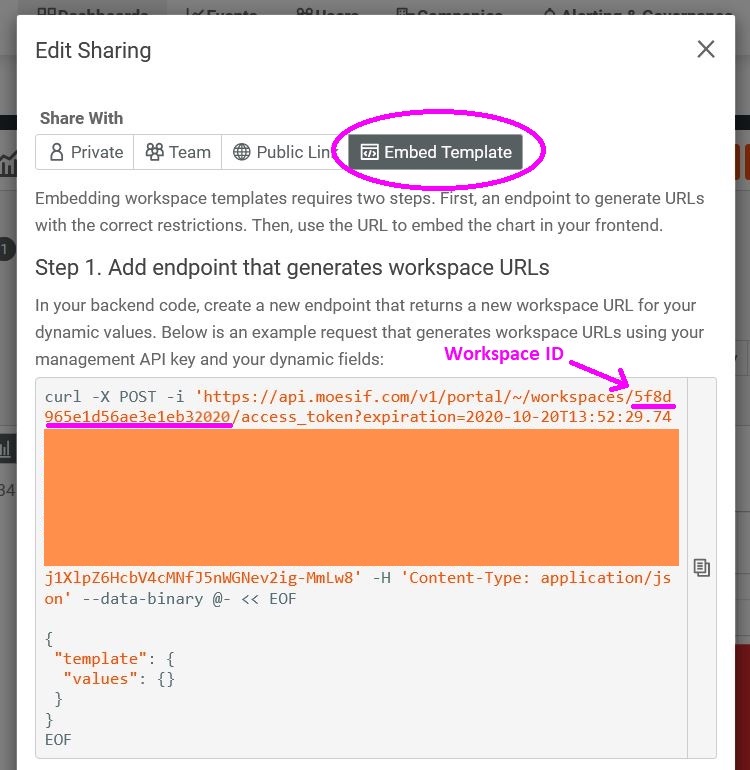
Choose Share with “Embed Template”. From there you can extract the workspace ID, which is required for our Dashboard component, right from the cURL example.
Using the App
To use the example, you have to run the server with Node.js:
$ node server.js
The frontend will be available at http://localhost:8888/.
Summary
If you have a developer portal created with React, embedding a dashboard into it is easy as pie. You can create a Dashboard component that encapsulates all the client-side logic needed to get the dashboard URL from the server and display it in an iframe.
If you want to make it configurable for different dashboards, you have to give it a workspaceId as a prop; then, you can use it in multiple places to load different dashboards.

Related Articles

API Strategy
Leveraging AI For a Better API Strategy
Learn how to leverage AI to build and fortify your API strategy. Improve design, governance, documentation, and align APIs with business outcomes.
API Strategy
The 5 Best Mixpanel Alternatives of 2025
Learn about the best Mixpanel alternatives to determine the right analytics solution for your use case.

API Development
How to Leverage Moesif Effectively for API Observability
Effectively leverage Moesif for API observability through best practices for integration, event enrichment, custom actions, and engineering workflow integrat...
API Strategy
How to Build an Internal Chargeback Model for Your API and AI Usage Using Moesif
Use Moesif to implement internal chargebacks and enable precise API and AI cost attribution for better transparency and resource optimization.
