Integrating with a Custom Webhook
How It Works
With a Billing Meter that uses Webhooks, Moesif will automatically meter the usage and send the usage data to your Webhook endpoint. Moesif Billing Meters support a variety of billing models including prepaid, postpaid, Pay As You Go (PAYG), and more. If you have different features or metrics you need to charge on, you can create multiple meters in Moesif, each linked to a plan.
Creating a Billing Meter that sends usage data to custom webhooks adds unlimited possibilities. Using custom Webhooks makes it easy for you to integrate a Moesif Billing Meter with a custom or in-house billing platform. Moesif will handle the scheduling and reporting of usage, you just need to implement a custom webhook handler to add the reported usage to the respective customer’s invoice/subscription in your internal billing system.

This page assumes that you already have a Webhook service/endpoint already created and available so that Moesif will be able to send messages/requests to it.
Configuring Your Webhook in Moesif
With your Webhook URL handy, go to the Billing Meters page in Moesif by clicking the Billing Meters link in the left-side menu. From the Billing Meters main screen, click on the Add Billing Meter button in the top right. This will display the Create New Billing Meter screen.
1 - Select Webhook Billing Provider
Click on the Select billing provider dropdown (under the Billing Provider section) and select Custom (Report/Webhook). Once selected, you dropdowns become available for selecting webhooks and plans.
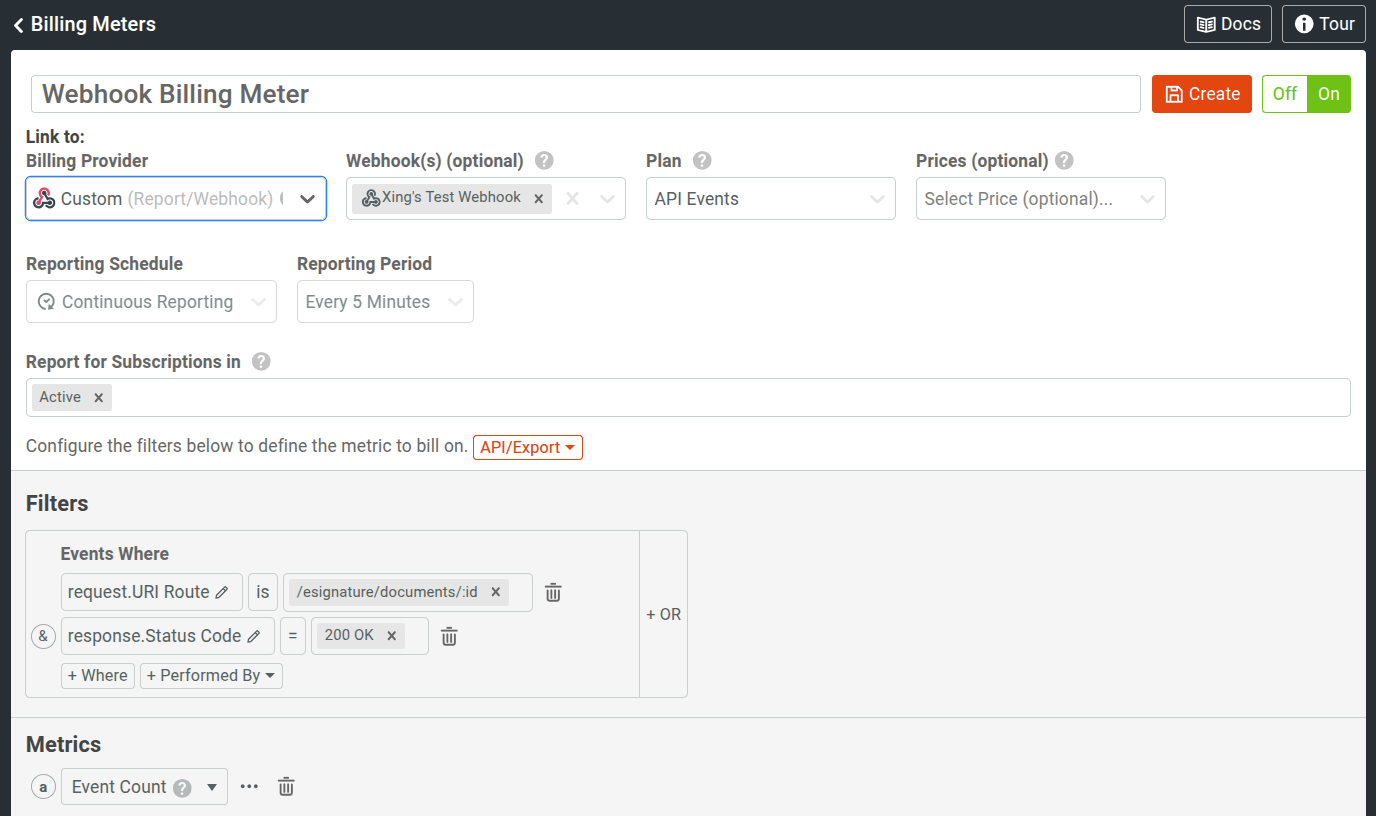
2 - Select Your Webhook(s)
To select the Webhook to send usage to, click on the Webhook(s) dropdown. If you have a Webhook already available/added in Moesif, you can select it from the list. Multiple Webhooks can be selected for a single meter. If not, select the Add New Webhook option to add a new webhook. In the Create Notification Channel modal that appears, you’ll need to add:
To authenticate webhook requests as coming from Moesif, it’s strongly recommended to add a secret key in a request HTTP header. For security, Moesif only allows webhooks protected by https.
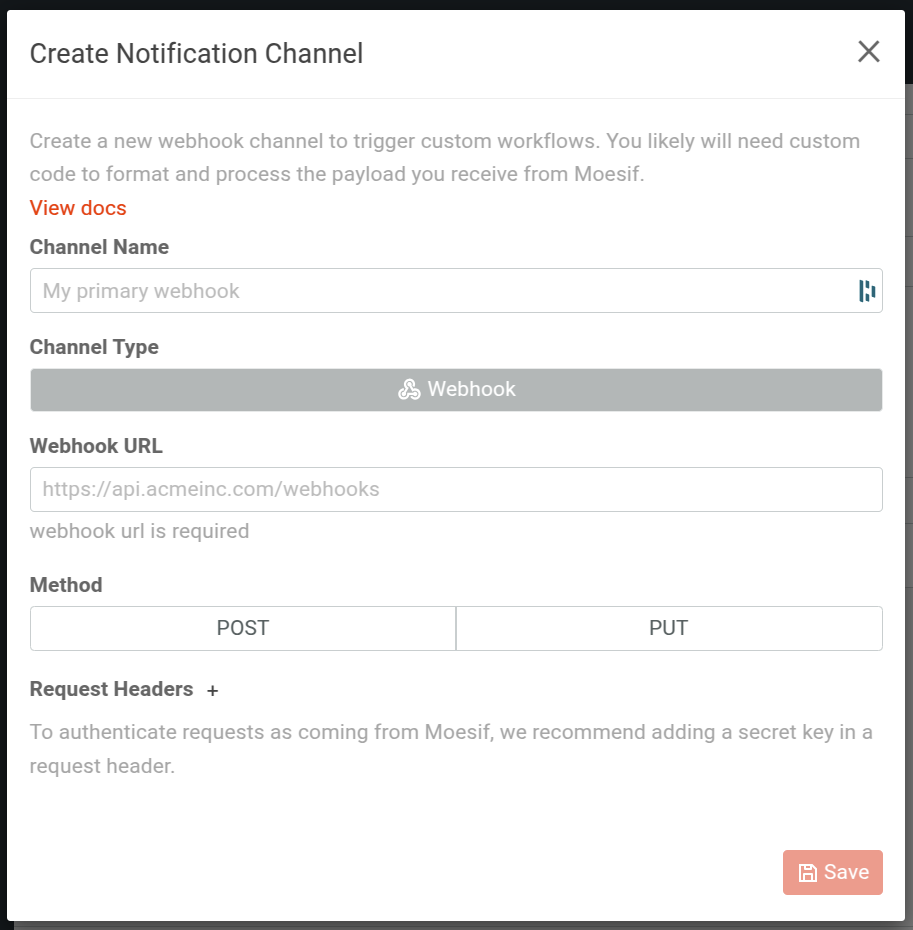
- Channel Name
- This will be the name that your webhook is referred to as in Moesif.
- Channel Type
- This will be defaulted to Webhook.
- Webhook URL
- This is your Webhook URL that you want Moesif to send requests to.
- Method
- This is the HTTP method,
POSTorPUTthat should be used when sending requests to your Webhook URL.
- This is the HTTP method,
- Request Headers
- These are any headers that you want to add to the Webhook request, such as an
AuthorizationorContent-Typeheader. To authenticate requests as coming from Moesif, we recommend adding a secret key in a request header.
- These are any headers that you want to add to the Webhook request, such as an
Once the Webhook fields are filled out, click Save.
3 - Select/Create a Billing Plan
To select the plan that usage should be attributed to, click on the Select Plan dropdown. IF you have plans that are already created, you can select them here. If not, select the Add New Plan option to add a new plan. In the Create Billing Plan modal that appears, you’ll need to add:
- Plan Name
- This is the name for your plan that will be displayed in Moesif.
- External Plan Id
- This can be used to store the Plan Id from your billing solution or any unique identifier that will help with mapping usage.
- Reporting Schedule
- This is the schedule type for how Moesif will report/send the usage to your Webhook. For more details see Choosing a Reporting Schedule and Reporting Period.
- Reporting Period
- This is the period that Moesif will gather the usage data over before sending. For more details see Choosing a Reporting Schedule and Reporting Period.
Once the Plan fields are filled out in the modal, click Create.
4 - Set the “Report for Subscriptions In” Option
In the Report for Subscriptions in selector, you will select what subscription status you want to meter. For instance, you may want to meter usage only for subscriptions which have an Active status. Options here include:
- Active
- Future
- In Trial
- Paused
- Non-Renewing
5 - Configure the Filters and Metrics and Save the Billing Meter
These details are covered in details on our Adding Billing Criteria docs page. Once the billing criteria is set, click the Create button in the top-right of the screen.
6 - Create a Subscription
Lastly, in order for usage data to be sent through the Webhook you need to make sure you’ve created a Subscription for the company(s) to be billed. This will be done by calling the Moesif /subscriptions API endpoint. An example cURL can be seen below:
curl --request POST \
--url 'https://api.moesif.net/v1/subscriptions' \
--header 'X-Moesif-Application-Id: YOUR_COLLECTOR_APPLICATION_ID' \
--header 'Content-Type: application/json' \
--data '{
  "subscription_id": "{unique_subscription_id}",
  "company_id": "{moesif_company_id}",
  "current_period_start": "2022-04-01T20:13:00.001Z",
  "current_period_end": "2024-06-03T20:13:00.001Z",
  "status": "active",
  "items": [
    {
      "plan_id": "{moesif_plan_id}" <-- the GUID of the Moesif Plan
    }
  ]
}'
The above cURL command requires the following details:
url- in the URL you will need to include both the orgId and the appId. The easiest way to grab these values is through your browser URL when you are logged into Moesif (
https://www.moesif.com/wrap/app/{orgId}-{appId}/).
- in the URL you will need to include both the orgId and the appId. The easiest way to grab these values is through your browser URL when you are logged into Moesif (
header-Authorization- For this parameter you will add your Moesif Management Token. To create one you can click Settings (your name in the bottom left) and then select API Keys from the pop-up menu. Under the Management API Key section, add the Scope for
subscriptionsunder the[Admin]header and any other scopes your API key will require. After this, scroll to the bottom, set your Expiration and click Generate Token. The generated token can now be added to the request.
- For this parameter you will add your Moesif Management Token. To create one you can click Settings (your name in the bottom left) and then select API Keys from the pop-up menu. Under the Management API Key section, add the Scope for
datasubscription_id- This will be a generated subscription ID that will be generated by you. Any unique value can be used here.
company_id- Here you will set the Company Id you used within Moesif. This can be found in the Company profile and other places within the Moesif app.
current_period_start- This is the current subscription period start date. If this is irrelevant for your billing scheme, stamp it with the current date and time.
current_period_end- This is the current subscription period end date. If this is irrelevant, you can set a date and time far into the future.
status- This is the status of the subscription. Possible allowed values here include
"active","cancelled","trialing", and"past_due"
- This is the status of the subscription. Possible allowed values here include
itemsplan_id- This will be the GUID of the plan you created in Moesif. To find this value, click Settings (select your name on the left-side navigation pane) and then select Billing Plans from the pop-up menu. Select the billing plan you want the
plan_idfor and in the modal that appears you will see the value you need in the Moesif Plan Id field.
- This will be the GUID of the plan you created in Moesif. To find this value, click Settings (select your name on the left-side navigation pane) and then select Billing Plans from the pop-up menu. Select the billing plan you want the
An important note for
current_period_startandcurrent_period_endmust be set manually when using Webhook billing. This will require custom logic, likely in your Webhook, to ensure they are adjusted correctly depending on the customer-selected billing period (eg, daily, weekly, monthly, etc.).
Once the data is sent to the API endpoint, your subscription will be created. Any usage that comes in that matches your Webhook Billing Meter will now be correctly sent to your Webhook.
Payloads
The following snippet shows an example request Moesif sends to your webhook endpoint:
 {
  "idempotency_key": "KG5LxwFBepaKHyUD",
  "company_id": "0a497",
  "subscription_id": "sub_1MowQVJkdIwHu7ixeRlqHVzs",
  "plan_id": "6631d0f6b0bbd31159137af8",
  "billing_meter_id": "6631e7c55e2dbf1867129d3e",
  "quantity": 1,
  "start_time": "2024-05-01T06:54:40",
  "end_time": "2024-11-01T06:54:41"
 }
Editing and Updating a Webhook
To edit a Webhook, click on the Settings menu in the bottom left of the screen (shown as your name) and select Notification Channels. On the Notification Channels screen, select your Webhook by clicking on its name. On the modal that appears you can update and edit the Webhook settings. Once completed, click Save.
Testing Your Webhook
You can test your custom webhook by using Webhook.site. Webhook.site generates a unique and random URL that you can use as the webhook endpoint URL when setting up your webhook in Moesif. Webhook.site instantly shows any data the URL receives. Therefore, you can easily test if everything works as you expect and what data Moesif sends.
Editing and Updating a Plan
To edit a Plan, click on the Settings menu in the bottom left of the screen (shown as your name) and select Billing Plans. On the Billing Plans screen, select your Plan by clicking on its name. On the modal that appears you can update and edit the Plan’s settings. Once completed, click Save.
For auditing purposes, the only detail that can be changed for a plan is the plan’s Name. To edit it further, you’ll need to archive the existing plan and create a new one.
Choosing a Reporting Schedule and Reporting Period
Currently there are three options for Reporting Schedule in the Moesif Billing Plan configuration. These options include:
- Continuous Reporting
- This option reports usage in near real-time throughout the billing period. This is the recommended option if your billing system can handle aggregating multiple reports in same billing period.
- Calendar-Aligned Billing
- This option reports all usages on same calendar date or quarter, such as the last day of the month.
- Subscription-Based Billing
- This option reports the usage separately for each subscription based on a subscription end date. You will need to keep these up to date using the Moesif Update Companies API.
For each of these Reporting Schedule options, there are also configurable Reporting Periods. For Continuous Reporting the Reporting Period select will aggregate usage within the chosen time period before sending to the Webhook. For Continuous Reporting, these Reporting Periods include:
- Every 5 Minutes
- Every 15 Minutes
- Every Hour
For Calendar-Aligned Billing the Reporting Period select will aggregate usage within the chosen calendar period before sending to the Webhook. For Calendar-Aligned Billing, these Reporting Periods include:
- Daily
- Weekly
- Monthly
- Quarterly
For Subscription-Based Billing the Reporting Period is based on the subscription.current_period_start and subscription.current_period_end set in the Company object. For subscription-based billing to work, your custom solution will need to write the subscription.current_period_start and subscription.current_period_end (or equivalent) to Moesif. This can be done by using the Moesif API.