Moesif API Analytics and Monetization


With Moesif, grow and monetize your API products with a powerful API analytics and billing platform. This template will log API traffic from Azure API Management using Moesif API Analytics & Monetization in a few minutes without any code changes or restarts. The integration also provides visibility into rejected requests that never reach your underlying service.
How it works
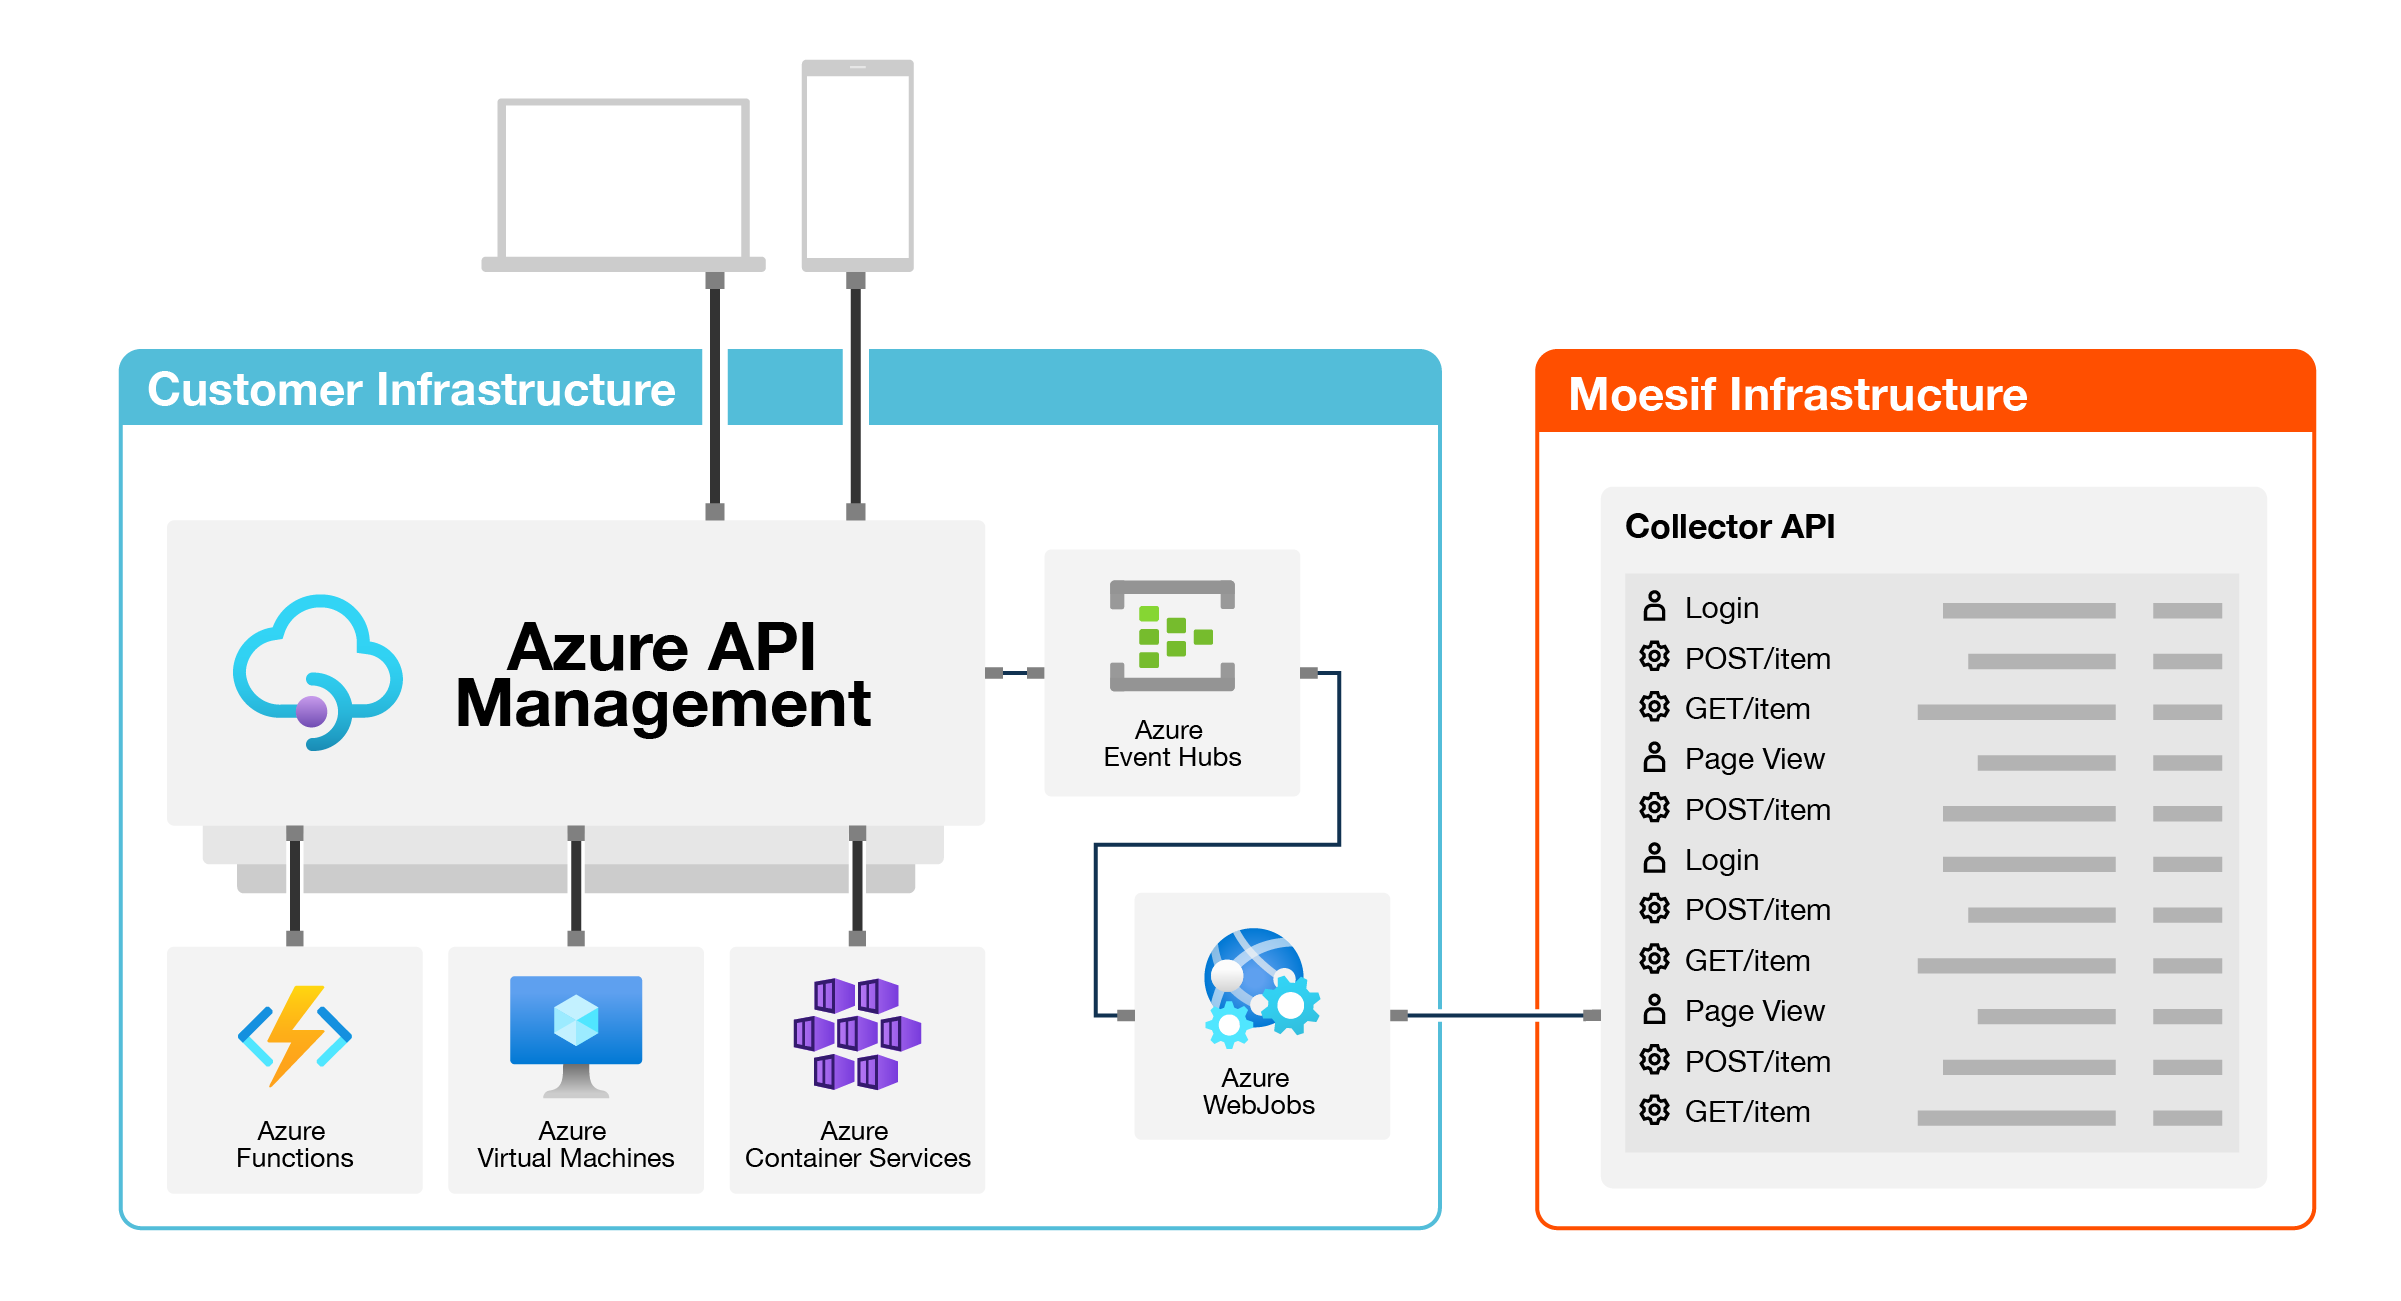
This solution is deployed using an Azure Resource Manager Template. An XML Policy configures an APIM logger to send API logs to an Azure EventHub. An Azure WebJob reads from the EventHub and sends to Moesif for data processing. More info on this integration.
How to install
1. Start Azure Resource Deployment
Click the below button to start a Custom deployment with the Moesif Azure Resource Template.
2. Configure Parameters
Within the Azure Template Deployment panel, set the following properties:
-
Set Resource group to the same resource group that contains your existing Azure APIM instance. This ensures the APIM logger,
moesif-log-to-event-hub, is automatically created for you. -
Set Moesif Application Id to the one displayed after logging into your Moesif account. You can create a free one on Moesif’s website
-
Set Existing Api Mgmt Name to the name of your Azure APIM instance. If blank, you will need to manually create the APIM logger.
Once done, click the Review+create button at the bottom and finish the template creation wizard.
Occasionally, Azure reports a failed deployment due to slow propagation of new DNS settings even though everything was deployed successfully. We recommend proceeding with rest of process. If you still have issues after last step, view troubleshooting.
3. Add XML Policy
Within the Azure portal, navigate to your existing Azure API Management instance. Select either a single API you want to add Moesif logging to, or select All APIs to add Moesif globally.
It’s recommended to add the XML policy globally for all APIs to reduce code replication. Then, use Moesif dynamic sampling to control what data is collected based on user behavior or regex rules.
Under the Inbound Processing section, click the Add Policy button. Select Other Policies which will open the XML editor. Paste in the XML code you see below.
More info on editing APIM policies is available on the Azure docs.
This policy applies at the global scope for All APIs in your APIM instance:
<policies>
    <inbound>
        <set-variable name="moesif-message-id" value="@(Guid.NewGuid())" />
        <log-to-eventhub logger-id="moesif-log-to-event-hub" partition-id="0">@{
var body = context.Request.Body?.As<string>(true);
var MAX_BODY_EH = 145000;
var origBodyLen = (null != body) ? body.Length : 0;
if (MAX_BODY_EH < origBodyLen){ body = body.Remove(MAX_BODY_EH); }
var headers = context.Request.Headers
    .Where(h => h.Key != "Ocp-Apim-Subscription-Key")
    .Select(h => string.Format("{0}: {1}", h.Key, String.Join(", ", h.Value).Replace("\"", "\\\""))).ToArray<string>();
var jwtToken = context.Request.Headers.GetValueOrDefault("Authorization","").AsJwt();
var userId = (context.User != null && context.User.Id != null) ? context.User.Id : (jwtToken != null && jwtToken.Subject != null ? jwtToken.Subject : string.Empty);
var companyId = (context.Subscription != null && context.Subscription.Id != null) ? context.Subscription.Id : string.Empty;
var cru = new JObject();
if (context.User != null) {
  cru.Add("Email", context.User.Email);
  cru.Add("Id", context.User.Id);
  cru.Add("FirstName", context.User.FirstName);
  cru.Add("LastName", context.User.LastName);}
var crus = System.Convert.ToBase64String(Encoding.UTF8.GetBytes(cru.ToString()));
var requestBody = (body != null ? System.Convert.ToBase64String(Encoding.UTF8.GetBytes(body)) : string.Empty);
return new JObject(
  new JProperty("event_type", "request"),
  new JProperty("message-id", context.Variables["moesif-message-id"]),
  new JProperty("method", context.Request.Method),
  new JProperty("ip_address", context.Request.IpAddress),
  new JProperty("uri", context.Request.OriginalUrl.ToString()),
  new JProperty("user_id", userId),
  new JProperty("contextRequestUser", crus),
  new JProperty("company_id", companyId),
  new JProperty("request_headers", string.Join(";;", headers)),
  new JProperty("request_body", requestBody),
  new JProperty("contextTimestamp", context.Timestamp.ToString("o")),
  new JProperty("metadata", $@"")
  ).ToString();}</log-to-eventhub>
        <set-variable name="sent-moesif-request" value="@(true)" />
    </inbound>
    <backend>
        <forward-request follow-redirects="true" />
    </backend>
    <outbound>
        <choose>
            <when condition="@(context.Variables.ContainsKey("sent-moesif-request") && !context.Variables.ContainsKey("sent-moesif-response"))">
                <log-to-eventhub logger-id="moesif-log-to-event-hub" partition-id="0">@{
var body = context.Response.Body?.As<string>(true);
var MAX_BODY_EH = 145000;
var origBodyLen = (null != body) ? body.Length : 0;
if (MAX_BODY_EH < origBodyLen){ body = body.Remove(MAX_BODY_EH);}
var headers = context.Response.Headers.Select(h => string.Format("{0}: {1}", h.Key, String.Join(", ", h.Value).Replace("\"", "\\\""))).ToArray<string>();
var responseBody = (body != null ? System.Convert.ToBase64String(Encoding.UTF8.GetBytes(body)) : string.Empty);
return new JObject(
  new JProperty("event_type", "response"),
  new JProperty("orig_body_len", origBodyLen),
  new JProperty("message-id", context.Variables["moesif-message-id"]),
  new JProperty("status_code", context.Response.StatusCode),
  new JProperty("response_headers", string.Join(";;", headers)),
  new JProperty("contextTimestamp", context.Timestamp.Add(context.Elapsed).ToString("o")),
  new JProperty("response_body", responseBody)
  ).ToString();}</log-to-eventhub>
                <set-variable name="sent-moesif-response" value="@(true)" />
            </when>
        </choose>
    </outbound>
    <on-error>
        <choose>
            <when condition="@(context.Variables.ContainsKey("sent-moesif-request") && !context.Variables.ContainsKey("sent-moesif-response"))">
                <log-to-eventhub logger-id="moesif-log-to-event-hub" partition-id="0">@{
var body = context.Response.Body?.As<string>(true);
var MAX_BODY_EH = 145000;
var origBodyLen = (null != body) ? body.Length : 0;
if (MAX_BODY_EH < origBodyLen){ body = body.Remove(MAX_BODY_EH);}
var headers = context.Response.Headers.Select(h => string.Format("{0}: {1}", h.Key, String.Join(", ", h.Value).Replace("\"", "\\\""))).ToArray<string>();
var responseBody = (body != null ? System.Convert.ToBase64String(Encoding.UTF8.GetBytes(body)) : string.Empty);
return new JObject(
  new JProperty("event_type", "response"),
  new JProperty("orig_body_len", origBodyLen),
  new JProperty("message-id", context.Variables["moesif-message-id"]),
  new JProperty("status_code", context.Response.StatusCode),
  new JProperty("response_headers", string.Join(";;", headers)),
  new JProperty("contextTimestamp", context.Timestamp.Add(context.Elapsed).ToString("o")),
  new JProperty("response_body", responseBody)
  ).ToString();}</log-to-eventhub>
                <set-variable name="sent-moesif-response" value="@(true)" />
            </when>
        </choose>
    </on-error>
</policies>
That’s it. Once the XML is added to your APIs, the logs should start showing up in Moesif.
To set policy at the API scope, use the base element within a section to inherit
policies from the global scope for that section. In the following API scope policy, the
inbound section inherits policies configured in the global inherit section:
<policies>
    <inbound>
        <base />
        <set-variable name="moesif-message-id" value="@(Guid.NewGuid())" />
        [...]
    [...]
</policies>
Configuration Options
The below fields in the XML policy can be modified by you to meet your requirements. XML Policies support a number of context variables which you can also leverage.
User Id
String, The field user_id identifies who the user is making the API and enables Moesif to associate API calls to user profiles. The default XML policy extracts the user id from the context.User.Id or the Subject of the JWT Token. If you are a B2B company, this can be used simultaneously with company id to track API Usage both at the individual user-level and also account-level. See identifying customers in Moesif for more info.
User Metadata
String, The field contextRequestUser allows you to store additional user metadata as part of the user’s profile in Moesif. By default, the XML policy also saves Email, FirstName, and LastName from Azure’s context.User object. Any fields can be stored. Keep in mind contextRequestUser is expecting a base64 encoded string.
Company Id
String, The field company_id identifies which company is making the API and enables Moesif to associate API calls to company profiles. The default XML policy does not set this field. See identifying customers in Moesif for more info.
Event Metadata
String, A JSON string that allows you to add custom metadata that will be associated with the API call. For example, you may want to store the context.Api.Name or context.Api.Version with the API calls by reading from the context variables. The metadata field must be a JSON encoded string.
Manual deployment
The individual components can be deployed directly if needed.
WebJob
The WebJob is deployed as part of the overall deployment. To re-deploy the WebJob:
- Download the run.bat script to your computer.
- Within the Azure Portal, go to your WebApp and select the WebJobs panel. – If there is an existing WebJob, stop it and remove it.
- Click the +Add button to create a new job. Give it a name, set type to continuous and upload the
run.batyou previously downloaded.
Once created, the script will clone the ApimEventProcessor repo ‘v1’ branch, run dotnet build, and starts the worker.
APIM Logger
If the name of an existing Azure API Management is not specified during deployment, you will need to add the log-to-eventhub logger to your Azure API Management service manually. To do so, utilize the nested/microsoft.apimanagement/service/loggers.bicep ARM template or view Microsoft docs
More info on configuring Moesif is available on Microsoft’s documentation.
Updating the integration
To run the latest version of webjob, simply stop, and then restart the WebJob (Within the Azure Portal, go to your WebApp and select the WebJobs panel).
Steps performed by the Azure Resource Template
This template performs the following tasks
- Create Azure Eventhub and policies for Send and Listen.
- If the name of an existing Azure API Management instance is provided, the template creates a new log-to-eventhub with the name
moesif-log-to-event-hub. - Create an Azure Storage Account to periodically checkpoint the EventHub read location.
- Create an Azure WebApp and configures the environment variables required by ApimEventProcessor.
- Deploys ApimEventProcessor as a Webjob on the WebApp.
Troubleshooting
- It is possible that the final step of deployment
app-service-webjob-msdeployreports a failed deployment with error such asconflictorBadRequestorGatewayTimeout. Despite these initial errors reported by deployment, it is possible that the WebJob deployment within Azure App Service may succeed automatically after 5-10 minutes without further custom action. At the end of this template deployment, you may view detailed logs in your App Service/Activity log. - Ensure the
log-to-eventhublogger is created - Ensure the
policyis set on Api Management Apis - Ensure App Service configuration contains correct environment variables. View your App Service/Settings/Configuration/Application settings
- Review the logs of App Service Webjob named
azure-api-mgmt-logs-2-moesifand ensure it is running. View your App Service/Settings/WebJobs